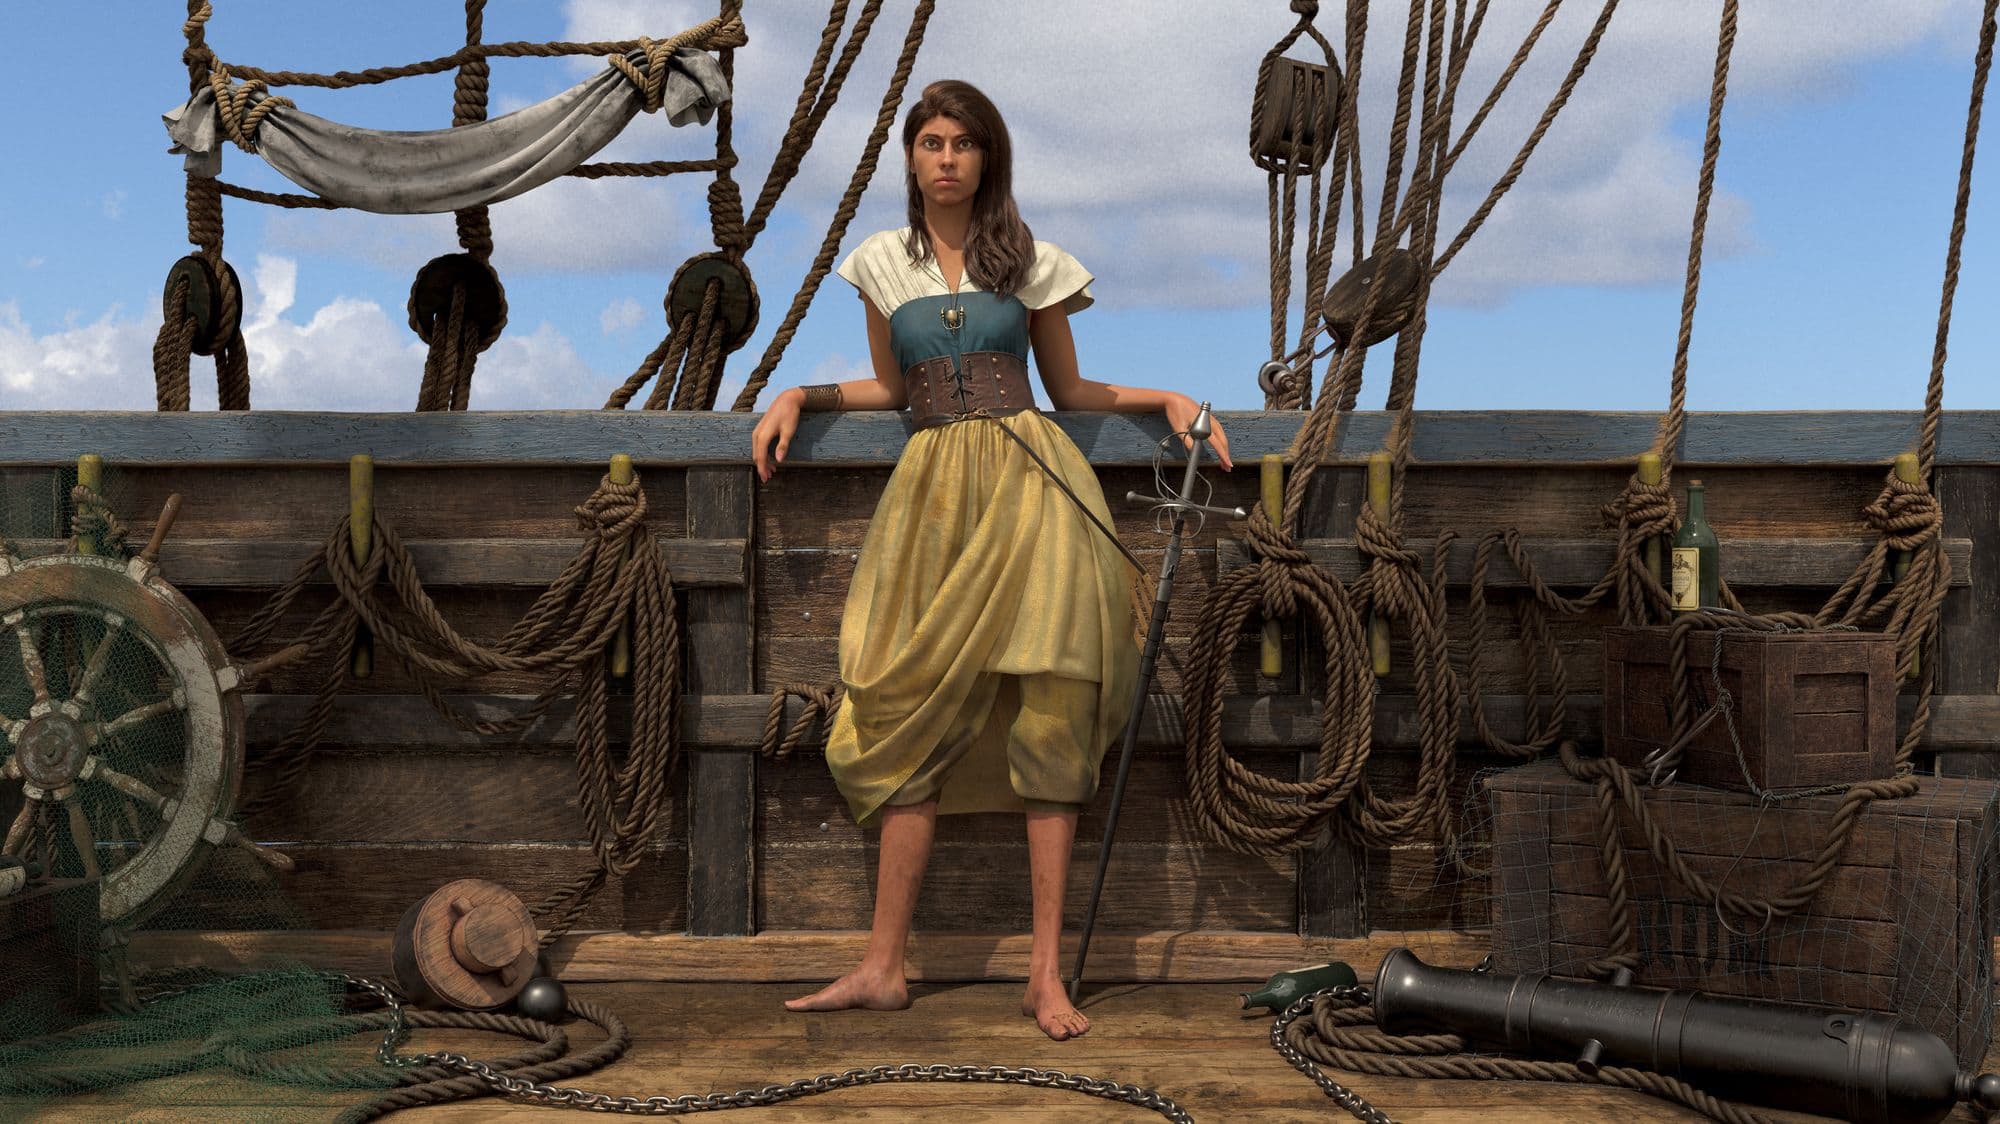
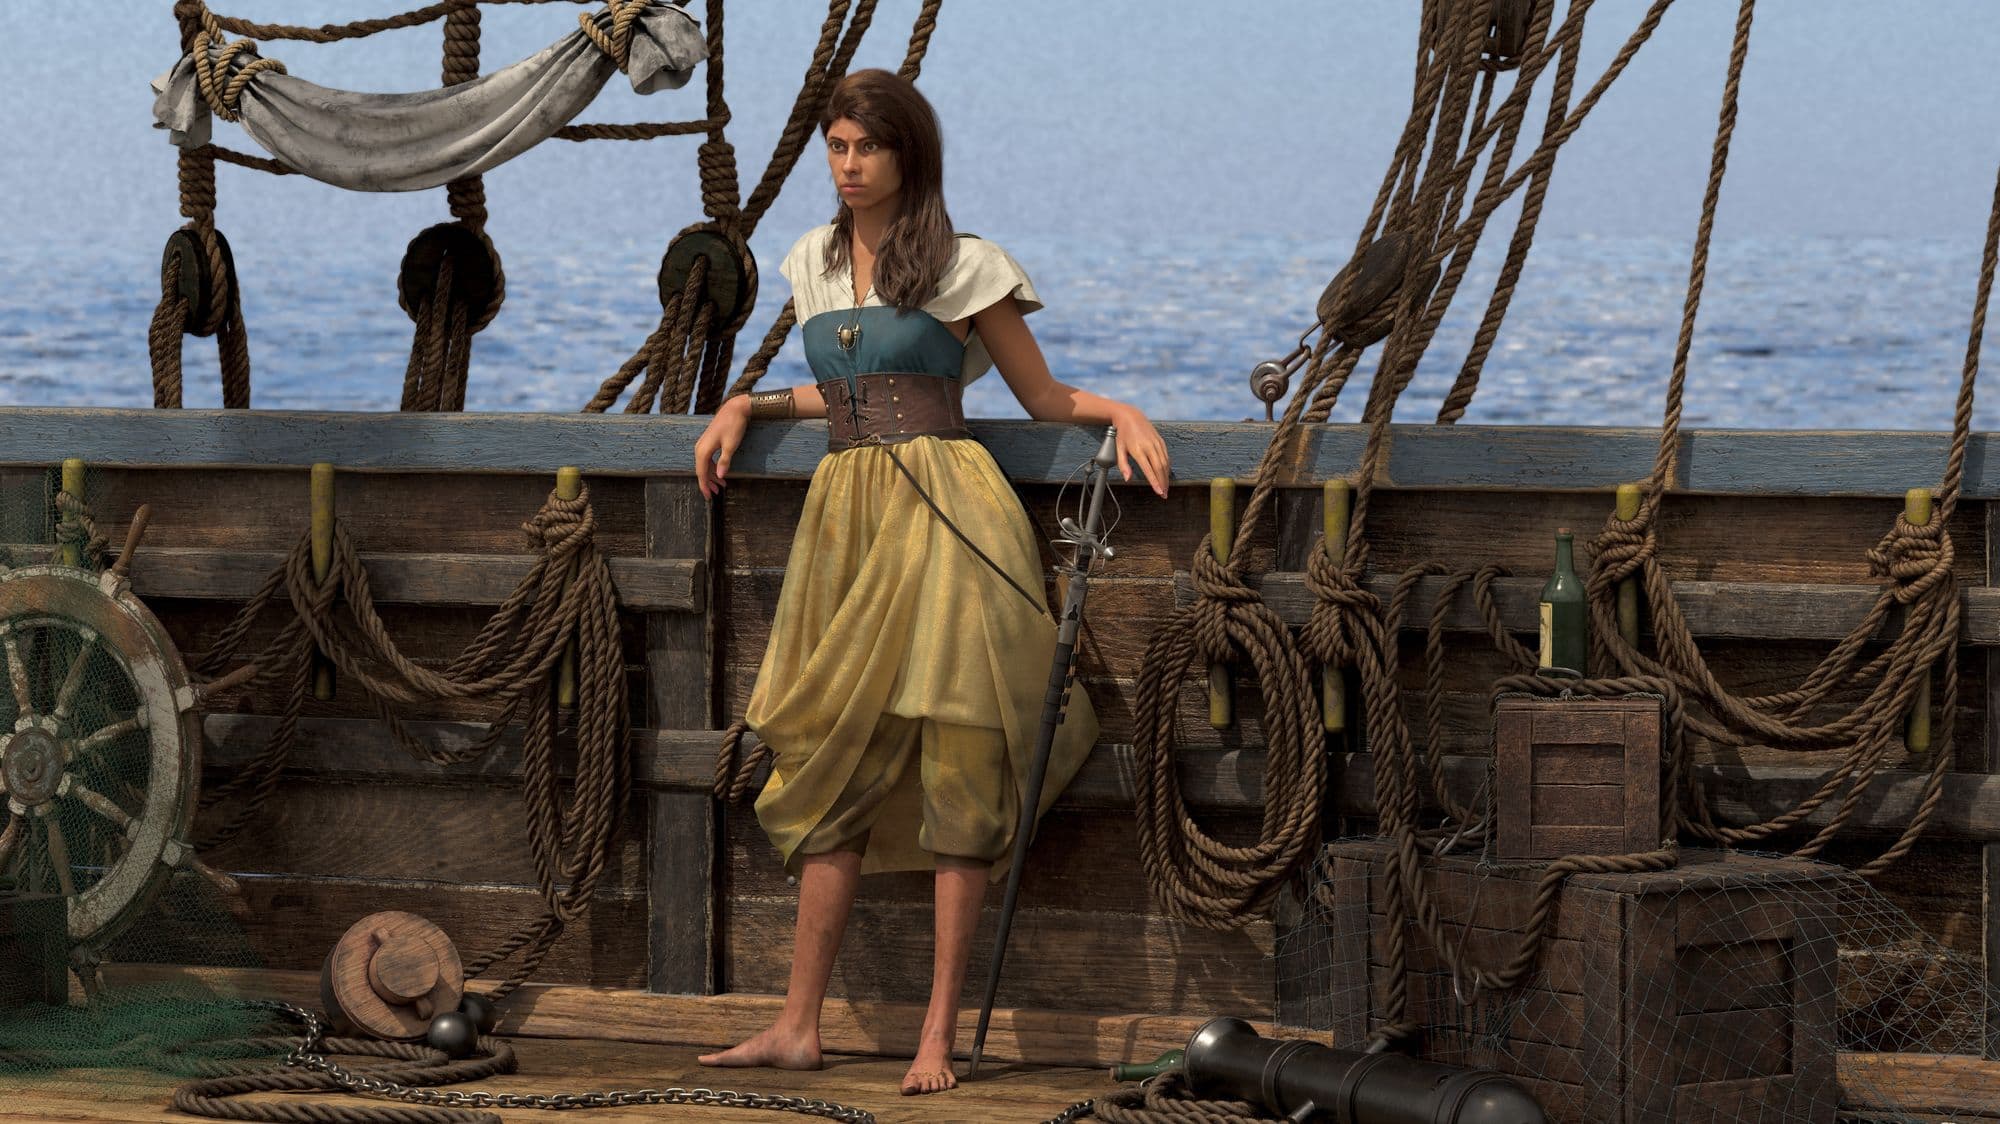
Creating a 3D Character and Environment For Your Portfolio
In this article Ashton Godinho shares he process for creating his 2022 Rookie Awards entry, Sail, which involved creating both a detailed 3D character and environment.
In this article Ashton Godinho shares he process for creating his 2022 Rookie Awards entry, Sail, which involved creating both a detailed 3D character and environment.
Ashton Godinho is a student at Think Tank Training Centre. Ashton is an artist skilled in character modeling, and texturing, and is constantly developing his skills in all aspects of character creation. In this article he shares he process for creating his 2022 Rookie Awards entry, Sail, which involved creating both a detailed 3D character and environment.
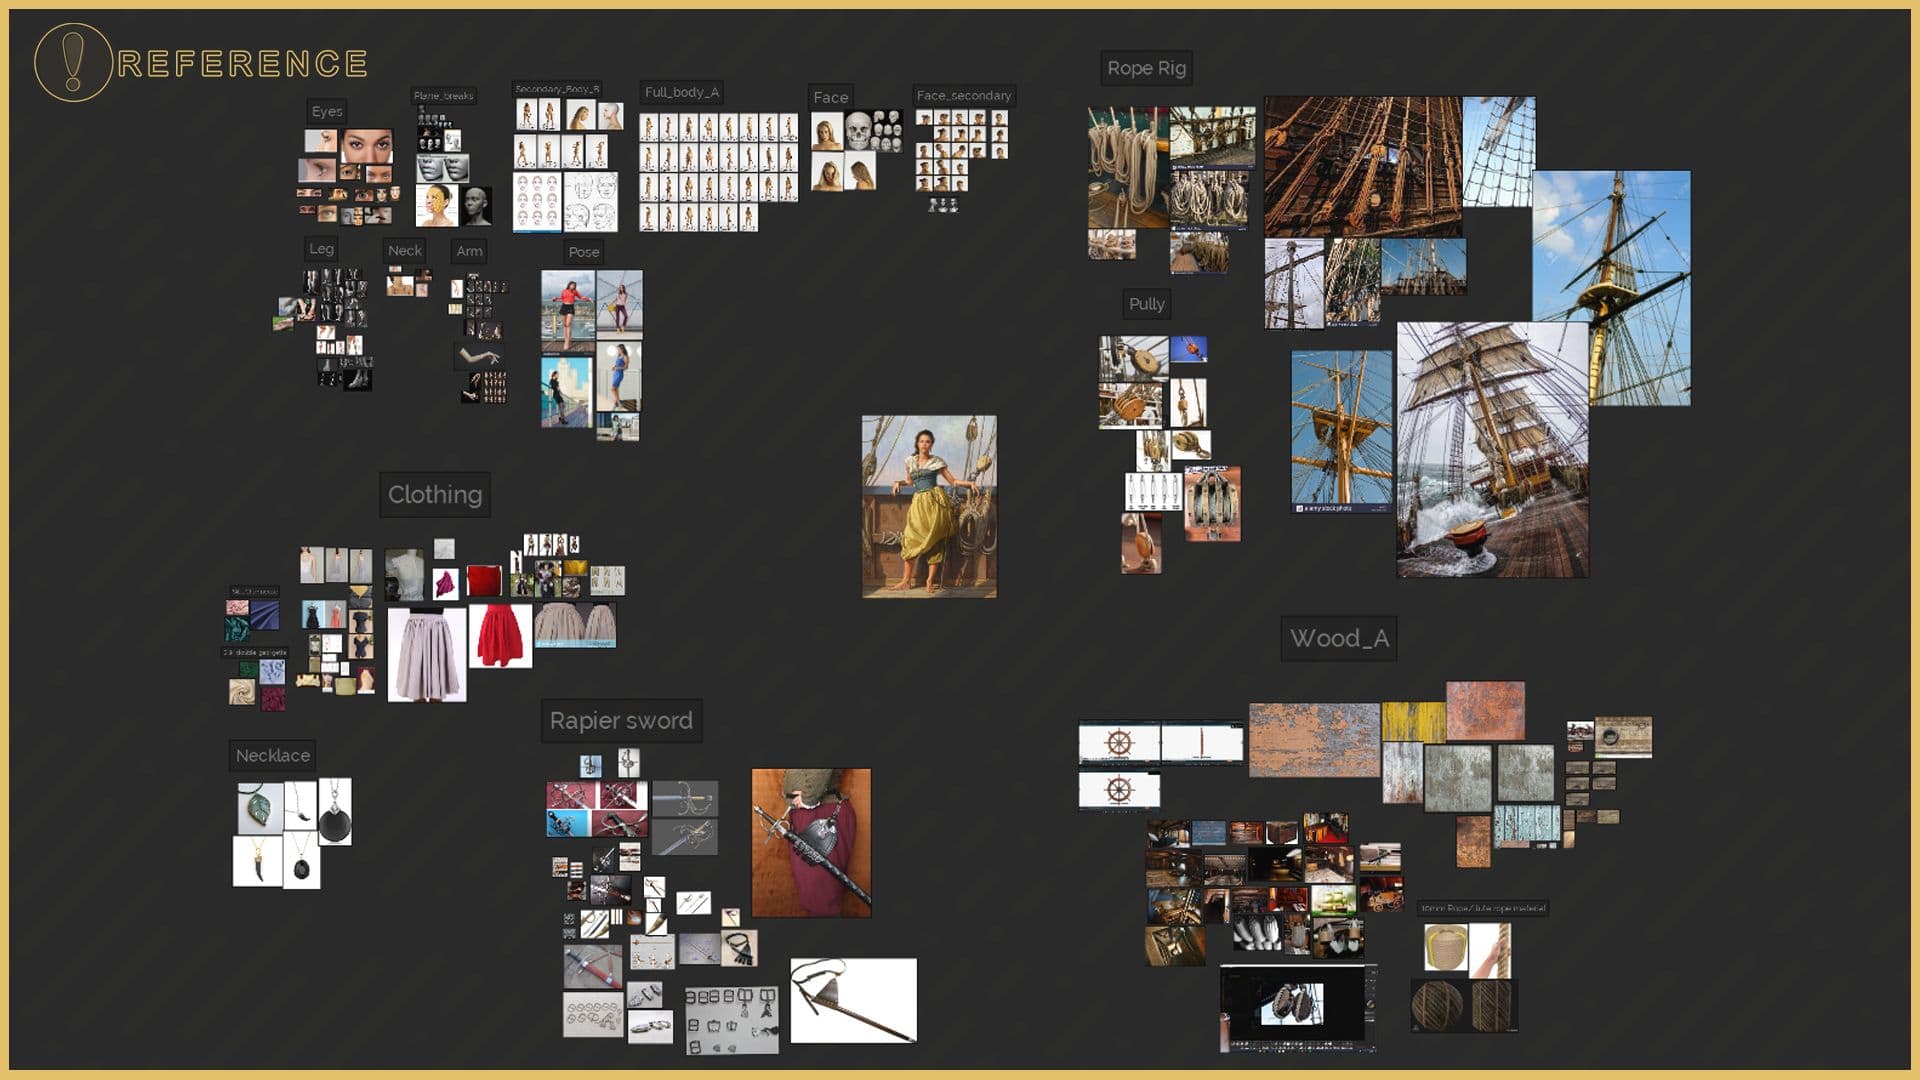
The emphasis on having proper references is very valuable. It's not only for connecting emotionally but more to clear uncertainty in your piece. When stuck on something, it is best to analyse your reference correctly and clear any doubts. It helps in the long run and makes you a better artist.
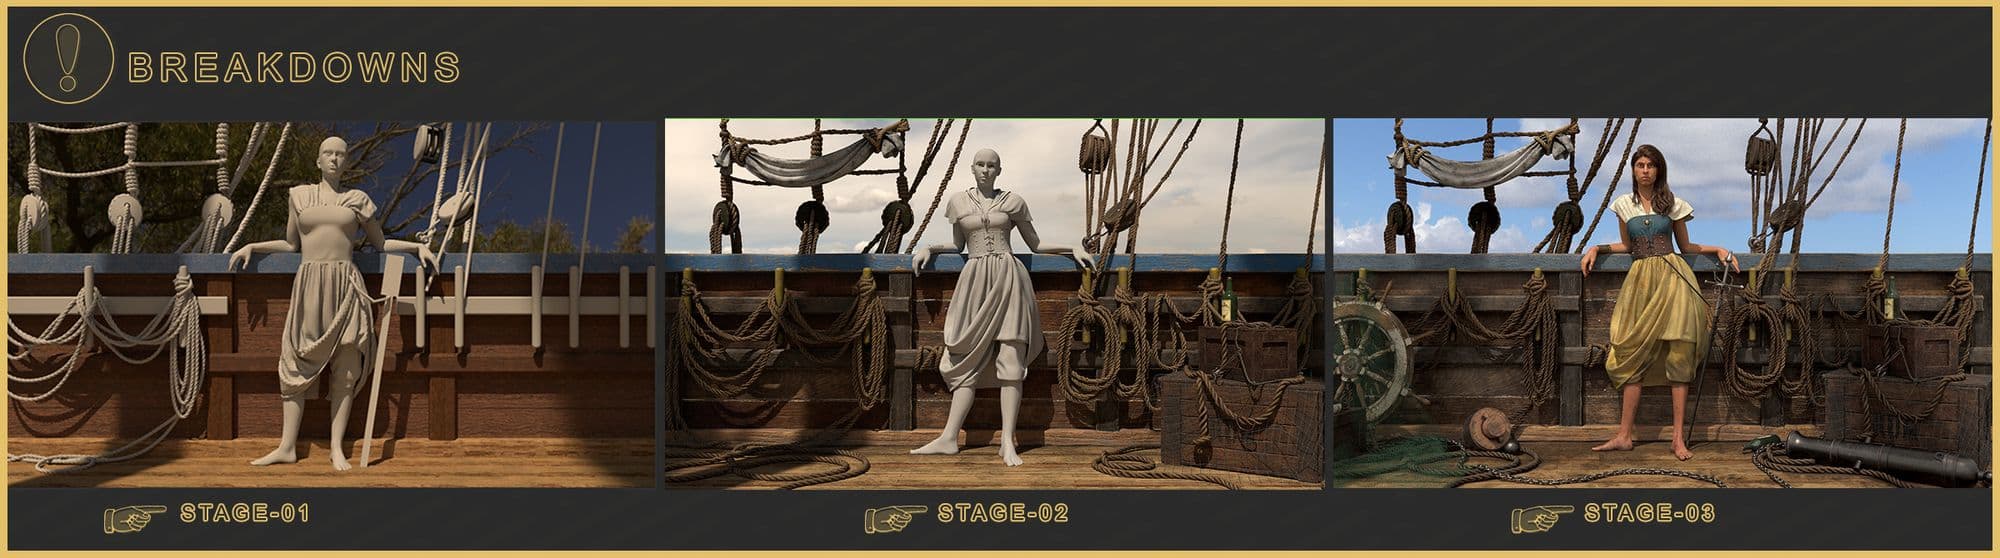
It is always good practice to establish your scene beforehand. Blocking out using shapes helps in understanding the composition of the scene. Here is the progression from how I started to the final result:
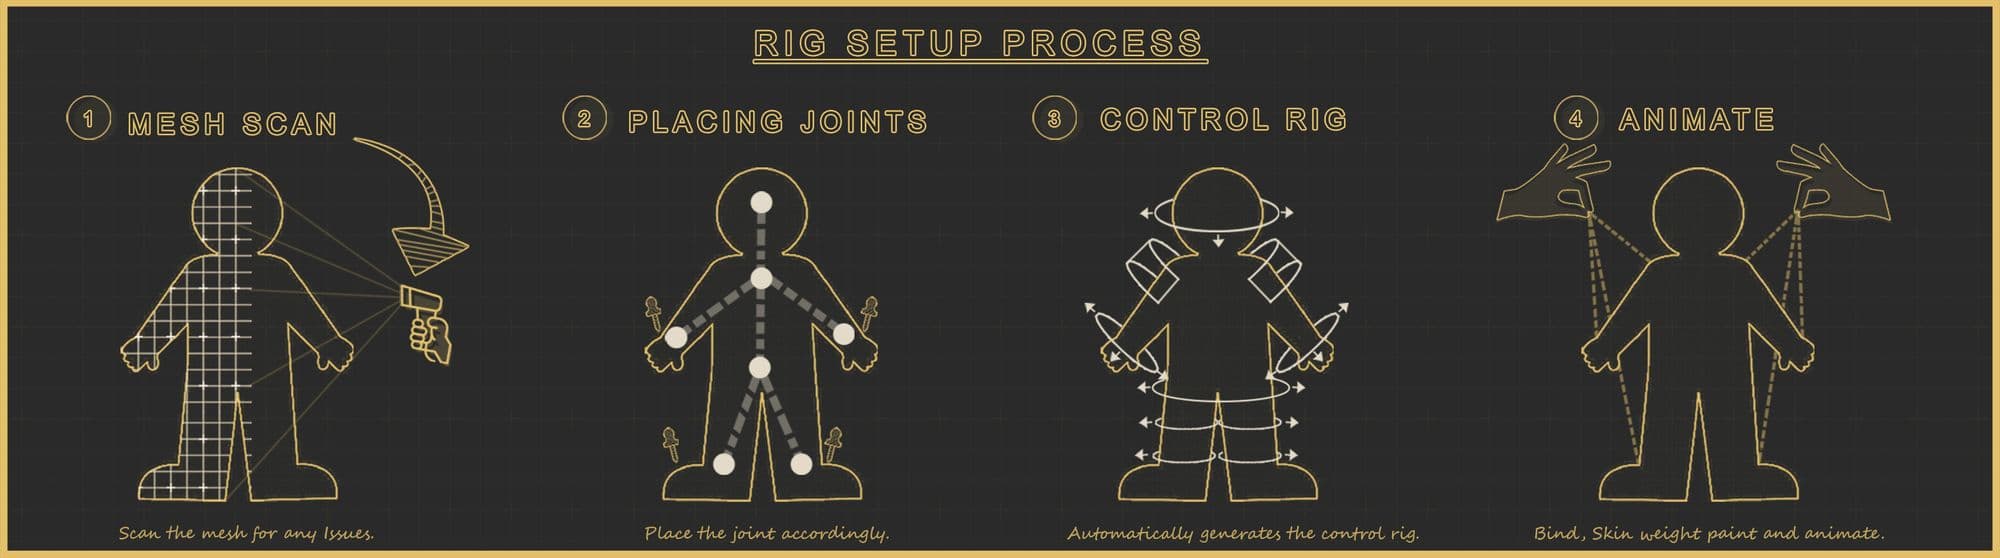
Regarding the character, I started from a base mesh provided by the school. I established that it would be a dynamic pose and required making changes per my liking. I used Advance skeleton to set up the rig. Amazingly, it’s a free plugin and is well optimised with Maya. Setting it up is very easy. Initially, it starts with it checking the mesh for any issues. After which you can create a skeleton from the various presets, automatically build the controls, and then just bind, weight paint and pose it.
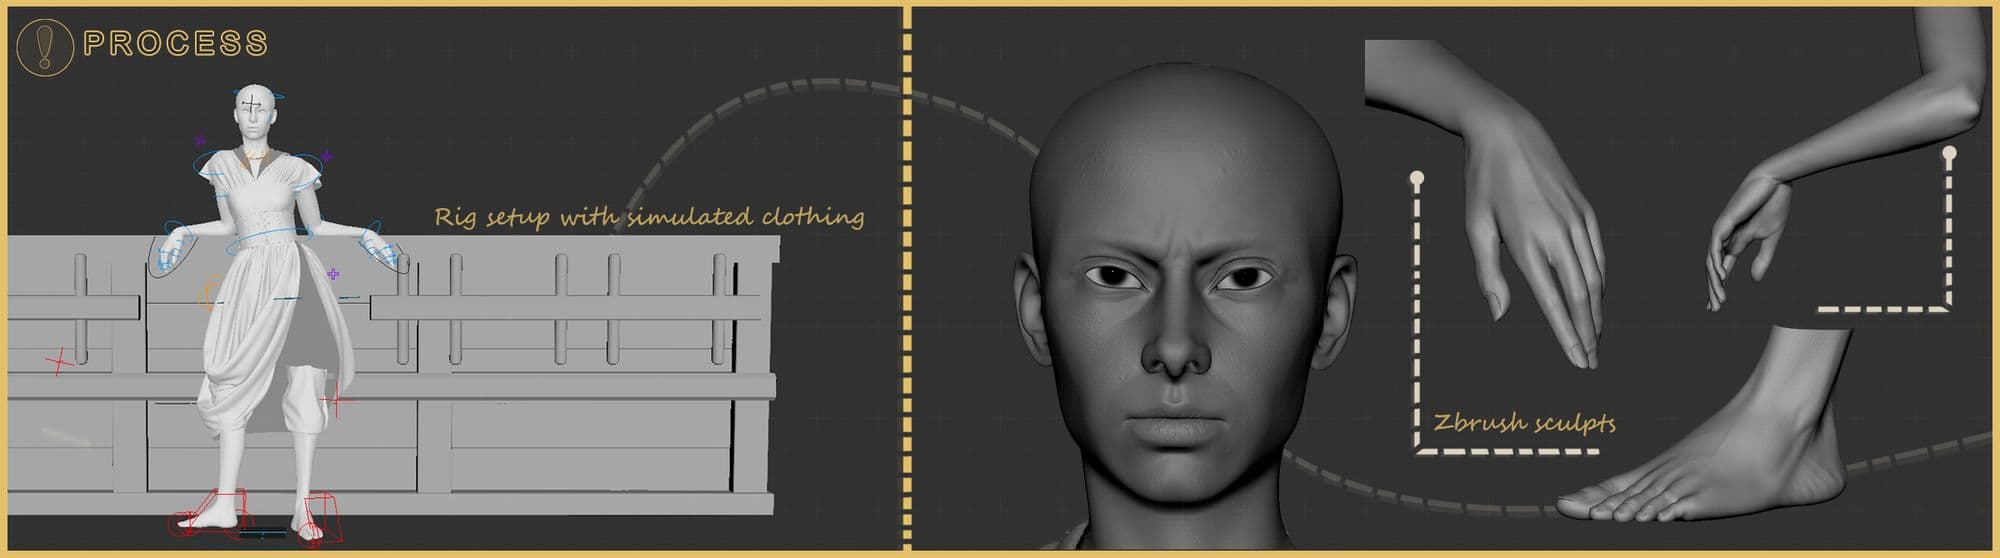
I then take the posed mesh, prepare it for sculpting, and also take it to Marvelous designer to simulate the cloth.
In Zbrush I then sculpted in the various forms following the fundamental approach of primary, secondary, and tertiary. I corrected any significant deformation during the rigging stage in Zbrush.
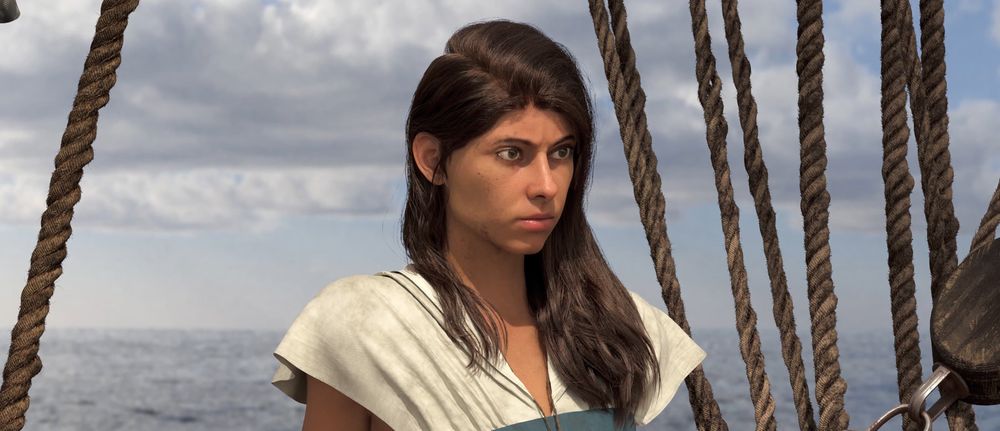
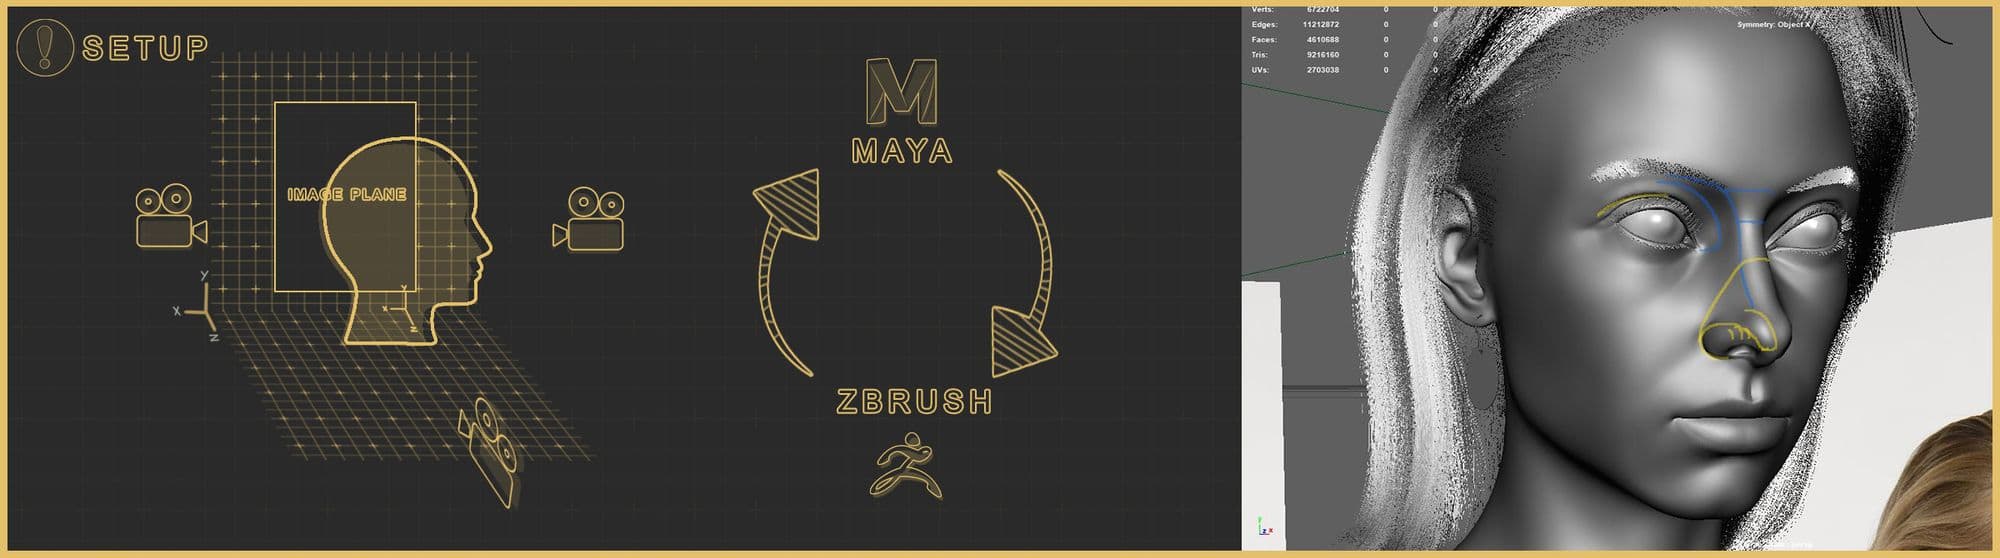
Sculpting the face was a back-and-forth process as I had to set up the references in Maya and match my cameras to sculpt it in Zbrush further. I am grateful to my mentor as I understood and learned the proportions and other techniques with his valuable feedback.
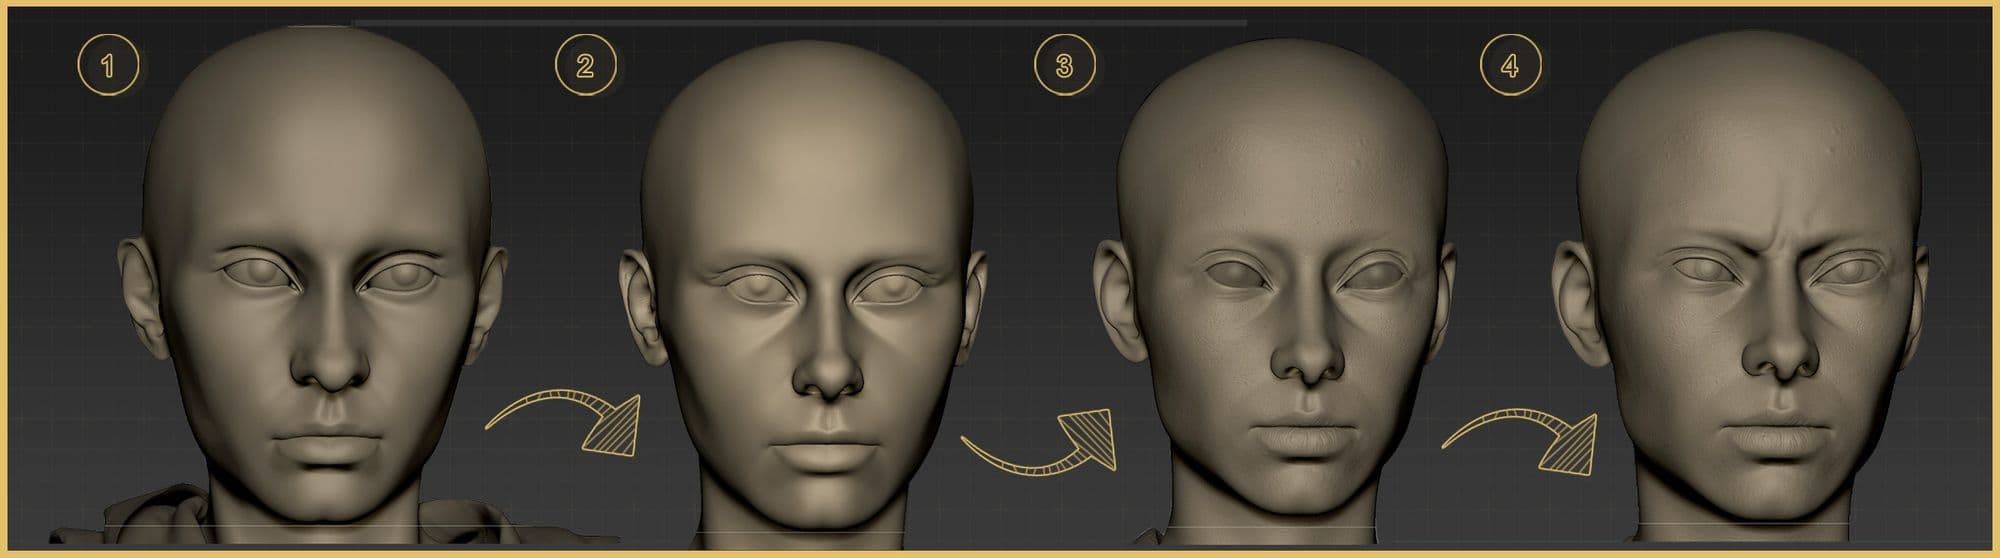
I added the expression and kept sculpting and refining the forms. I faced a topology issue that I corrected in Maya and then re-projected in Zbrush. Since having the advantage of having sub-divisions working with layers and exporting to test it in Maya was convenient.
For the overall scene, I started taking each block-out piece and refining it as per my references. Afterward, I UV unwrapped my models in UV layout and organised them according to the materials in UDIMS.
For the clothing after the simulation, I manually quad drew over the patterns I got from Marvelous Designer and transferred attributes to match my initial simulation. In some instances, I used Zremesh to help me as a guide making it easy for me to quad draw over in Maya.

The most time-consuming element of the scene was the ropes and their placement. I used the method of NURBS circles and extruded them along the curve. After which, I extracted three more curves from the initial extrusion. Since the history is intact on the initial extrusion, deforming it is convenient. You can find attributes such as twists and bends in the initial shape properties.
Here is a video on how it is done.
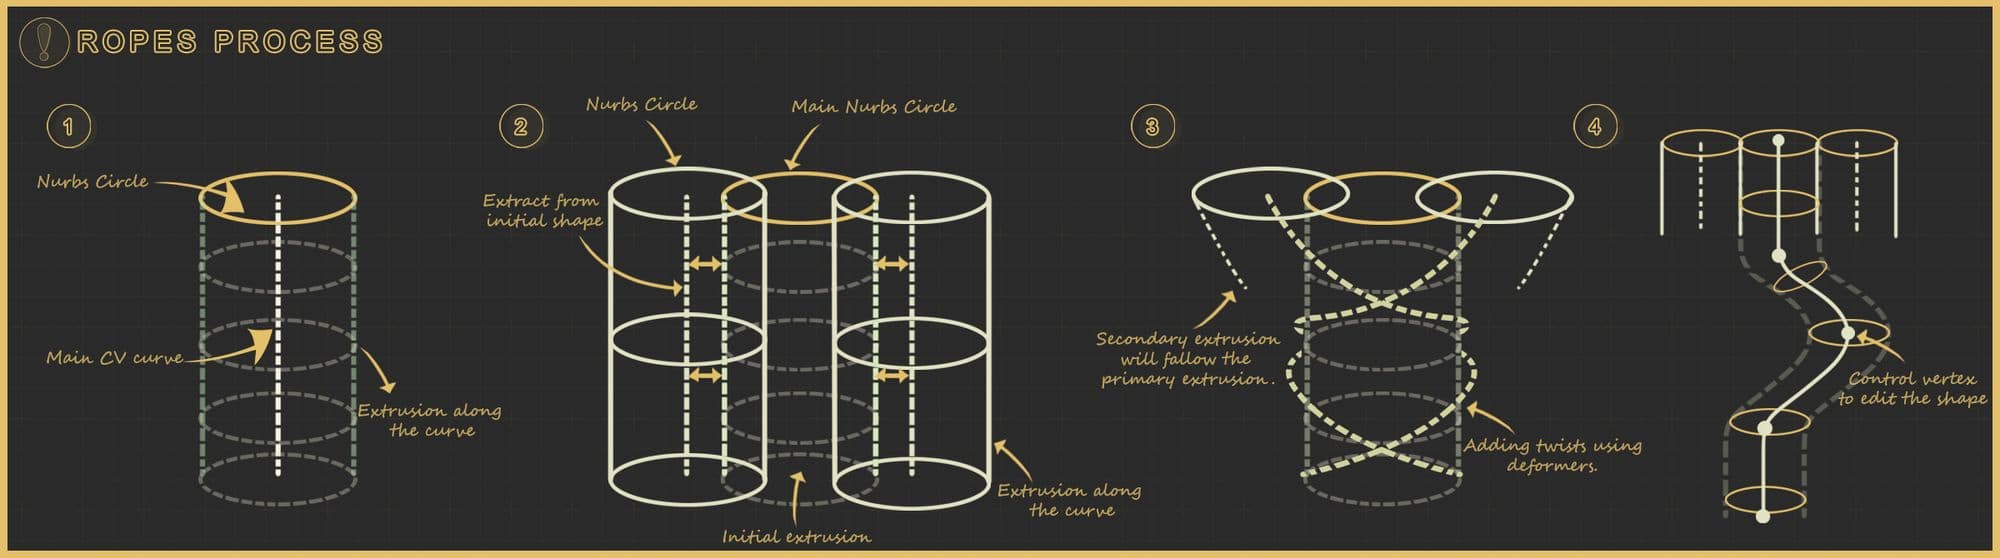
I converted the ropes to polygons making sure to use the most optimal settings to preserve the bends. UV unwrapped it, took it into ZBrush for further changes, and used the move tool, which was very helpful. To split, I used the topological move brush to get individual control.
There are more options you can play with in Zbrush once you have proper UV. I used a tiny bit of noise and tiled it with a rope texture to break the evenness.
I used Texturing XYZ maps as the base of my displacement. I initially applied the texture to a plane and wrapped it around my mesh using Wrap 4DS. After covering the plane, I baked down the various maps, such as the diffuse, displacement, and utility, using Xnormals. I used Mari in combination with Substance 3D Painter to clean up my textures.
Here is the documentation on the process.
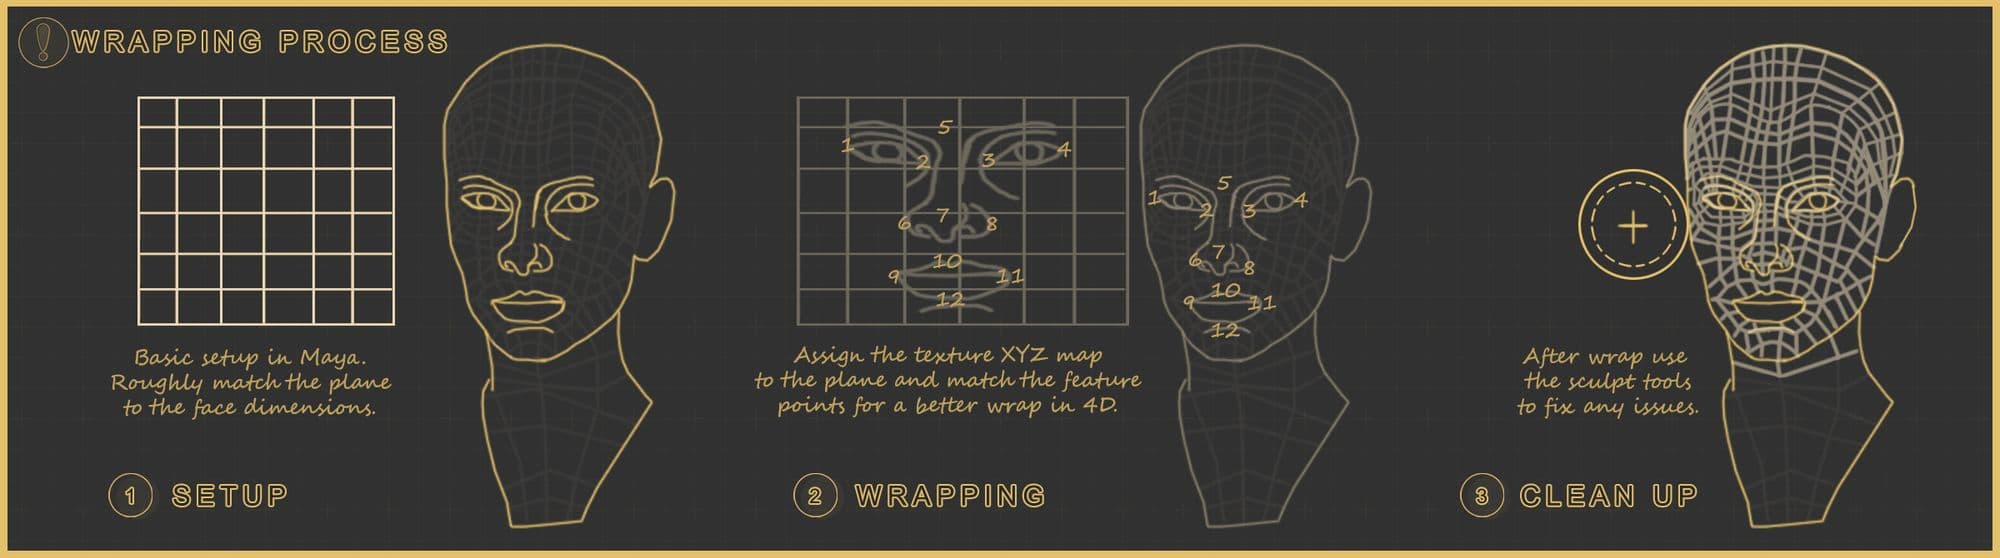
In conjunction with Zbrush layers, XYZ maps present you with more controls as you can import the different channels RGB respectively and tweak the intensity or just clean out unwanted areas.
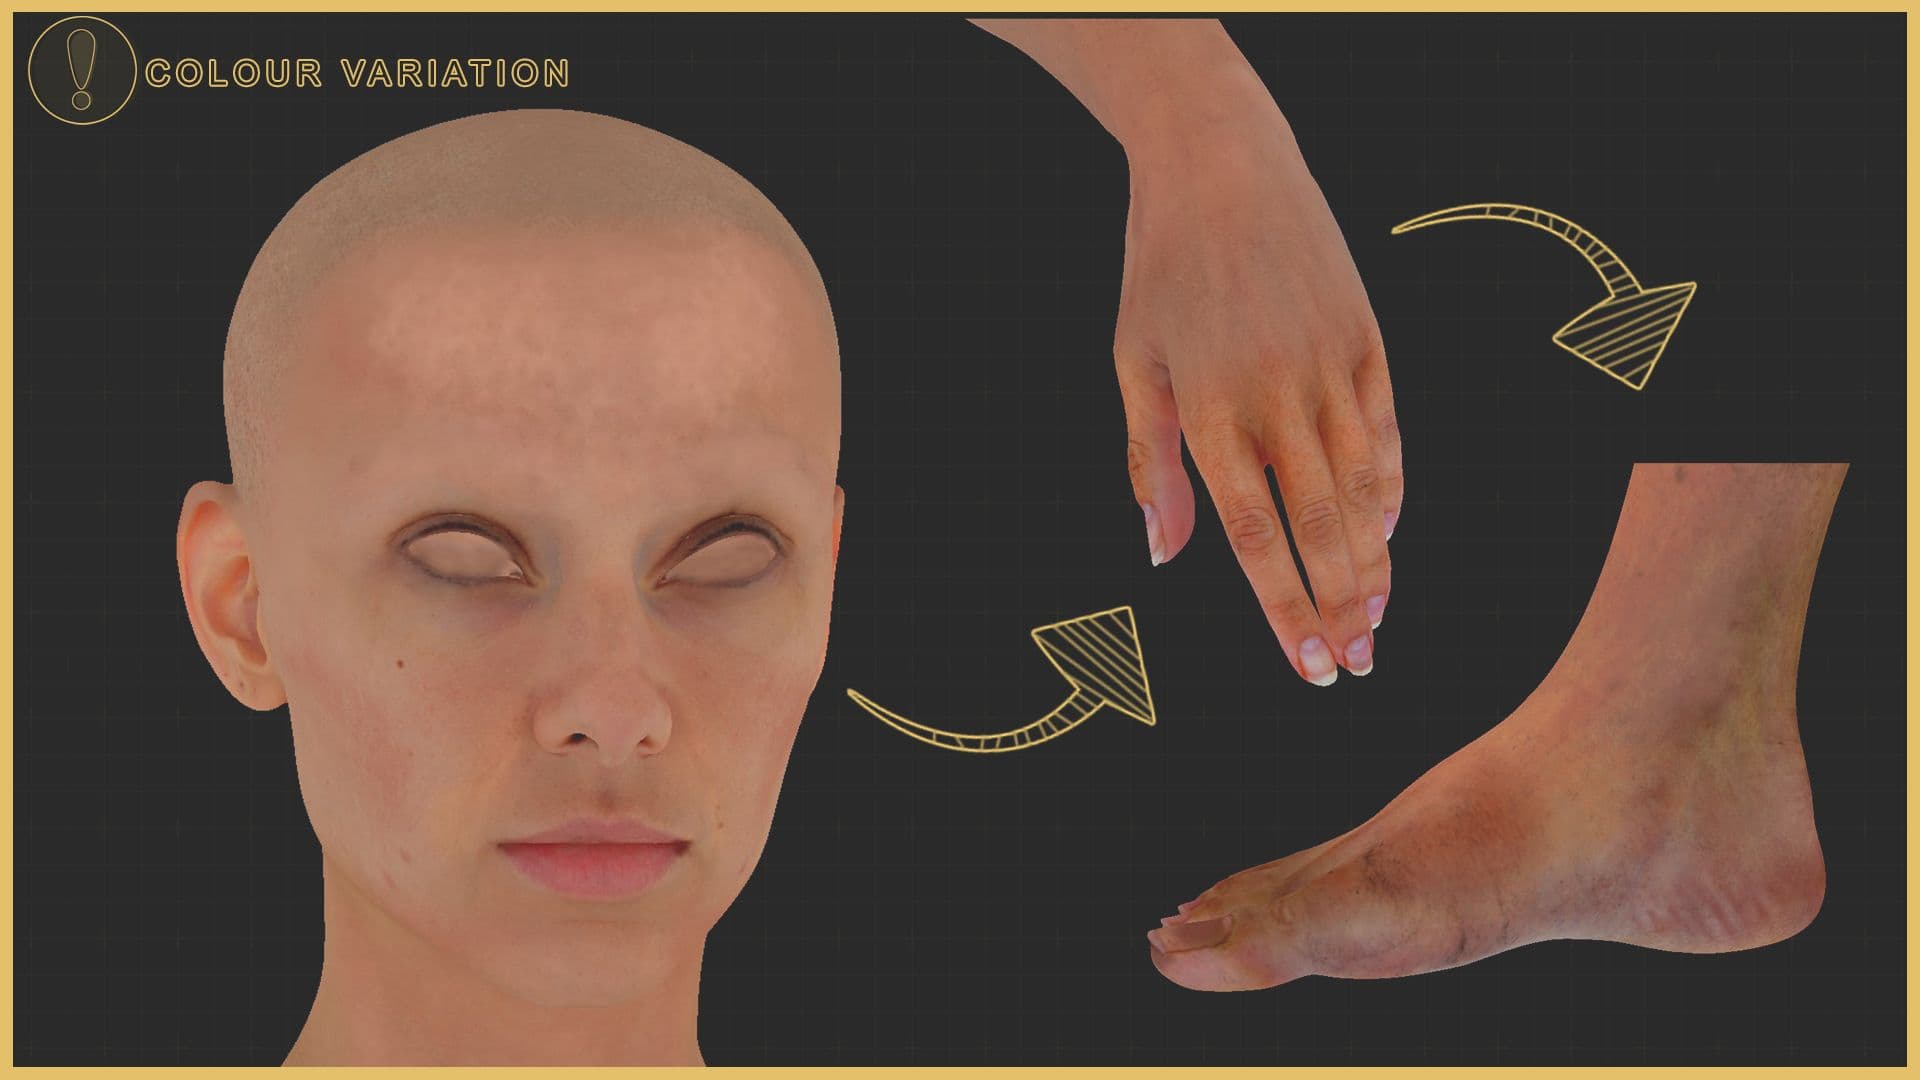
I exported the normal map from Zbrush and used it as a base mesh map. In addition, I extracted a cavity map to have more variations in the skin.
I added more colour variation in Mari, breaking up the initial base colour. I used a combination of various splash brushes and tweaked it further by using multiple adjustment nodes. I approached the rest of the body similarly.
Tip: Texture painting involves observing your reference and extracting information from it. It not only helps in matching your reference but also improves your eye for details. Practices such as traditional painting help enhance one's knowledge of colour understanding.
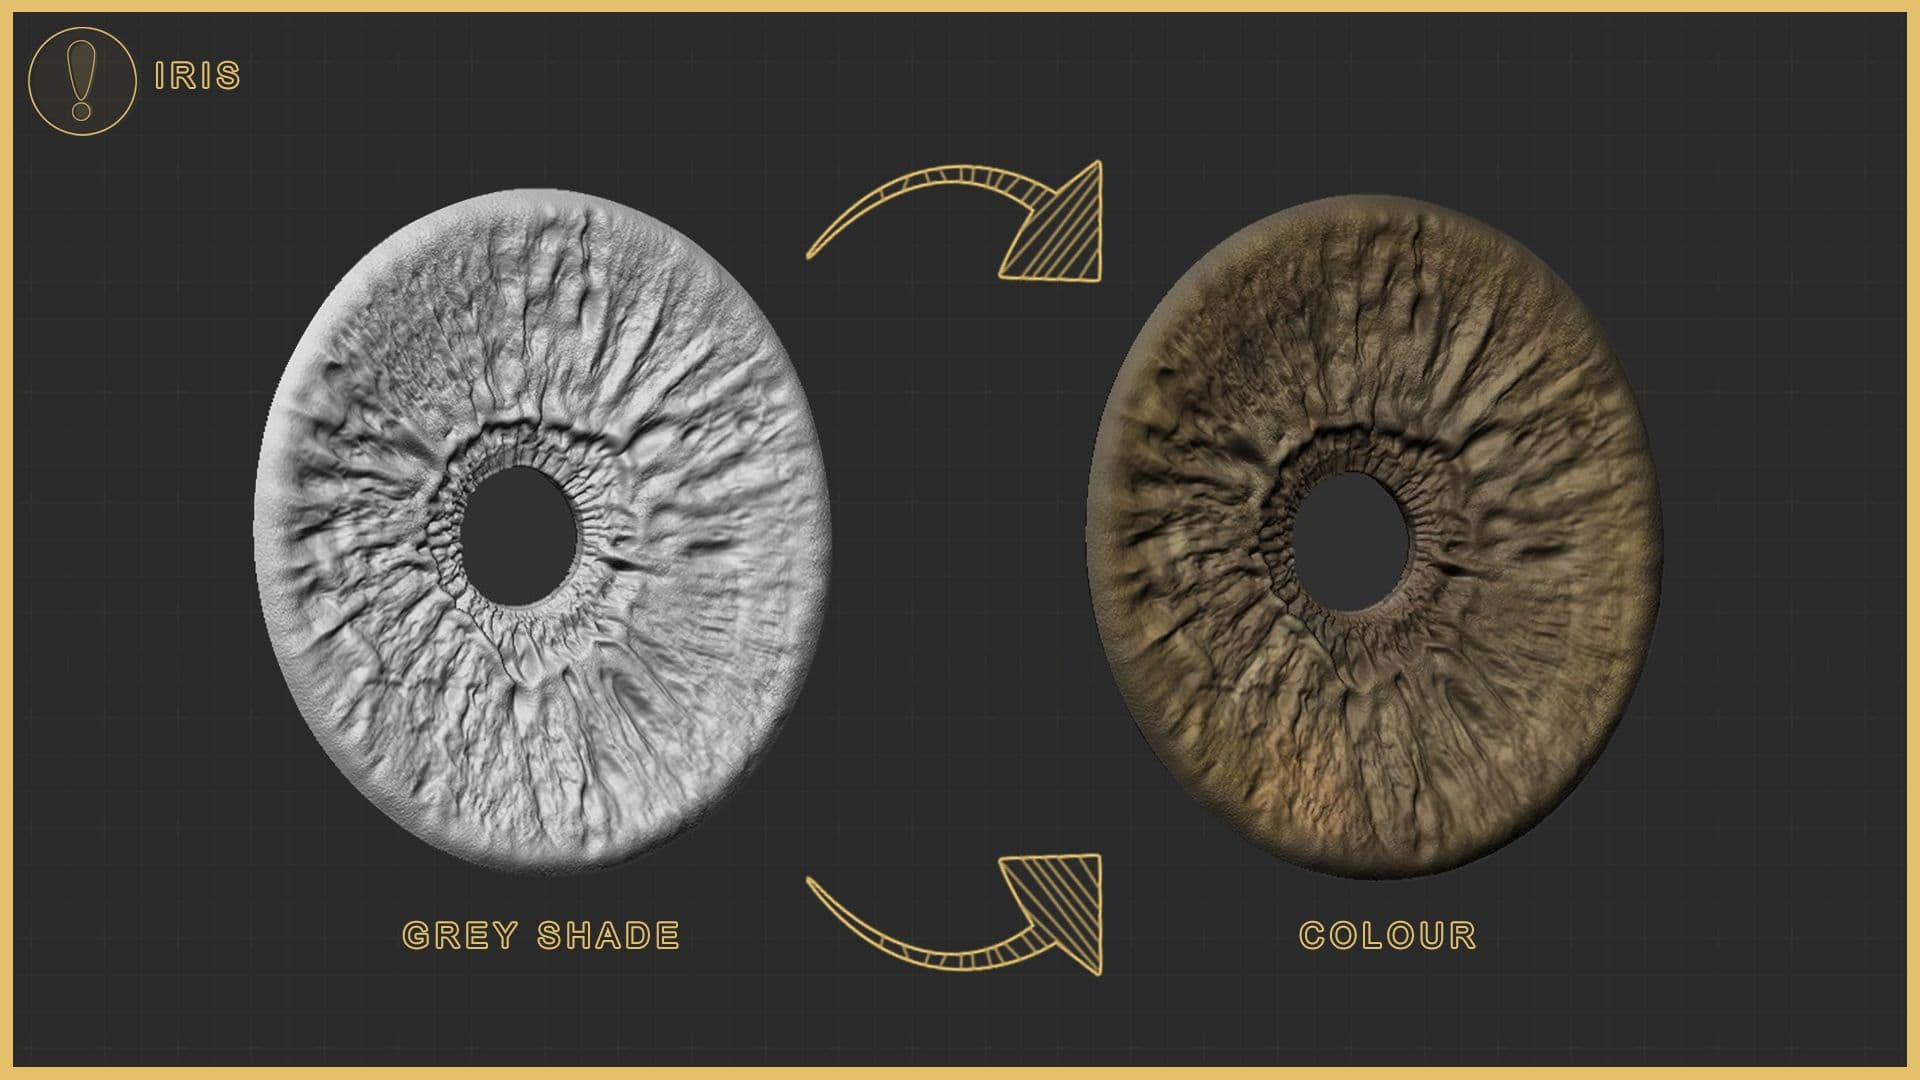
I modeled, and UV unwrapped the eyes in Maya to have the proper topology. I tweaked some parts of the Iris according to my liking and added variations to my colour map. I projected the iris displacement in Mari and used it in Zbrush to enhance the details.
For the rest of the scene, I used various resources such as Textures.com to get a base texture. After which, I added more and more detailed variations.
For the wood walls, I specifically sculpted some wood grains to get a cavity map, which I then used in my texturing phase to add different details. This workflow tends to be faster as I could add variations quicker.
For the ropes, I used tileable textures found online. Since I could only find the diffuse, I created the rest of the maps in photoshop, such as generating the bump/normals and roughness.
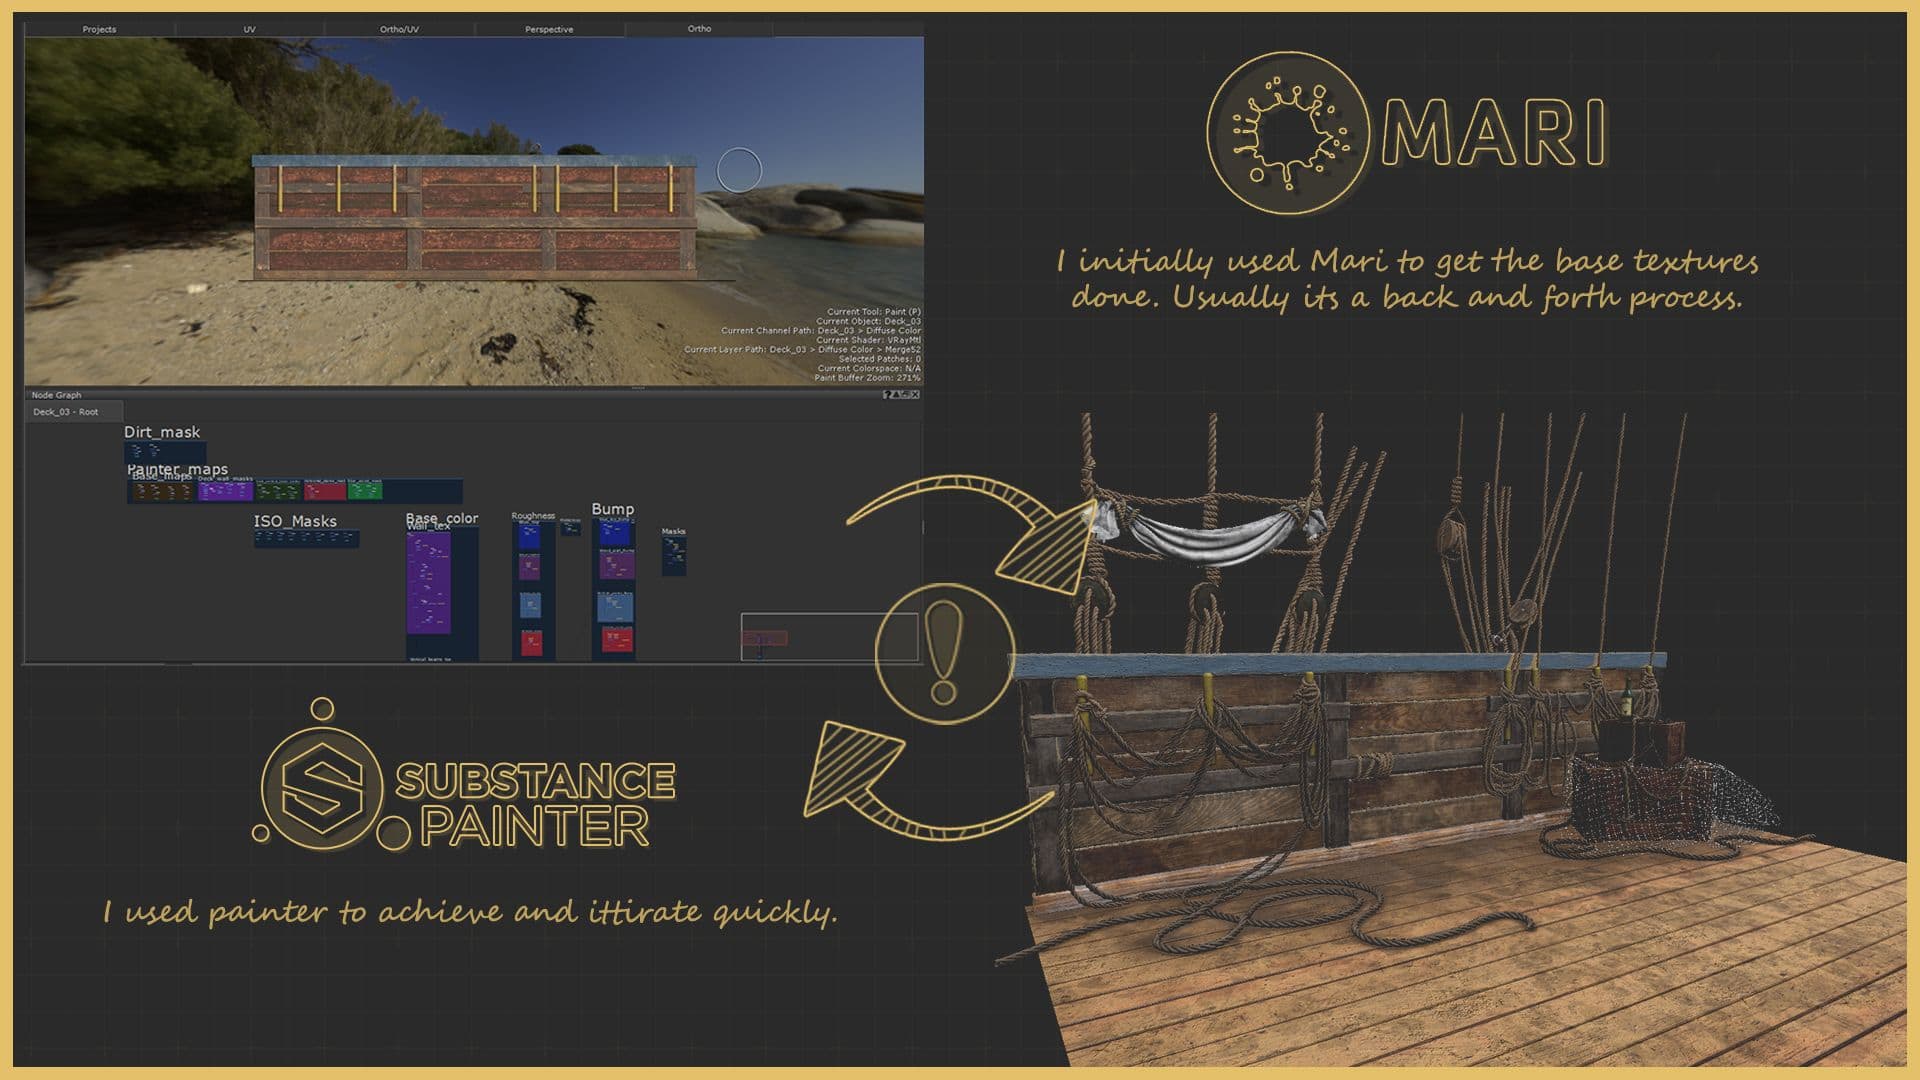
Tip: Implementing various techniques in different 3d packages will eventually speed up the process. The best case would be using both Mari and Painter to iterate and achieve results faster.
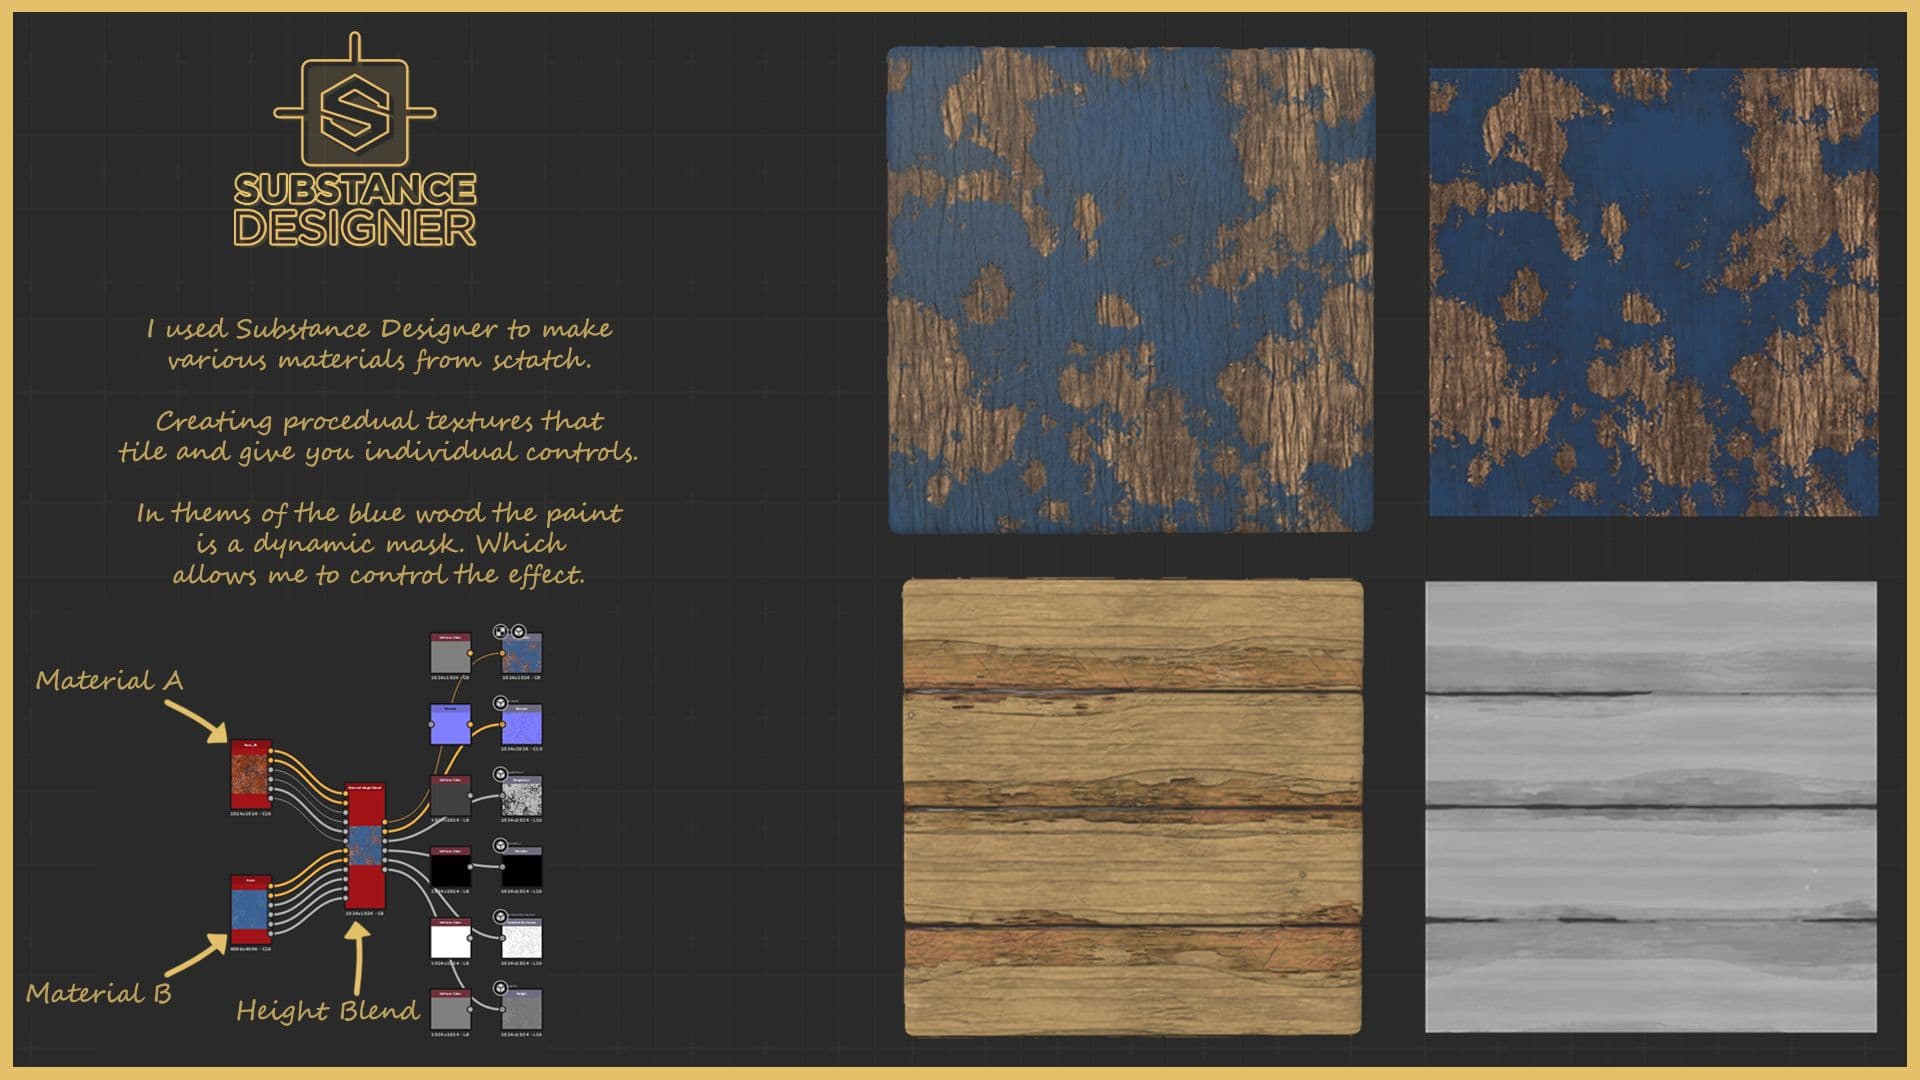
In some instances, I had to create textures for my scene to have more control. I used Substance 3D Designer to achieve what I wanted. I procedurally created the blue paint chipping effect by using simple techniques. To accomplish the aging of the paint, I blended the two base wood and paint materials with a height blend, allowing me to control the effect.
I created the floor material by layering different procedural noises to create variation. I broke up the initial height and used a height blend material node to control the overall dirtiness. I broke it up further by hand painting some details onto it.
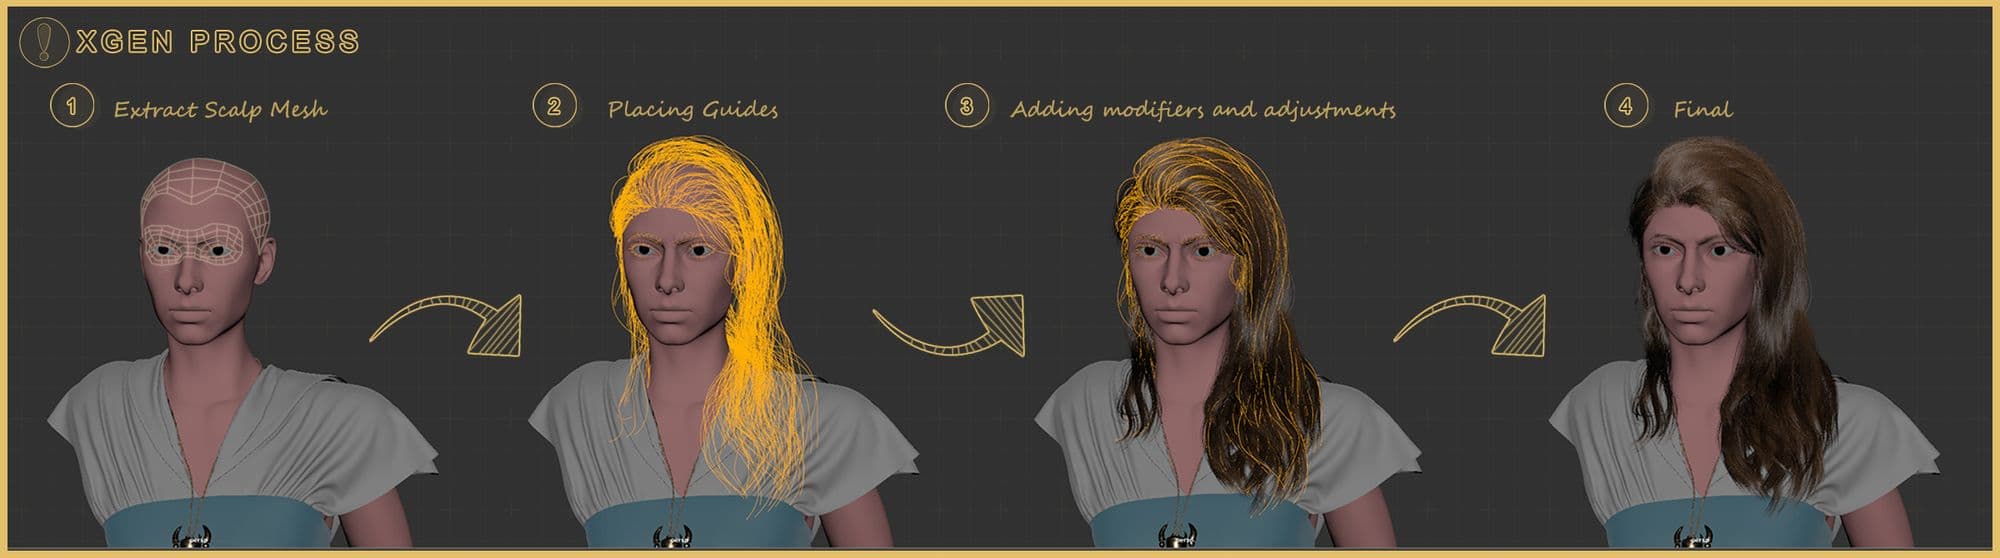
Xgen was the most difficult part for me, as I constantly ran into issues when setting up the initial guides.
I realised that to work with Xgen properly, having a proper file directory is very important. For instance, having a solid naming convention and limiting the use of underscore helped Xgen locate things quickly.
I created scalp meshes for most of my objects, including the ropes. I controlled the density of the fur around the ropes using a density map I created in Painter.
Since I had proper scalp placed for the hair, I painted various other maps such as region, .density, and width. I further broke it down by using modifiers present in Xgen core and simple expressions to create more variations.
Since I had blocked out my scene, which gave me a clear road map on how I wanted to place my lights, I began by changing the placements and played with different HDRIs during the look development stage. Since light is essential to make your textures look good, I spent most of my time back and forth in other programs to achieve the look.
My mentor always emphasised the importance of establishing your shots and camera movements. It helps you decide what to work on and how much time and effort you need to put into a particular asset. I made my cameras to have the essential primary pan, move, and zoom.
All of the look dev was done in Maya using V-Ray as my primary render engine. I rendered the background separately in some shots and composited it later. I enhanced the video in Nuke, After effects, and Premiere Pro.
You can see more photos and videos of my project here on my Rookie Awards 2022 entry.
I would like to thank my mentor, Jon Catapia, for his knowledge and helping me throughout the process. Him being the best teacher I could ask for. I would also like to thank the school Think Tank Training Centre for providing me with the resources and, most importantly, for surrounding me with amazing artists worldwide. I learned a lot quicker and could appreciate the wonderful community we have around us.
Thank you for taking the time to read this and feel free to reach out via LinkedIn and ArtStation.