Creating a Real-Time Cinematic Character in Unreal Engine 5
For his mentorship project at Think Tank Online, Jocque Butler took on the challenge of creating a real-time cinematic character using Unreal Engine 5. In this article he takes us through his entire process.
Jocque Butler is a 3D Character Artist and recent graduate of Think Tank Training Centre Online. For his mentorship project at Think Tank Online, he took on the challenge of creating a real-time cinematic character using Unreal Engine 5 over a period of approximately 4 months. If you're looking to take on an ambitious project like this, this article is for you!
The rest of this article outlines the high-level details within each step.
Concept Selection and Determining Objectives
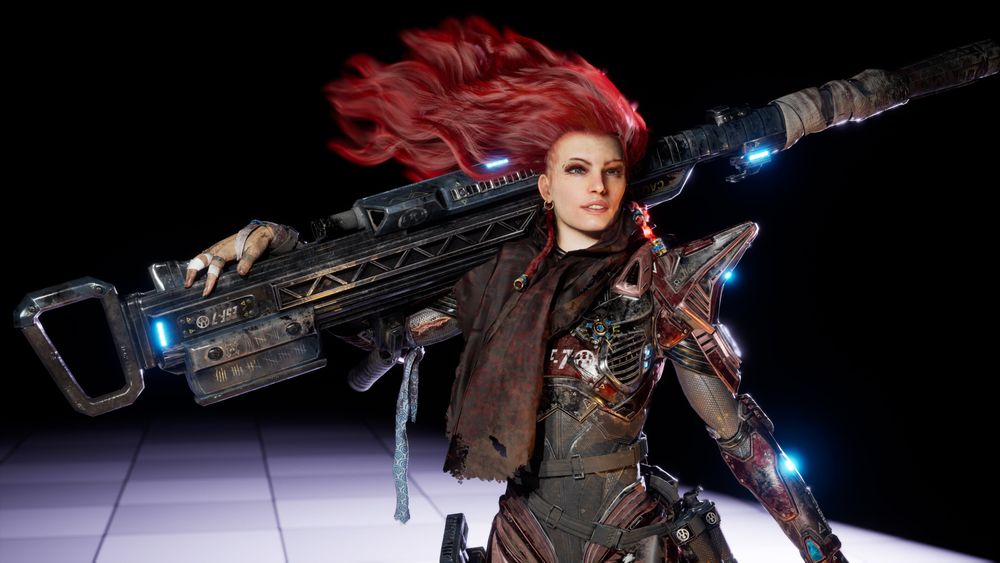
The initial step involved picking a concept and deciding on my objective for the project. Over the past year I had been collecting concepts that were of interest to me and saving them for this occasion. I had completed a male character with organic elements in my advanced term; thus I wanted to focus on a female hard surface concept. The concept had to be something that would keep my interest over the 4 month period. I grew up loving everything sci-fi, so I gravitate towards futuristic designs.
After selecting the Legion concept, I determined my goal for the character. I wanted to pose and create my own take on the scene similar to the concept with multiple characters standing triumphant after a battle. The concept was ripe for environmental animation, blowing flags, wind, smoke and clouds. This was exciting to me; but was also a very large unknown. Most of the environmental effects and rendering was outside of my knowledge base as a character artist.
I had performed my previous project’s look development in Maya/Vray and Marmoset Toolbag. Thus, I wanted to use the Unreal Engine as another challenge and learning experience. I had recently seen the stunning Coalition real time character UE5 demo; this inspired me to try a real time cinematic character.
Planning and Scheduling
When I started my final term at Think Tank Online, I saw that my final mentorship submission date corresponded closely to the Rookies 2022 contest deadline. I knew then that I HAD to meet that deadline. With a full-time family and part-time job, creating and sticking to a project plan was key over the 4 month term.
I reviewed my previous project plan from my advanced term character. This review determined that I underestimated the time required for the low poly and the look development phases. Taking this into account and not having significant Unreal Engine experience, I created an 18 week project plan that broke down the major milestones and steps to finish this project on time.
The look-dev and animation section of the schedule was the largest unknown as I had very little experience in UE which would need a lot of learning. I had set a cut off date to either stick to a turntable if the environment and animations did not pan out. I wasn’t going to sacrifice the deadline for the sake of the animation… but thankfully, I was able to execute on time.
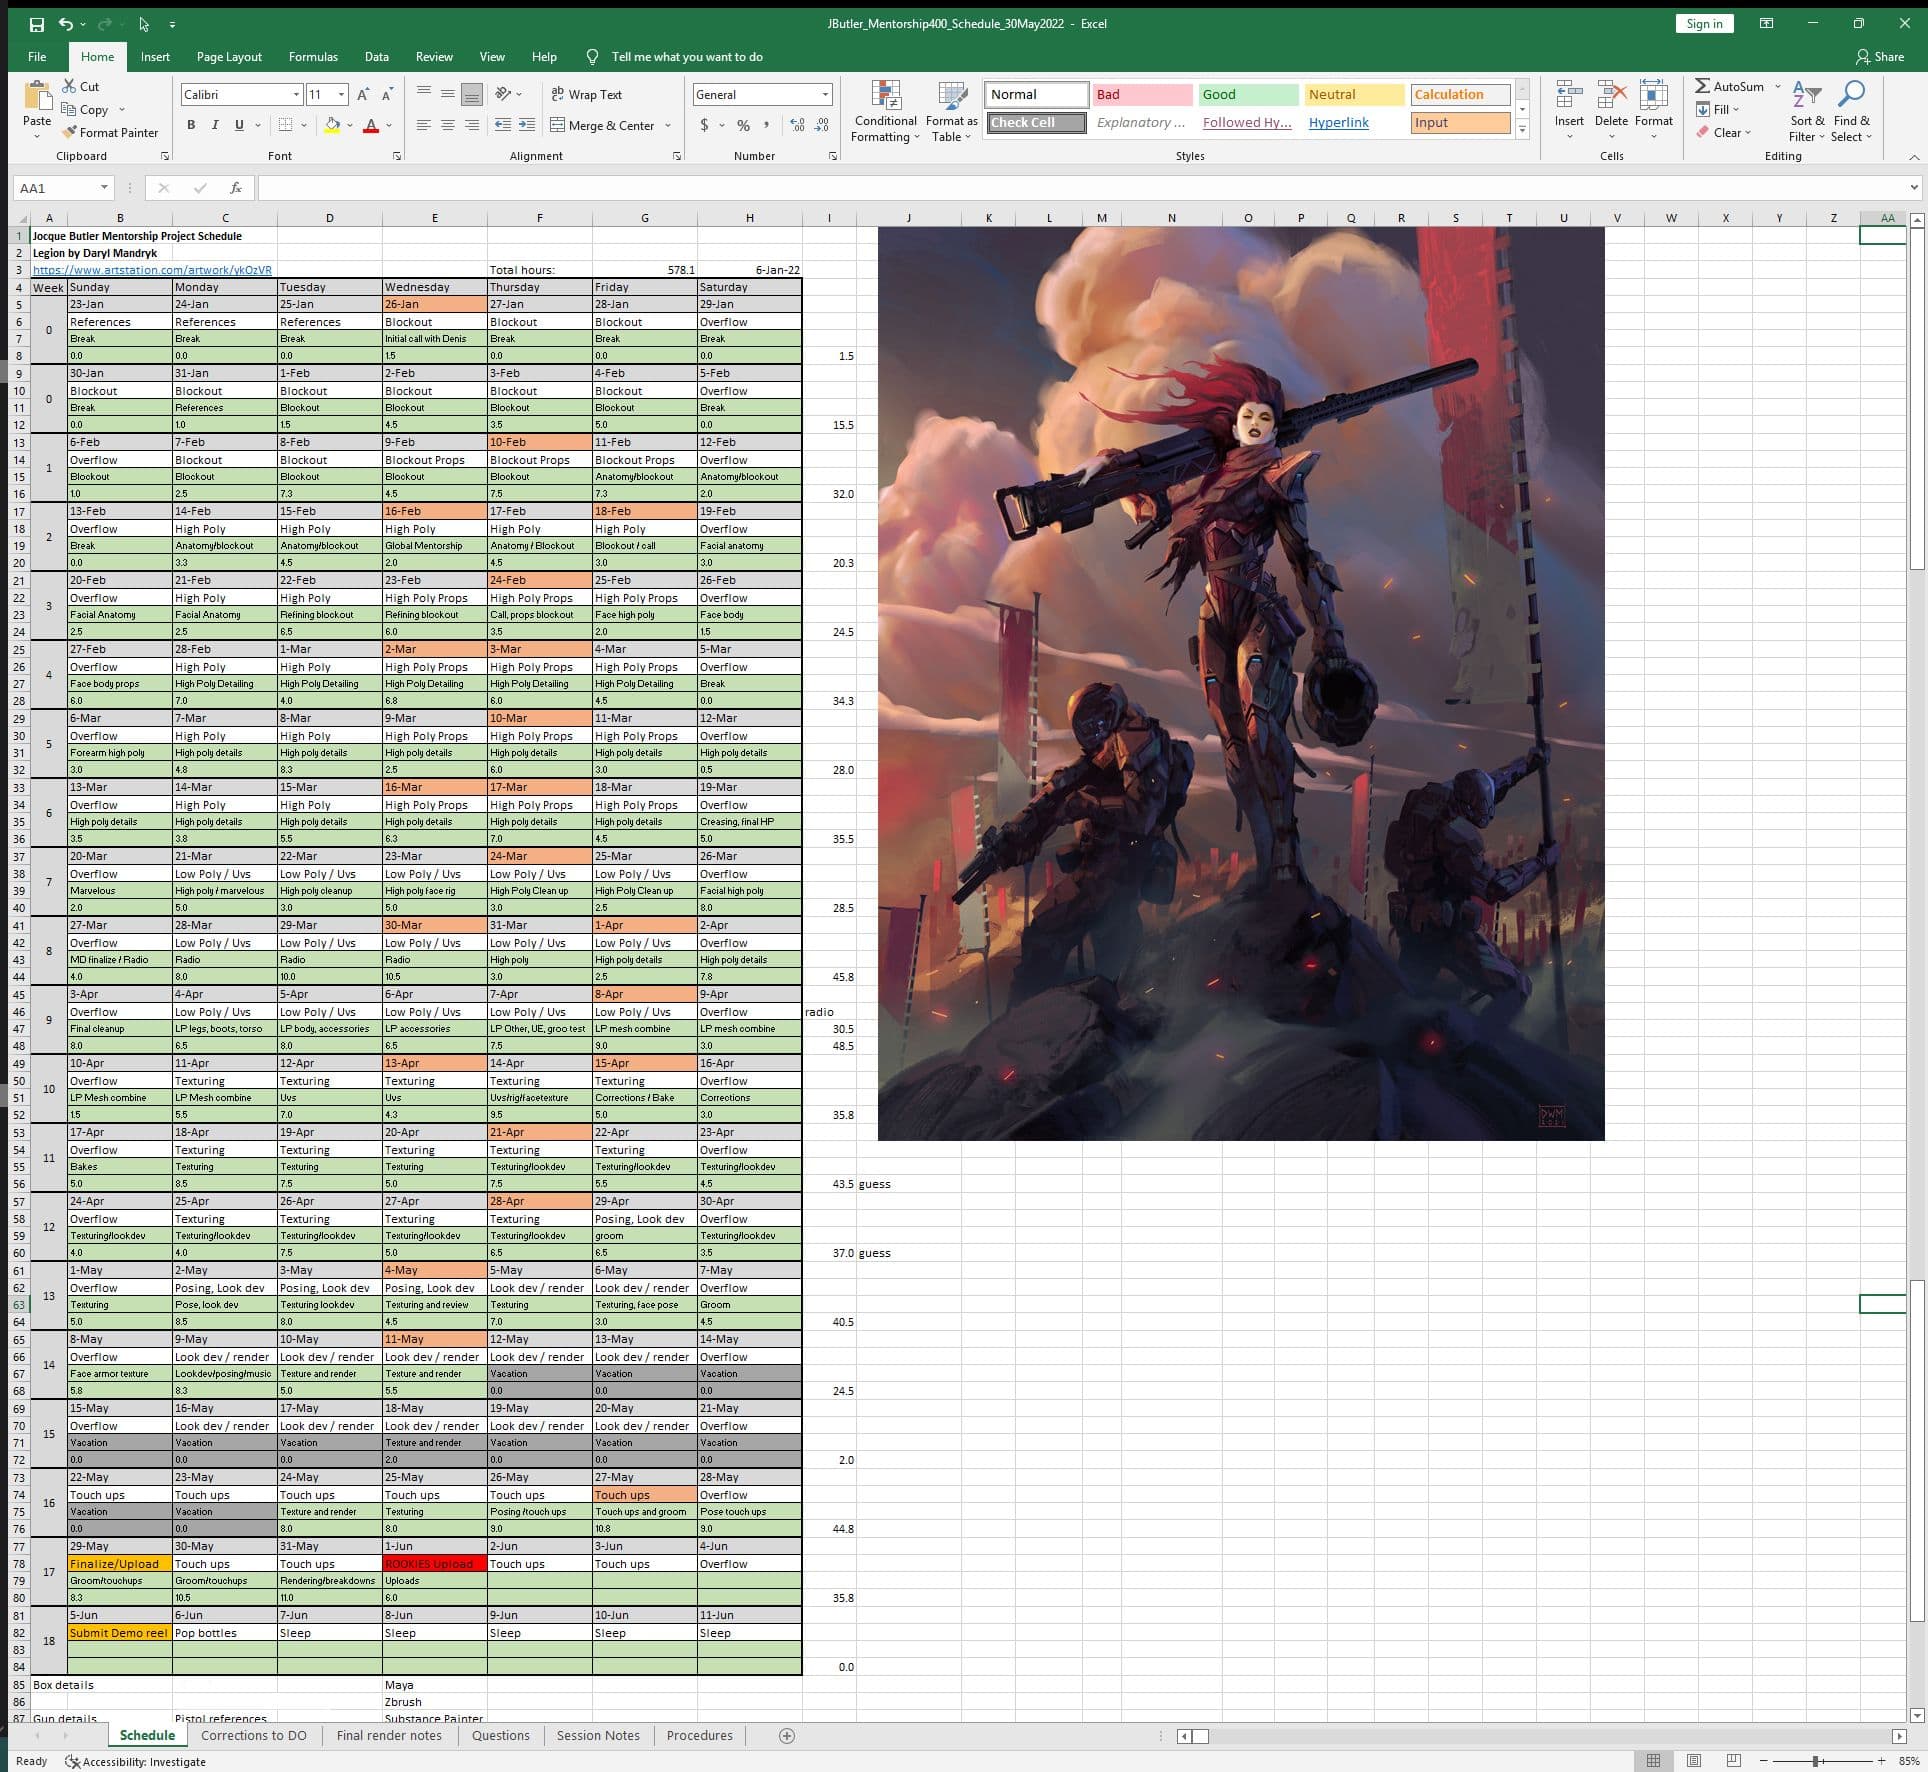
Project Schedule and Actual Hours Executed
During the project, I cannot emphasise how critical it is to maintain a strategic view at all times.
I tend to get deep down into the details and can get fall behind schedule when not keeping an updated project view. There were many instances where I had to readjust based on my progress and/or a roadblock that took longer than expected to bypass. Flexibility was key especially during the look dev and animation phase. The project plan allowed me to pivot where necessary to still achieve the submission date.
Feedback and Avoiding Tunnel Vision
Tunnel vision is a real problem, especially when a project spreads over months. Tunnel vision can make it very difficult to see errors and areas of improvement as you view the same project for a long period. When drawing, I always look at my image in front of a mirror for a fresh perspective. This project did not allow such an easy method for a fresh look, so I relied on listening to feedback and acting immediately. Immediacy was key to ensuring that the project improved over the term and I did not fall behind schedule.
I was provided excellent guidance from my mentor, Denis Melenets who was invaluable in providing feedback to improve my quality immensely. We met one-on-one weekly for 14 weeks over zoom calls and his input and knowledge was paramount in upping the level of this character.
Additionally, Think Tank Online provided group bi weekly feedback sessions provided by Karam Chahal. These sessions also added great value and honed my end result. Lastly, my partner Céline and my friends with a creative eye were great for gut-checking and bouncing ideas off of between mentoring sessions. I cannot emphasise how important it is to get a second opinion on your image... especially when tunnel vision sets in, thank you everyone!
Gathering References
With the project plan completed, I started reference gathering using using pure ref to consolidate my images. I focused on collecting references for her face, hair, helmet, armour, weapons, and other major props. Organisation is key as it’s very easy to drown in reference images. I wanted to find reference images of strong women with partially shaved heads and some battle scarring. Her armour, weapons, and props had to be grounded in reality while having a sci-fi slant.
Anatomy references are critical as her proportions are beyond standard human (more on that later). Her anatomy needed to be realistic, especially her face or the overall image would not be a success.
References Used
I used PureRef as it is very easy and quick to import images (drag and drop) and organise. In the past I used Photoshop for this task, but for pure speed of use, I definitely prefer PureRef.
Block out
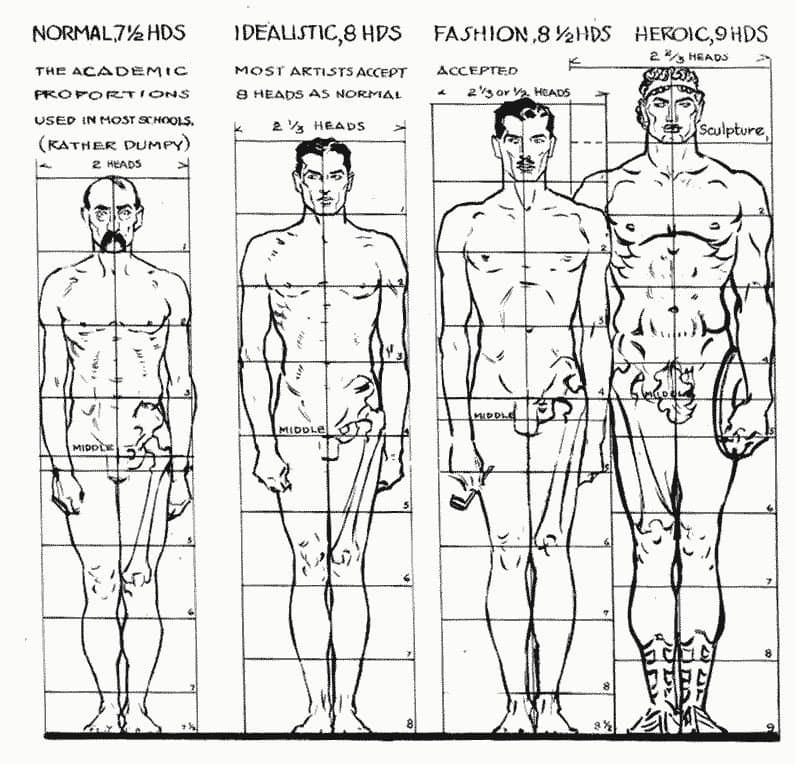
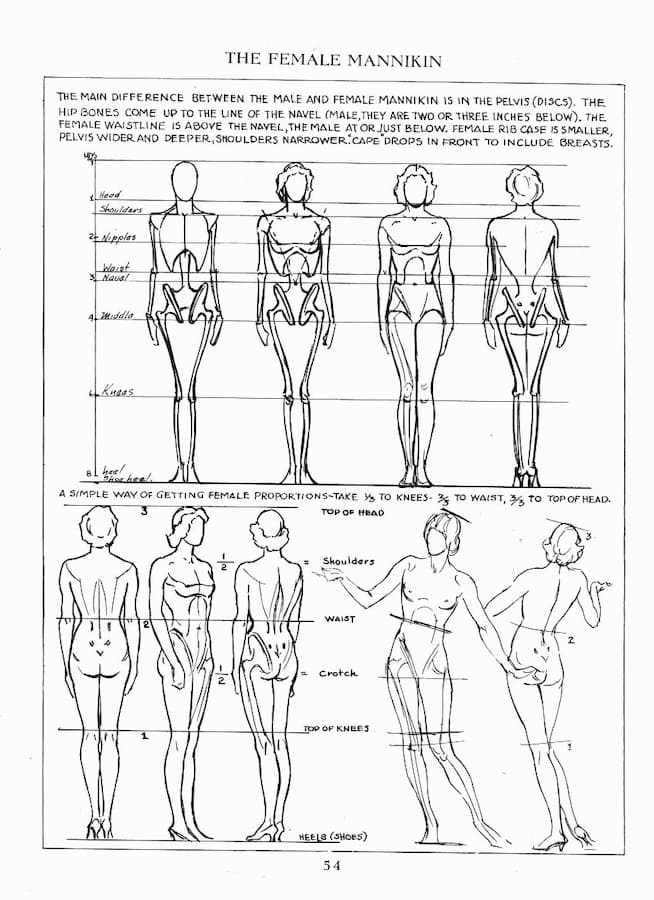
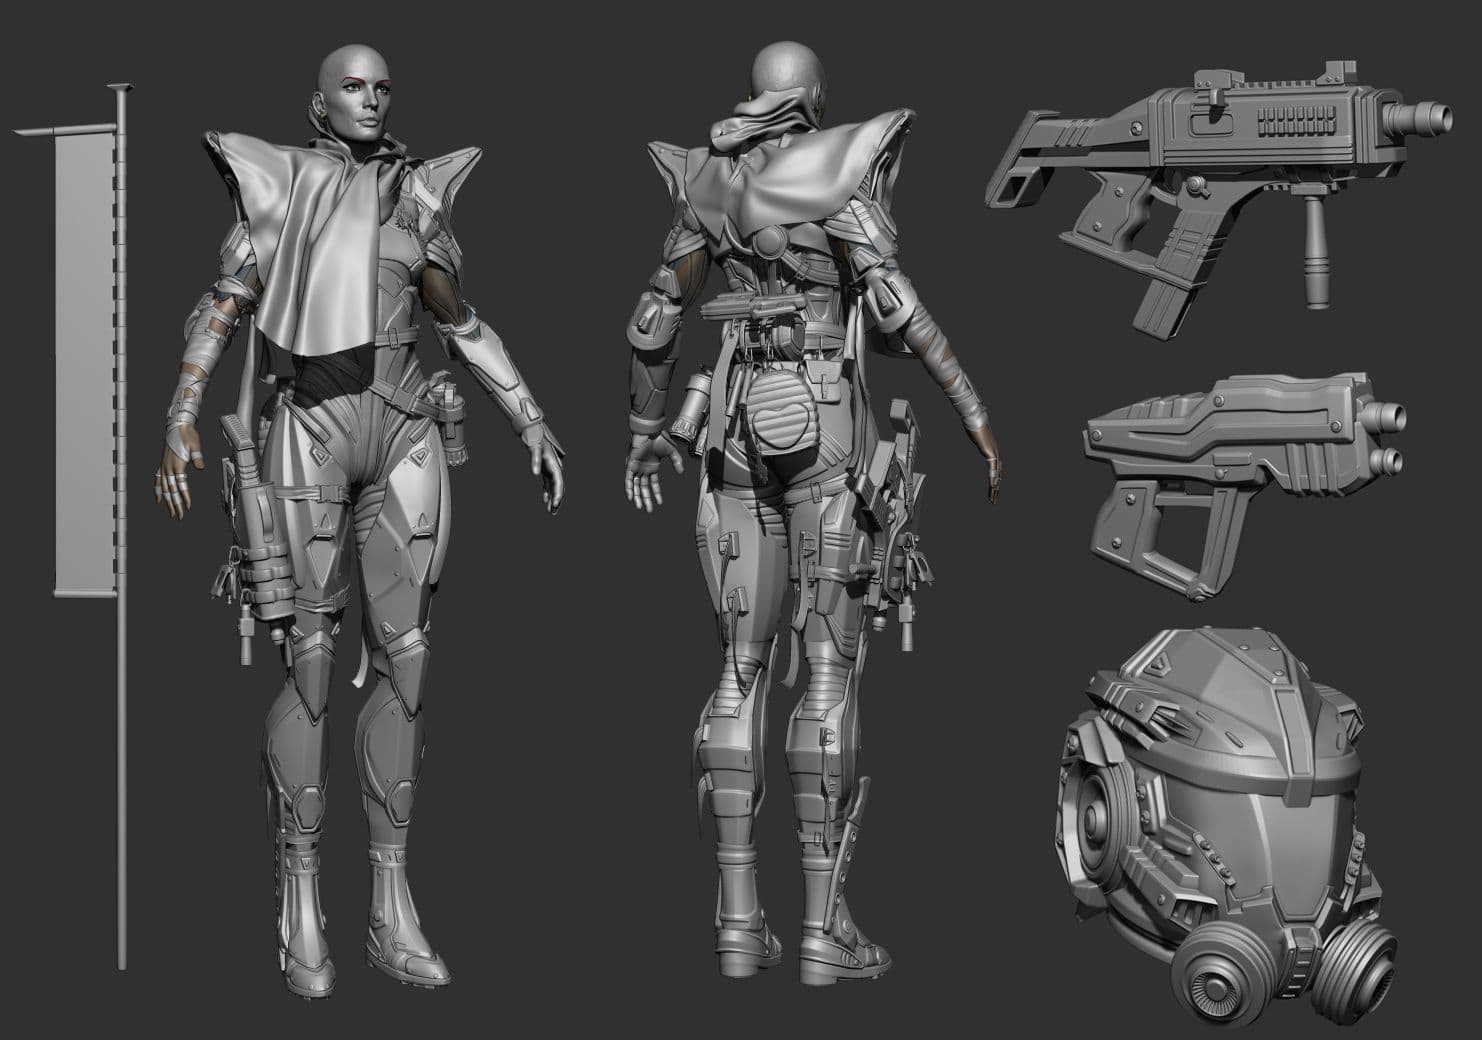
While I sometimes block out in Maya, I utilised Zbrush and z-modeler to perform the vast majority of block-out very early in the project. The main focus on the block out was getting her overall “feel” correct without diving into details. Her proportions are about 8.5 - 9 heads, between fashion and heroic, based on the Andrew Loomis proportions standards.
Human Proportions by Andrew Loomis
This proportion allowed for her to have a long torso and limbs which projected her deadly stature. This meant that the armour needed to look sleek and deadly, not bulky and rugged… she was a fast and deadly ranged assassin, not a battle charging tank.
Female Specific Proportions by Andrew Loomis
I ensured that her T-pose proportions matched the heroic proportions of the concept. If this stage was not completed correctly, the foundation of the project would be off and any detail added after this point would not help to match the body proportion and feel.
Proportions Check for Blockout versus Reference
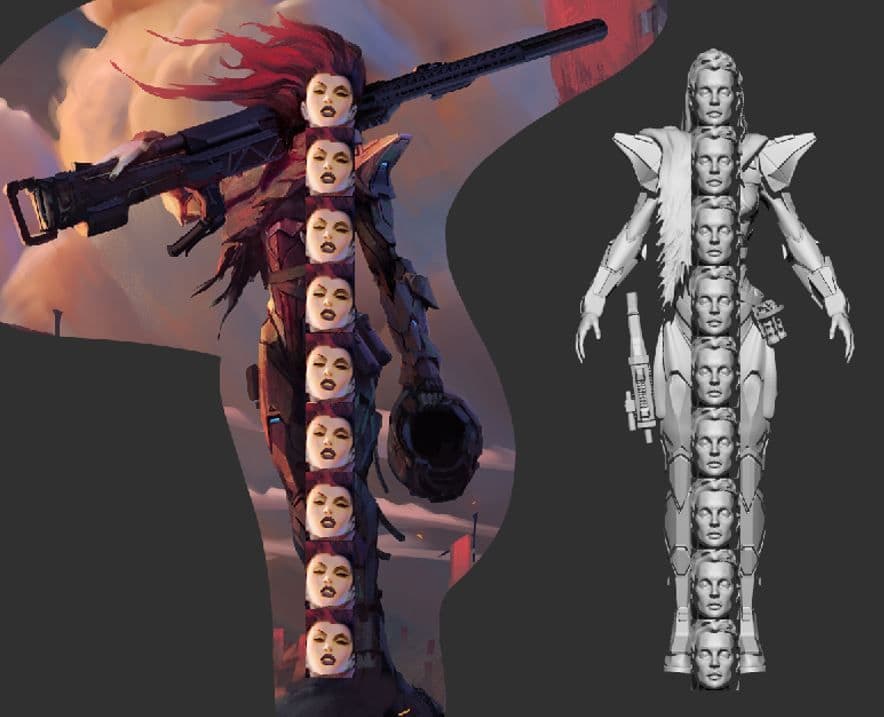
Once the body / anatomical proportions matched, her facial features were next. Again, references and feedback are paramount, especially for faces and it will be the most focused on area of the image. The concept does not provide a significant amount of information for her facial features, so I took some liberties to create a face that I felt embodied her stature.
Lastly, armour, props and weapons were blocked out. While the concept provided guidance, there were some areas that required improvisation and design on my part. A significant amount of time was spent designing how the armour and plating would interlock with the softer sections of the suit while looking natural.
As block out progressed into high poly details, some of the suit was redesigned. The boots for example went through multiple designs as the concept doesn’t provide much detail.
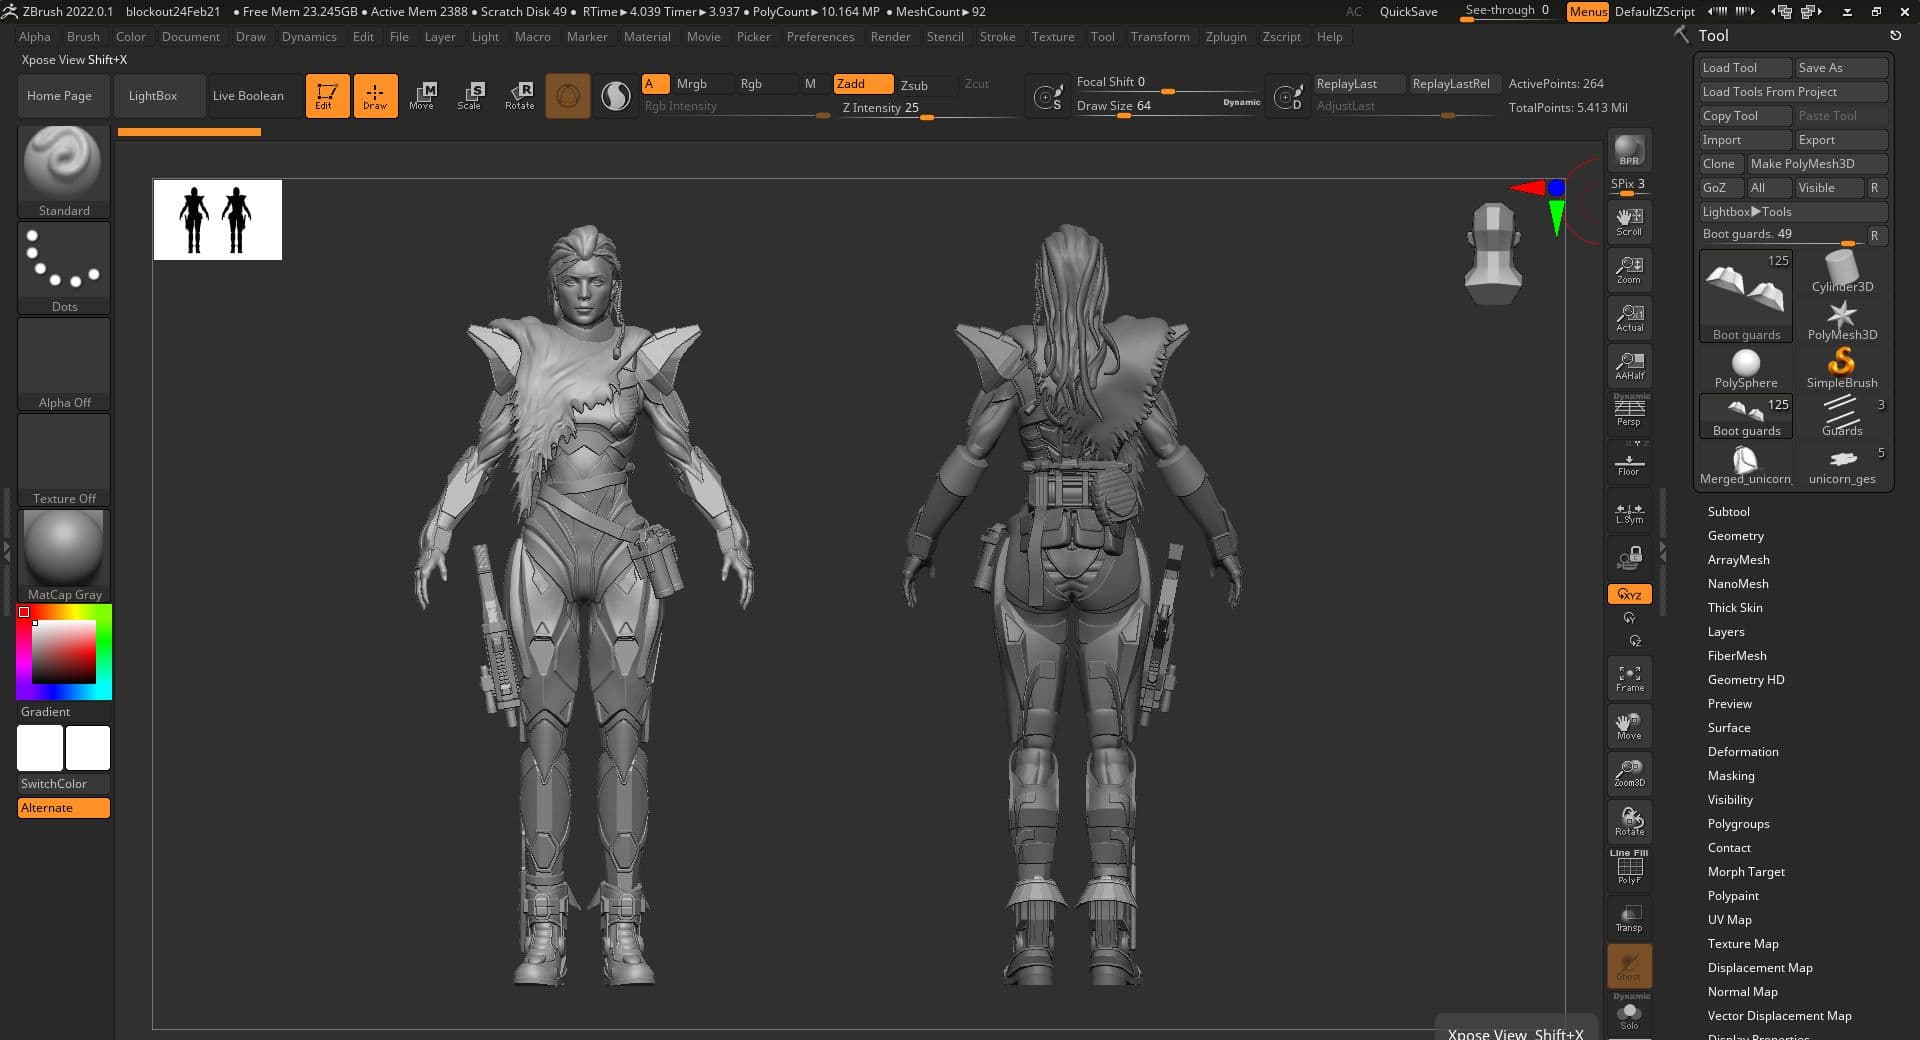
Completed Blockout in Zbrush
Detailing
With the blockout complete, detailing was performed using z brush. I created the hard surface components using z-modeler, crease set at level 2 and sub dividing to achieve a smooth finish.
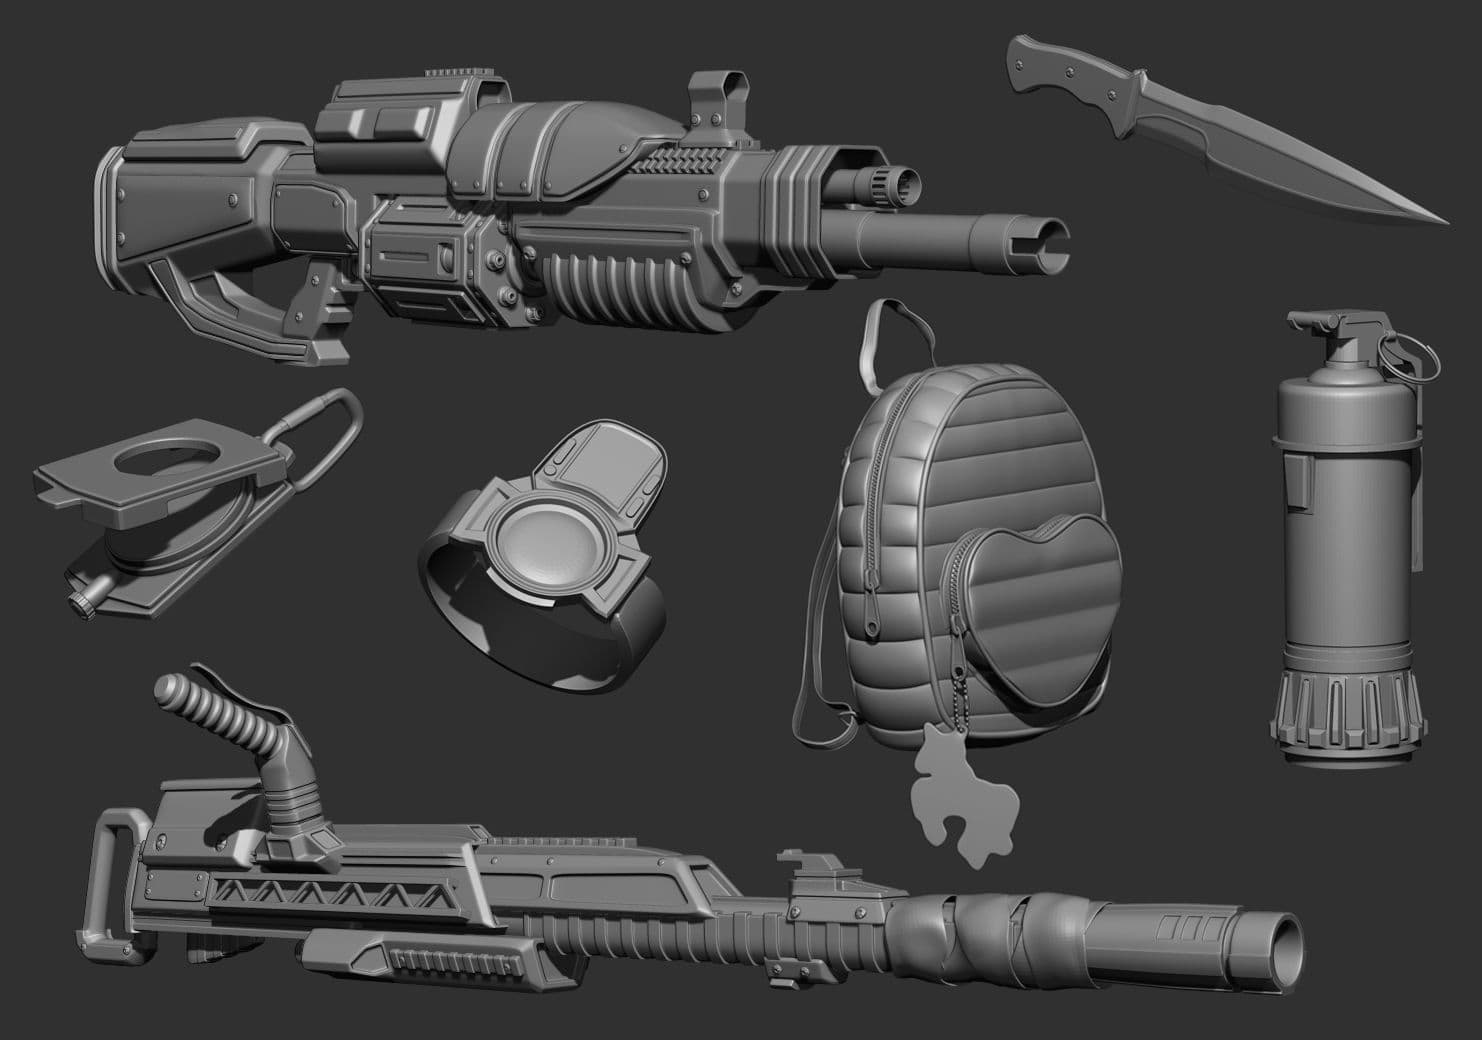
Detailed Sculpts of some of the Props and Weapons
I completed the facial sculpt before wrapping a scan from 3d scan store using R3DSwrap for pores and skin data. Ensuring to always refer to references, I detailed the remaining props and weapons to a high poly polished state.
Detail Sculpt on the Character Other Props
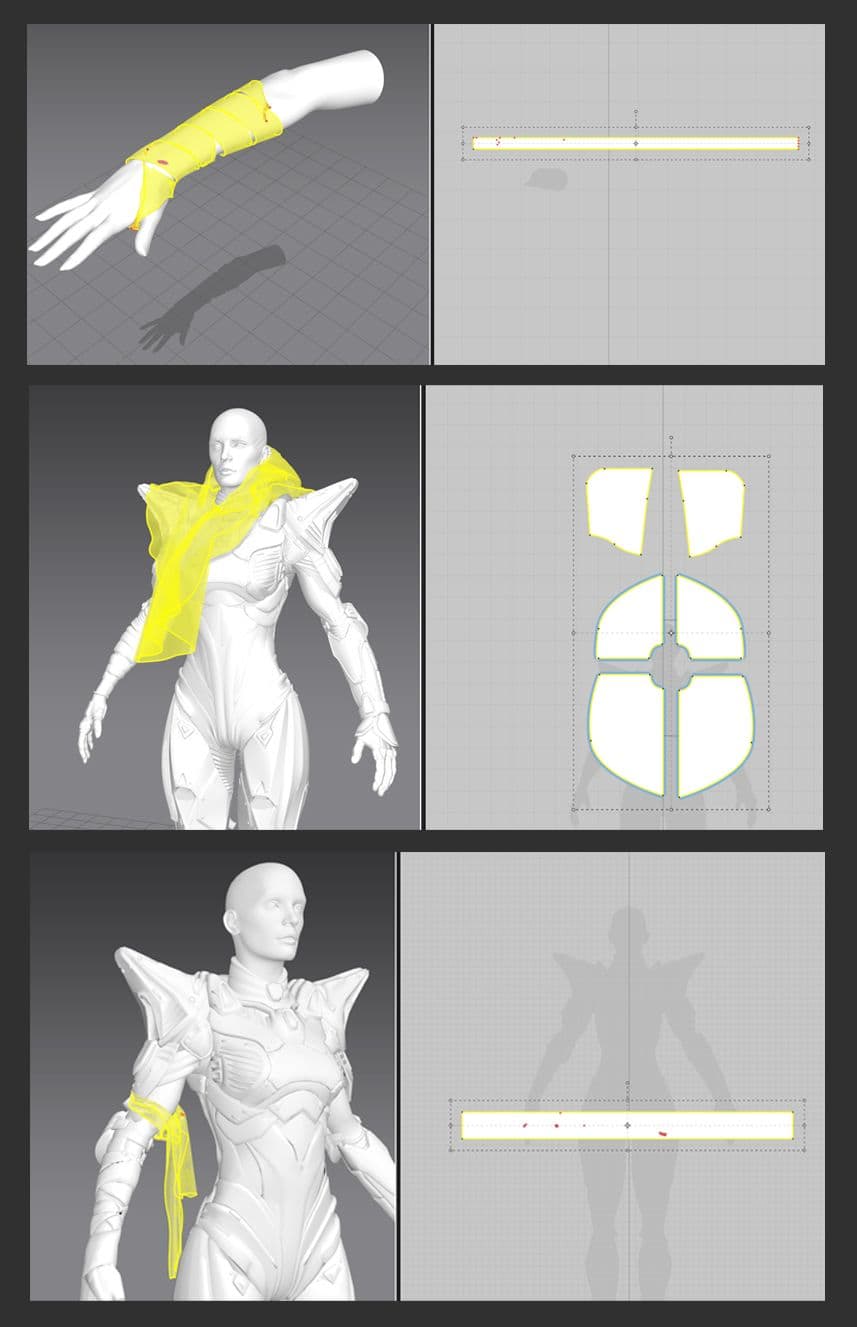
For the cloth elements such as the cloak, the forearm and arm wraps, I used Marvelous Designer to create a natural look. Pins were utilised to manually wrap her forearm and create a knotted bicep wrap. Once the simulation was acceptable, it was exported into Zbrush for smoothing and additional fold sculpting.
Marvelous Designer Simulation of the Forearm Wrap, Cloak, and Arm Wrap
It was critical that the detailing did not push her away from the overall proportions and lithe / deadly feel that was set during the block out stage.
Low Poly and Baking
As she is a real-time character, retopo to a low poly model is essential for performance optimisation. High poly objs were exported from Zbrush into maya where I used quad-draw to re-topo. For simple items such as straps, I exported the 0-level Zbrush model without the need for a manual retopo.
As part of my experimentation and learning, I decided to match the facial UVs to that of Unreal’s metahuman. This would allow potential use of facial rigs and other tools on my model. This was achieved using R3DSWrap. I manually unwrapped all other objects, ensuring to arrange them unidirectionally where possible, to maximize texel density.
Low Poly and UV Breakdowns
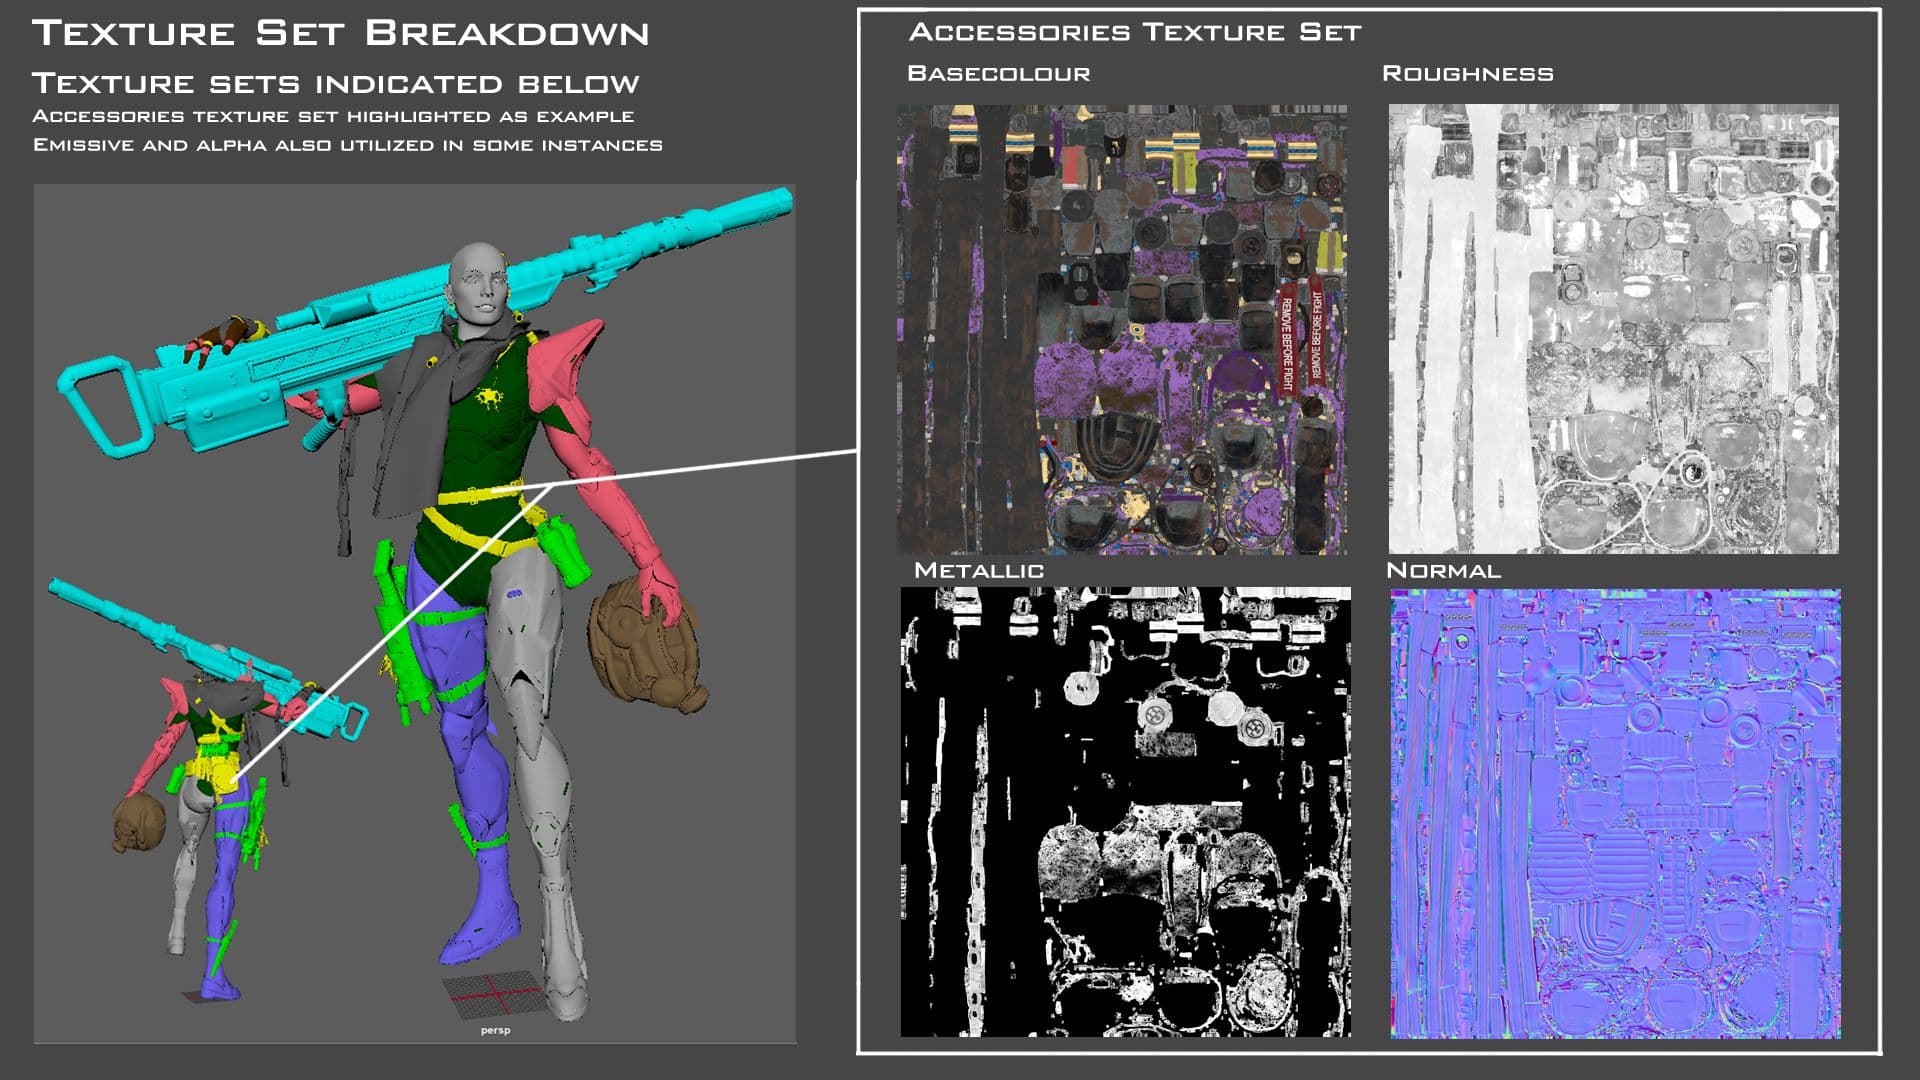
I split the low poly objects into multiple texture sets (face, eyes, helmet, arms, legs, accessories, weapons etc.). I wanted to ensure there was enough texel density to allow for some crisp textures on this cinematic character.
Texture Set Breakdown
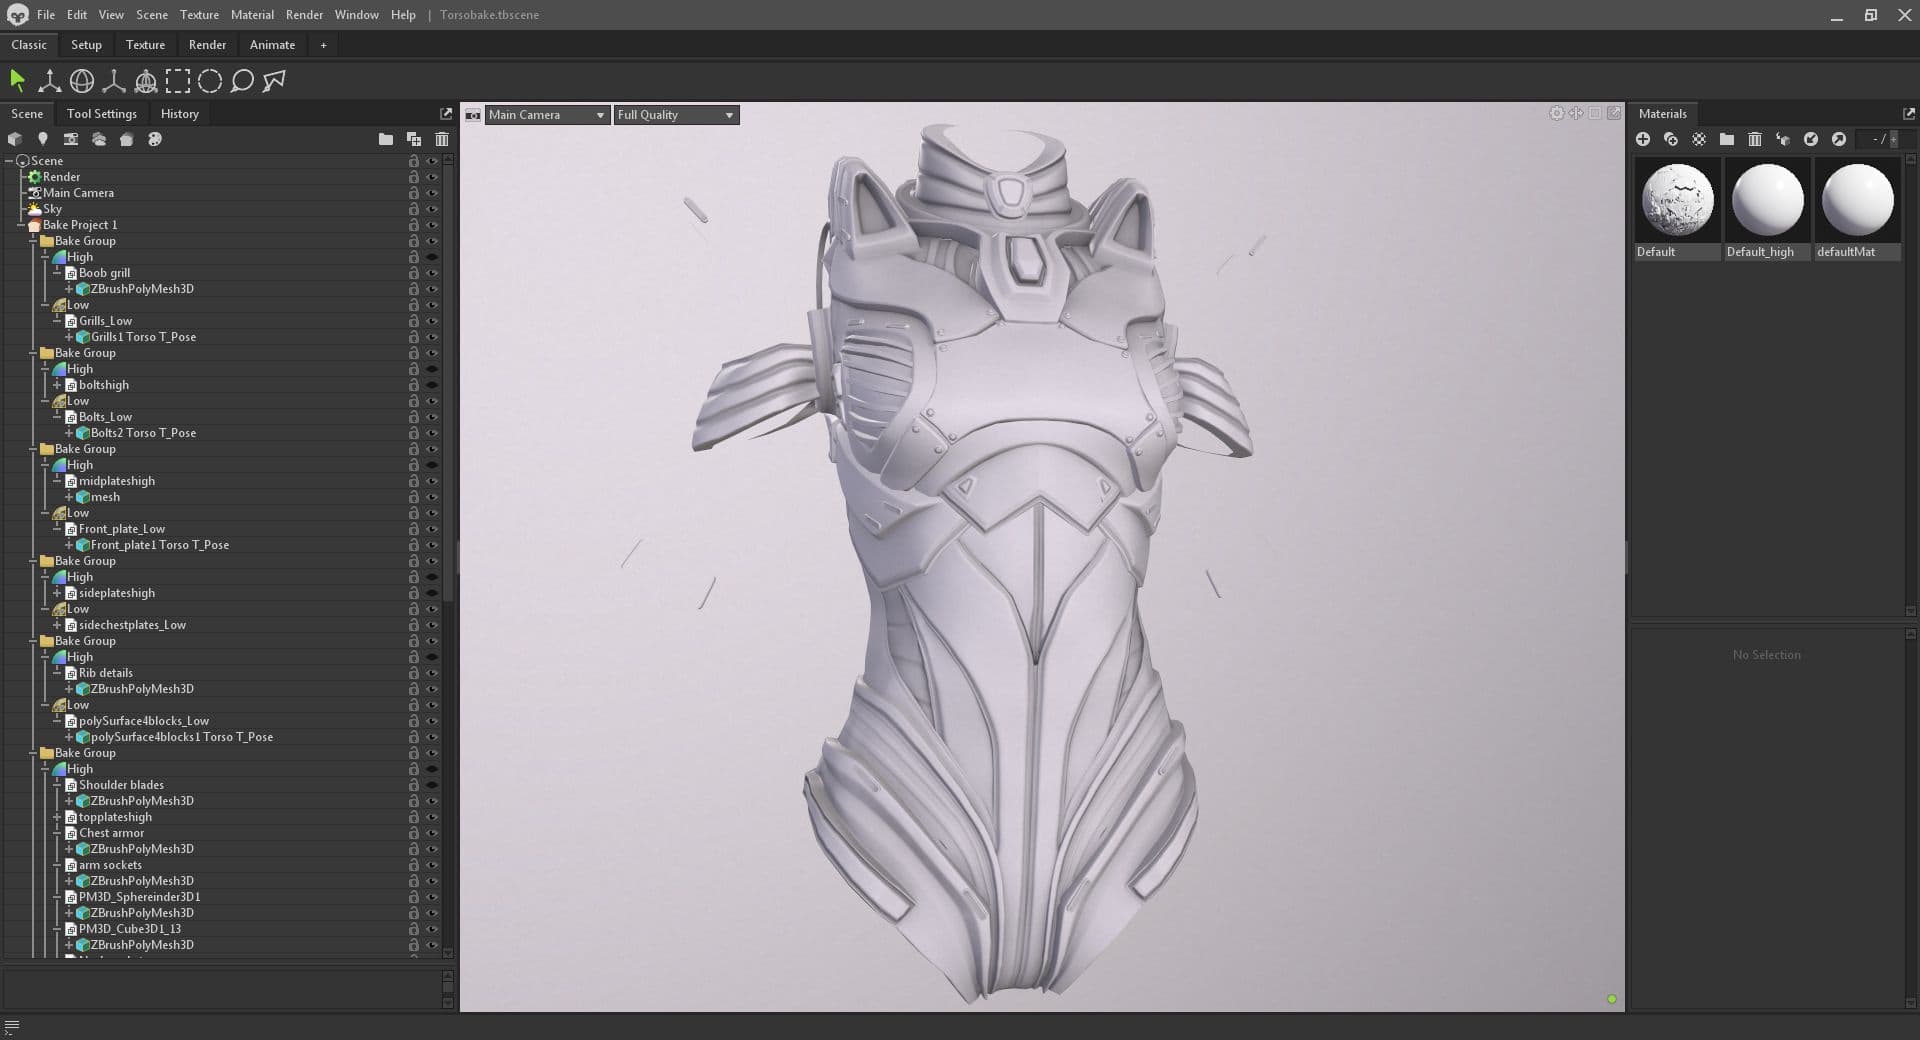
Before baking, I triangulated the low poly sets within Maya and exported the final low polys. Triangulation within Maya ensured that the baked maps matched the set triangulation. This prevented the rendering engine from performing its own triangulation, potentially changing the applicability of the bake maps.
I utilised Marmoset Toolbag for the baking process.
In my experience, Toolbag is very fast and allows great flexibility with baking groups and real time feedback when changing baking parameters.
Completing the Torso Bake
Texturing
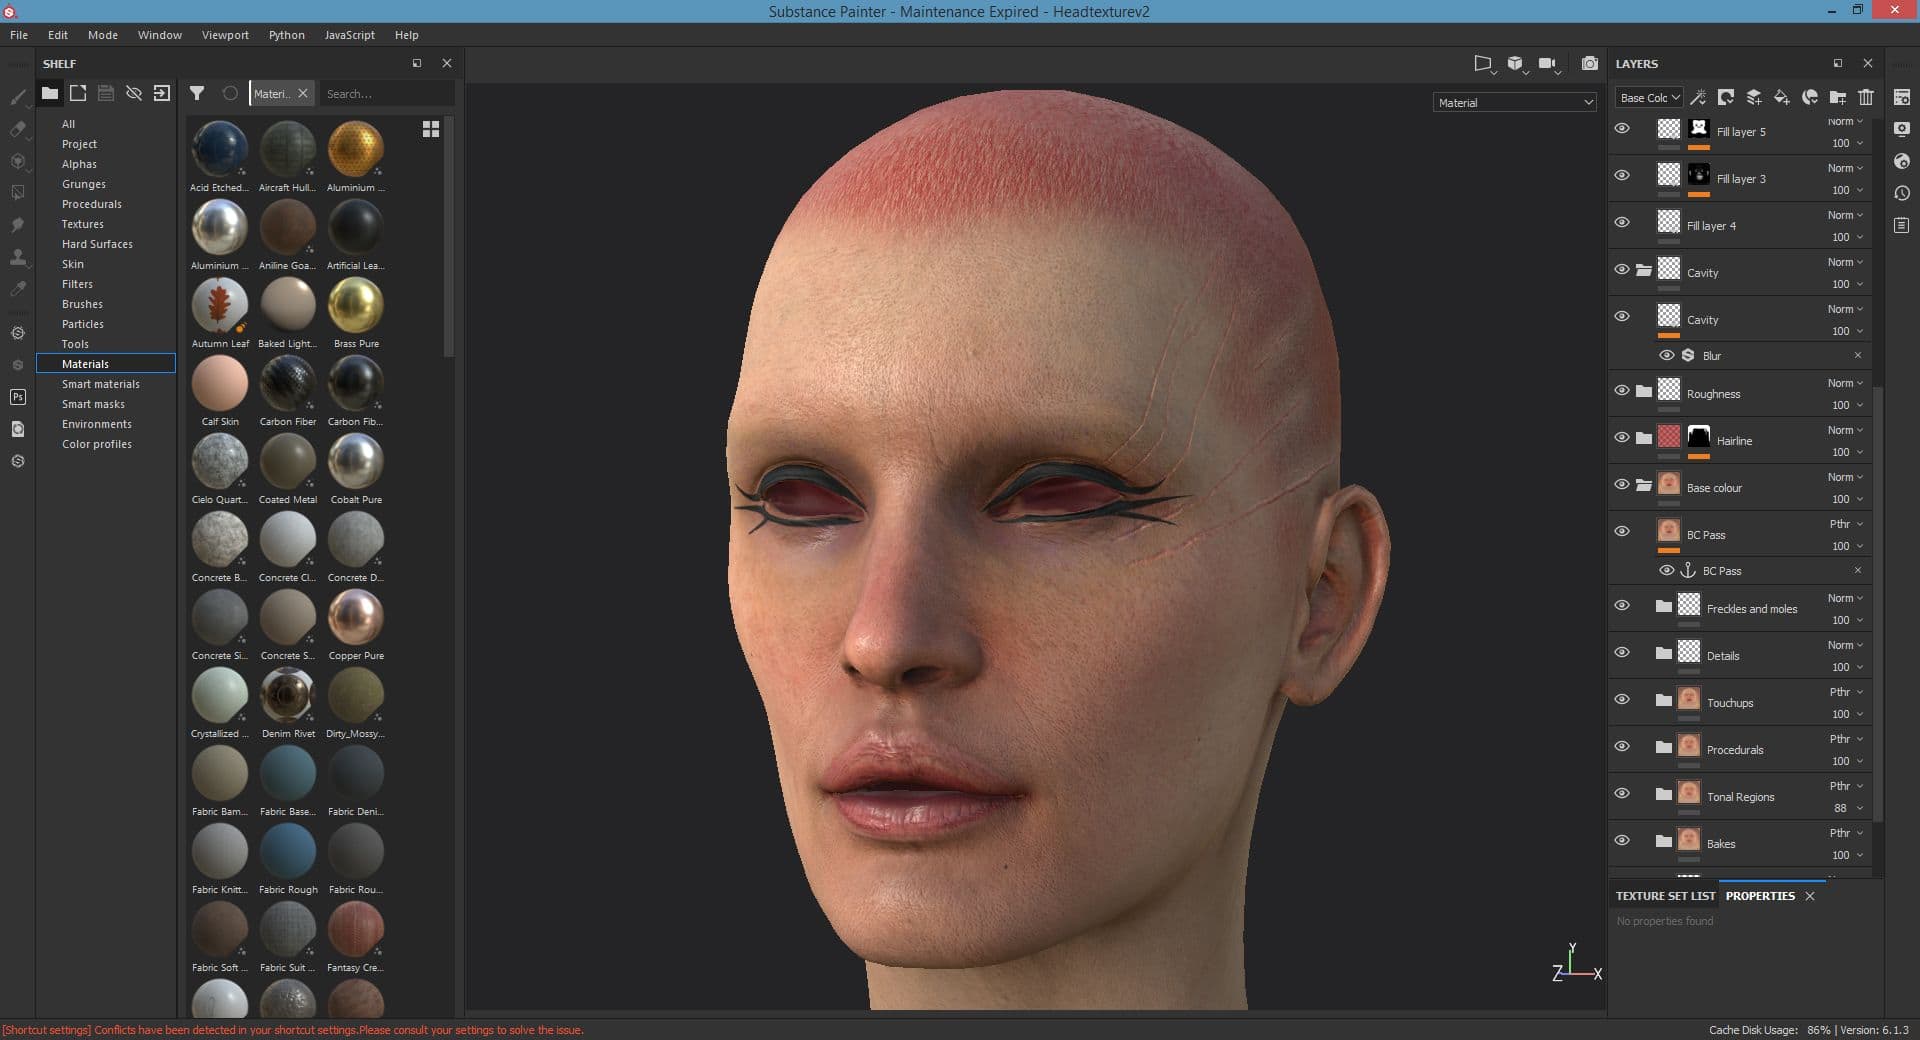
Once baking was complete, I imported the maps into Substance 3D Painter as it was used as the primary texturing tool. For the face, I used scan data as a base before adding colour regions, veins and capillaries, scars, makeup, hairline etc.
Face Texturing
Photoshop was utilised for creating alphas, decals and screens textures on the electronic components. I imported these textures into Substance for use.
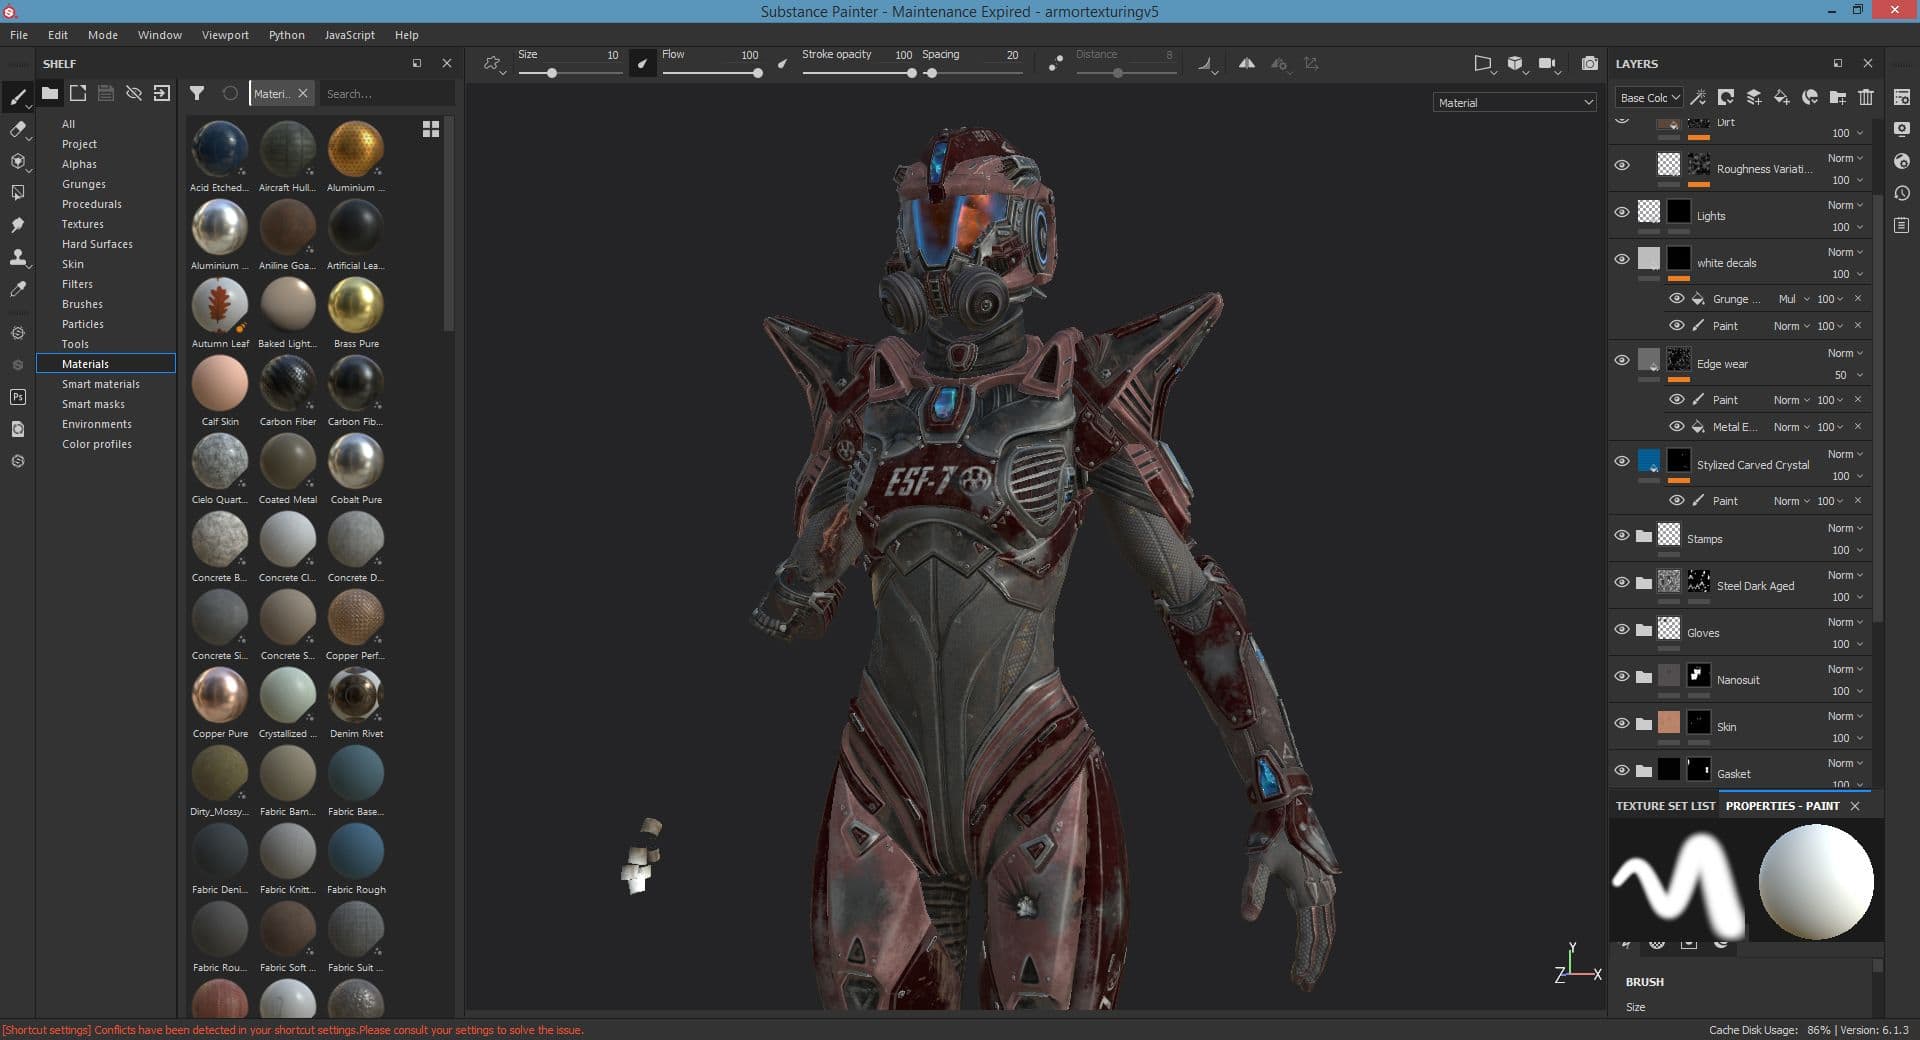
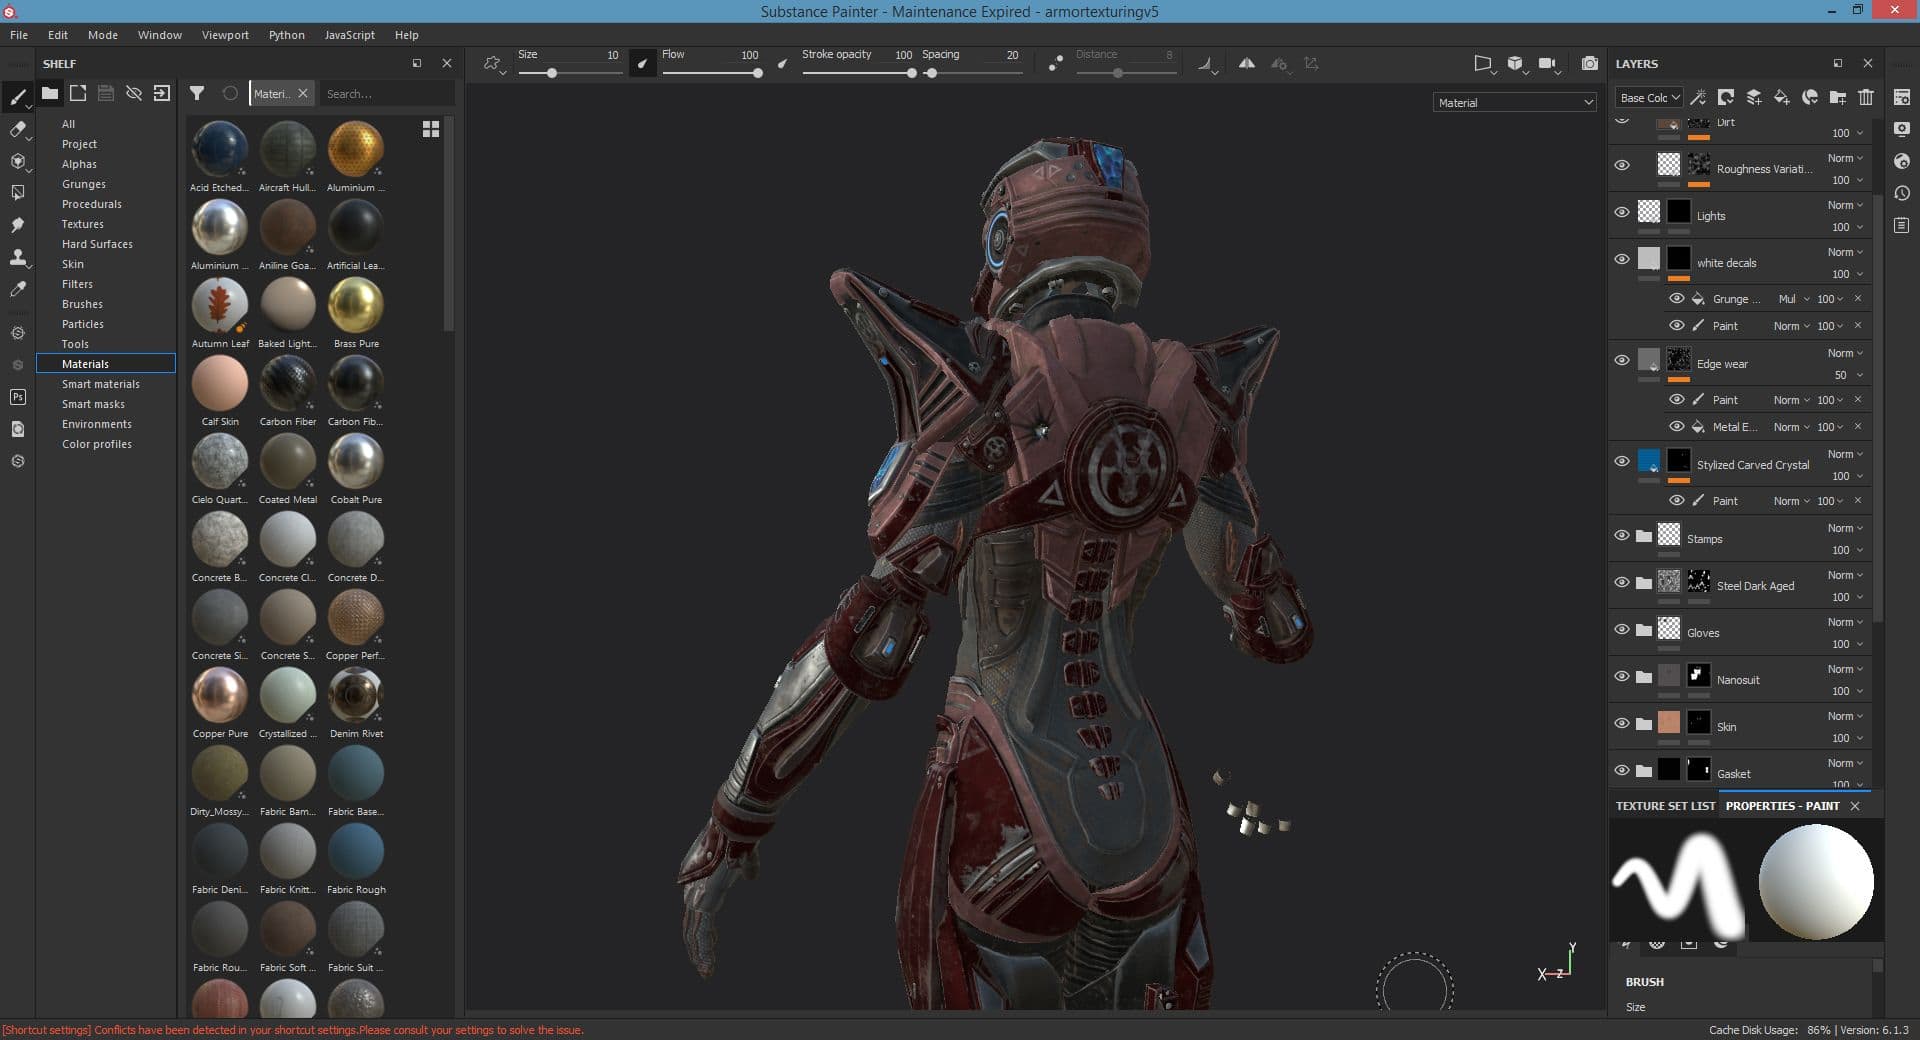
I created the armour texture with a base material and layering paint, decals, wear, dirt, and emissives on layers above. Additional hard surface normal details were stamped in focus areas while leaving less detailed areas for the eyes to rest. For example, heavy detail elements and decals are present on the breast plate with less elements on the stomach and bicep areas.
Armor Texturing
Care was taken to ensure that all channels were checked on the armour and other accessories to ensure that compelling textures were created.
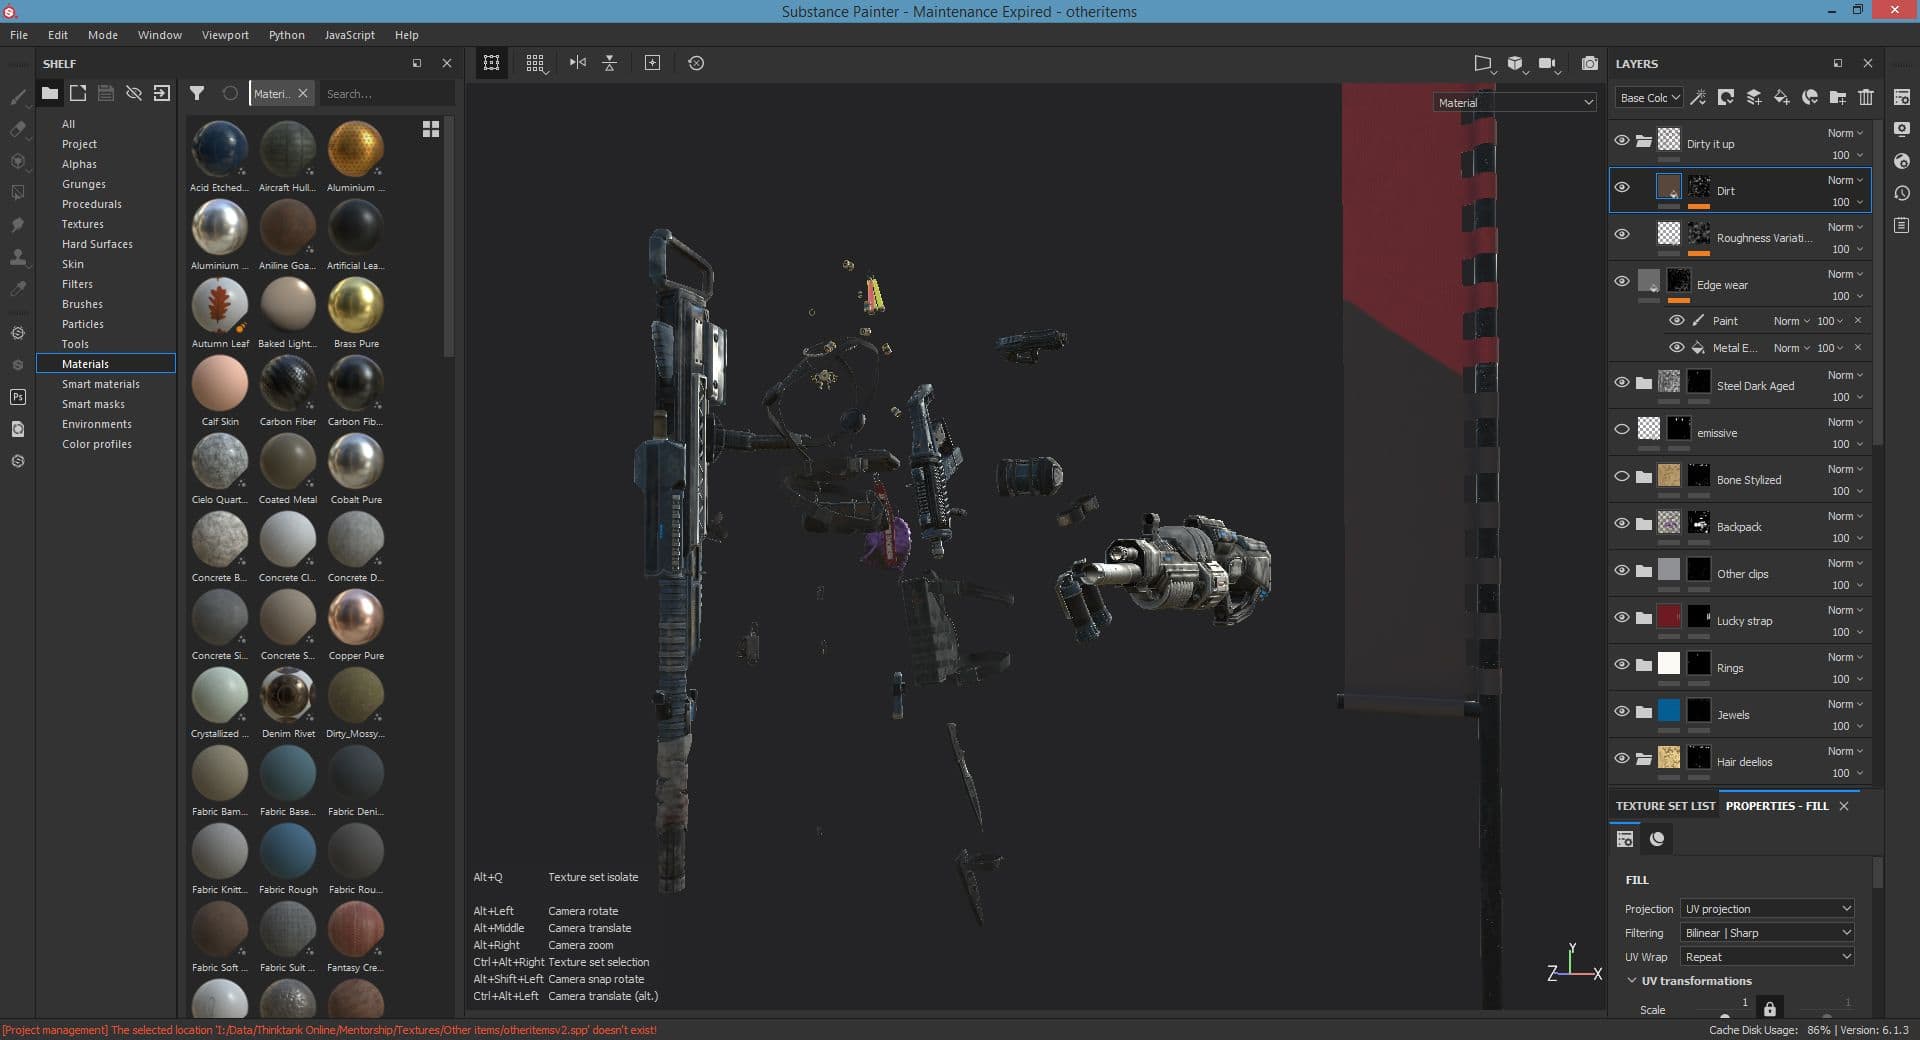
I used a similar approach for the accessories and weapons to ensure they were dirty and worn to the same degree.
Weapon and Props Texturing
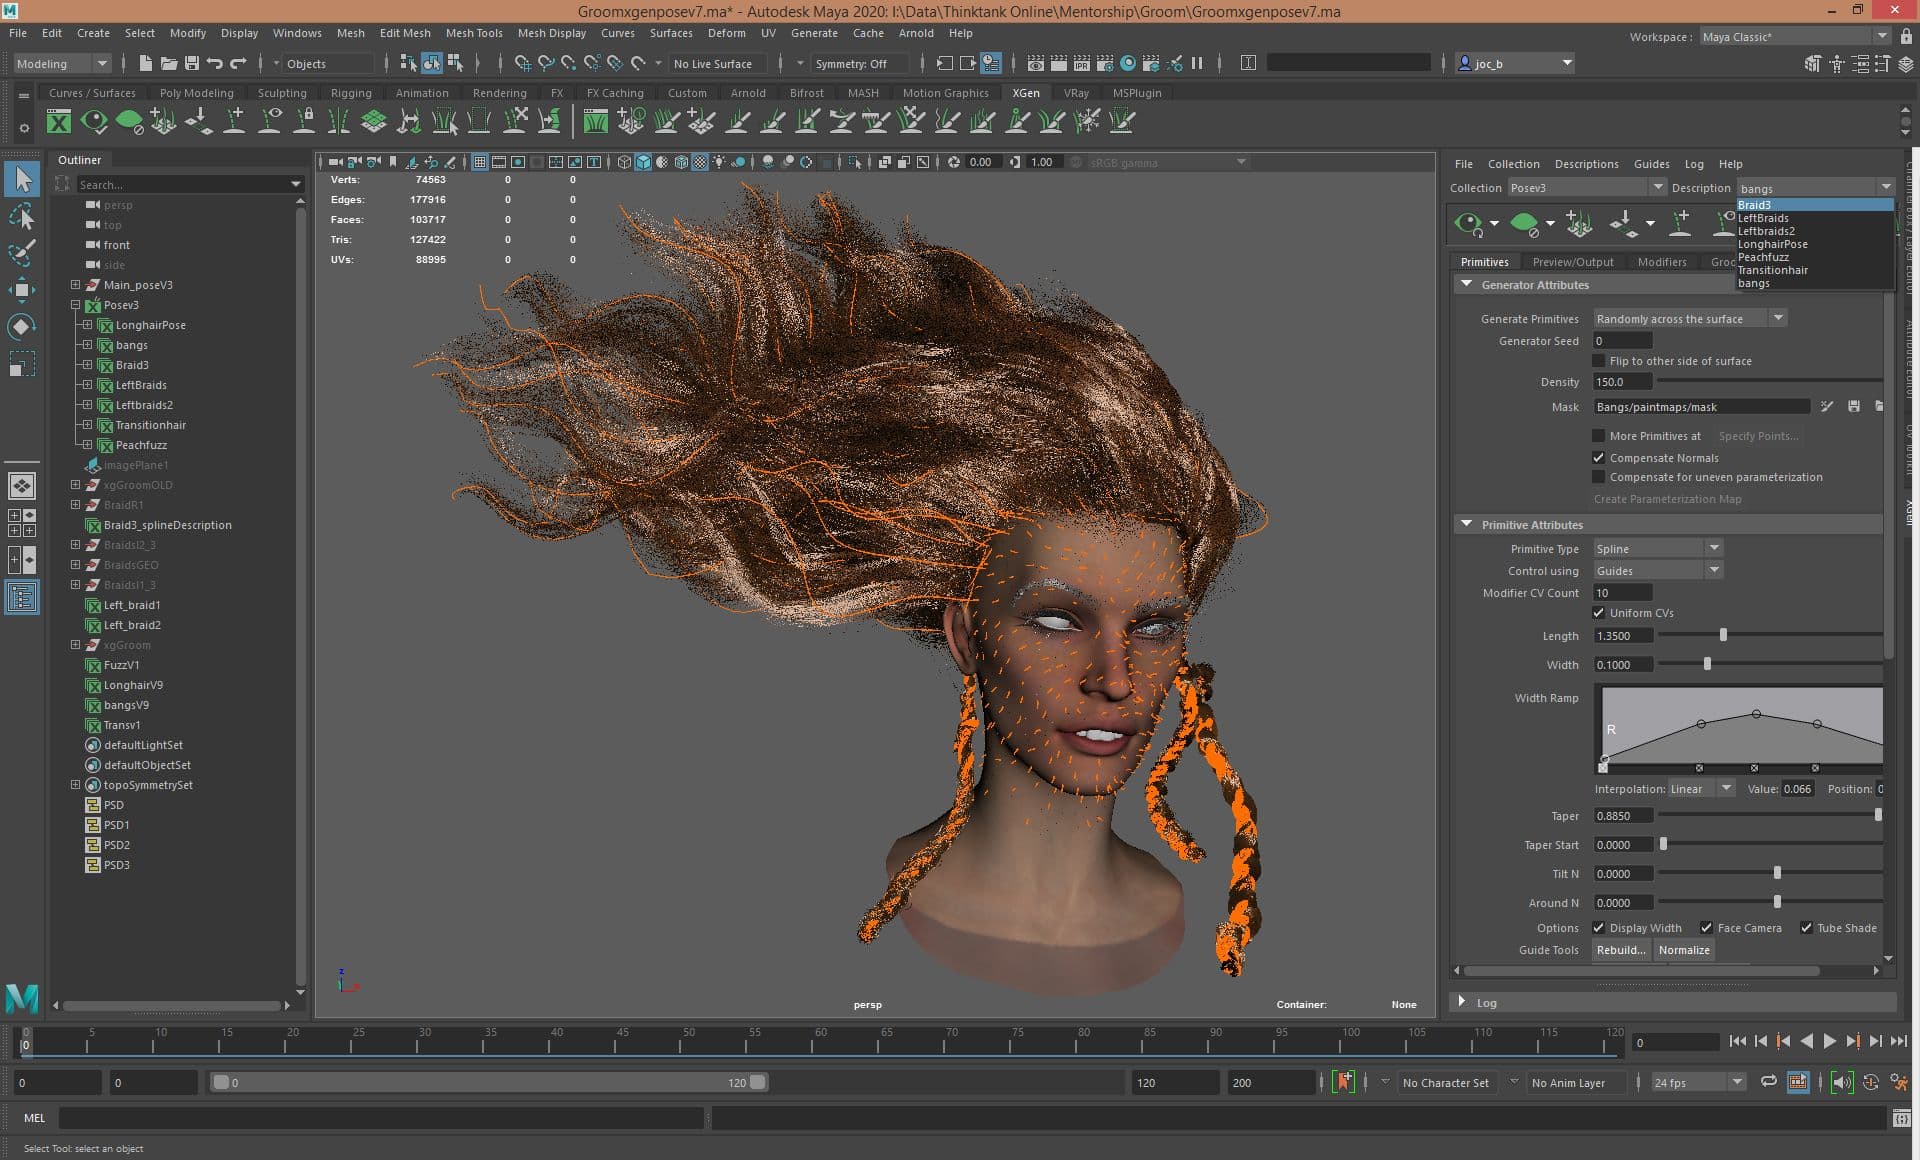
Groom
Having utilised hair cards in the past, I wanted to attempt something different on this project and create alembic hair.
I used an individual Xgen description for the hair elements: braids, bangs, longer hair, and vellus hair. The braids were a longer process, having first modelled them in Zbrush, then extracting curves from the low poly geo. Those curves were then converted to guides for Xgen. The remainder of the elements were created with guides and density masks within Xgen.
Groom Setup
To export the hair for import into UE5, the Xgen hair descriptions were converted to interactive grooms within Maya. I adjusted details such as root and tip width, density, and control vertex (CV) amounts before the final export. As this groom will be real time rendered, the CV count and density can have significant performance issues. High CV counts caused a lot of crashes within UE5 until I was able to achieve a performance balance for my setup. Once the interactive groom was finalised, I exported a groom cache for import into UE5.
As in the concept, the hair is very wind swept, so I created the swept positions as the “base” hair position. This would allow for easier animation within UE5.
Look Development
As mentioned, this was my first time using UE5, so the learning curve was a bit steep. Thankfully, there are A LOT of free tutorials existing that answered the vast majority of my questions. It’s amazing what you can find if you can identify your specific problem / need.
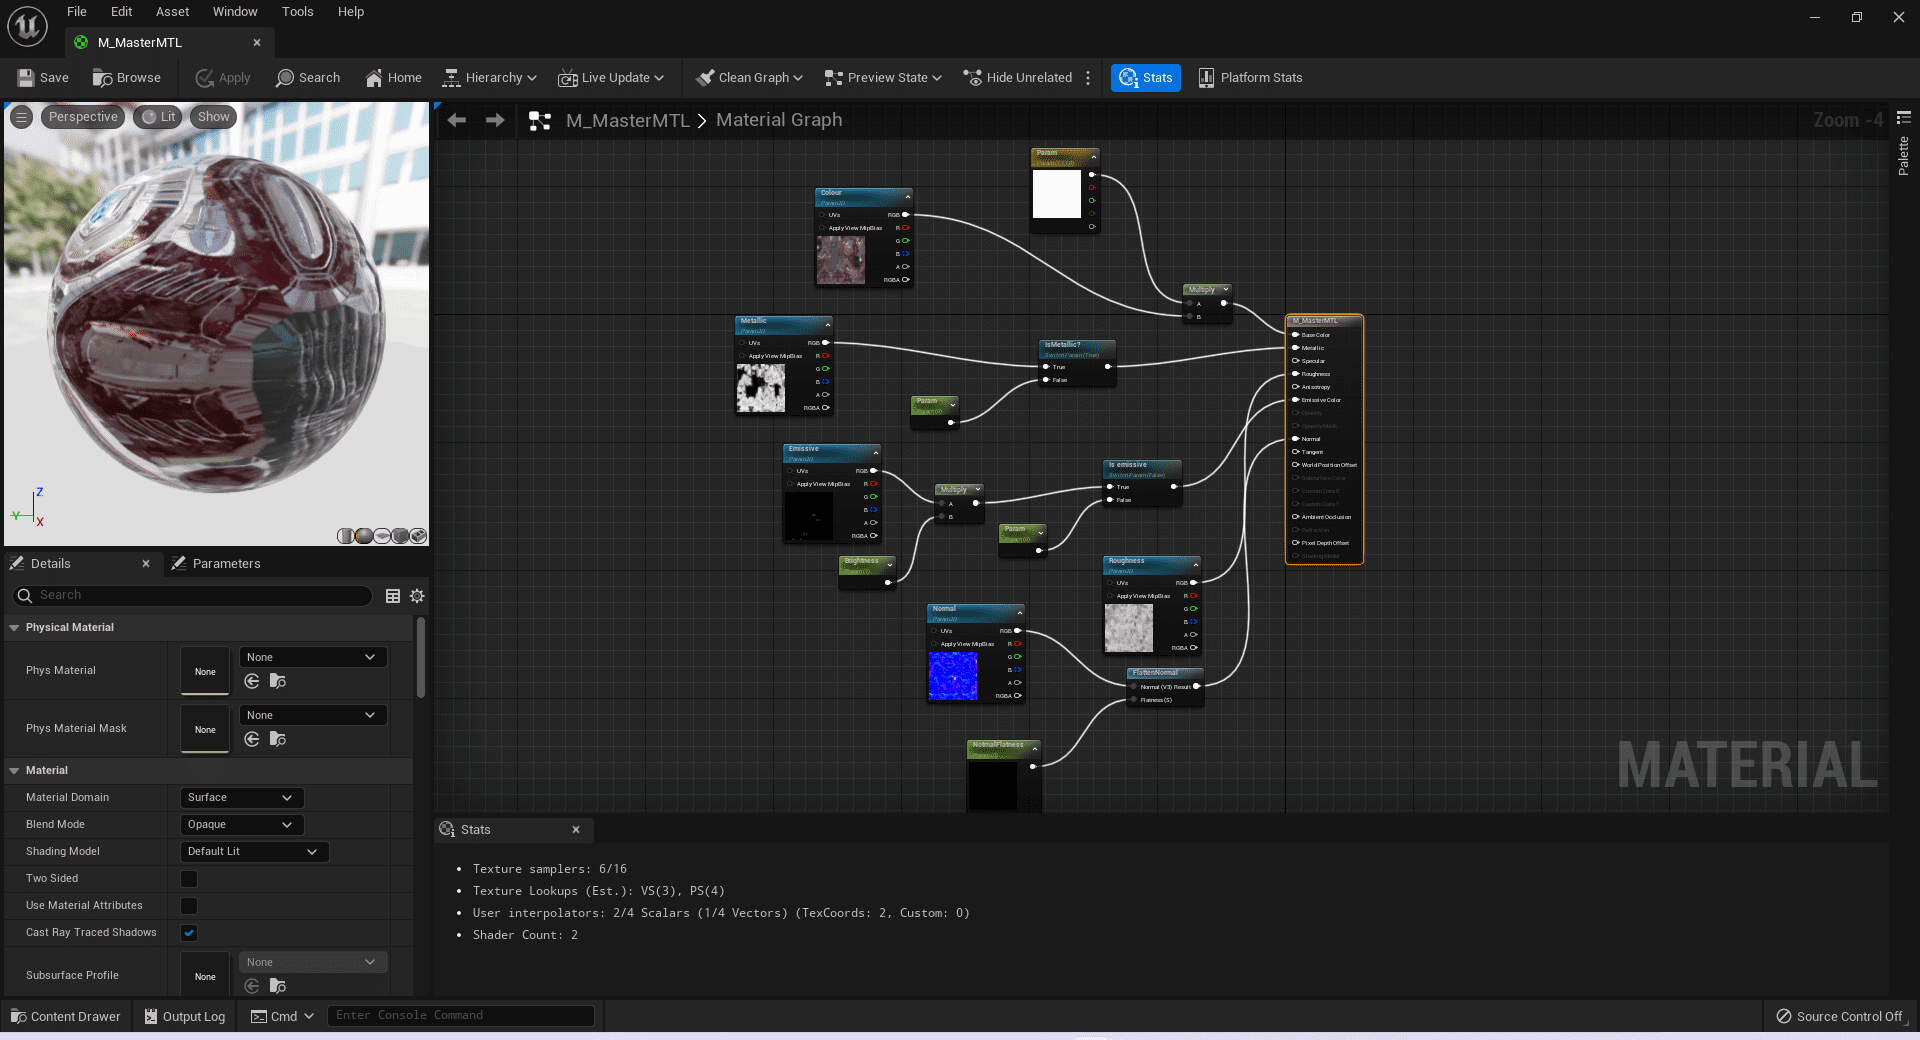
I created master materials for the major types of materials. The master was made as modular as possible (metallic Boolean, emissive Boolean etc.) to allow for the least amount of master materials.
Master Material Shader
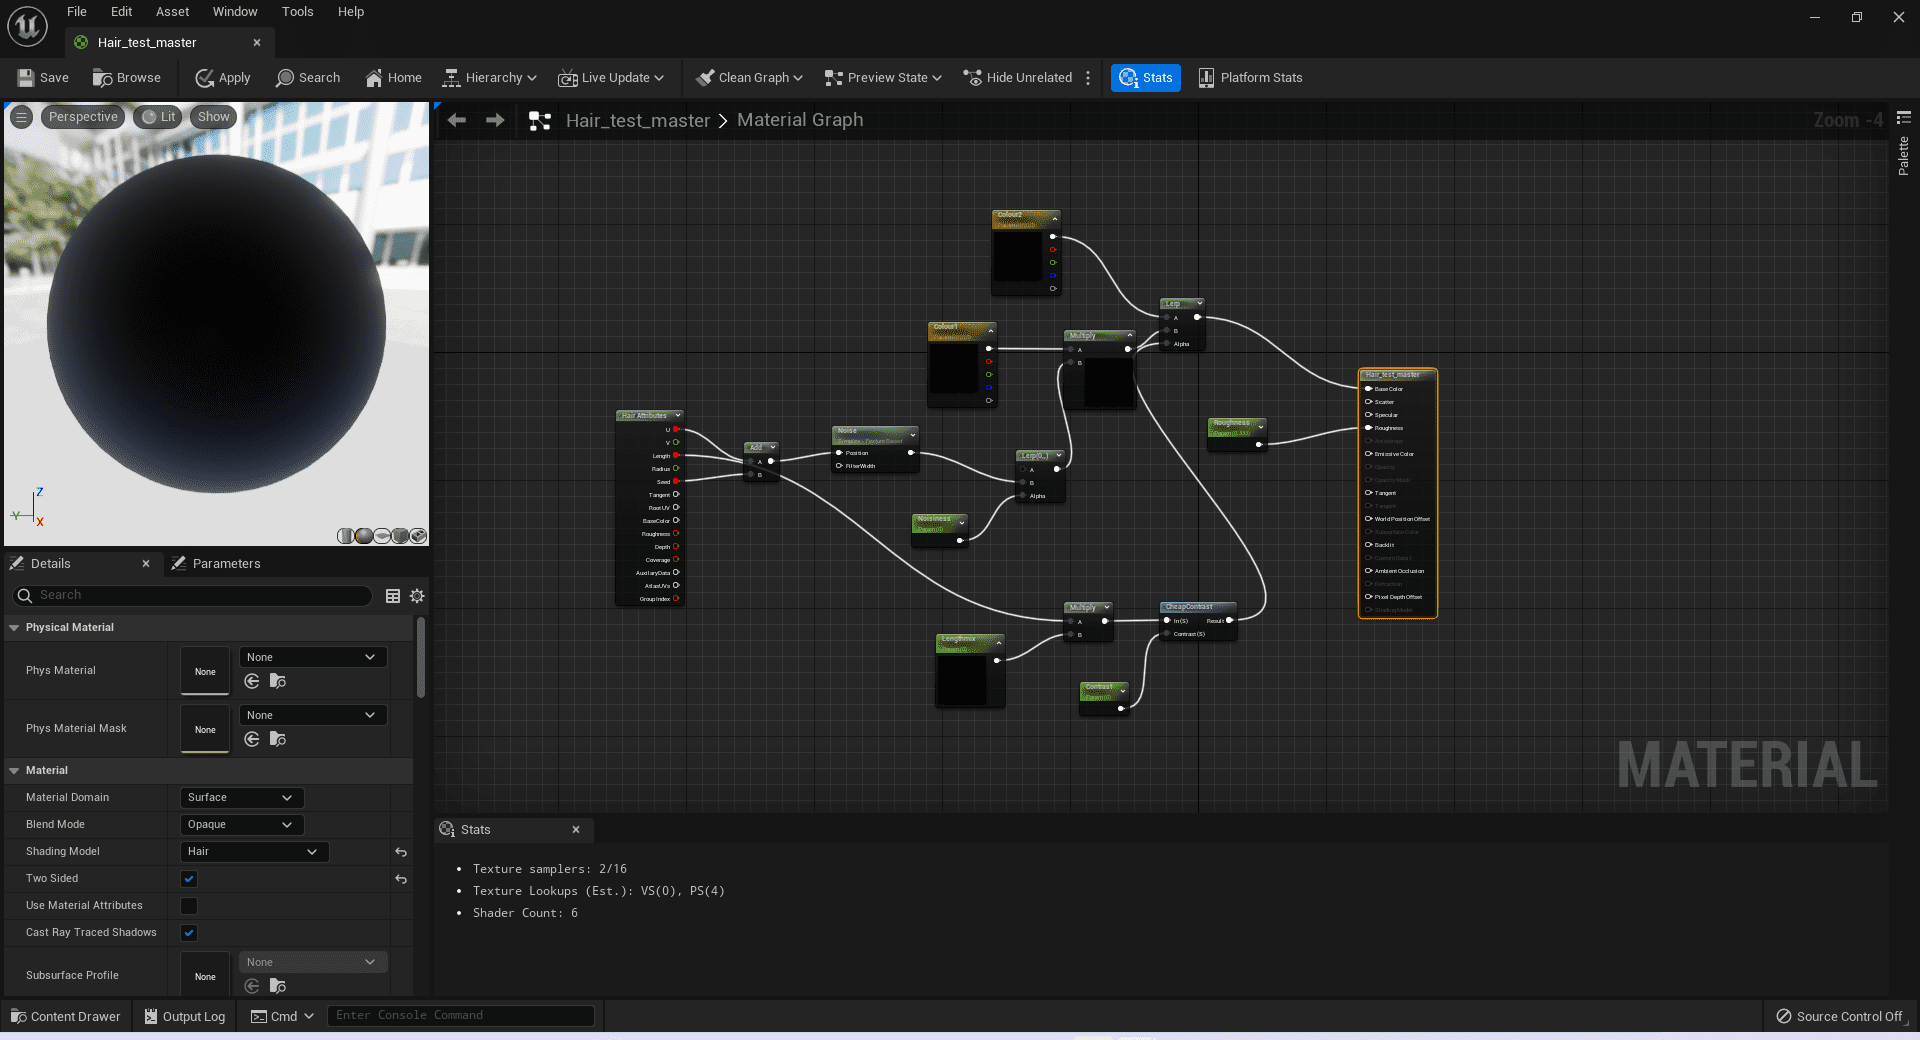
I created the alembic hair master material following tutorials. This shader uses linear interpolation to change the hair pigment along the length of the hair (root is a different colour than the tip).
Hair Master Material Shader
For the skin and eye shaders I utilised Epic’s Meet Mike shaders with my texture and baked maps plugged into place.
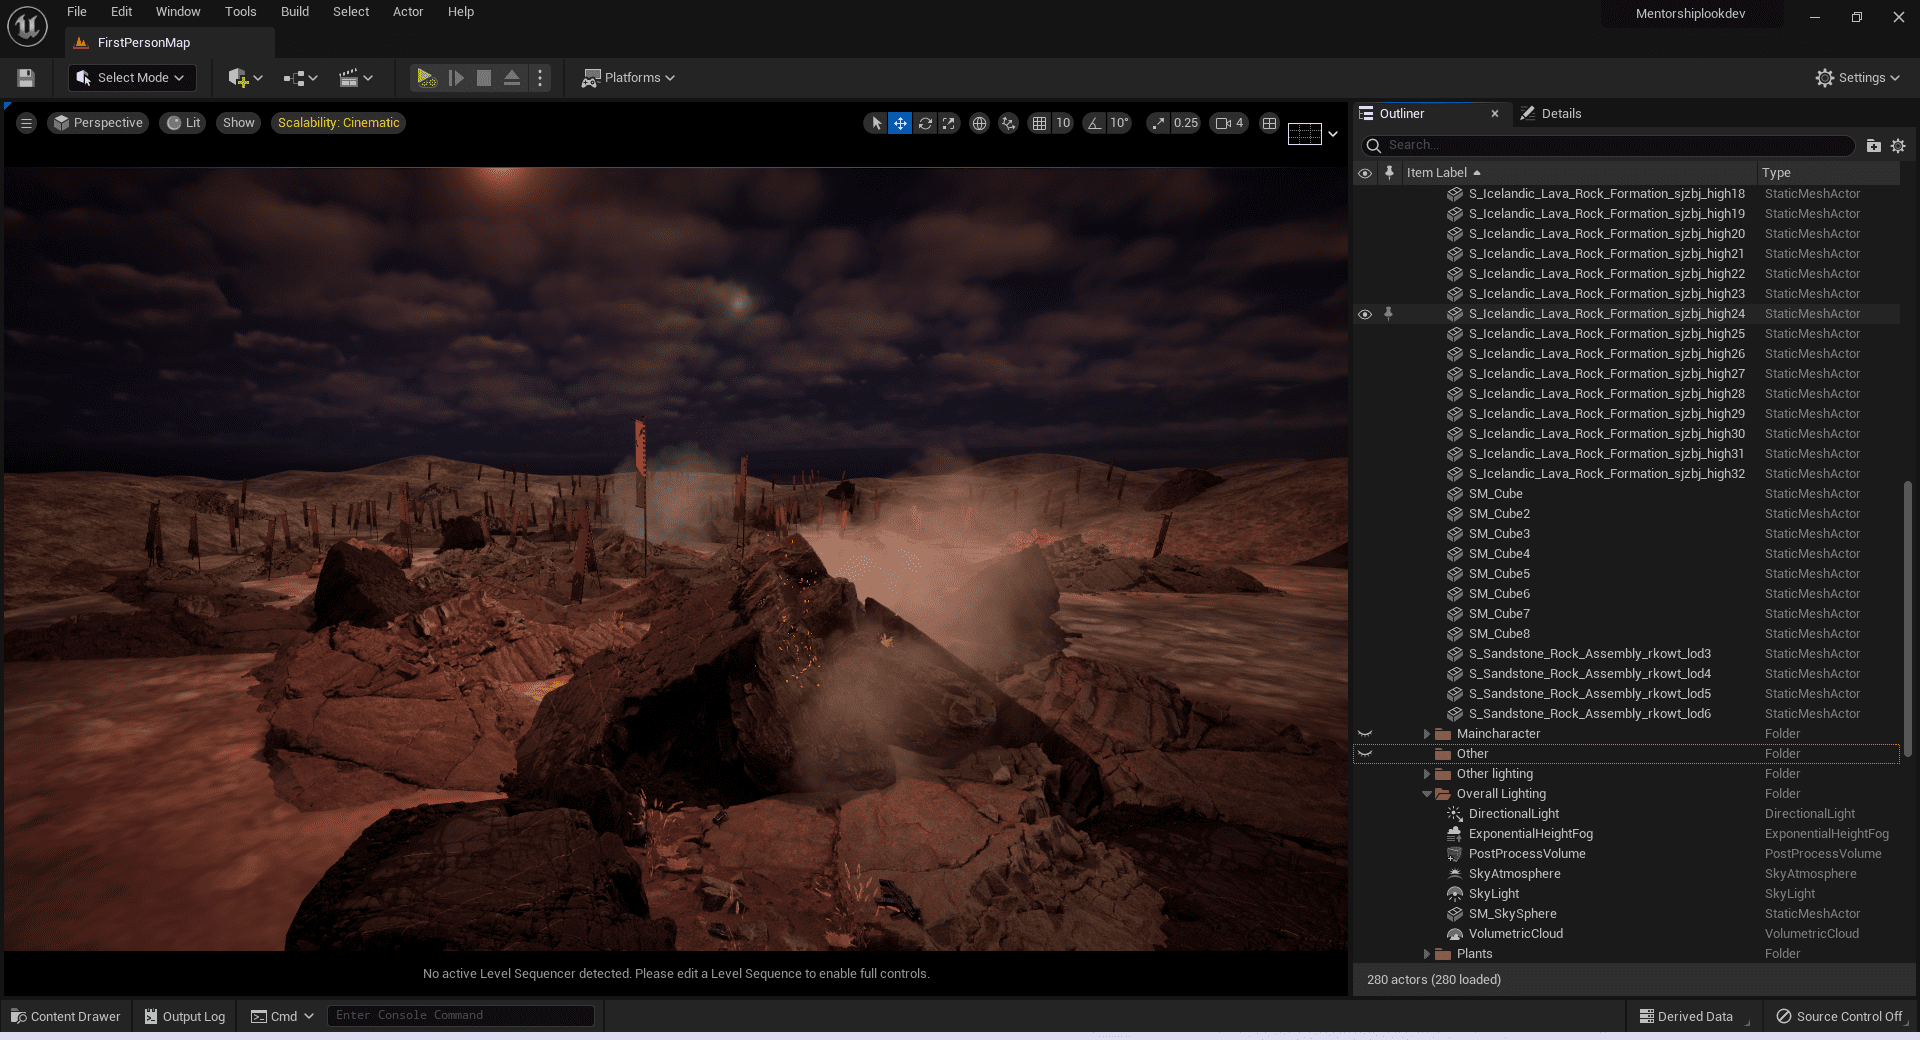
Environment Setup
Using a skylight and directional light setup using Lumen, I started with a basic environment and sculpted the contours and background terrain. Utilising Megascans, I imported rocks and foliage and placed them to match the overall layout and spirit of the concept.
Environmental Setup
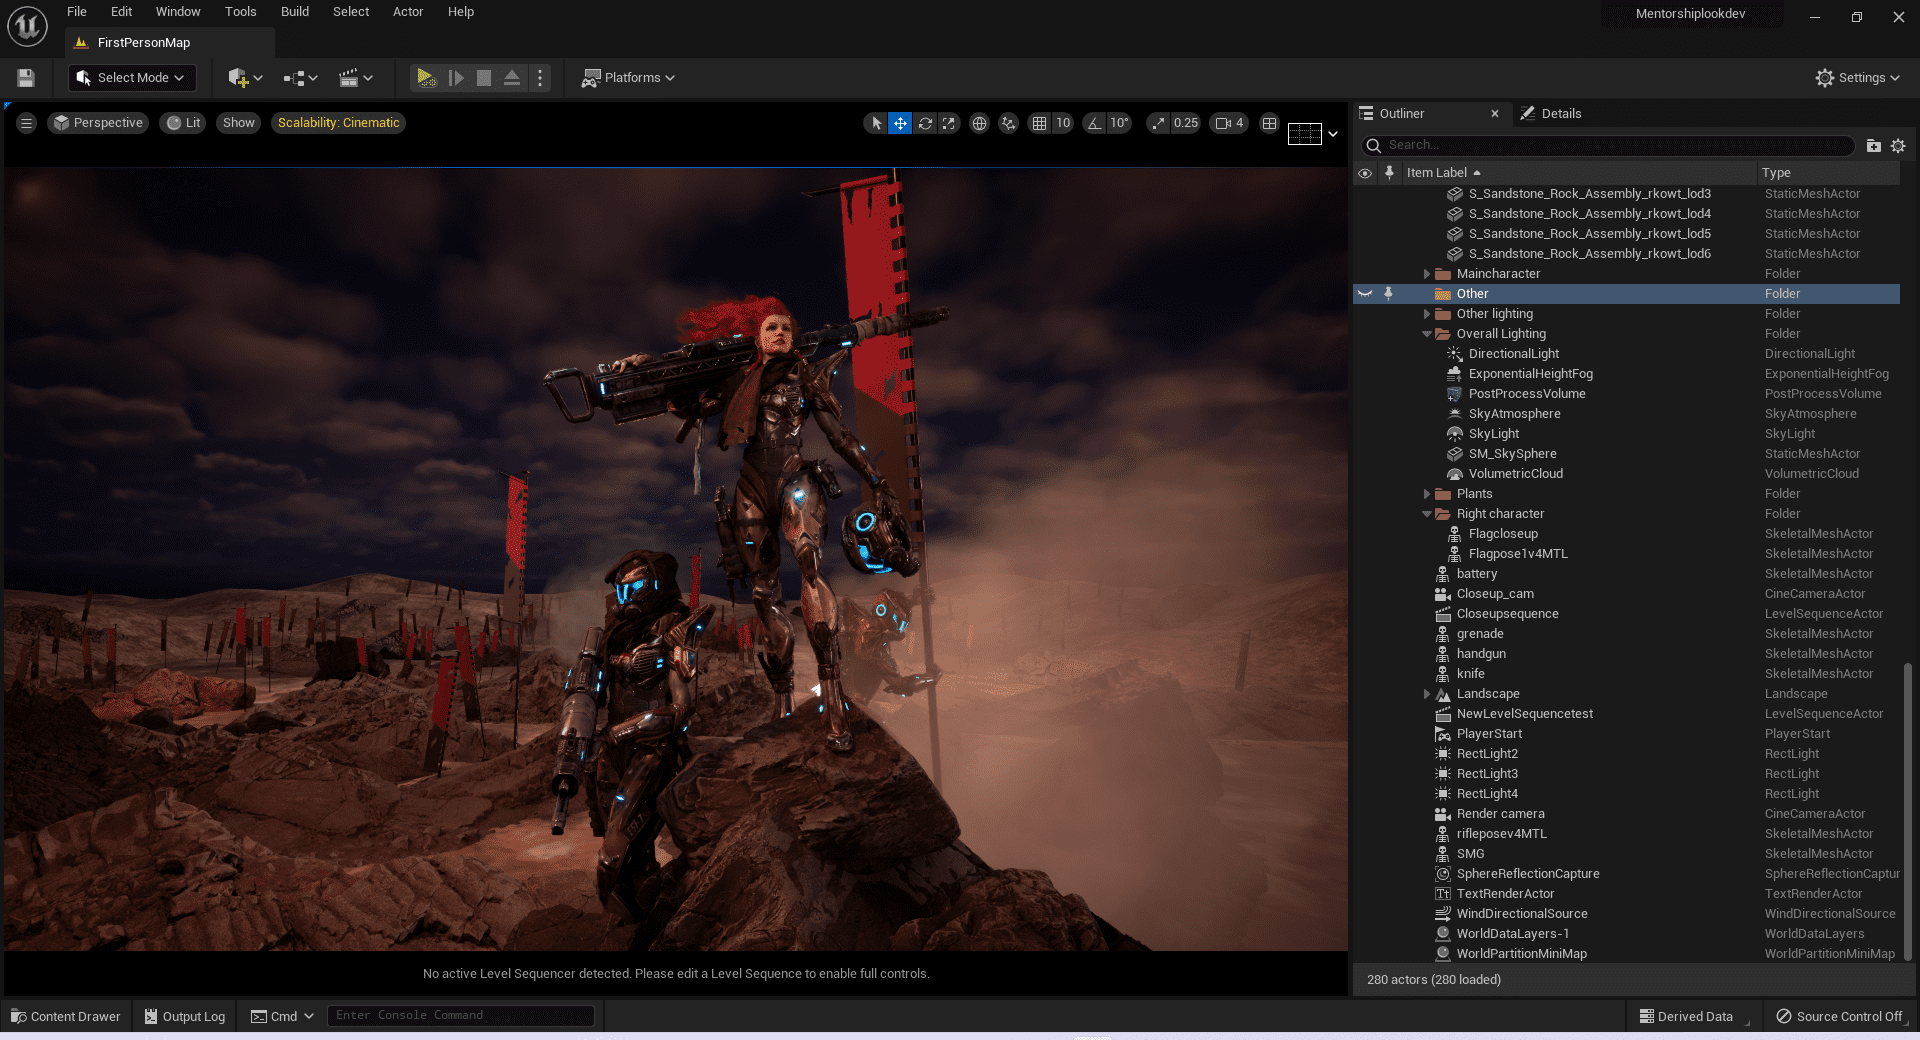
I imported the posed meshes and positioned as per the concept, with some liberties taken for my interpretation. Particle effects such as the embers and dust/smoke were added for the overall ambience and feeling of a recent battle.
Adding Characters to the Environment
Animation
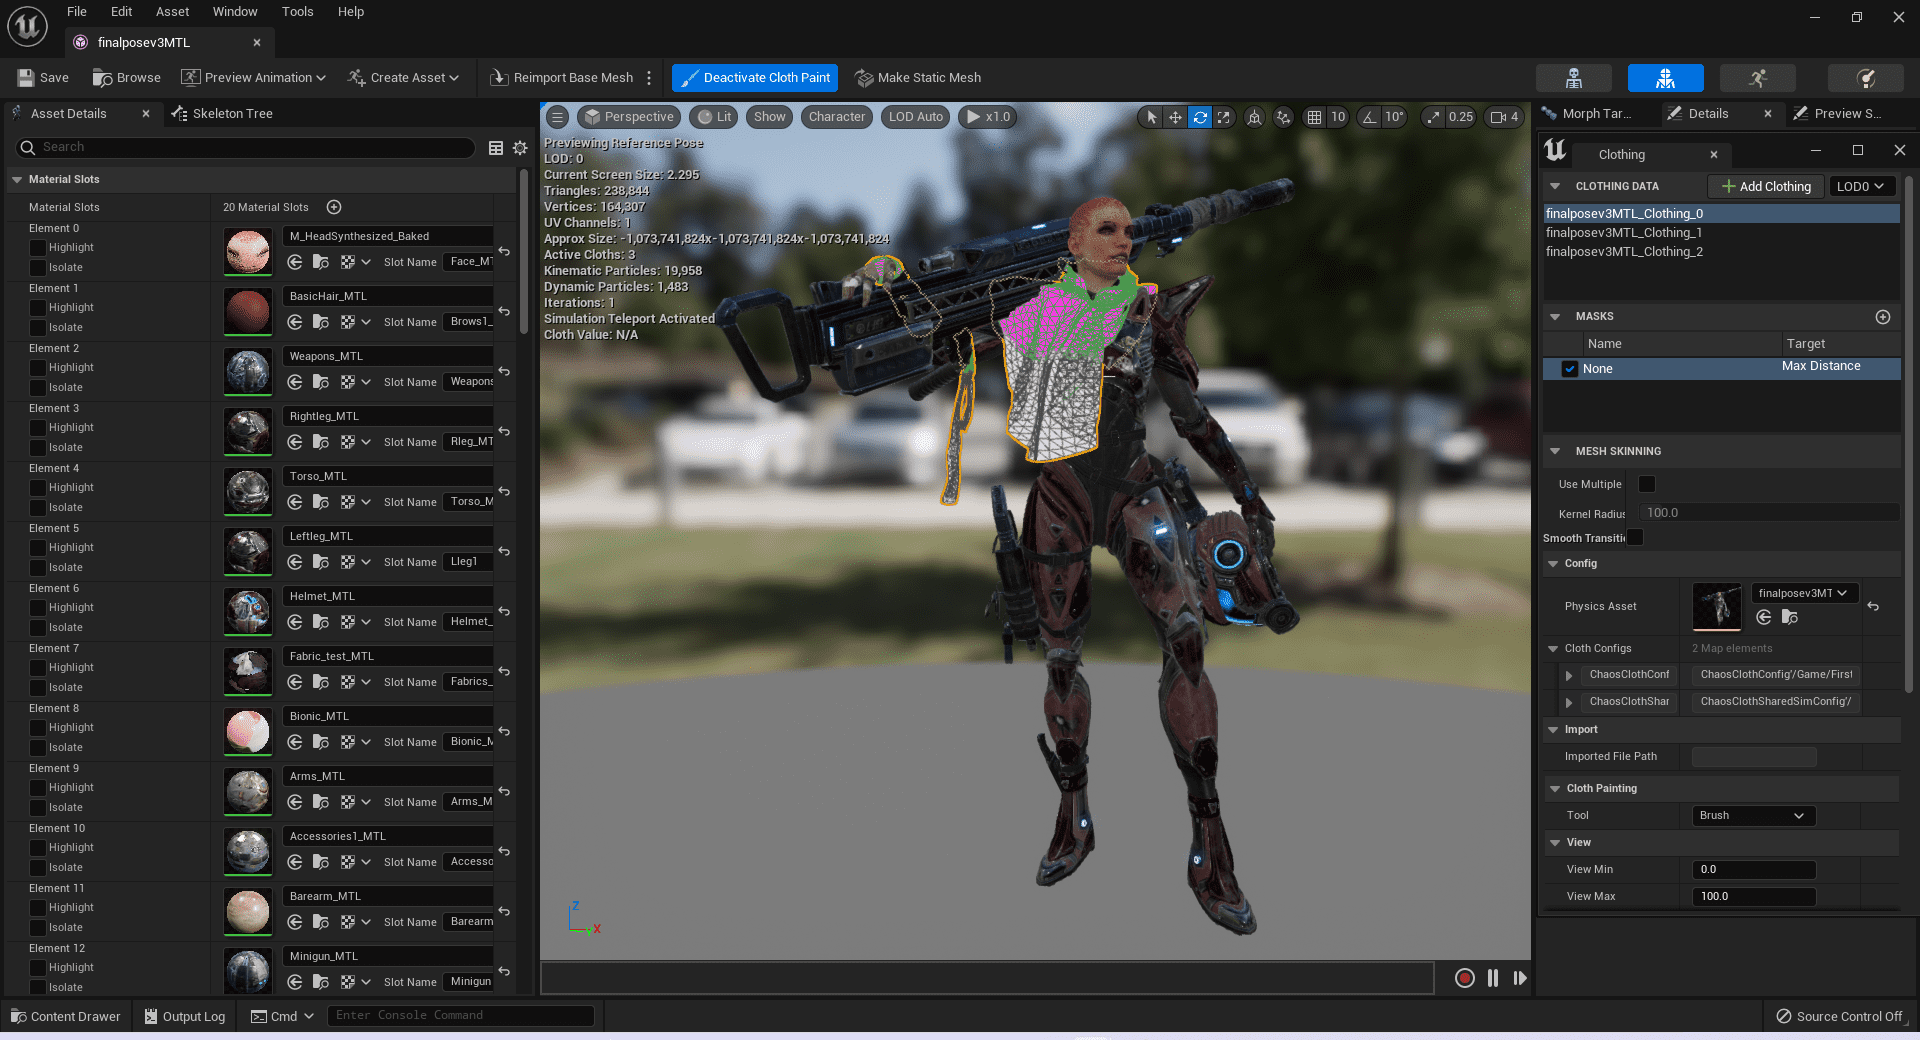
For the animated sequence, cloth dynamics played a very key role. I created Cloth data with vertex painting for the flag static mesh and I added a wind directional source to create the billowing animation. Similarly, the cloak, arm wrap and the loose straps all have their own cloth data added allowing for motion created by the wind vector.
Cloak Cloth Data with Vertex Paint
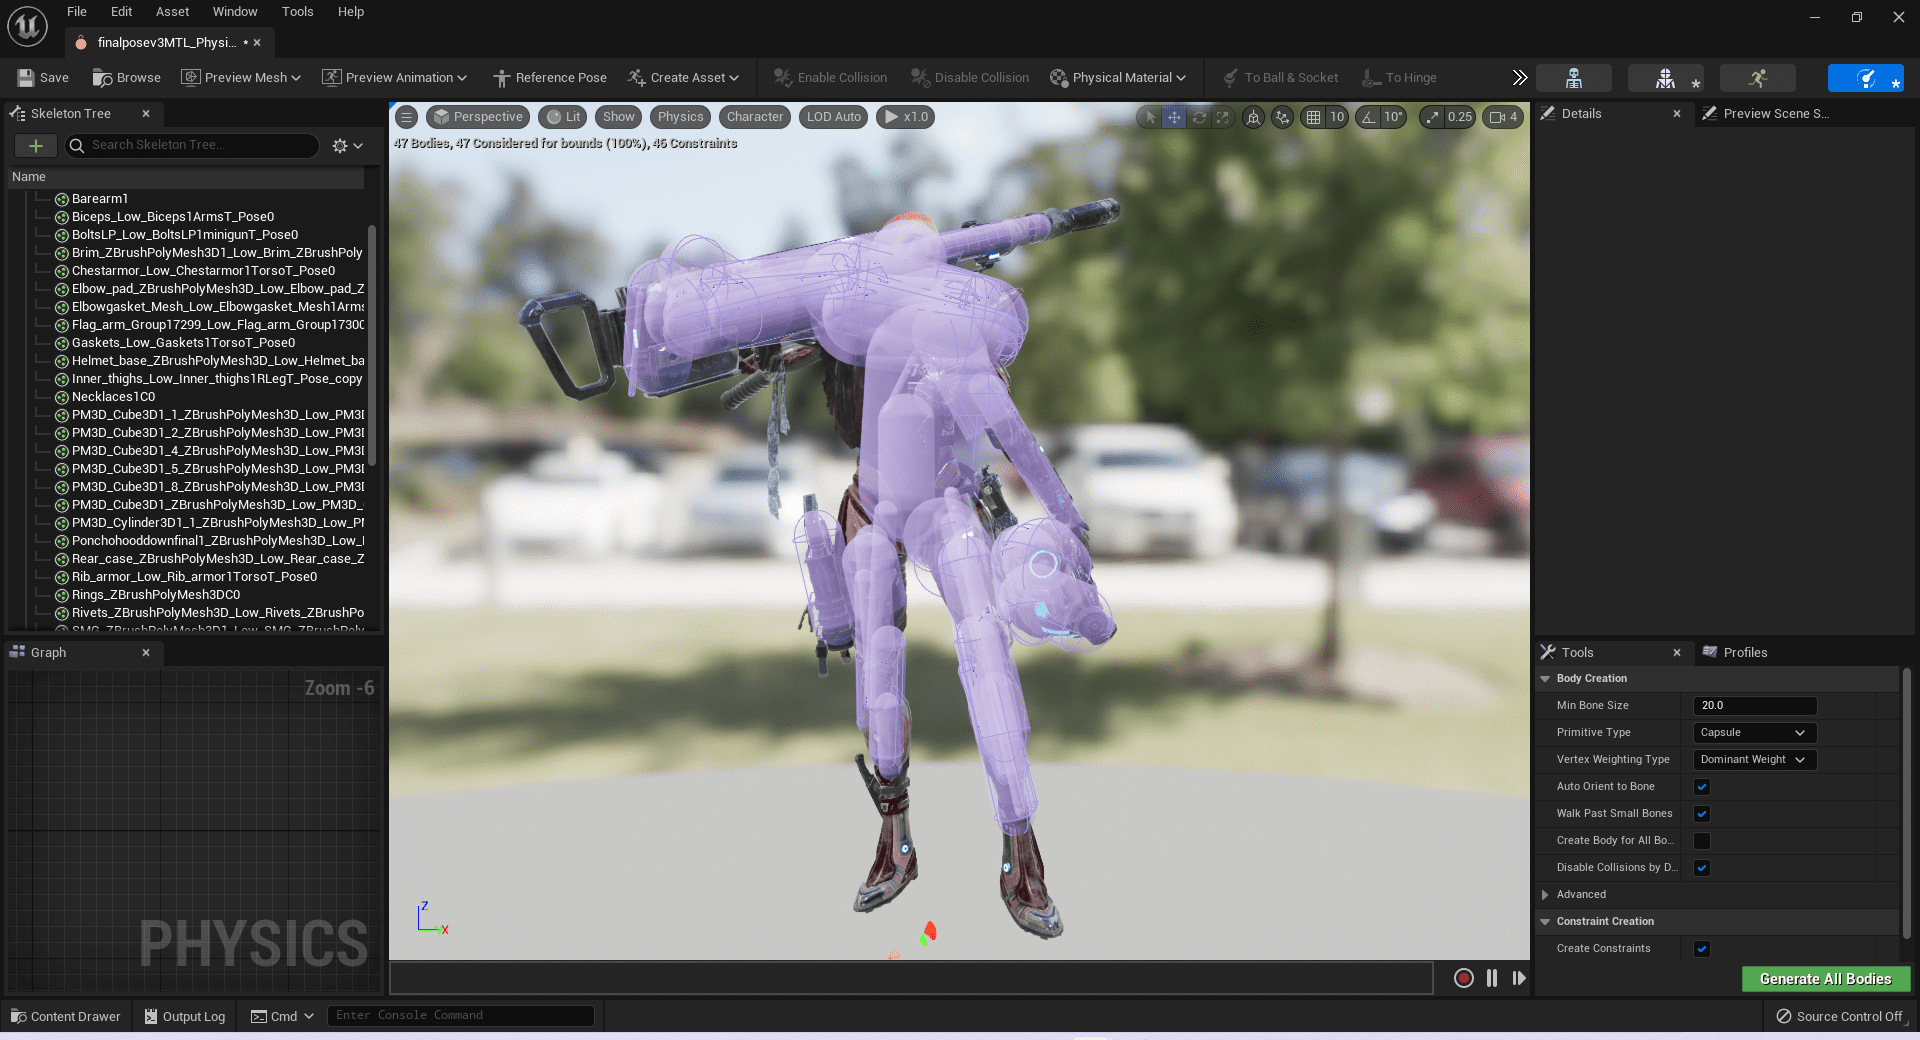
For this billowing motion to look natural, the physics model on the flag and her mesh needed to be setup correctly. The default physics model required tweaking to ensure that the volumes were not expanded beyond the silhouette of the model. This would affect the animation in adverse ways causing it to pop out or move erratically.
Physics Model AKA Staypuff Marshmallow Woman
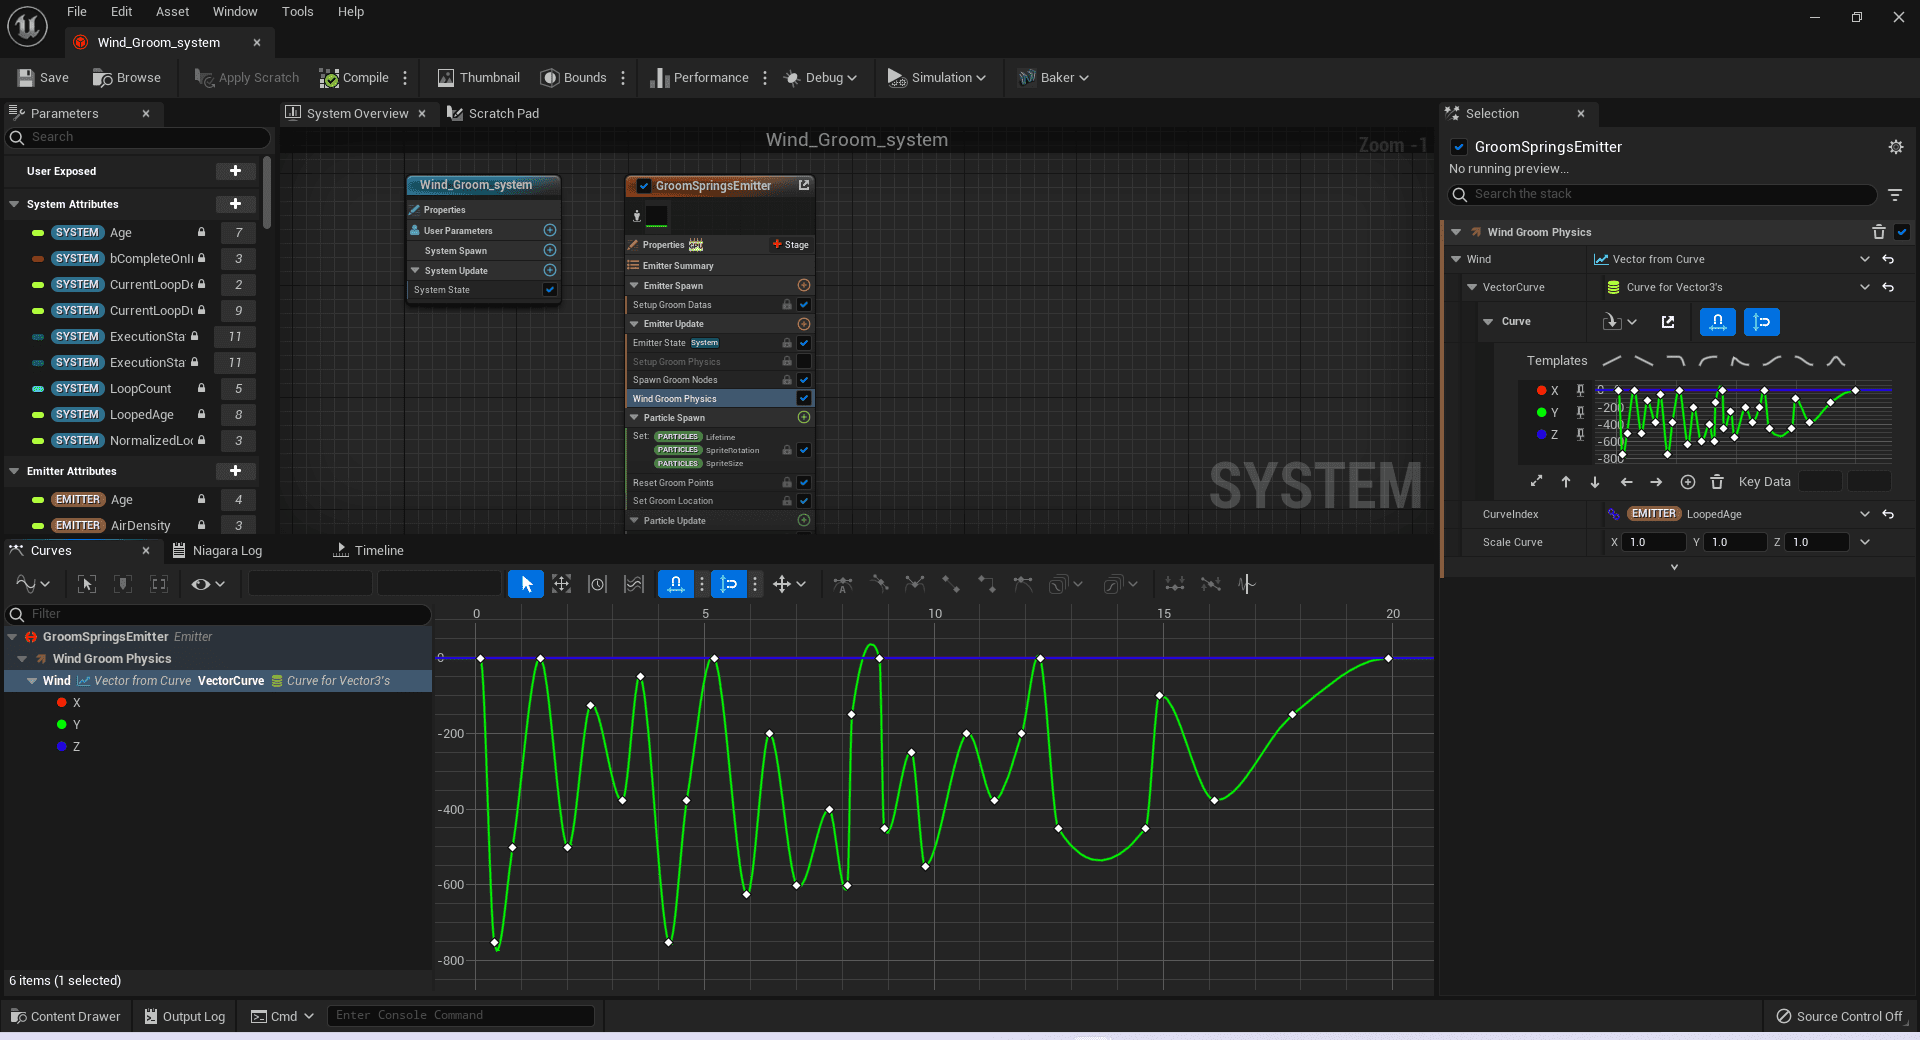
As the hair was alembic, cloth physics was not applicable for animation. Therefore, I had to create a custom physics solver to mimic the motion of hair blowing in the wind. This was created using a groom spring emitter as the base. I created a vector from curve graph where I set the magnitude and frequency in a direction to create the movement. This required some trial and error to ensure that the hair motion matched the overall wind direction and force in the environment.
Custom Hair Physics
Exporting and Comping
Within UE5 I created a cinematic camera and level sequence that laid out the camera path and any other important keyframes for the animation.
The movie render queue window was key in rendering clear images. My settings included a PNG export with anti-aliasing and motion blur was set in the post process volume. Without this blur, the cloth physics looked jittering in the final video. I used the render remote command instead of rendering local lead as it lead to less GPU crashes. As my scene became more complex this became problematic
Movie Render Queue and Level Sequence with Key Frames
I utilised Blender to comp together the images, text overlays and music into the final render reel.
Comping the Final Video
The final introduction video is below:
Legion Introduction
The same process was used for the turntable renders, albeit without the environmental effects.
For the walking, kung-fu, and fabulous dance animations, I utilised Mixamo. The process is quite straight-forward, requiring an upload of the T-pose character with some initial setup for the rig. Once the setup is complete, the chosen animations can be downloaded and imported into UE5. The animation sequences for the character were rendered in a similar fashion using the movie render queue.
Review and Lessons Learned
Thanks for sticking around until the end! The two most important aspects to completing this piece on time were:
Creating a schedule with sticking with it; and
Regular feedback acted upon quickly.
I can’t stress those two points enough!
I was able to keep to the schedule and adjust accordingly where needed, especially in the final stretch. The overall project took approximately 578 hours or roughly 34 hours a week. Looking back on it, a significant portion of this time was spent on research and studying solutions for the animation and look dev side of the project, which was a fun experiment and I am happy with the results! The next time I would schedule a similar character and scene, I would take into account the newly gained knowledge. This would allow a more accurate schedule and set correct expectations on my next project.
I hope you enjoyed reading about my workflow on Legion and thank you for taking the time to check it out!