Artist Journey: Making My First CGI Character
Think Tank Training Centre student, Thrace Kelsick, embarks on his first CGI character and imparts some valuable tips along the way.
Think Tank Training Centre student, Thrace Kelsick, embarks on his first CGI character and imparts some valuable tips along the way.

During his third term at Think Tank Training Centre Online, Thrace Kelsick finished his first CG character. The timeline was 14 weeks, and he was responsible for all aspects, with the once-weekly guidance of a class supervisor.
If you are looking to embark on your first 3D human character, this article is for you!
When doing a CG likeness of a human character, it is common for beginners and professionals alike to attempt a famous actor, actress, or celebrity. But this has many pitfalls, primarily for the beginner. First, while images may be plentiful on the internet, quality, closeup images will be rare. And you will not have any photo metadata.
Already having extensive experience as a 2D character artist, I approached this project full of confidence. It was sorely tried along the way!
Here I will outline the process and concepts behind my choices, as well as the many poor decisions I made, and I hope to save others time when embarking on possibly the most difficult task in 3D: creating a photorealistic human character.
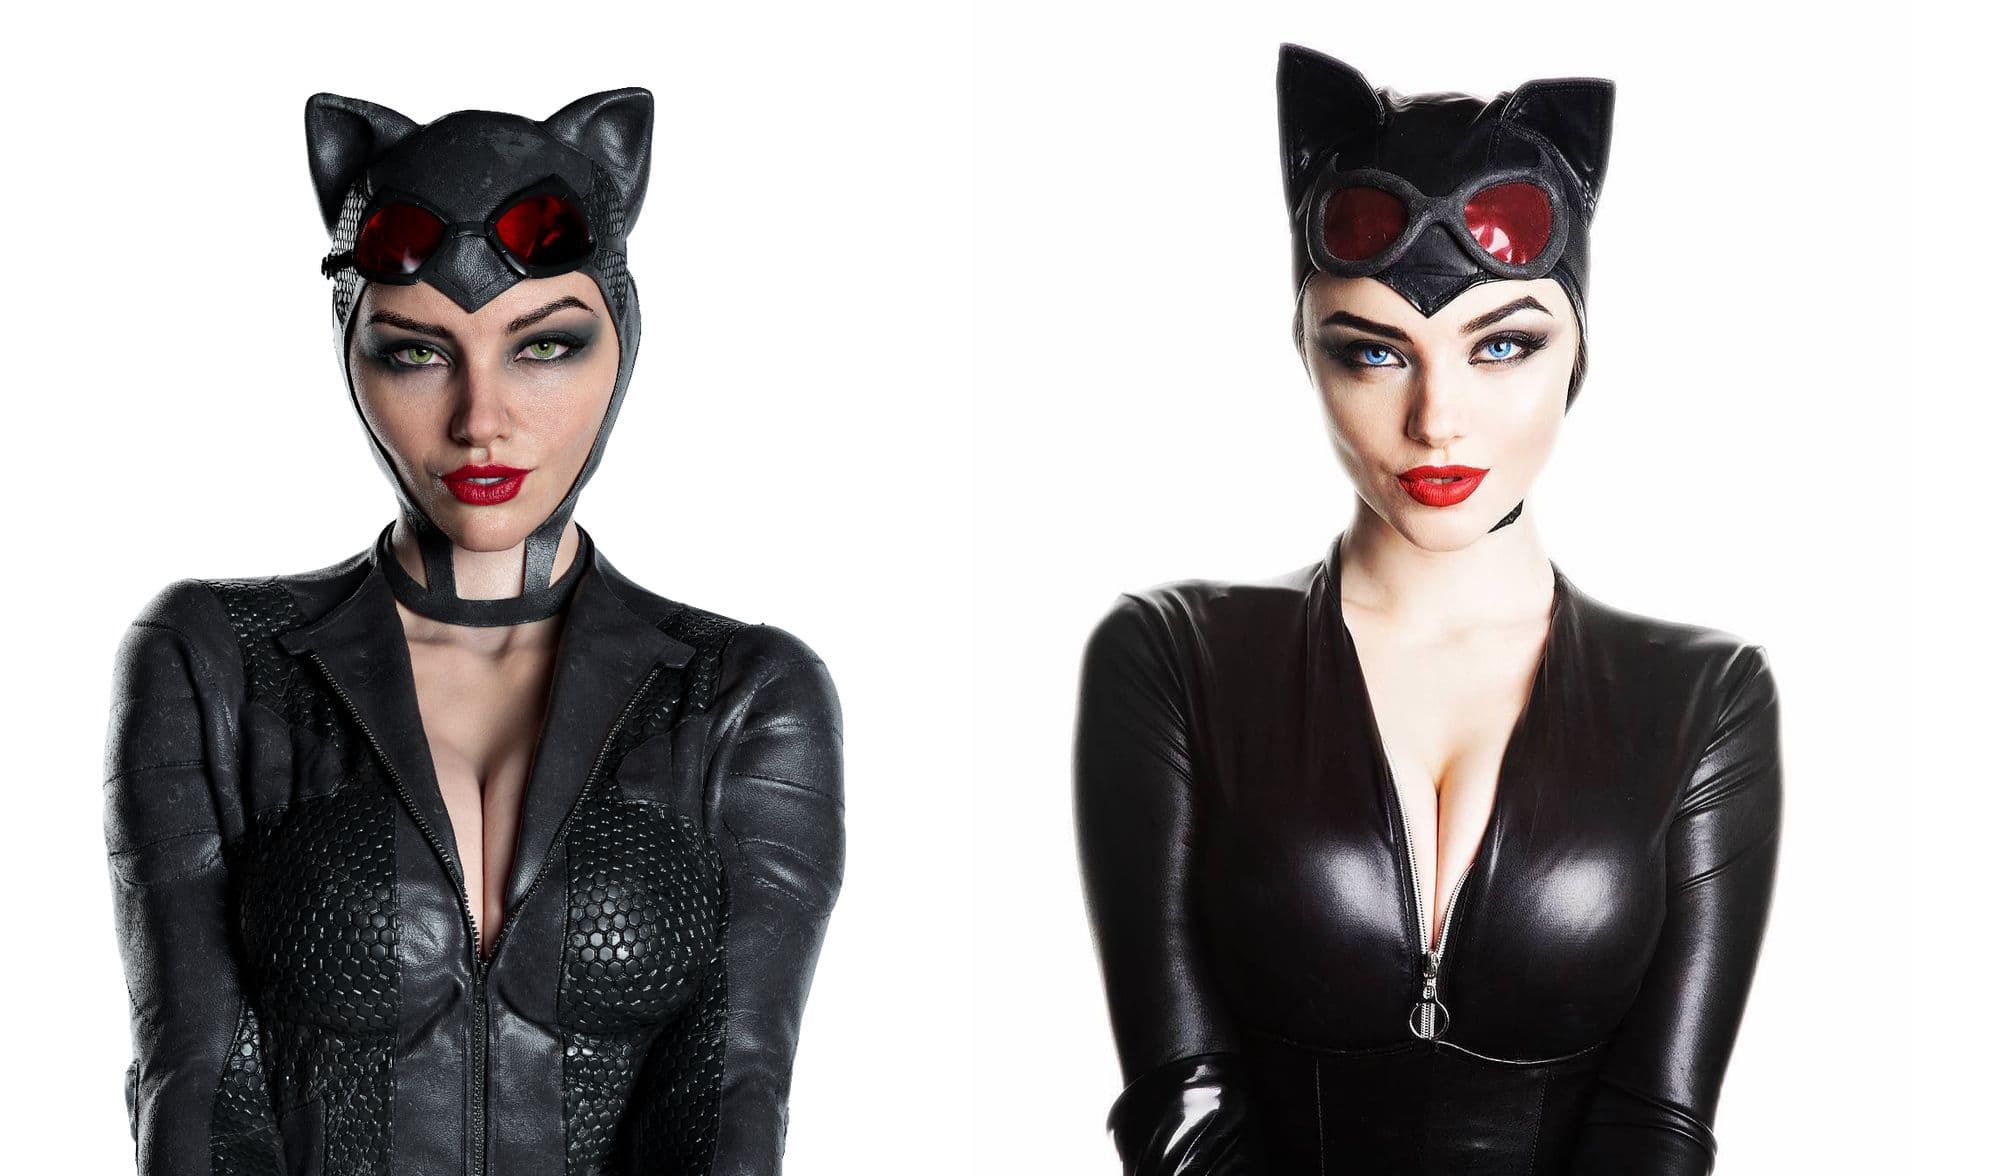
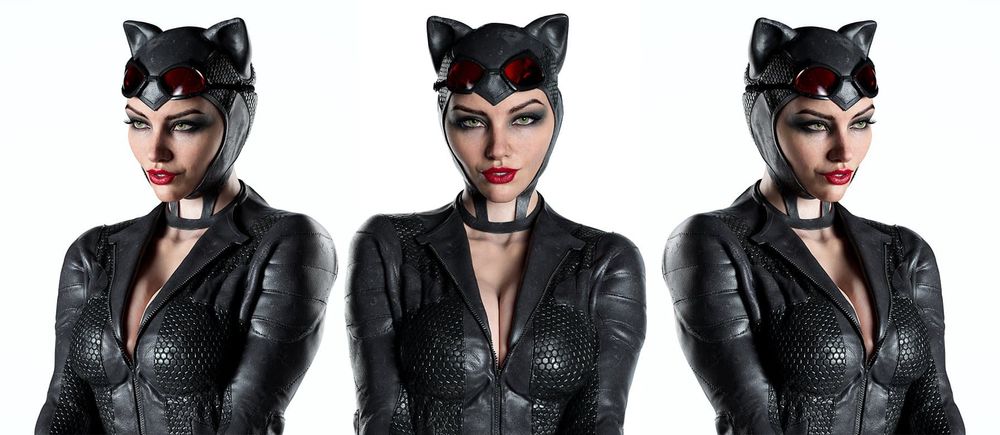
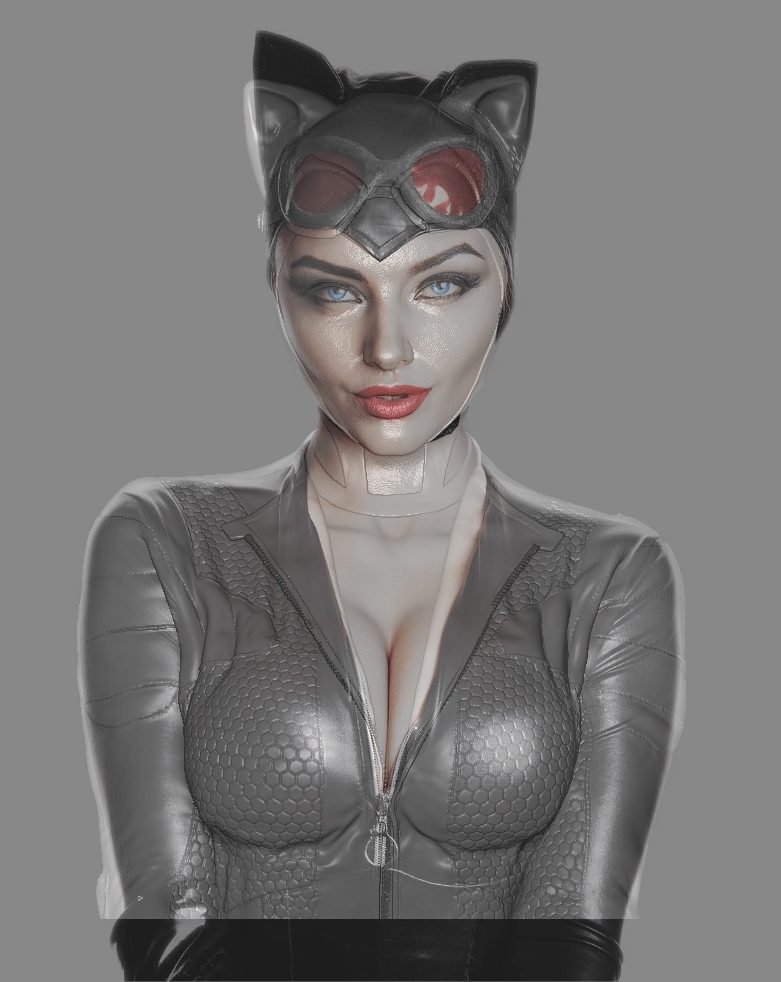
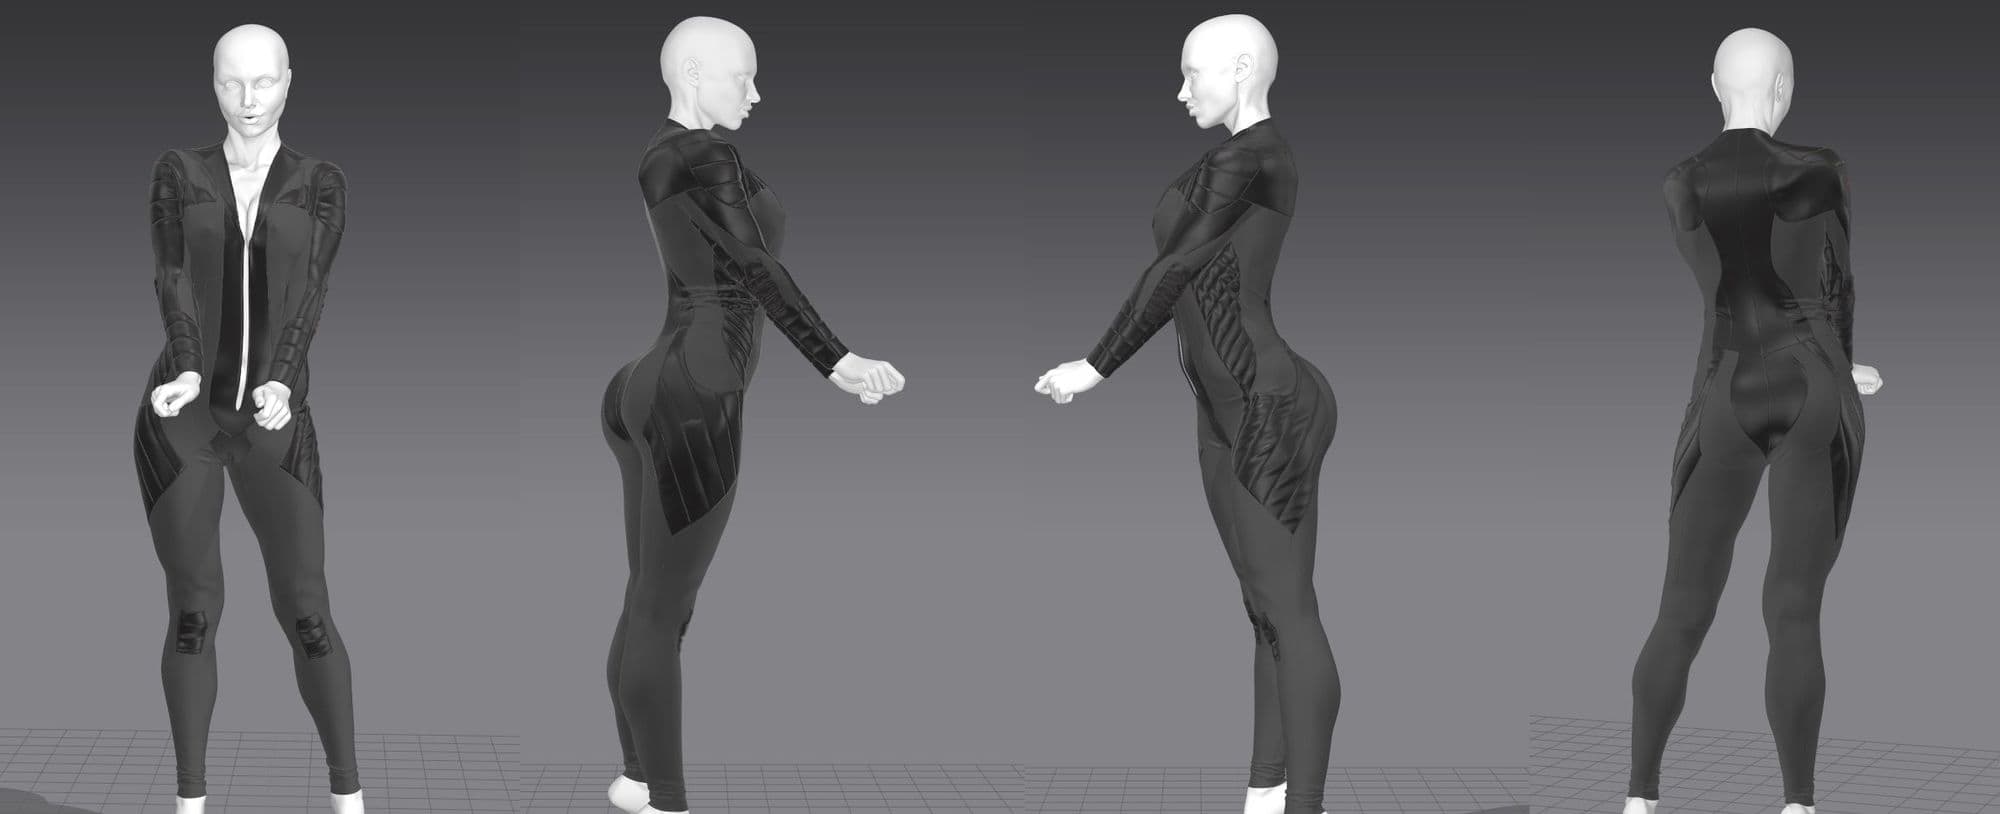
Being a lifelong comic book fan, as well as being very fond of Rocksteady Studios’ Batman: Arkham Knight, I chose to attempt a film quality version of their Catwoman. I wanted a real-life reference to draw from however, so I found a cosplayer who had the look I was after. I chose to attempt her likeness as well, though that was certainly optional.
The mistake made in choosing this model was that only low resolution images on Instagram were available, and those were heavily processed and filtered.
Feminine characters also present an extra challenge, as normally your references will be wearing heavy makeup, which makes some features hard to nail down.
With that covered, let’s move on to the linear breakdown.
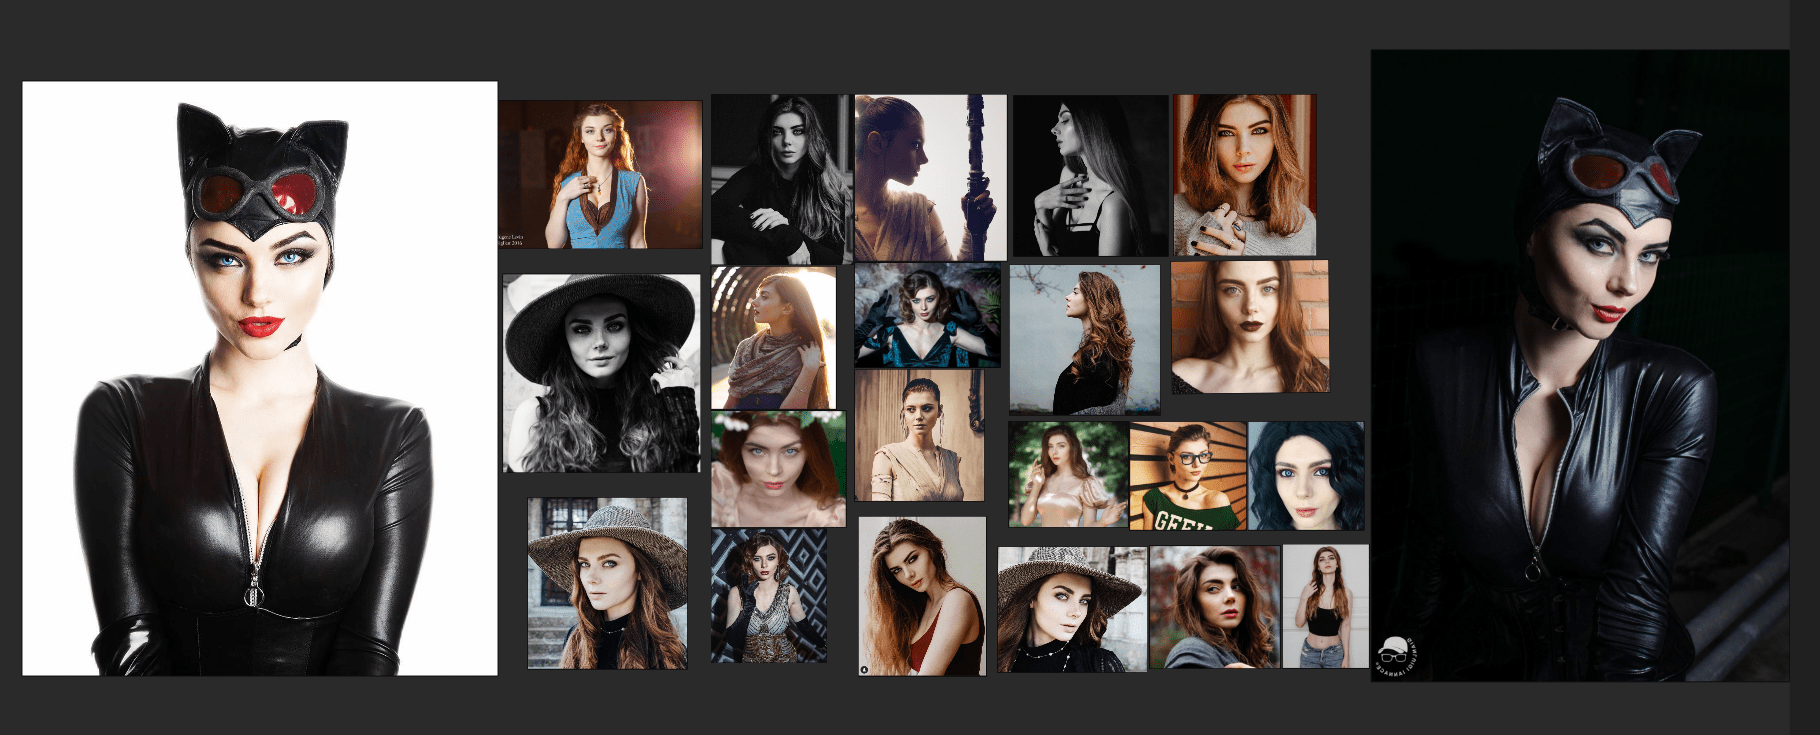
1. Pick a model. Doesn’t need to be a celebrity, on the contrary it’s better to find a professional photo pack from a vendor on ArtStation or similar, with a consistent subject in controlled lighting, shot at the same time, from many different angles. Usually post processing on these is minimal as well. And you will most likely have access to the camera focal length via the metadata, found in Windows if you right-click on an image and then select Properties>Details.
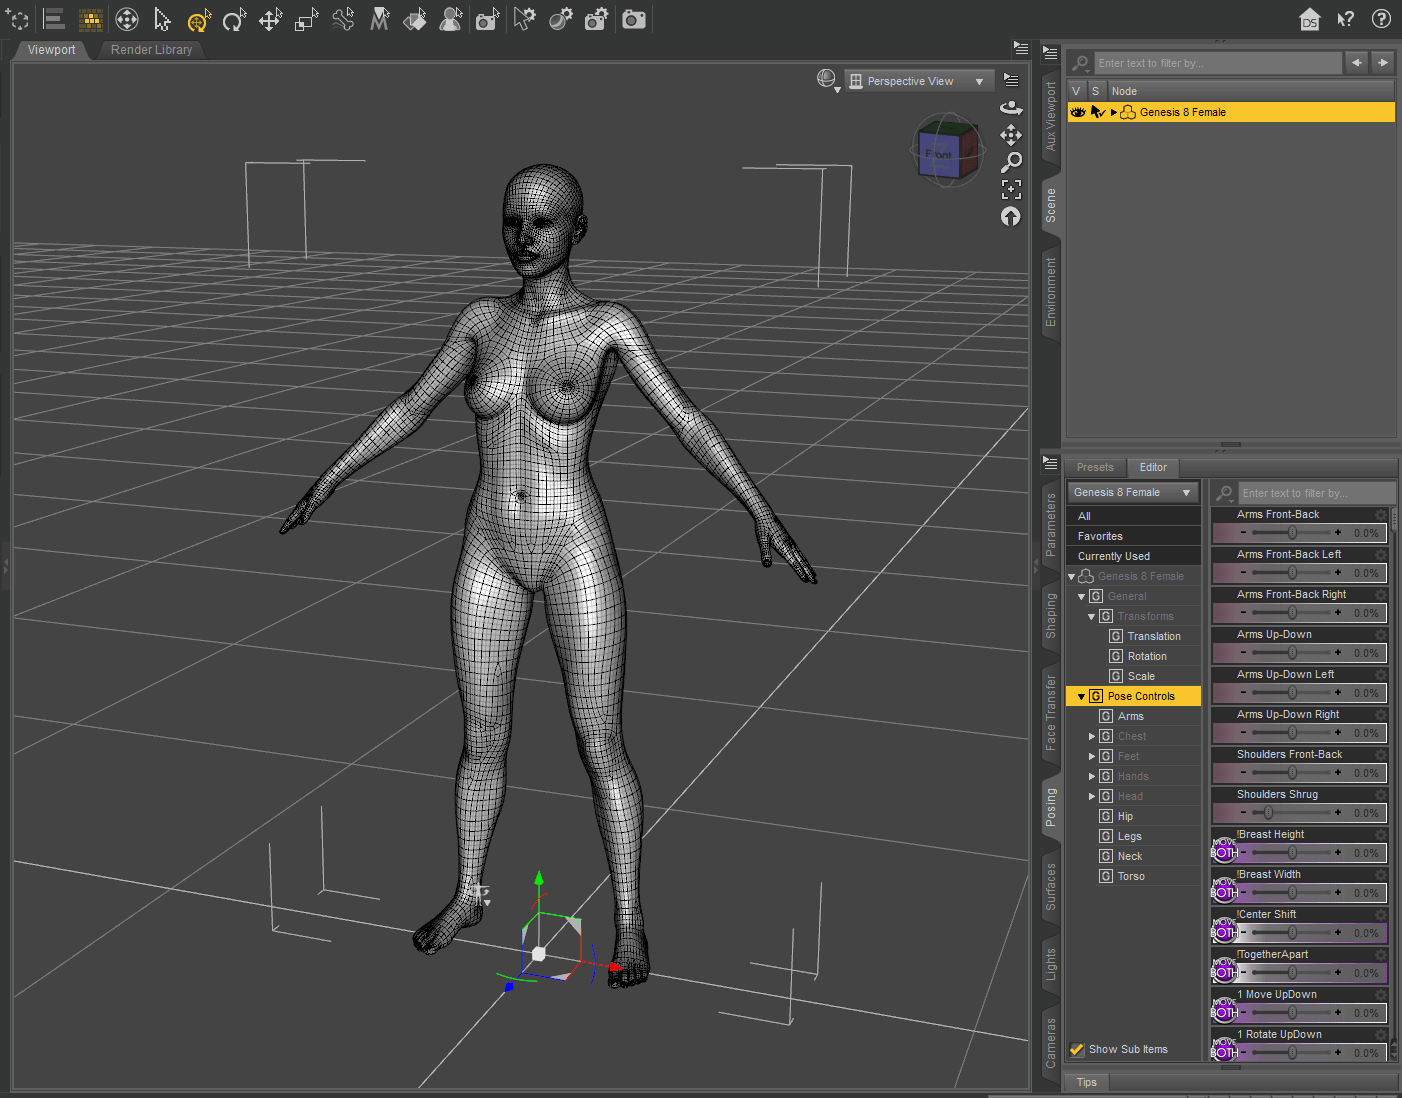
2. Determine your skin texture workflow (Texturing xyz, 3D Scan Store, or manual creation). This will help determine the base mesh you should start with. I chose to use the Genesis 8 female base from DAZ Studio to leverage the built in rig. While this made posing easier as well as a convenient Morph Target for Marvelous Designer, it caused some problems I will detail later on.
3. Gather reference. This is an obvious step, but I would take it as far as time allows. Comic book artist Alex Ross talks about the three R’s: Read, Research, and Reference.
The more you learn about the things you're making in 3D, the better decisions you will make.
I did a lot of research on zippers, night vision goggles, and leather/polyurethane materials. Be a total nerd about it!
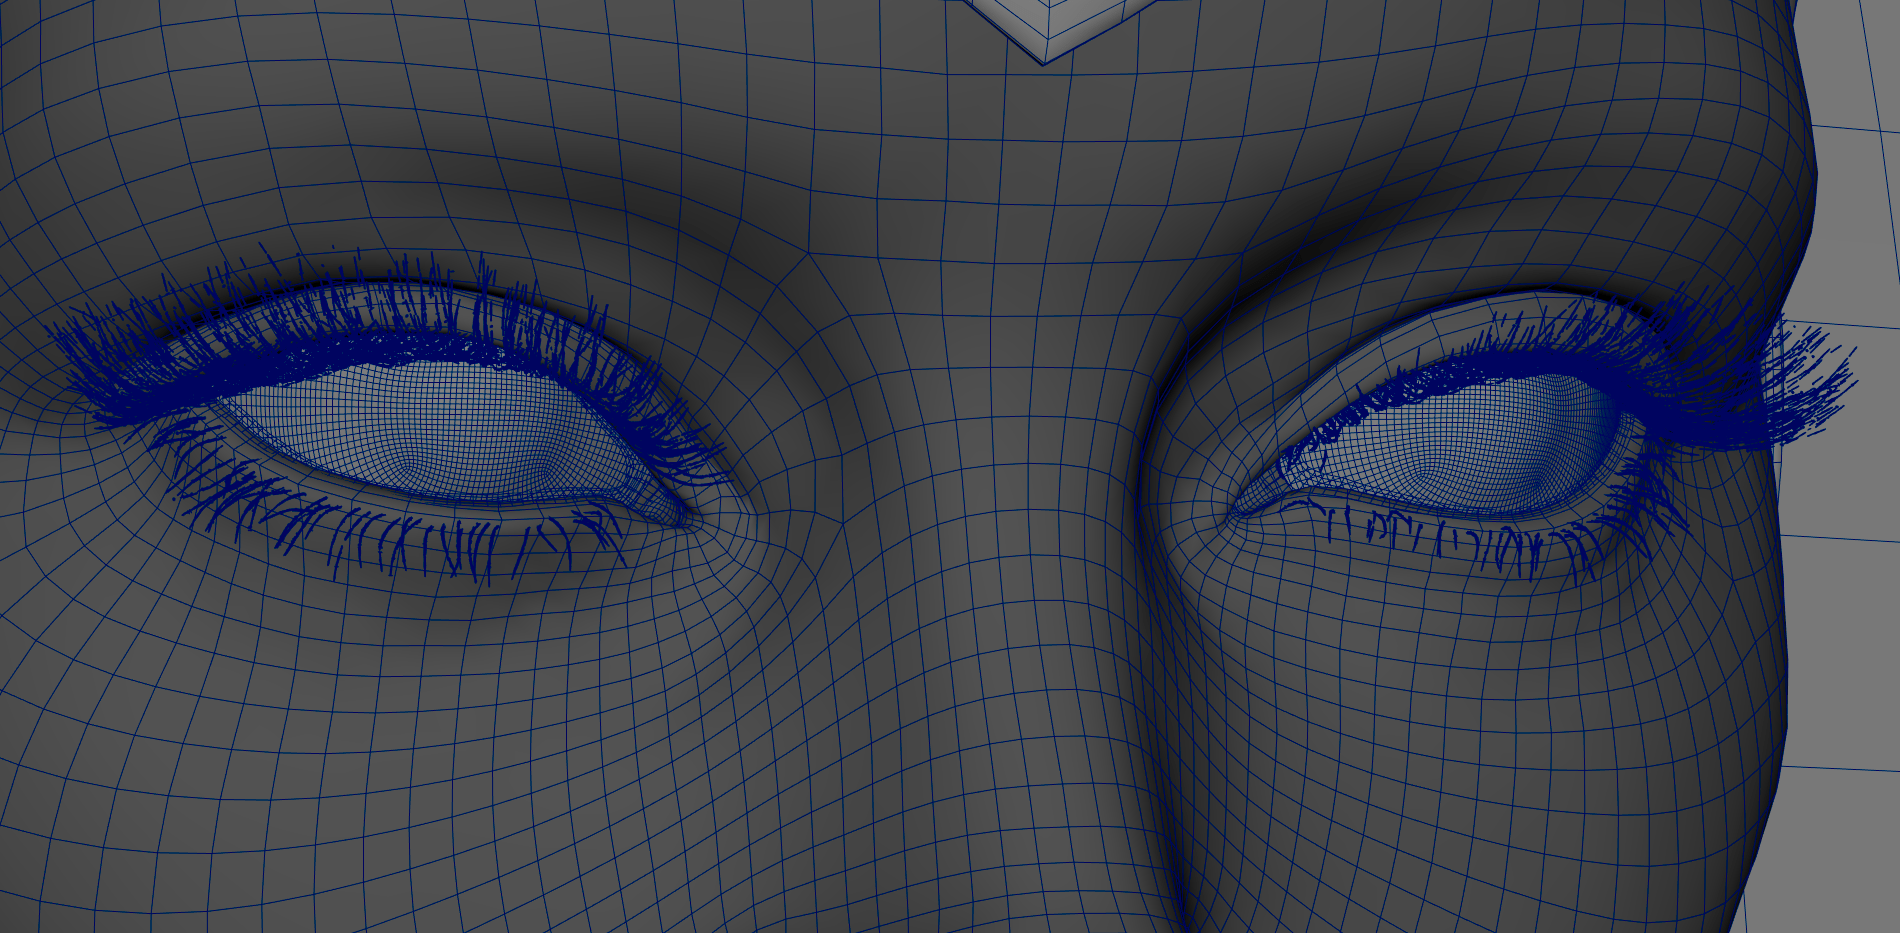
Once you have a base mesh selected, setup reference images and line up your cameras in your preferred sculpting package. Begin making large scale adjustments to get your primary shapes in place.
It is absolutely essential to stay in subdivsion 1-2 at this point, as the primary and even some secondary forms will all be established here. This was the most challenging aspect for me personally, despite having anatomy experience and years of 2D drawing experience.
There are many ways to use reference images in Zbrush. The most flexible, and my preferred, is Spotlight. Image planes in the Texture Palette, as well as the Draw Palette are options as well, and even the See-Through method.
Once you have a basic likeness, it’s important to move on. Understand that sculpting corrections will continue throughout the project, and you must be careful not to get mired in the likeness stage. Once you add things like SSS, groom, and physically accurate lighting, you will see things differently than in Zbrush. This back-and-forth can be cumbersome, but it’s all part of the process.
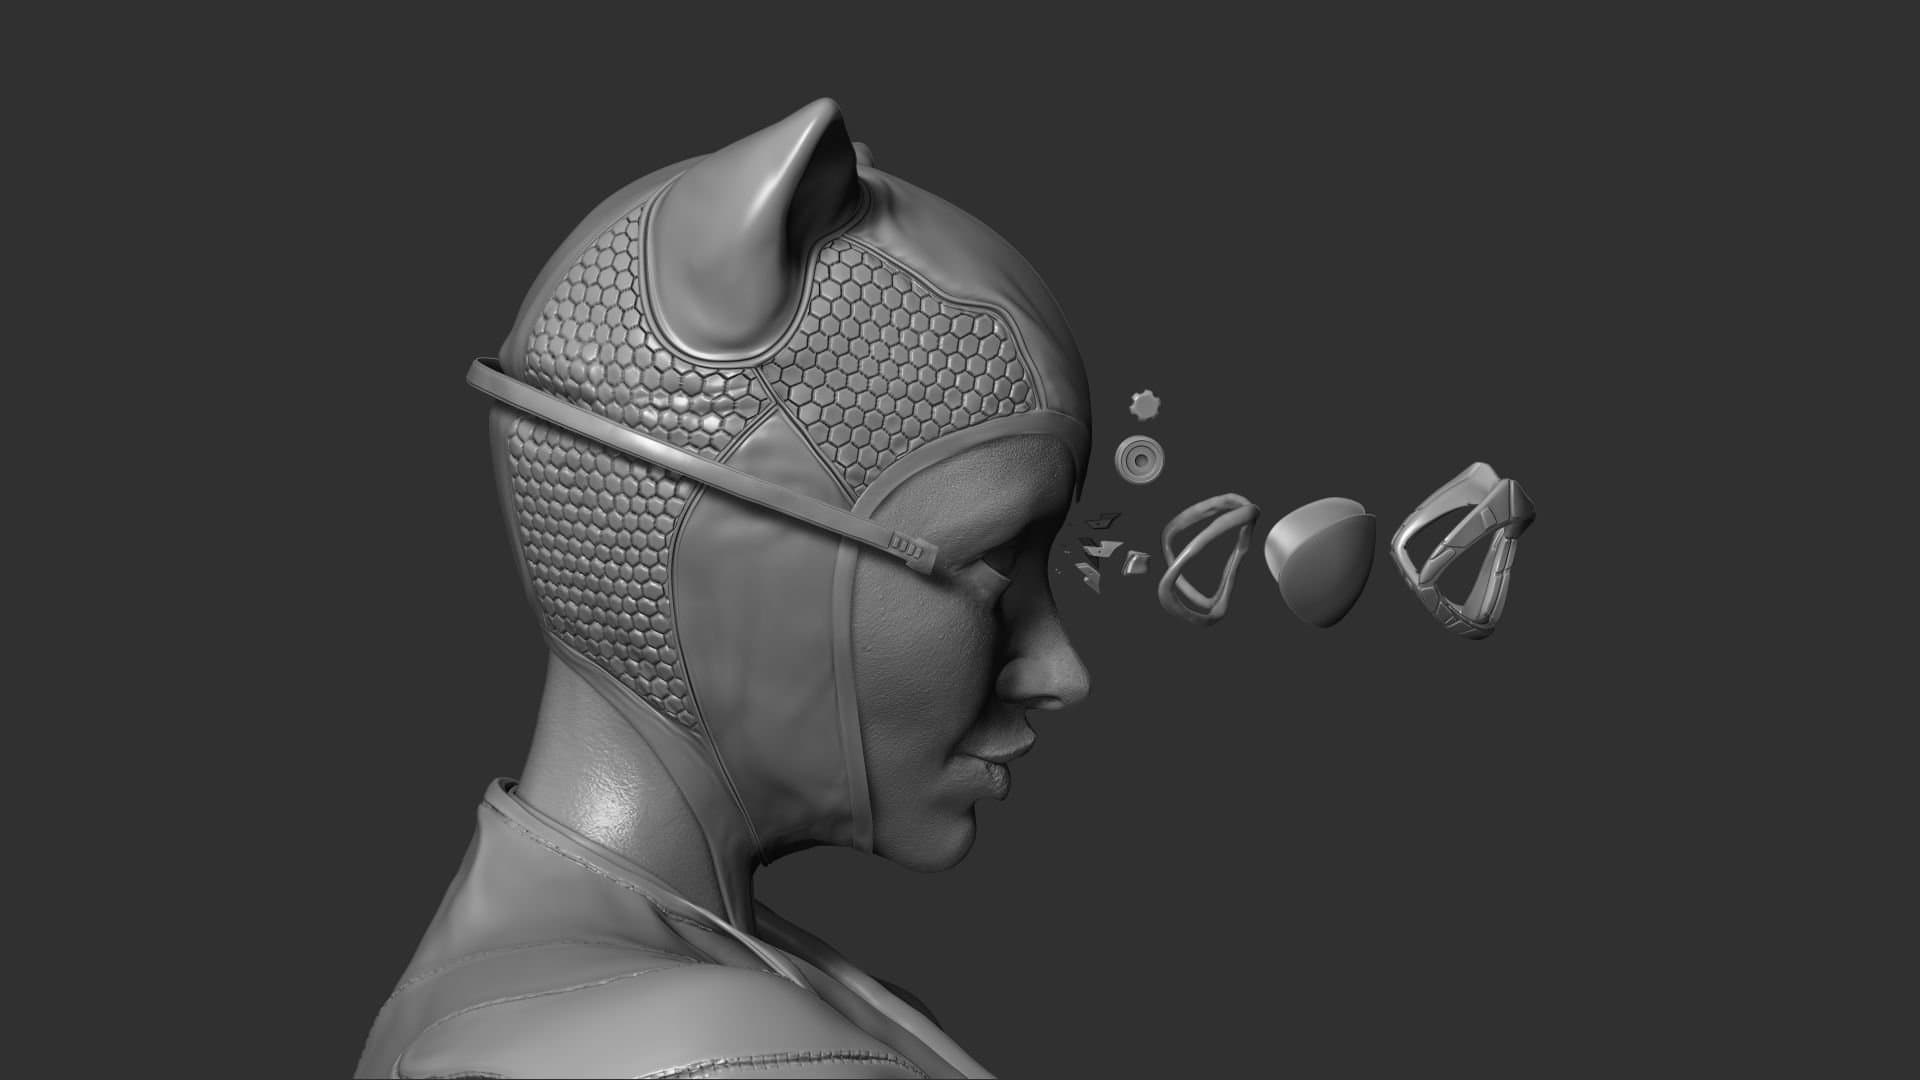
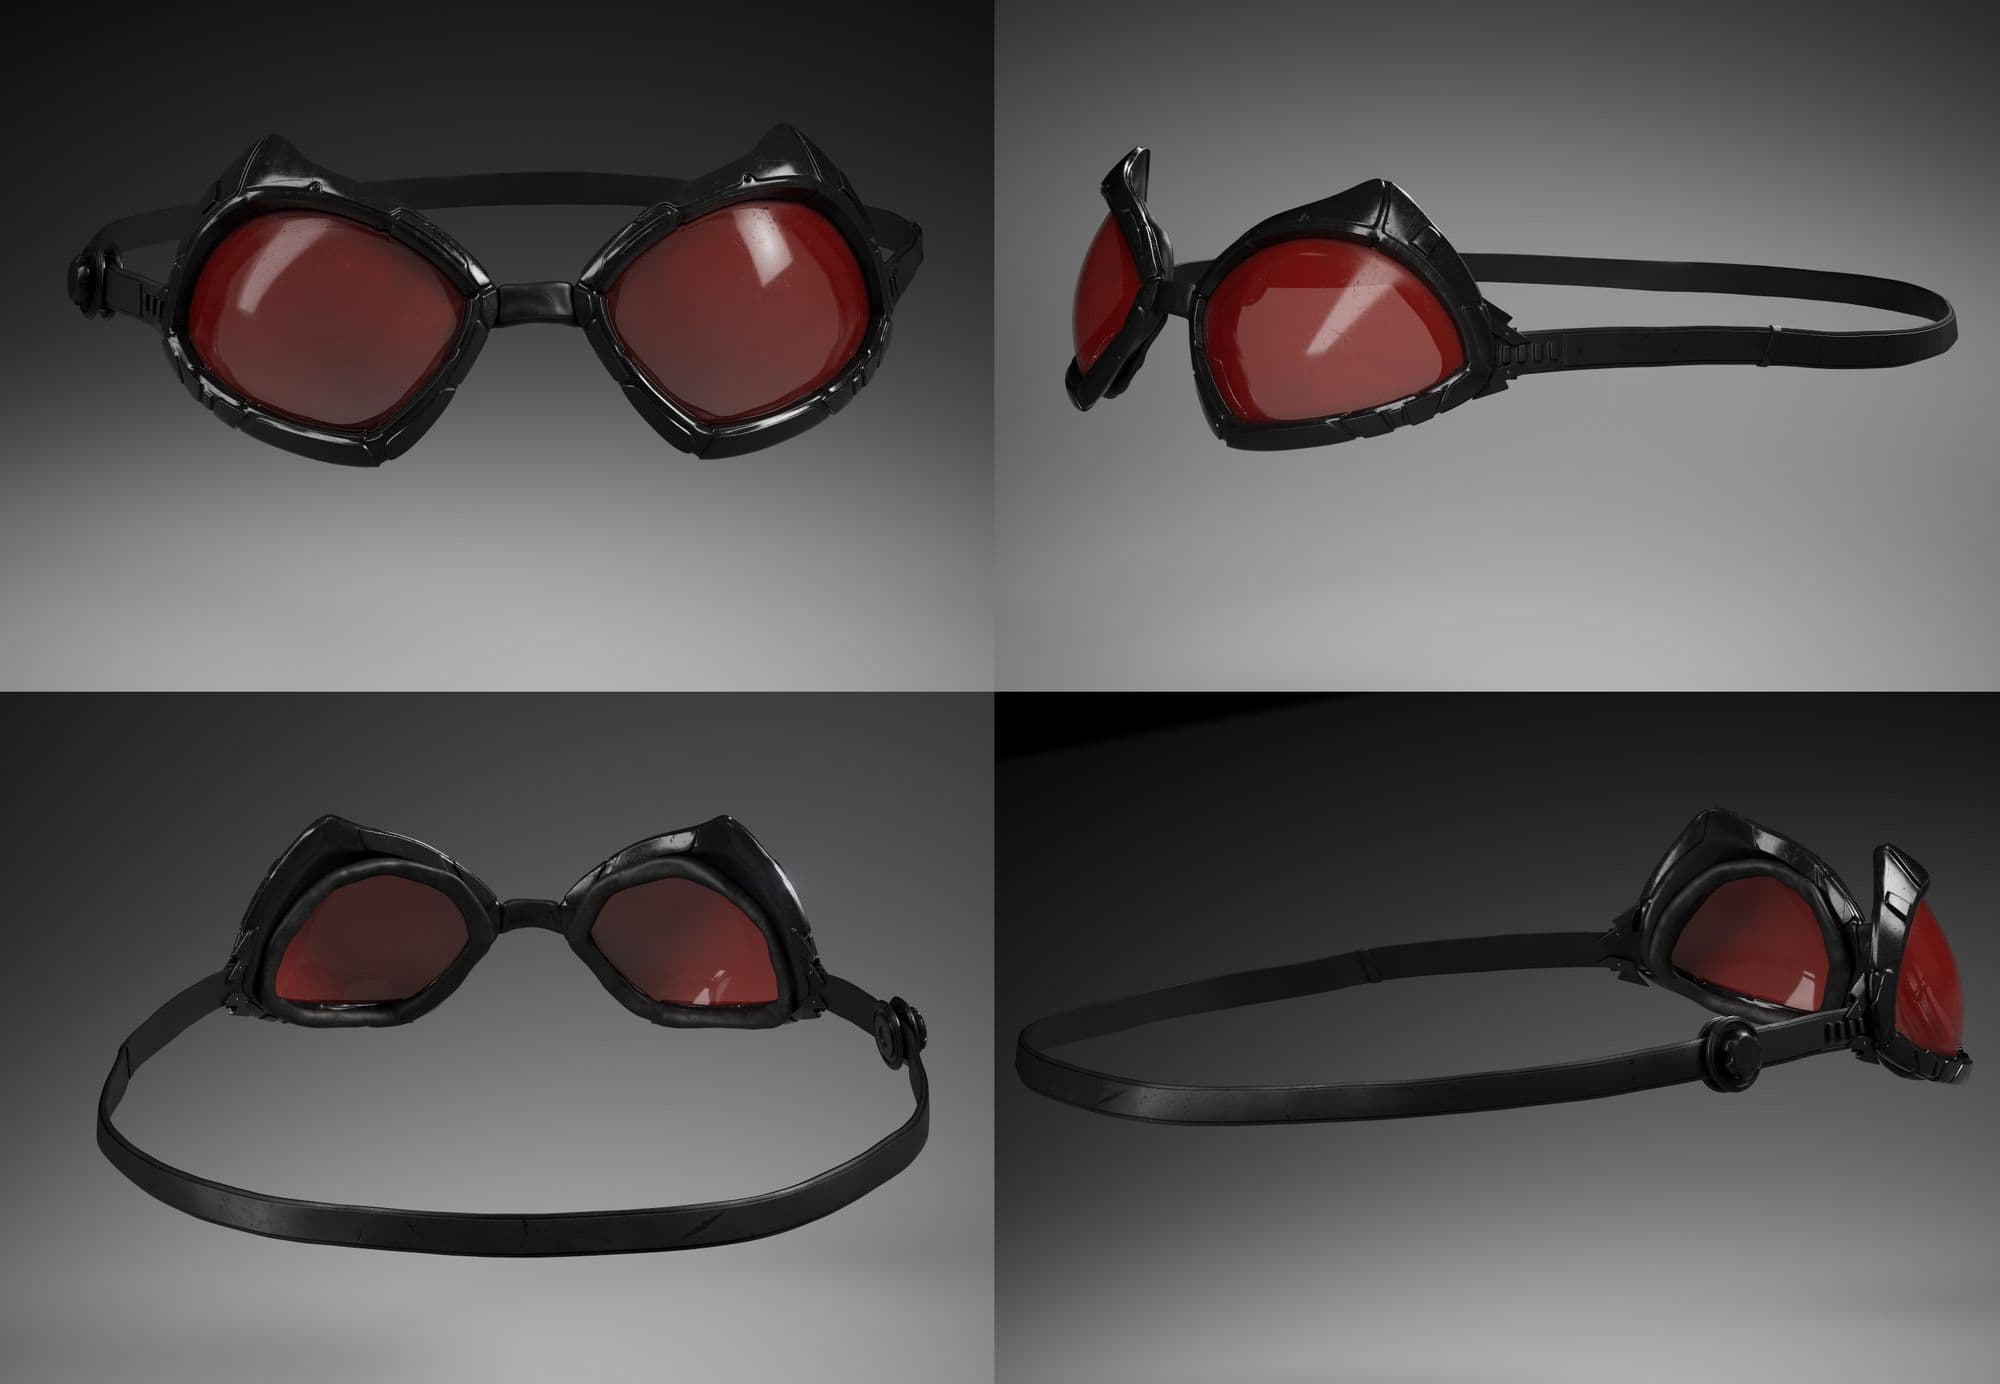
For the hard surface elements (her goggles) I first created the general shapes with dynamesh in Zbrush. This allowed me to quickly block out things like the stylised frames without worrying about topology. Also, it allowed me to fit them to her face, which was important if I showed them being worn.
I treated the goggles like a hero prop, and improvised a more functional design and mechanics than the reference. The zipper was created using a modified version of the Zbrush IMM zipper brush. This is where Zbrush really shines, you can make quick iterations and changes to shapes and pose without worrying about technical limitations.
Since I was sculpting on the Genesis 8 female base from DAZ Studio, I was able to quickly and easily import my sculpt into DAZ as a morph, then use the robust rig and pose controls to create the basic expression and body pose. However, I want to make it clear this is not the best approach. Ideally, all phases of modeling, sculpting, UV layout, and texturing should be done on a symmetrical model. In my case, to preserve the rig of my basemesh, I had to pose before making any changes to my UV's for texturing. A better workaround would have been to start with a different base mesh that already had proper UVs, wrap the DAZ base to that, pose as needed, then wrap the original to the posed DAZ model. Or, I could have followed the more common method of posing manually in Zbrush with Transpose Master. Maya Quick Rig was also an option.
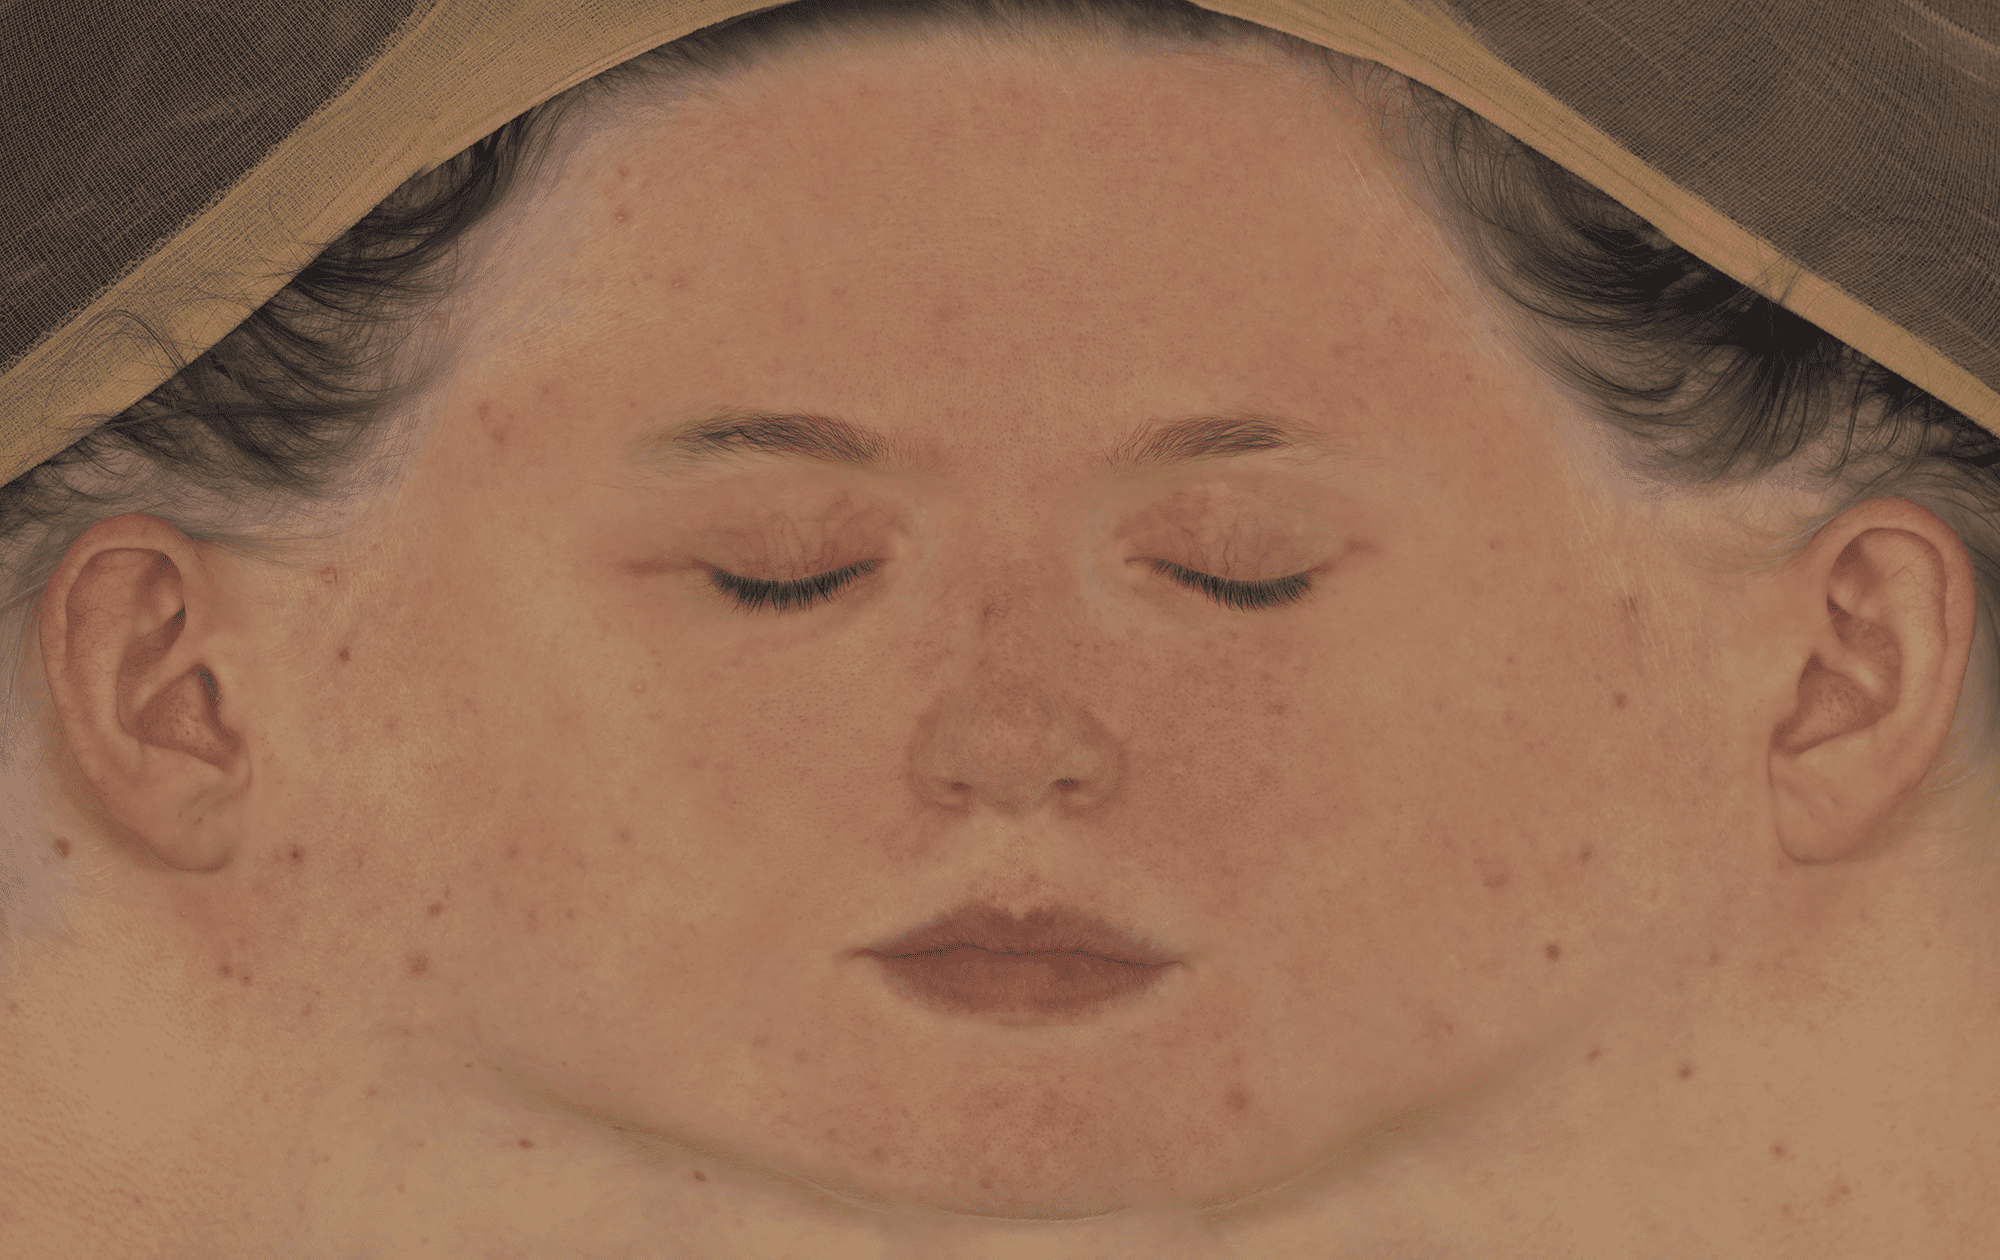
Once I had a posed sculpt that was adequate, with optimised UVs, it was time to add high resolution skin displacement to the model. This can be done in many ways, but the more or less “industry standard” method is taking scan based data (Texturing xyz, 3D Scan Store are the best options) and either projecting or wrapping this to your model. In my case, I purchased one of the Multi-Channel Faces from the XYZ store. (Note: they now have a new product available, called VFace, which is far superior).
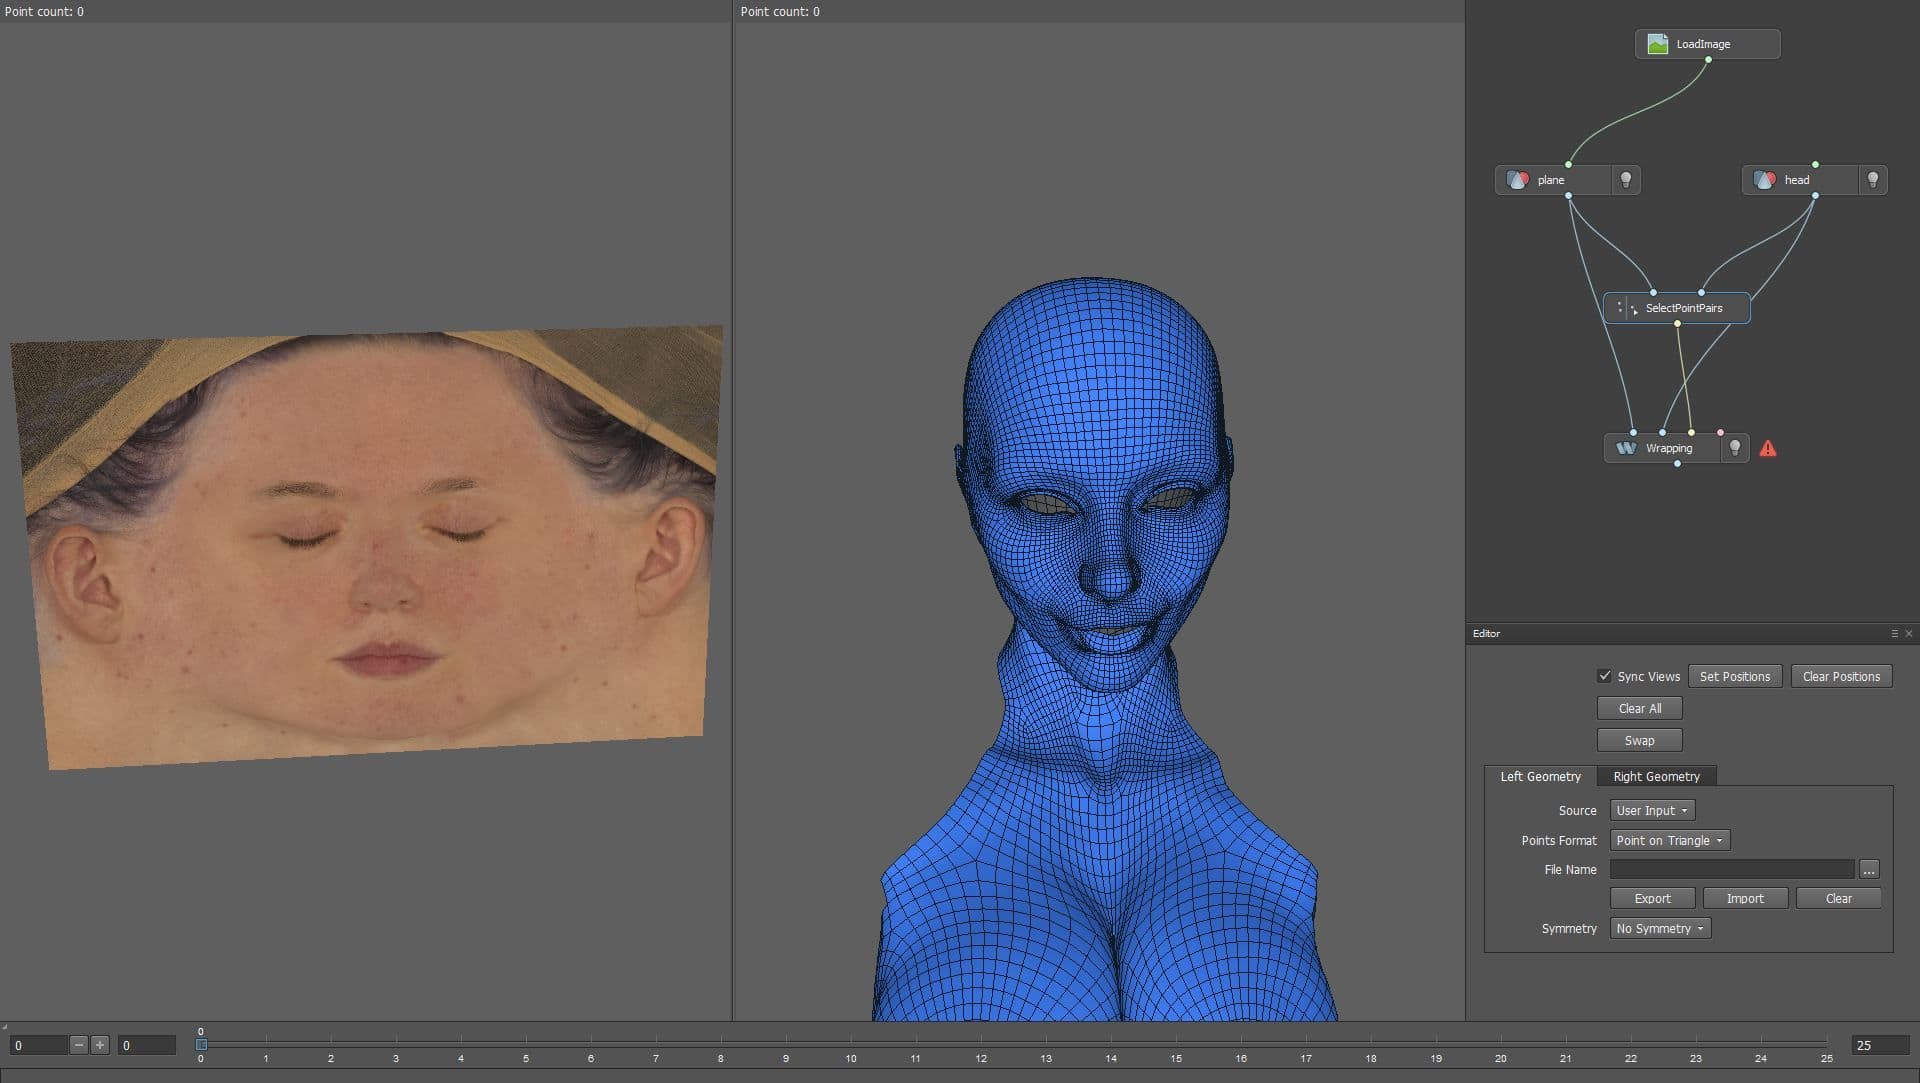
For the texture transfer, I used the popular “plane wrap” method, utilising the amazing software R3DS Wrap in a similar way to the workflow Texturing XYZ demonstrates here.
After this process is complete, you should have three transferred texture images: Albedo colour, packed RGB displacement, and packed Utility map.

From there, it was time to clean up the displacement with projection in Mari, and then split out into three different maps using the Copy Channel node. XYZ separates these as secondary, tertiary and micro detail. Thankfully, Mari works with 32 bit textures just fine, so there’s no need to compress the data.
Note: There seems to be some confusion out there regarding Zbrush and displacement bit depth, as well as .exr files. Here are the facts: Zbrush can natively handle 32 bit .exr, but what it cannot handle are negative values. Therefore, any displacement you bring in that has a midpoint of zero, must have the midpoint shifted to work correctly.
The next step was to bring each displacement channel into Zbrush as its own layer. This allows for more fine tuning and control as to the intensity of each one. Once this is balanced, many more layers of skin detailing will need to be added, both to fill in blank areas and also modify the wrinkles and creases as the expression demands. This can take some time if you have not done it before.

Marvelous Designer was one of the first 3D programs I discovered several years ago, and since then I’ve learned a lot about pattern making and proper clothing fit and drape. I think this is mostly overlooked by 3D character artists, as many try to fake fit by pulling edges around until it “looks right”. I want to emphasise that Marvelous Designer is a virtual clothing simulator, and is designed with all the traditional drafting and sewing principles in mind. You will get a better result if you respect this and go about garment creation in a real world way. This starts by taking appropriate measurements on your avatar, and drafting patterns based on those measurements. There are many good resources to learn more about this. I highly recommend these books by Antonio Donnanno.
I started by bringing an A-pose version of my DAZ base into Marvelous, taking those measurements, then drafting a bodysuit from patterns available in the books I just mentioned. This will give you very important information, such as where the seam lines should be, appropriate wearing ease, etc.
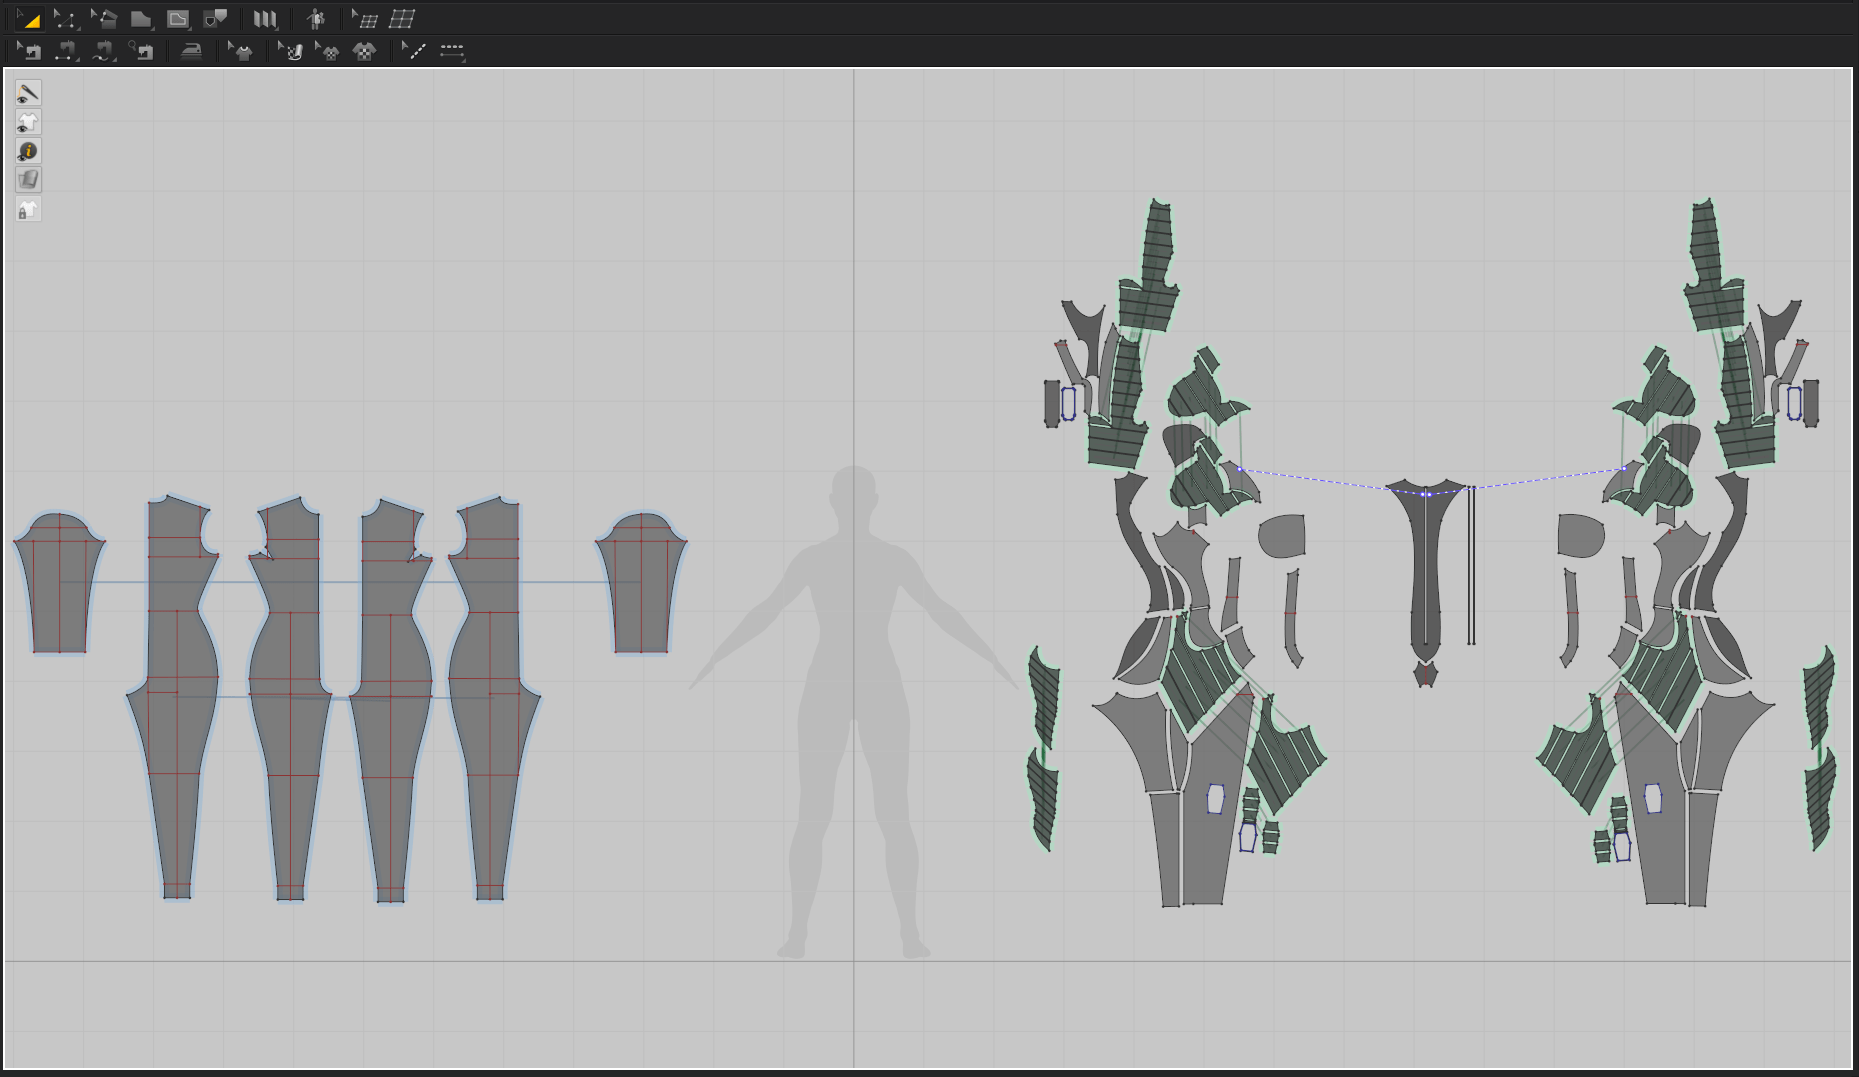
Once I had a well-fitting bodysuit, I chopped up each pattern to match the different materials in her Catsuit. This was quite challenging, as the reference video game suit made no practical sense, and had a ridiculous amount of seams.
From there, I assigned each pattern an appropriate material for simulation, (this is important, as obviously thick leather will simulate much differently than thin silk) and lowered my particle distance as much as my machine would allow; 3 in this case.
From there, I brought in my posed mesh as a morph target, and simulated the garment over 30 frames. (Longer is better, I would recommend 90 frames).
Retopology on this project consisted primarily of the simulated mesh from Marvelous Designer, as the simmed garment is decimated. You do have the option to quadrangulate before export, but I don’t recommend it. Thickness is also a problem, as there is no practical way to add this in MD.
Taking the single sided, decimated garment mesh and turning it into production ready topology with proper thickness is a complicated and trying process, but I’ll outline mine:
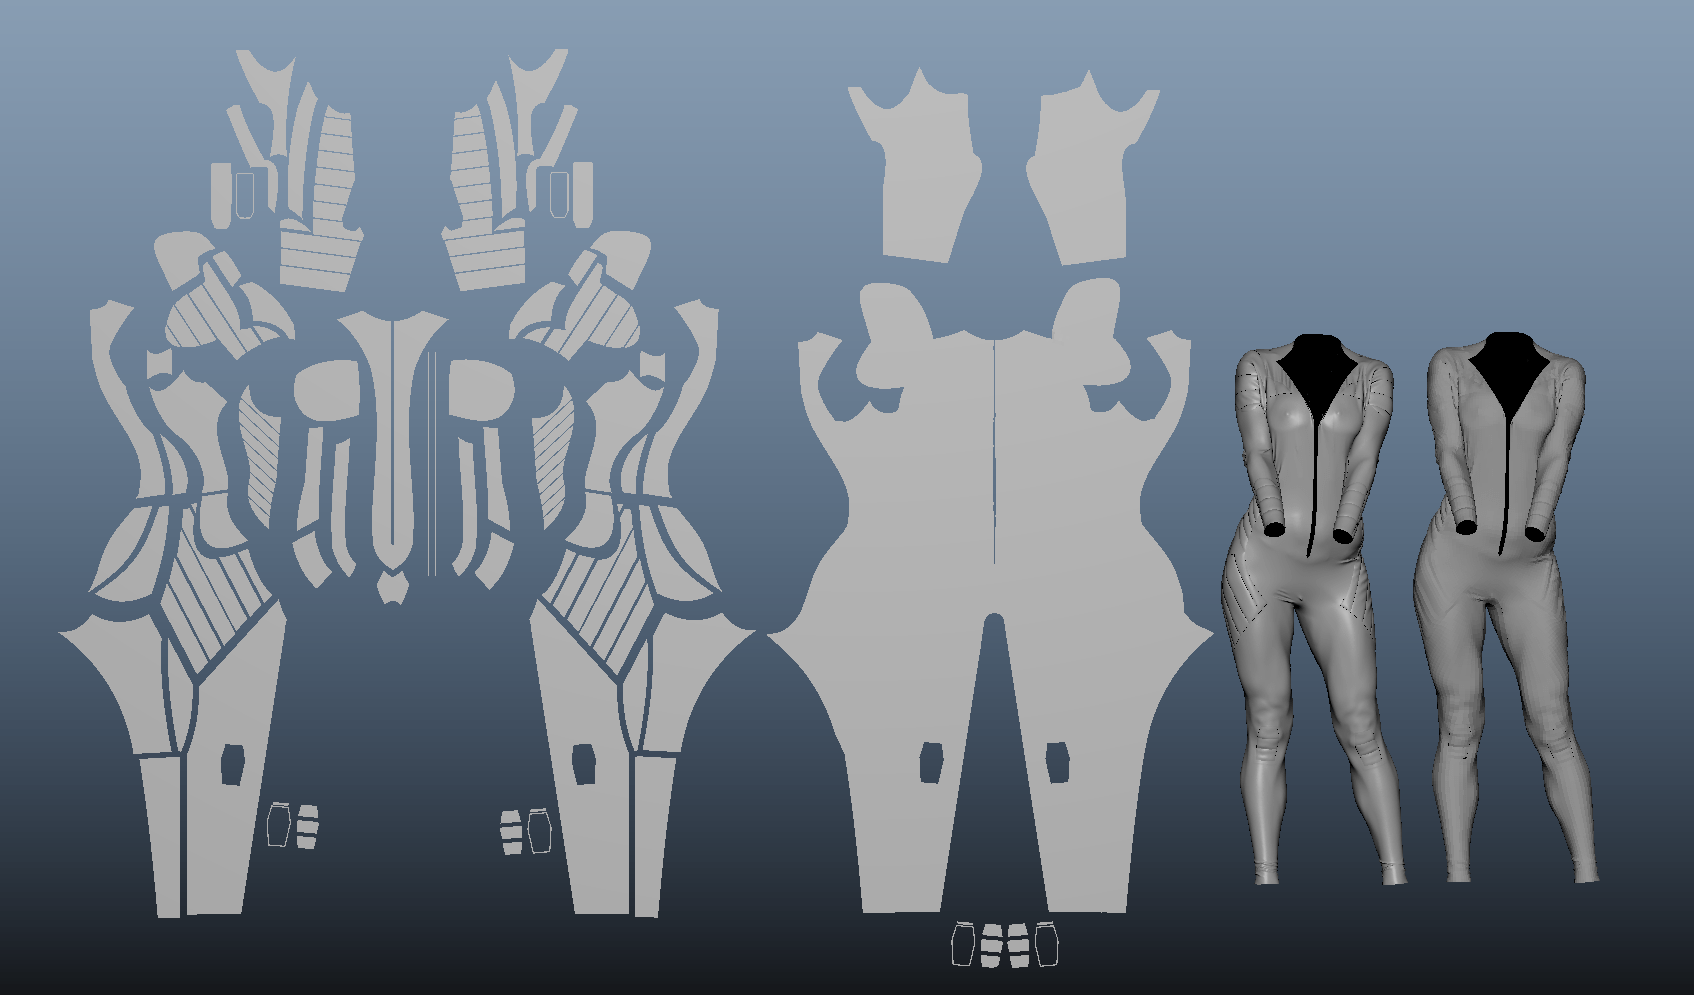
Retopology and UVs for the goggles were done in Maya, then it was brought back into Zbrush to add creasing, subdivision levels, and create a displacement map.
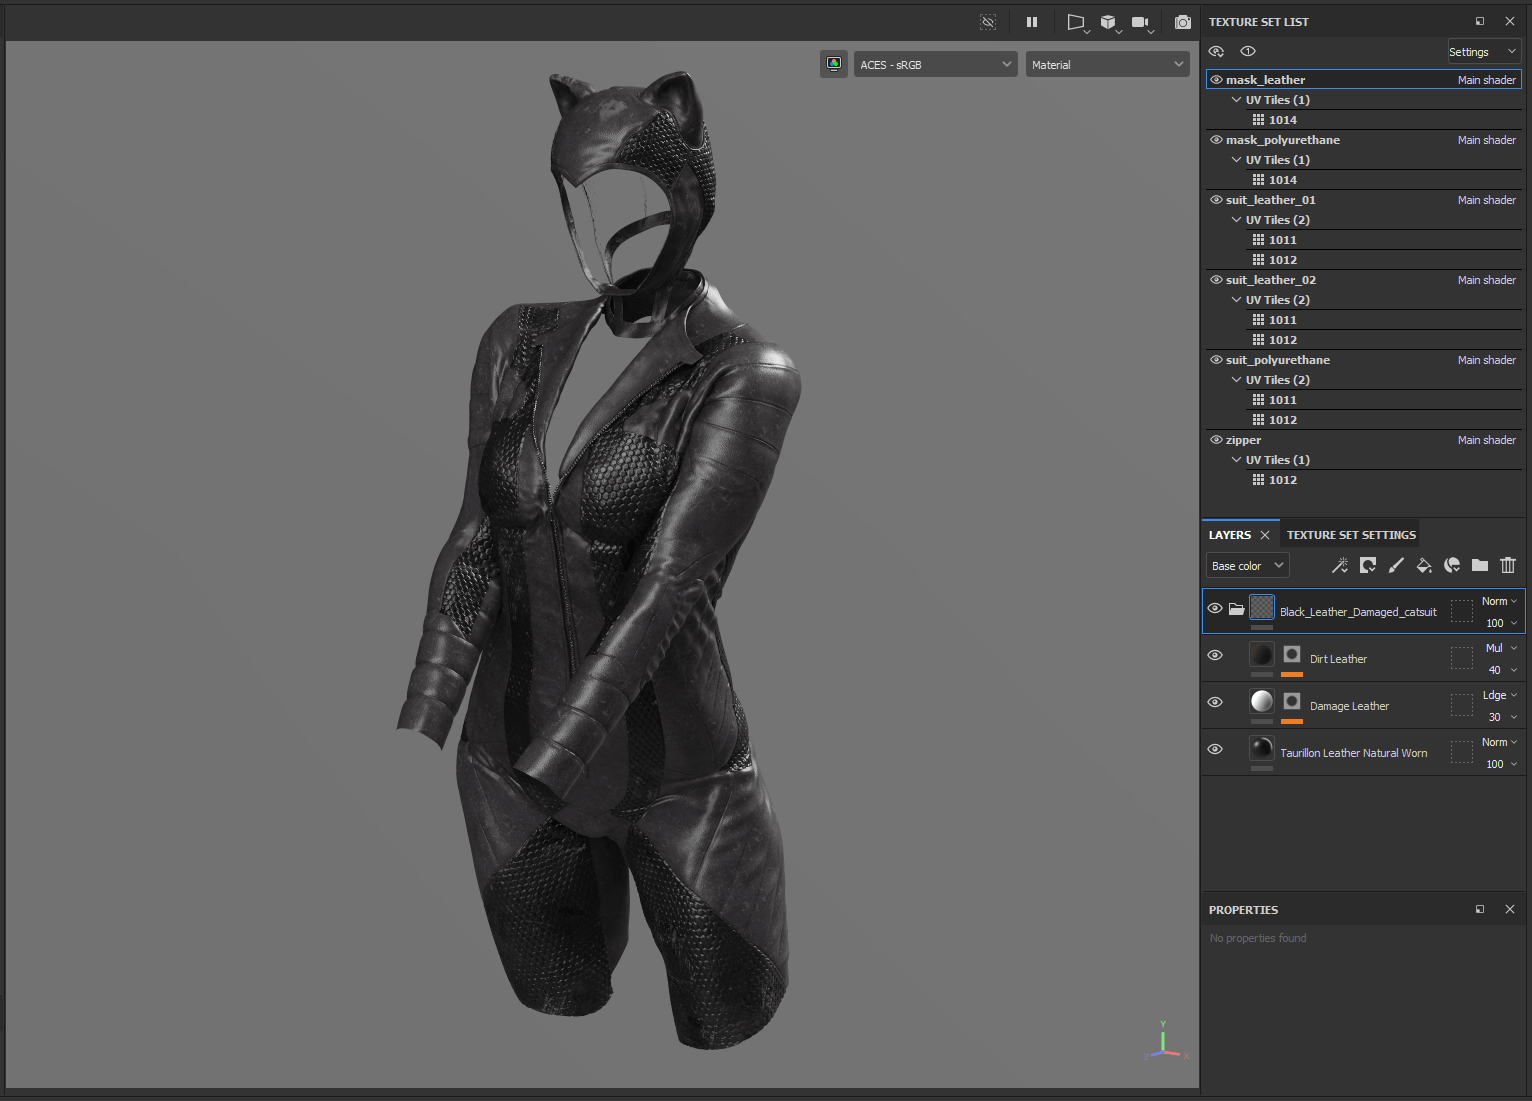
I divided texturing into two parts: The skin, eyes, and teeth would be textured in Mari at 8K, and everything else (suit, goggles) would be done at 4K in Substance 3D Painter.
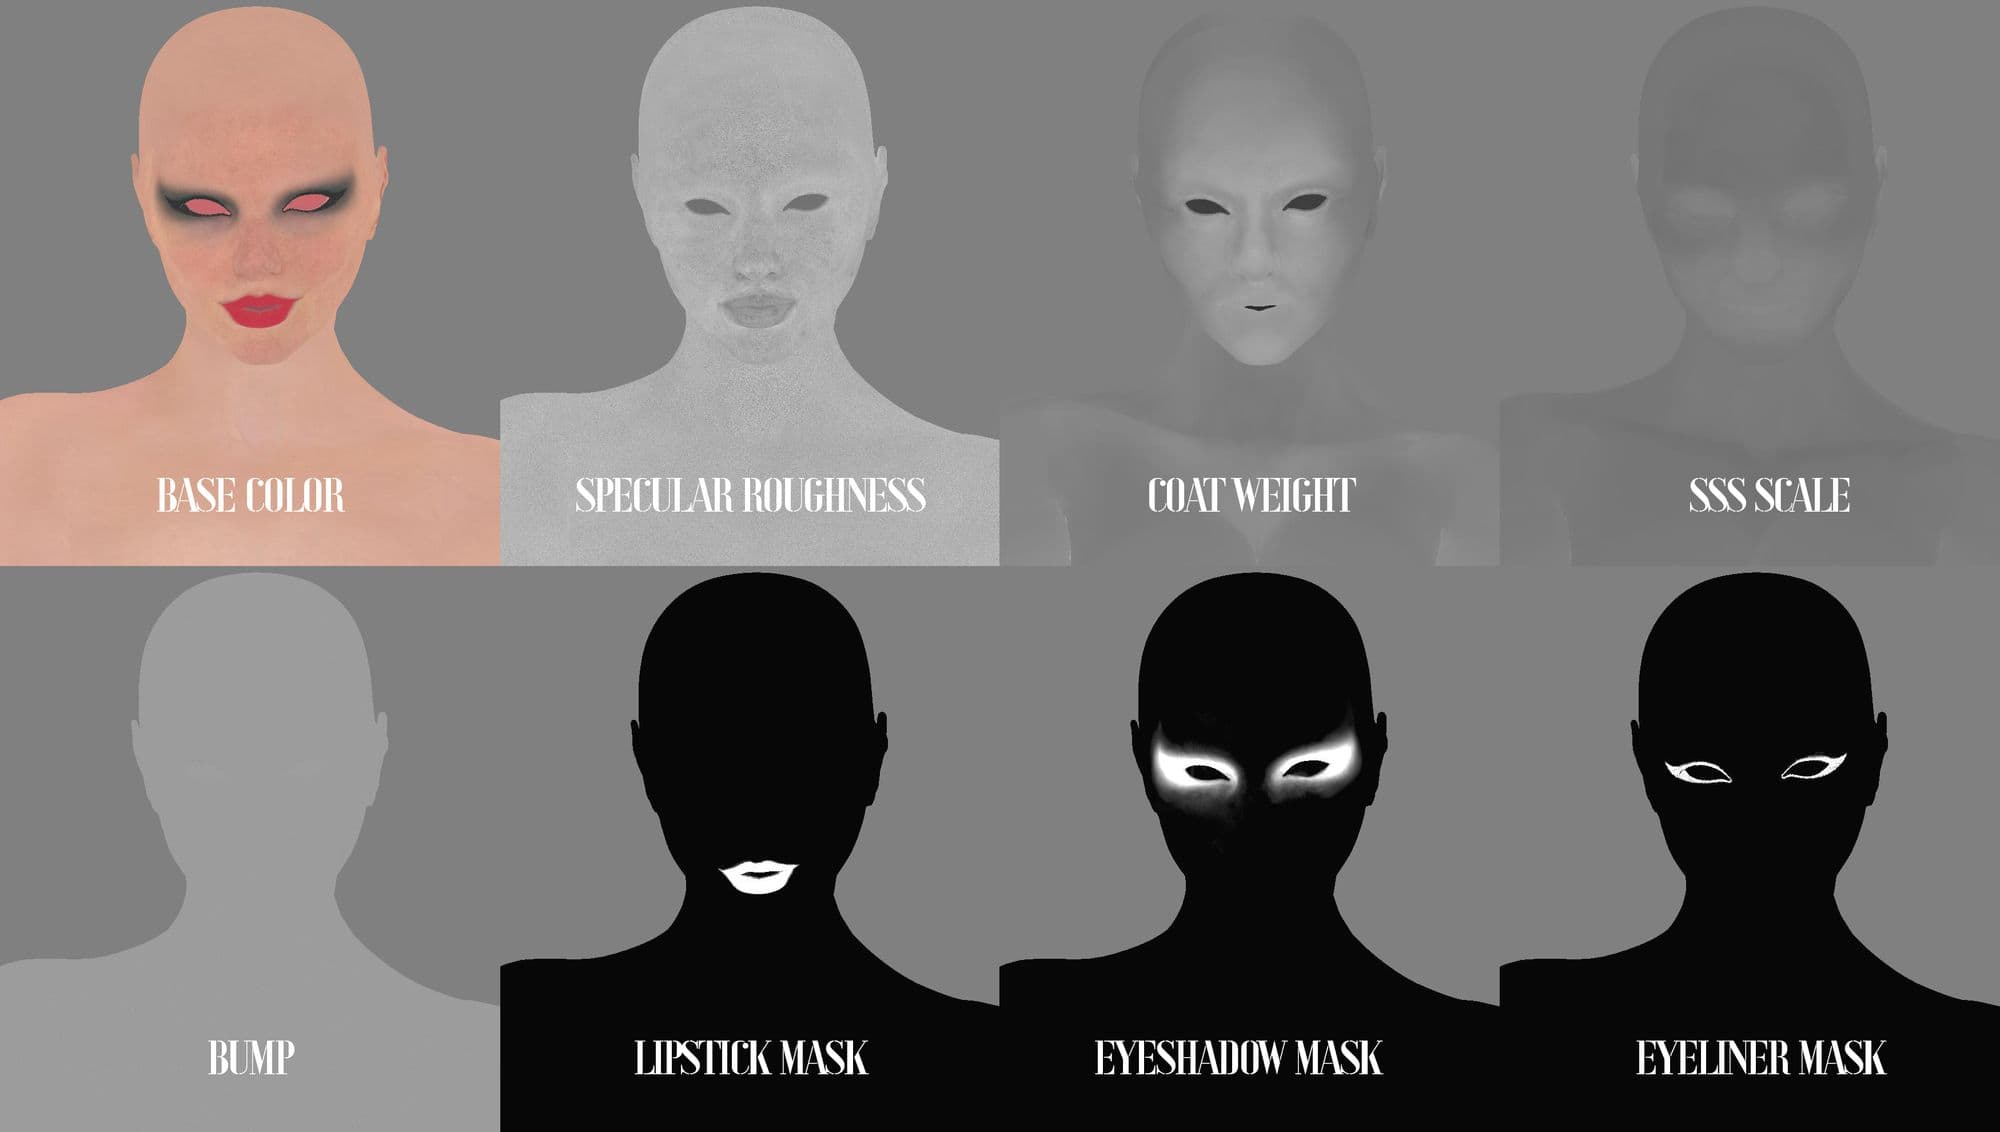
For the skin, I started with the XYZ albedo map, as well as some of the low resolution skin textures that came with my base mesh. Lots of touchup, colour grading, and removing shadows was the primary work done here. To create my secondary maps, (Specular Roughness, Coat, SSS Scale) I primarily leveraged the XYZ utility maps, as well as the mesh Maps I baked in Substance Painter.
The makeup masks were created as separate channels, then instanced into the diffuse channel as masks on fill layers, to create non-destructive flexibility.
For the costume elements, Substance 3D Painter made them a breeze.
The vast assortment of smart materials and masks available natively [in Substance 3D Painter], and through the Adobe Creative Cloud Marketplace, made getting to 90% very easy.
The leather, polyurethane, plastic and rubber materials all required only modest adjustments and tweaks to look great. This was probably the easiest part of the project.
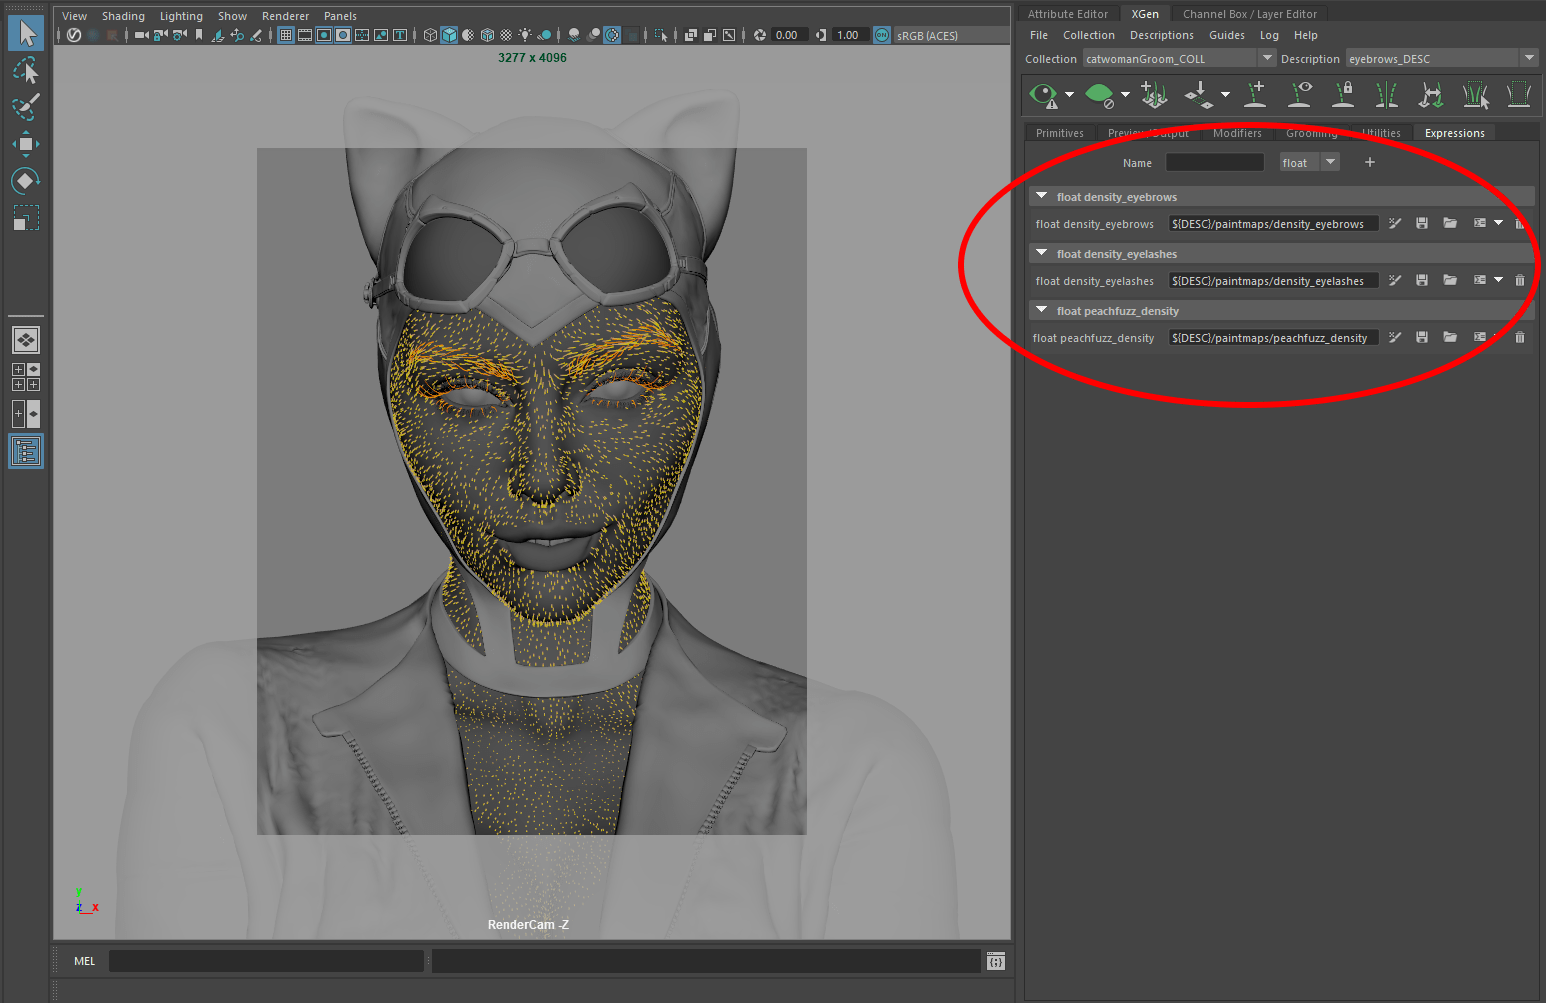
Grooming in Xgen is a precarious process, and there are some essential fundamentals for success:
1. Create a “scalp” mesh. UVs must be in the 0-1 space. Lambert1 material should be applied.
2. Keep a second “utility” set of UVs matching the original model for updating the shape. This is very important, you need to be able to update your groom shape as the sculpt evolves.
3. No renaming, unless you plan to fix paths everywhere.
4. High resolution reference for all angles of the groom.
5. Focus on guide work. If the shape and flow aren’t correct, no amount of modifiers will fix it.
In my case, grooming was fairly straightforward. My characters’ mask covered her hair, so I only had to make eyebrows and eyelashes, with a basic peach-fuzz. It’s very helpful to create all Xgen paint maps as floats, so you have the flexibility to call them into any attribute.
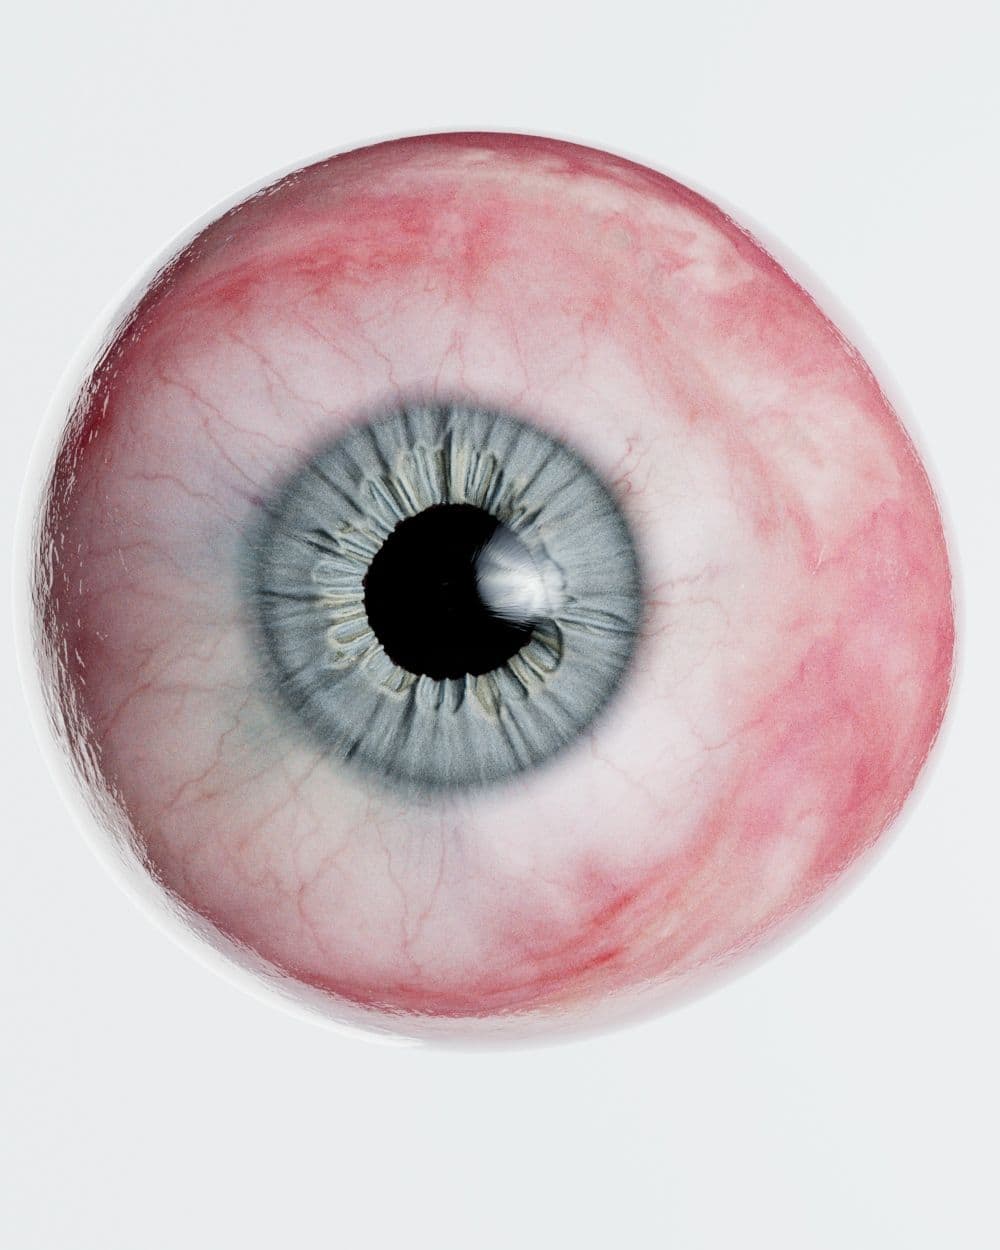
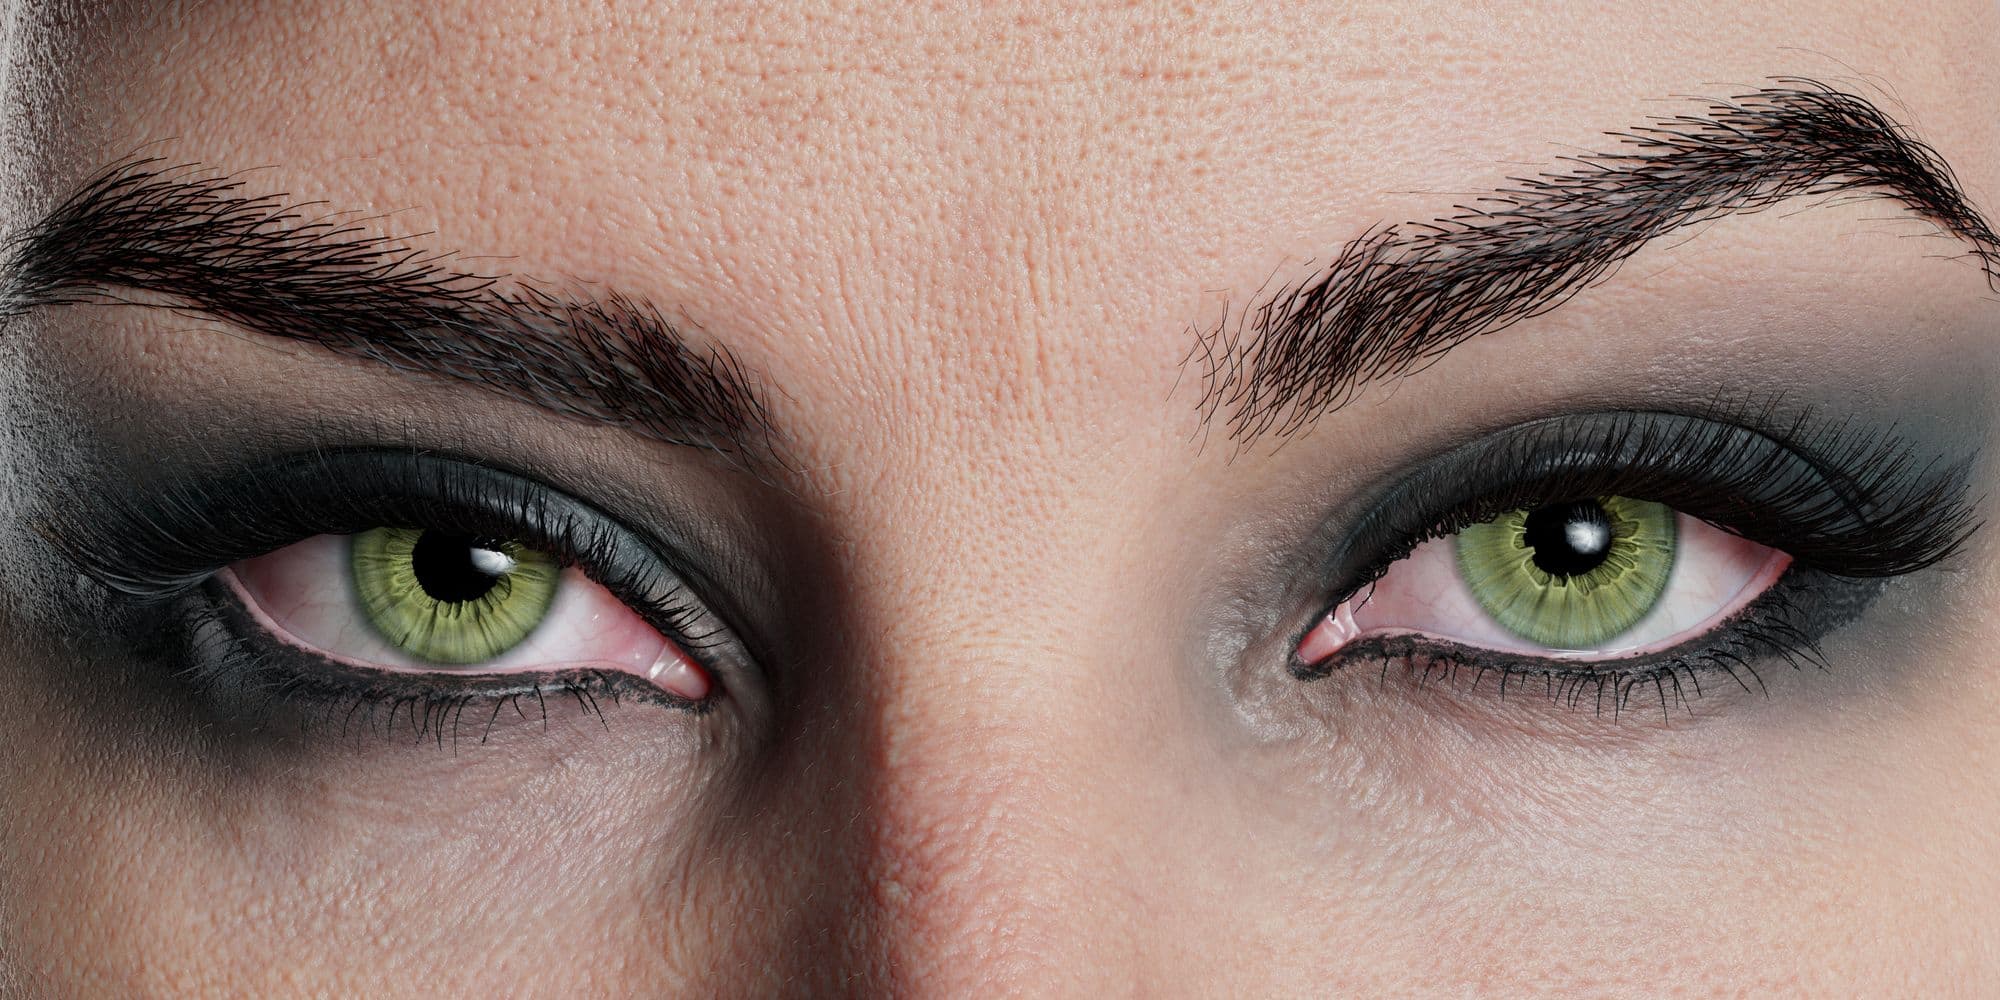
Believable eyes are a must, but it can be hard to know where to start. There are many different methods for creating eyes in CG, and I experimented with more than one. My first set was created following the method commonly used in games, inspired by Alfred Roettinger’s tutorial.
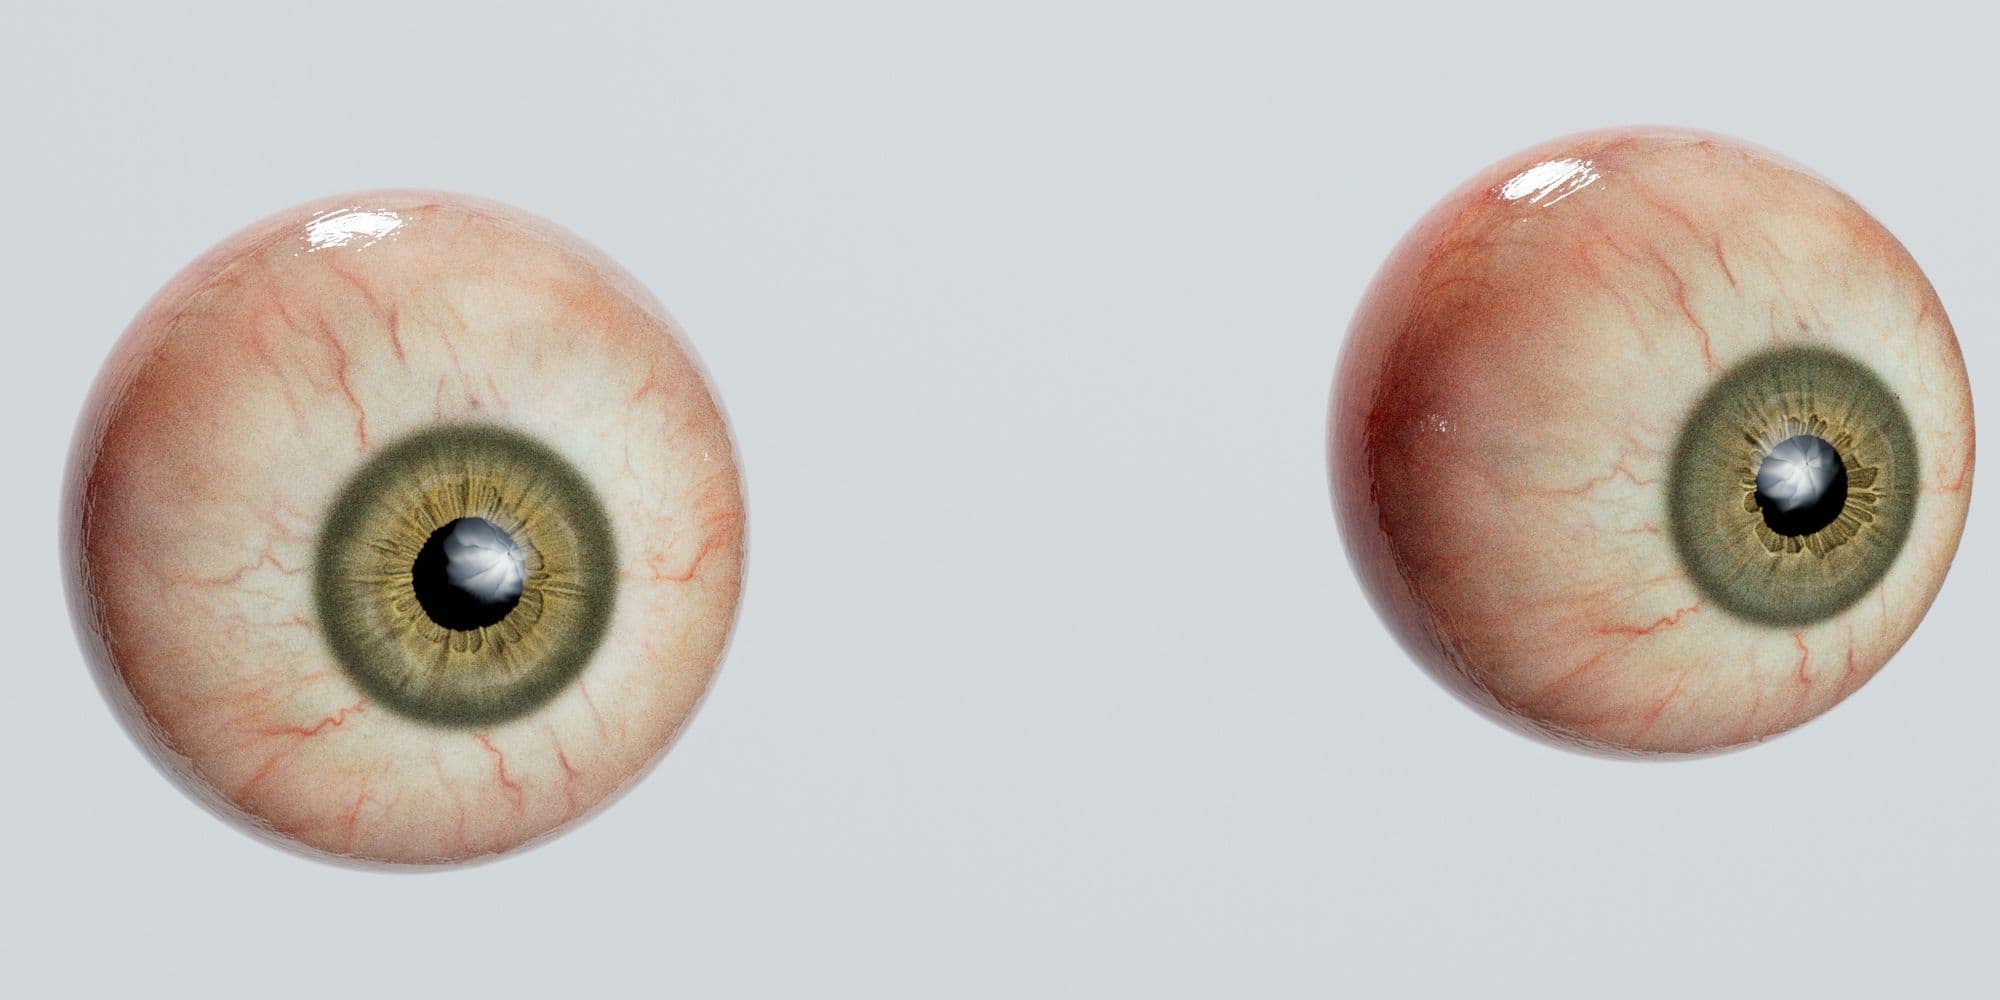
However, this method is not physically accurate, and I wasn’t happy with the look I got. So, I dug deeper, watched a lot of different tutorials, and found this method, which seemed the most physically accurate to me.
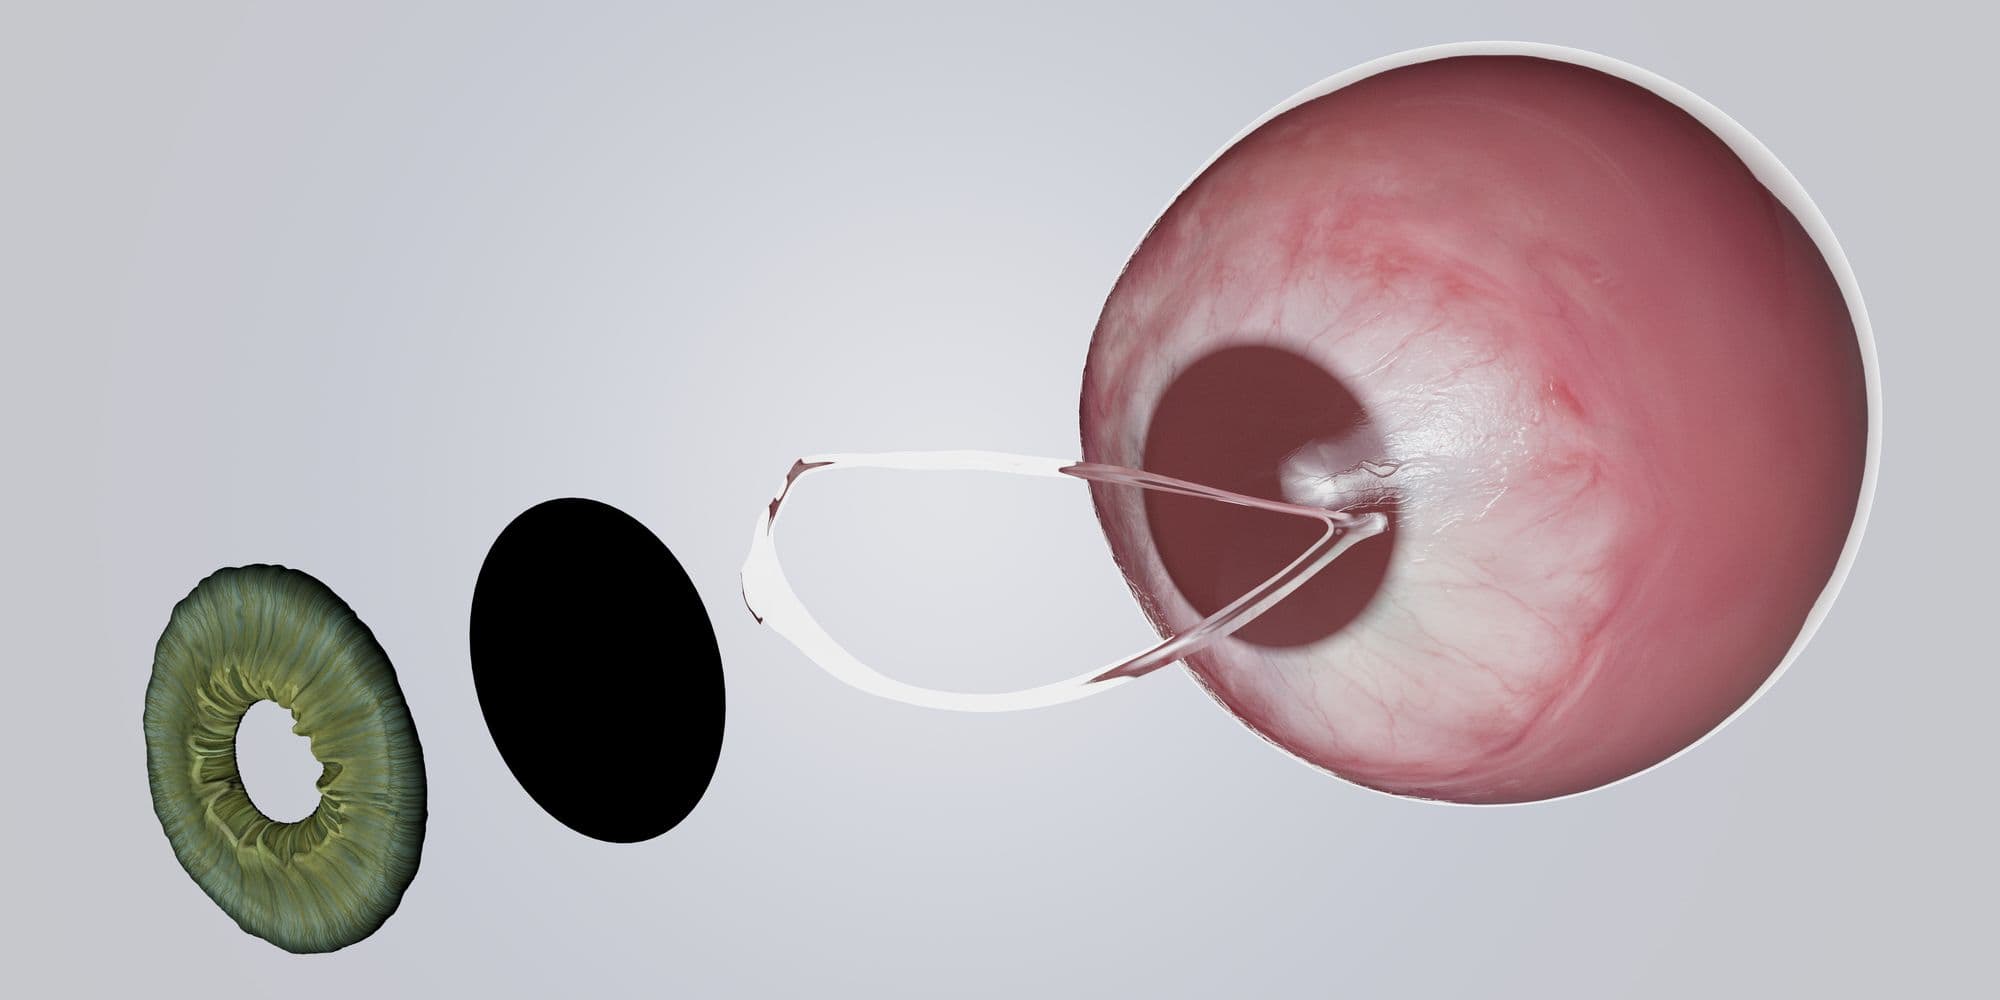
I added several steps for my version: Retopologising the Digital Emily eye scan data to create the Sclera geometry, and making specific UVs that allowed the corneal bulge to be driven by a circular ramp. And then placing the HD Iris from Texturing xyz inside. I also modeled a strip of geometry around the lid line to serve as the tear line. The Caruncle was not separate, but modeled into the head mesh.
For this project, I determined I wanted to make the switch over to ACEScg working colorspace. There were many reasons behind this, primarily the fact that ACES is now industry standard in Film pipelines.
The technical aspect can be intimidating, but there is great information available on ACEScg, namely here.
Creating a realistic skin shader was challenging, but thanks to great tutorials like Adam O’Donnell’s Obi Wan Kenobi tutorial series, I was able to get something satisfactory.
The most important thing is to start with just a base shader, and plug your texture maps in one-by-one, only moving on once you’ve verified that the map is working as expected.
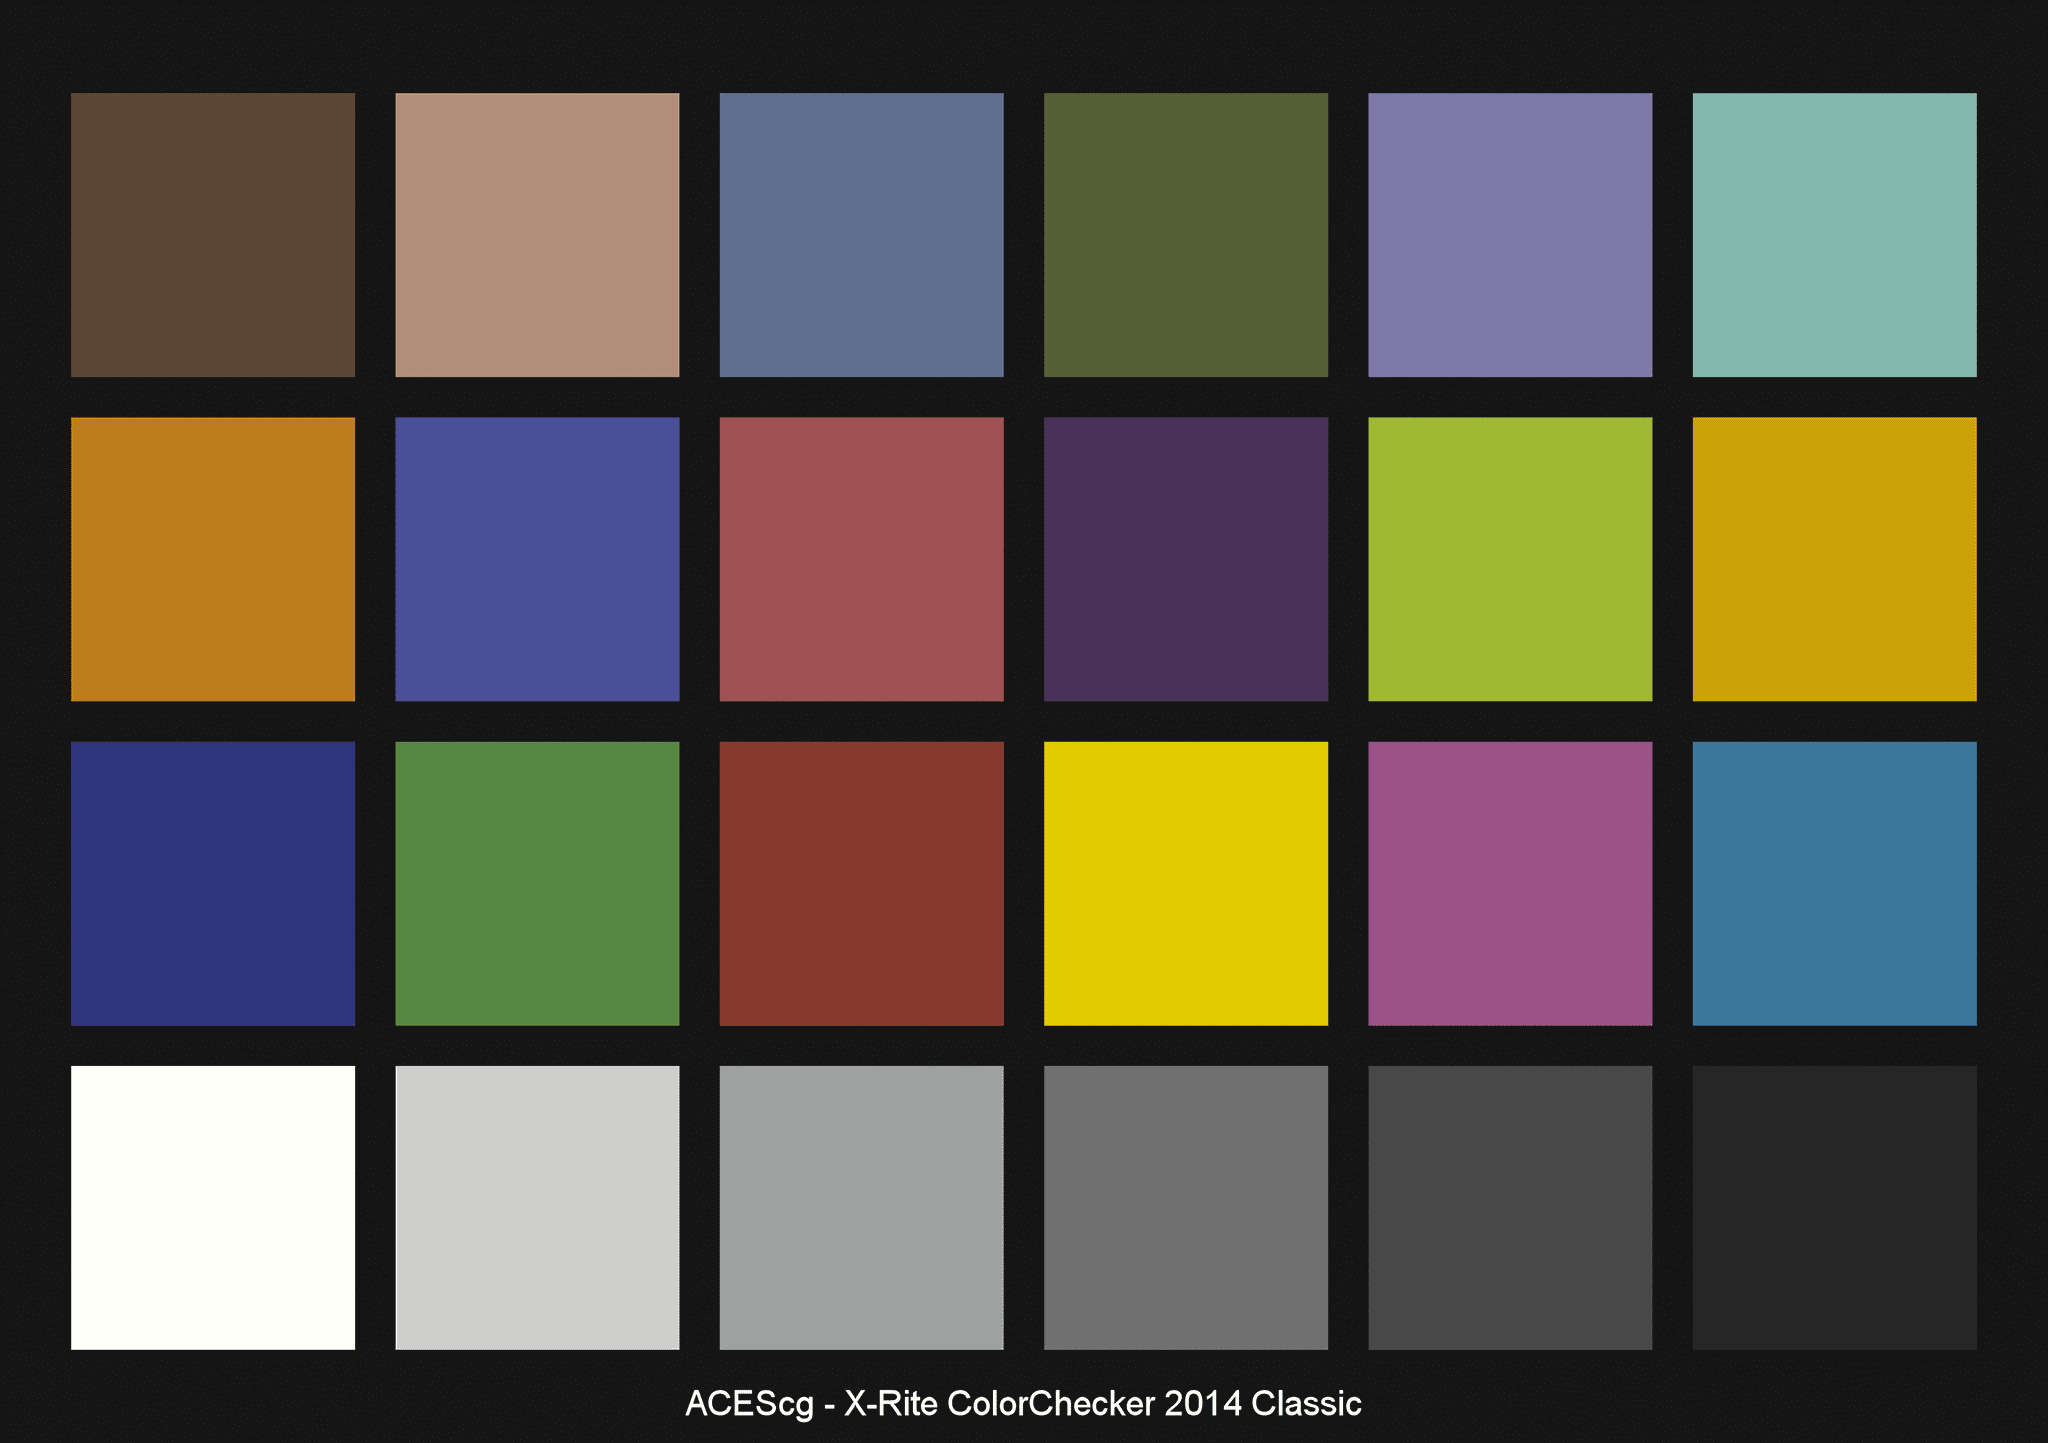
After that, calibrating your colour and exposure levels by creating a neutral environment without light contamination, is very necessary. This lets you know how your textures are looking without coloured light from an HDRI affecting things. Use an ACEScg Macbeth Chart in your scene to correctly balance your lights and not overexpose.

Coloured light and exposure can be used purposefully afterwards, but only once a good neutral base has been established.
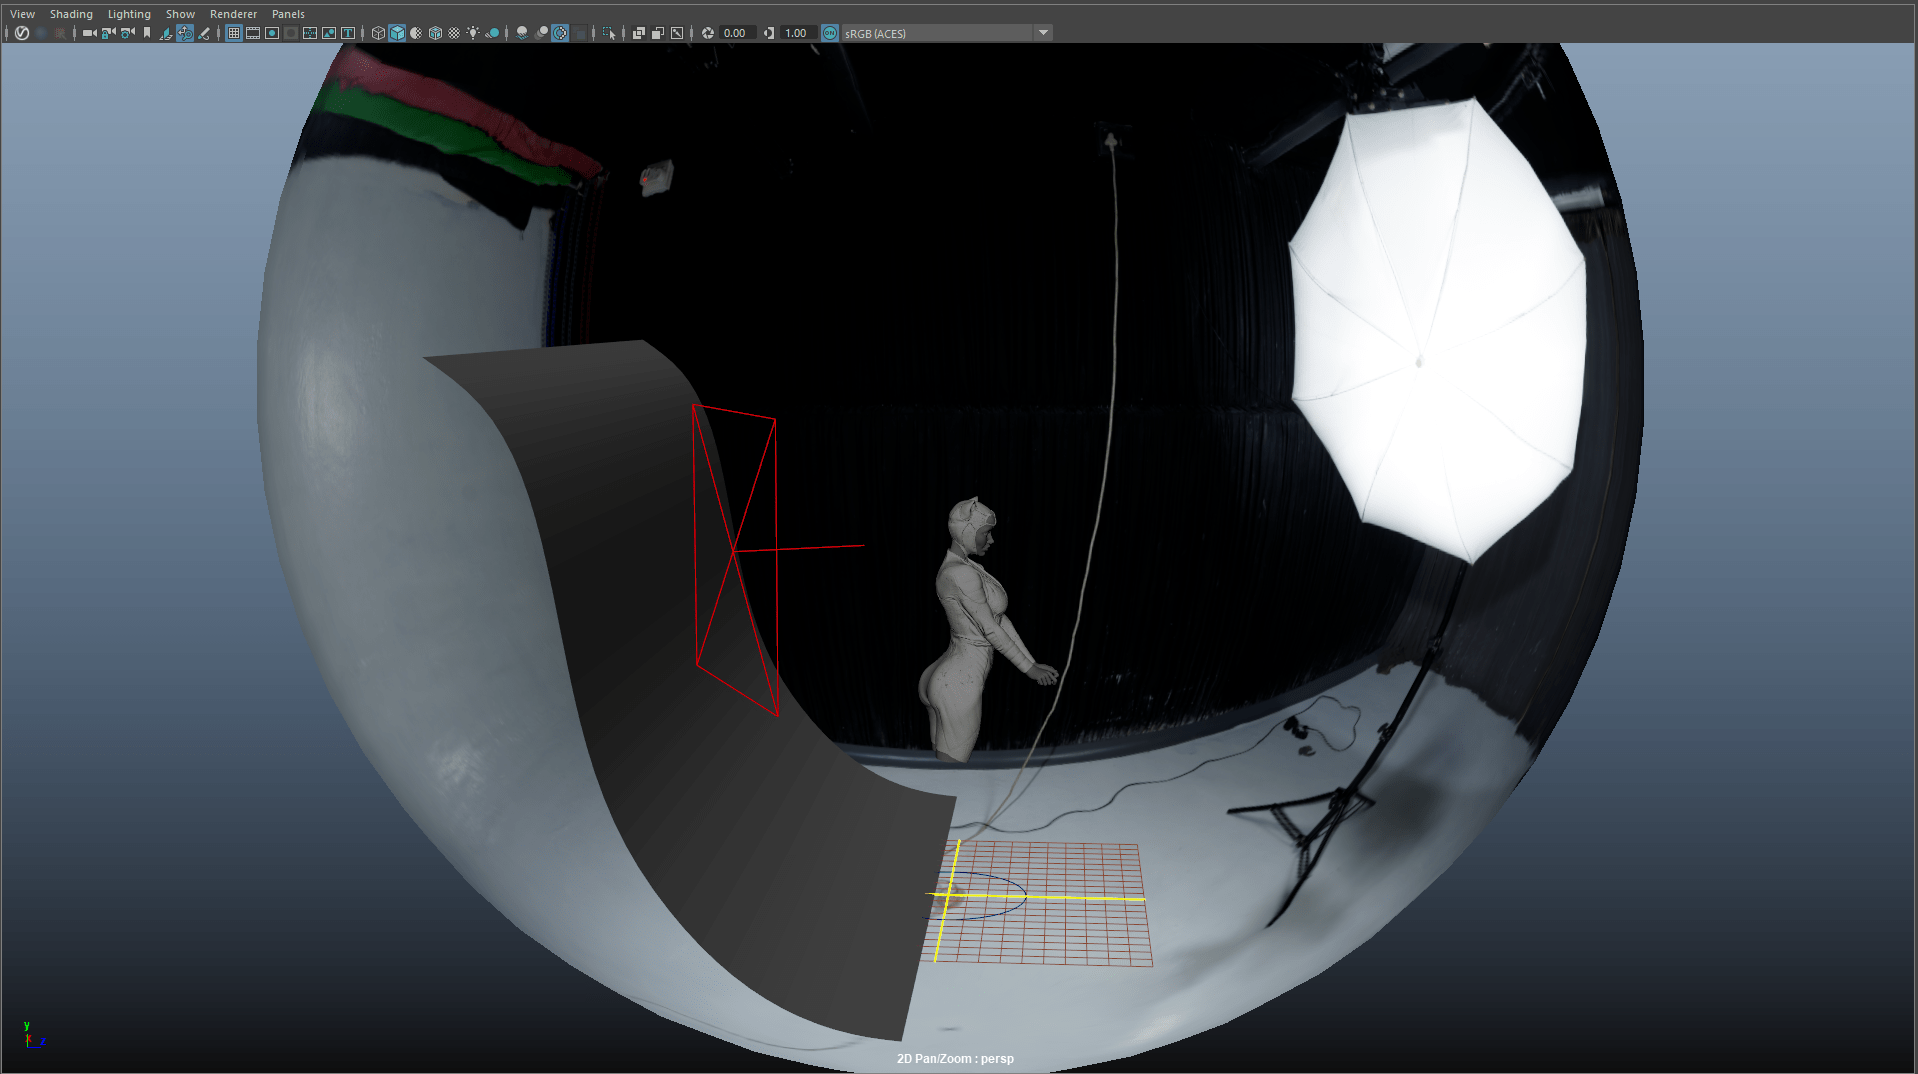
My lighting setup was fairly straightforward, and consisted of a photo studio HDRI (from Polyhaven) functioning as both the Key and Fill, and an aiAreaLight for the rim light. I also created a simple backdrop. I intentionally overexposed the final render somewhat, to match what had been done to the reference image.
You may find in the Look Development stage that things are still looking very “CG”. This can be combated by adding small details and shader tweaks. In my case, adding mascara in the form of small pieces of simple geometry scattered via a MASH network helped integrate the eye makeup with the eyelashes. Also, some small saliva geometry at the corners of the mouth, and lipstick bump, to separate the makeup and skin.
I hope this article helps others mitigate the steep learning curve of making realistic human characters in CG. Don’t give up, it can be very rewarding!
Coming from a varied background in traditional art, automotive, and photography, Thrace Kelsick did not come to the 3D world early. Although aware of it for many years, he even toyed with Maya as early as 2008, but spent his early years trying to break into the comic book industry. Thrace also had a short career as an Airbrush Artist.
After 7 years in the Automotive repair world, he became highly interested in 3D as a means to solve 2D problems. The deeper he delved, the more hooked he got.
After some stop-and-go self teaching, Thrace discovered Think Tank Training Centre and started their 16 month program studying asset creation for Film & TV.
[Studying at Think Tank] has been one of the best choices of my life, as I now feel on the road to the career I want.
You can find more of Thrace's work on The Rookies, Instagram, and ArtStation and can contact him via LinkedIn.