3D Environment Breakdown of an Iconic Movie Set
In this article, VFX-Workshop alumnus, Jonathan Truong, shares details about his Highly Commended Rookie Awards 2022 entry: "The Shining Tribute".
In this article, VFX-Workshop alumnus, Jonathan Truong, shares details about his Highly Commended Rookie Awards 2022 entry: "The Shining Tribute".
Jonathan Truong started 3D as a hobby and eventually turned his passion into a career. After finishing his studies at VFX-Workshop, Jonathan started at Irrational Studios in Paris, France, as a 3D Generalist.
In this article, Jonathan shares details about his Rookie Awards entry that gave him his Rookie of the Year - Highly Commended status, in the Visual Effects Category.
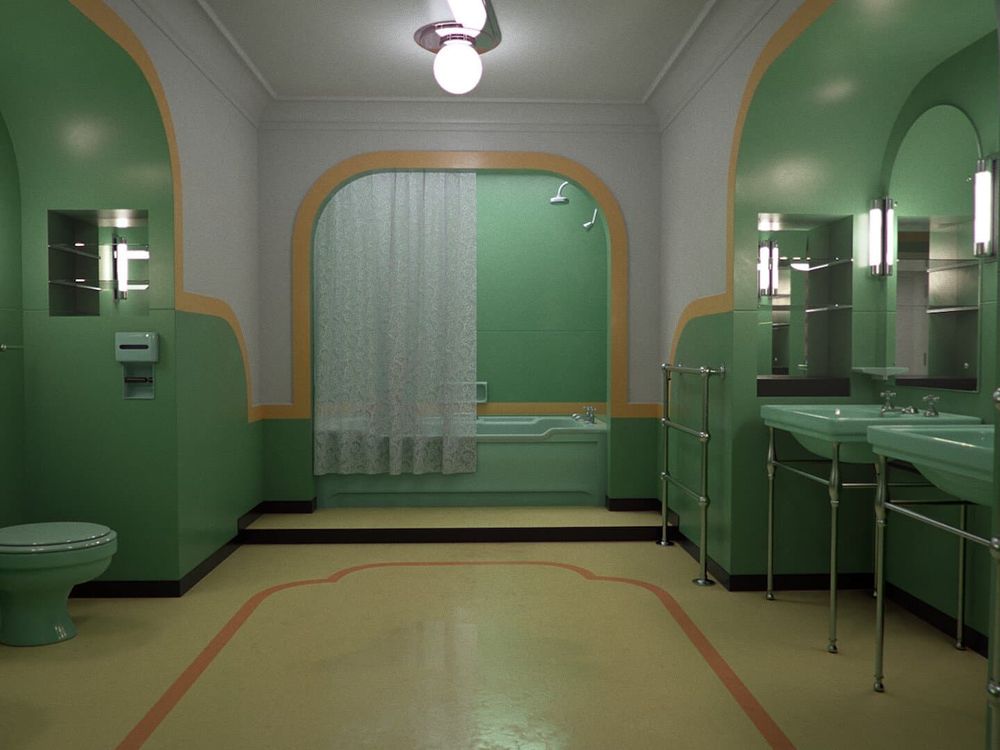
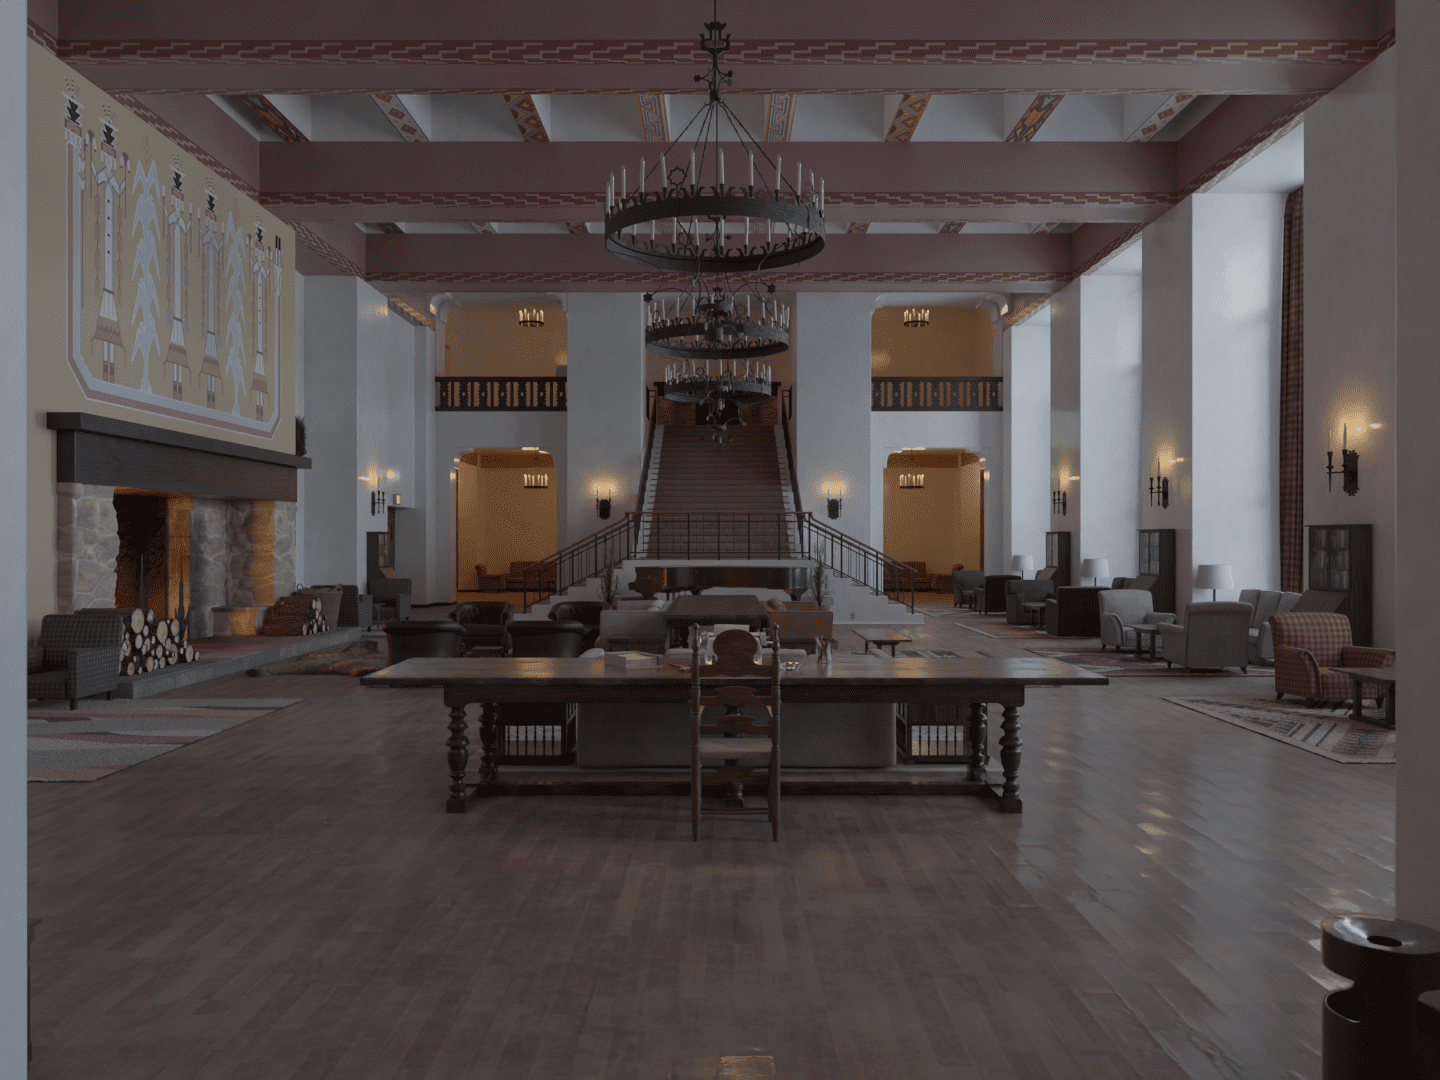
I’ve always been inspired by what’s called “Liminal Spaces”, environments that give a feeling of nostalgia, loneliness and emptiness. What better movie than “The Shining” to represent this emotion. So, for my graduation project I wanted to focus on the Hotel’s interiors and recreate them as photo-real as possible. I’m going to walk you through the process of recreating this iconic environment, that is the Overlook Hotel from “The Shining”.
I entered "The Shining Tribute '' into the Rookie Awards this year because it's my graduation short film, so it's the project I'm the most proud of, the most ambitious of all and, I think, the one that represents by skills at the moment.
I've been posting my work on The Rookies for the past 3 years on my school's advice, so it was obvious to me to enter The Rookies Award in 2021 and then again in 2022. My goals were only to end up with a better rank than last year and to share my best work to others.
My advice to other students thinking about entering the Awards is to simply do it. Even if you think that your work is not good enough in comparison to the rest of the participants, it doesn't matter, it's your work and you should be proud of it!
You never know what could happen, in 2021 I was in Rank B and this year I was a Finalist, and then Highly Commended! So don't be scared, and enter with as much content as you can with breakdowns and explanations so people can truly appreciate how much effort you put into it.
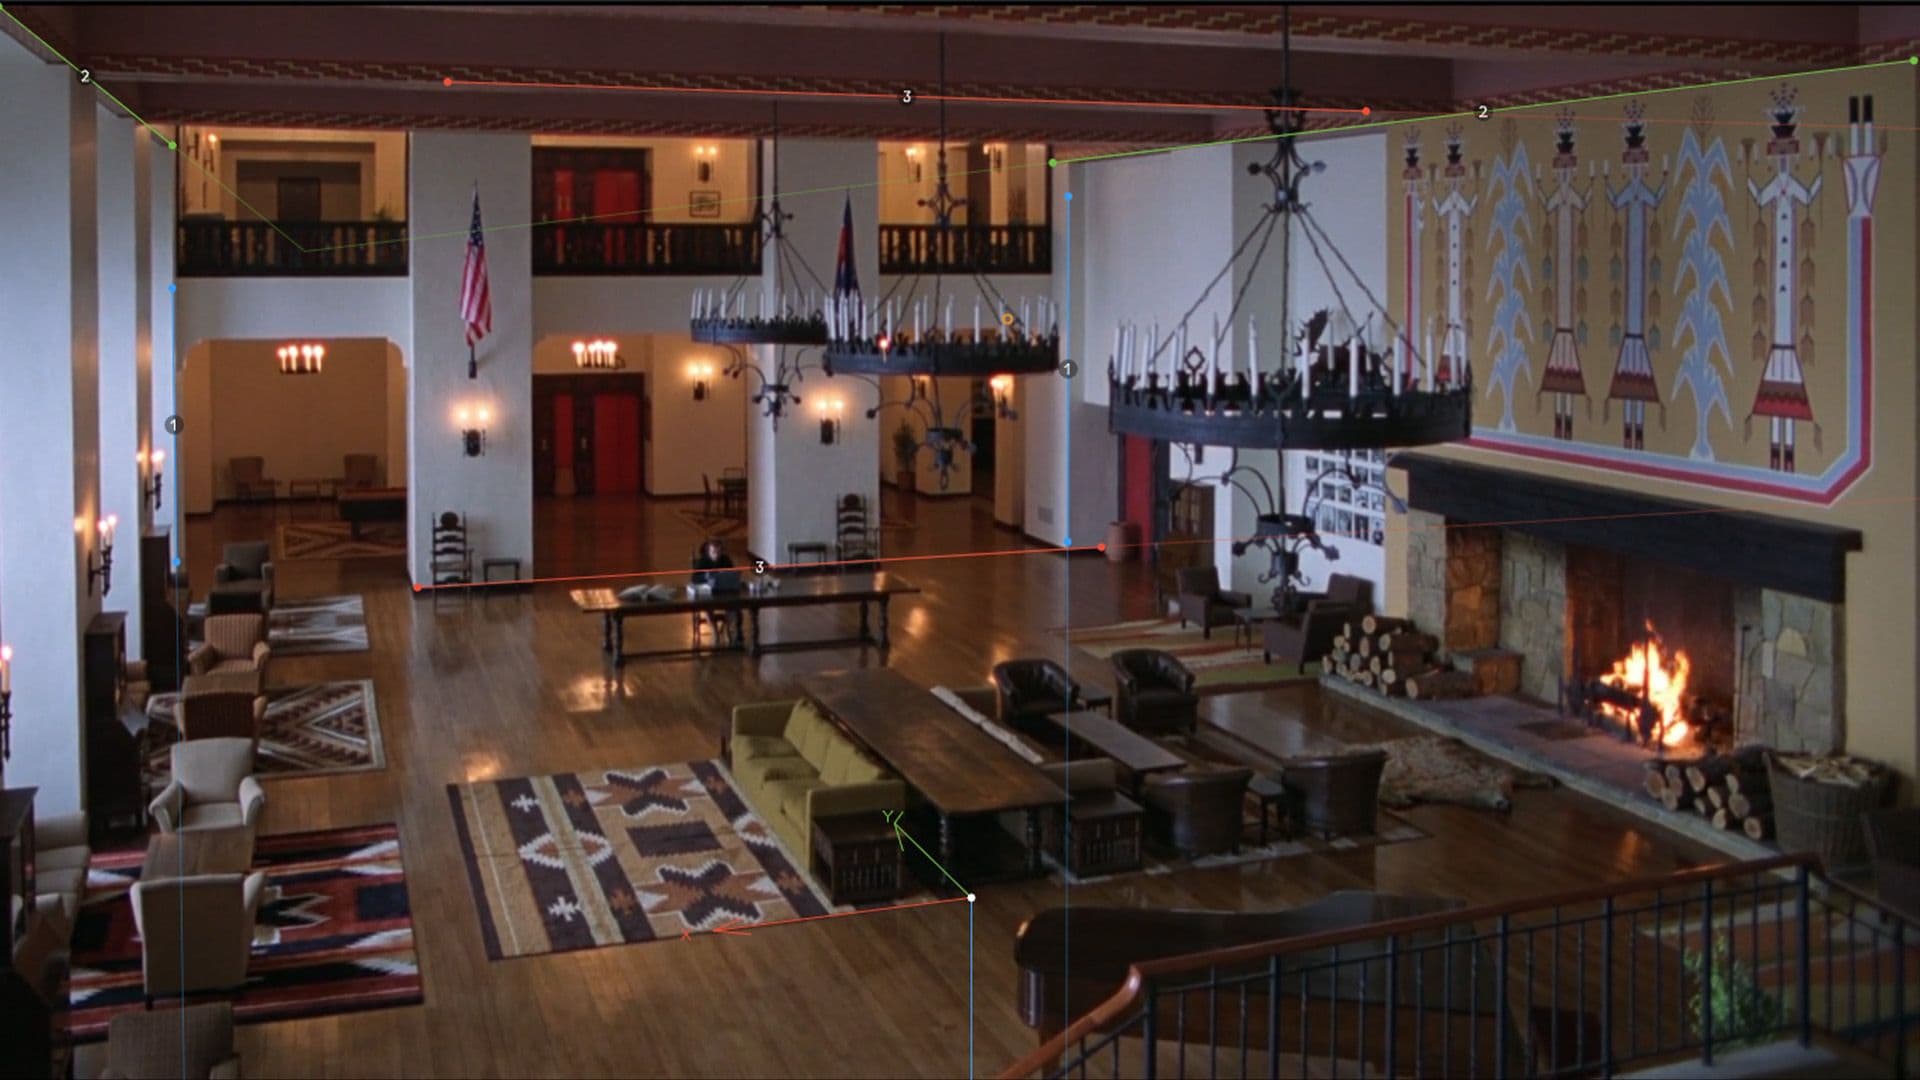
This part was pretty straight forward, I just rewatched The Shining and took a screenshot every time there was an interesting shot of the environment. I also looked online for some Making Of of the movie, but there was nothing about the Hotel. Then, I looked for the Behind the scenes of the movie “Doctor Sleep” the sequel of The Shining and there was a complete breakdown on how they recreated the Set from the Original movie.
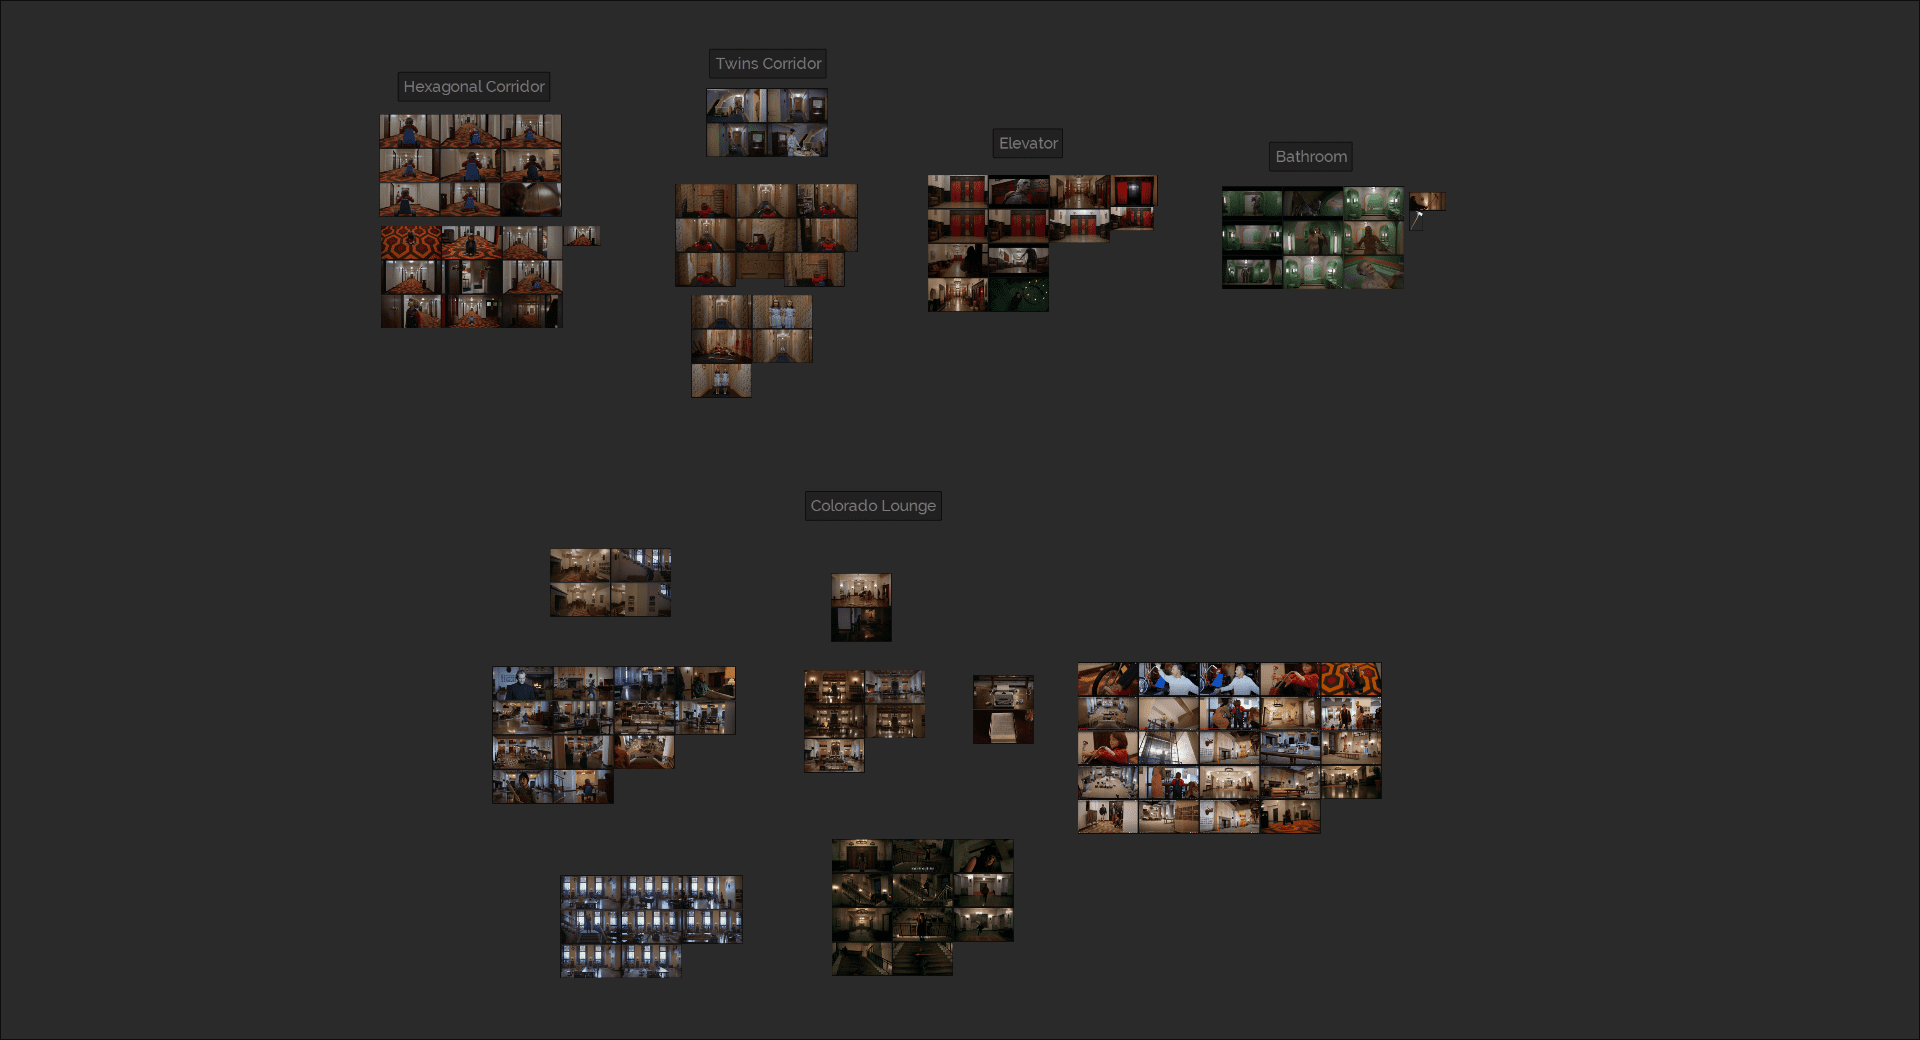
Once I had all my references and figured a base story on what was going to happen in this short film, I made a plan (that evolved while I was working on the film) and a shot list, which was more of a set list since I had a 2 minute sequence shot into 5 different rooms.
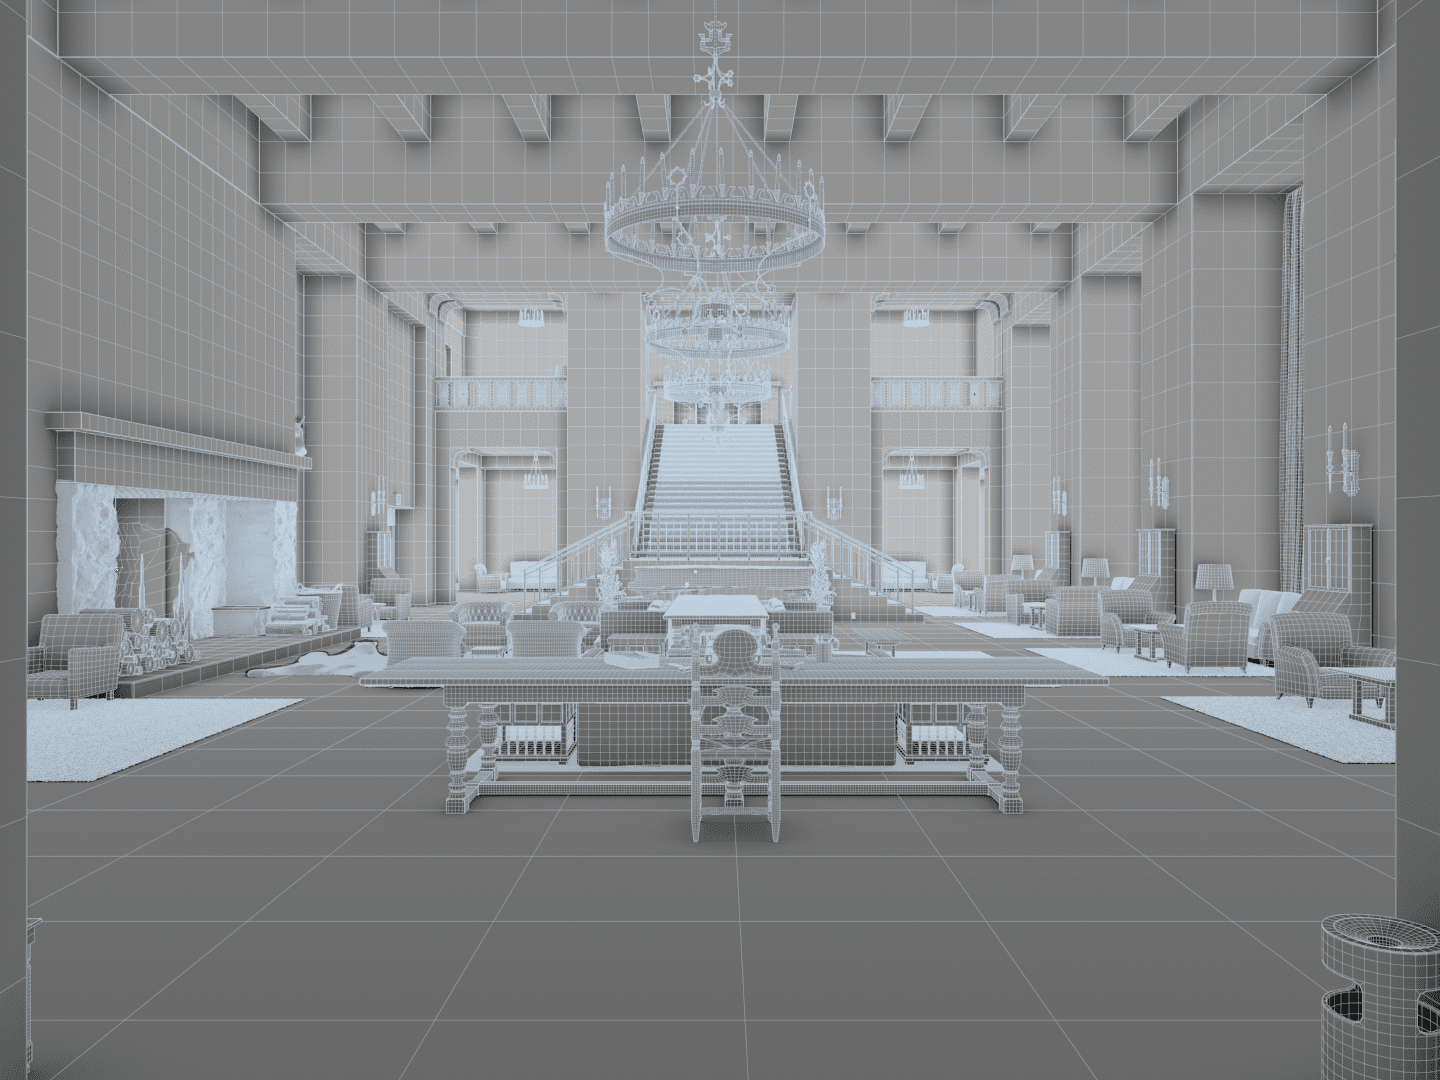
Let’s dive right into the making of this huge environment, which is actually five separate environments combined into one.
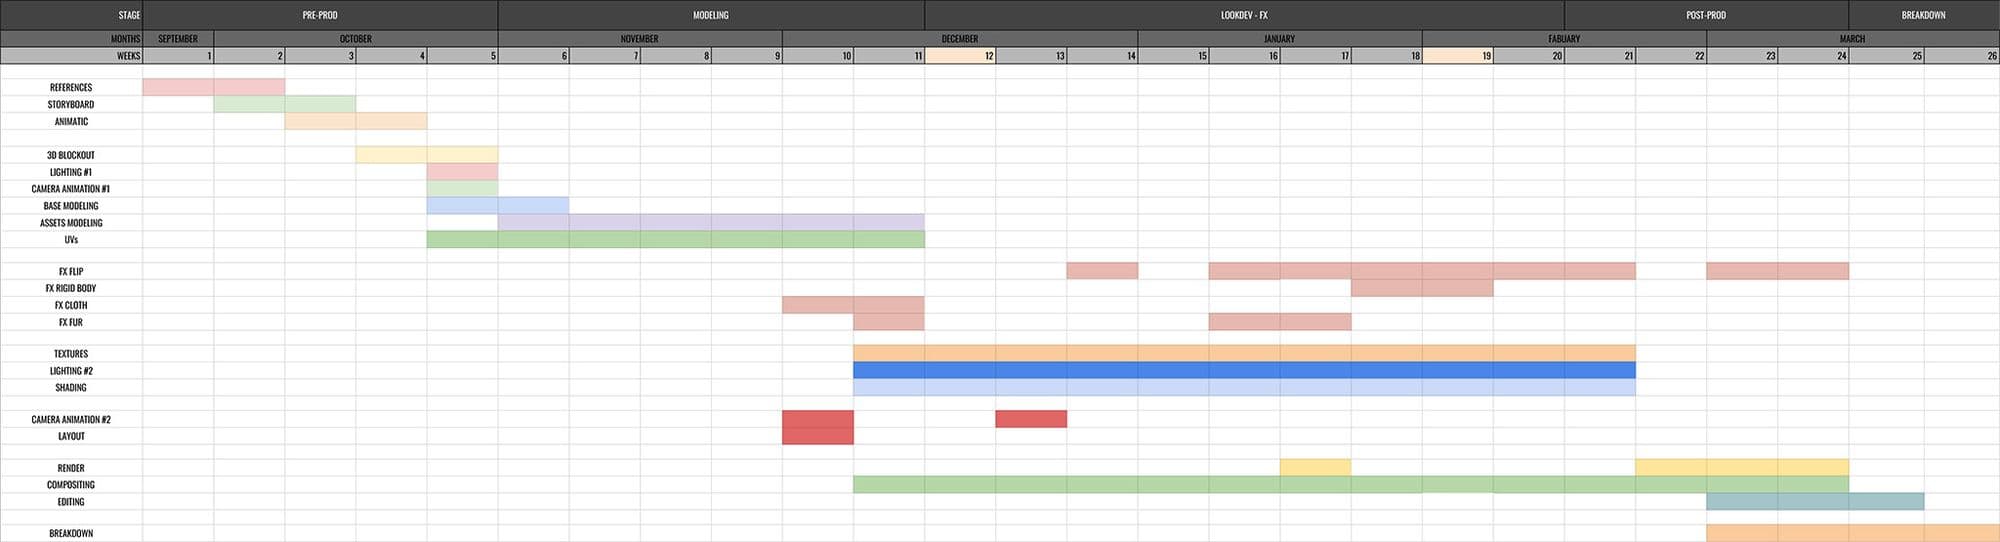
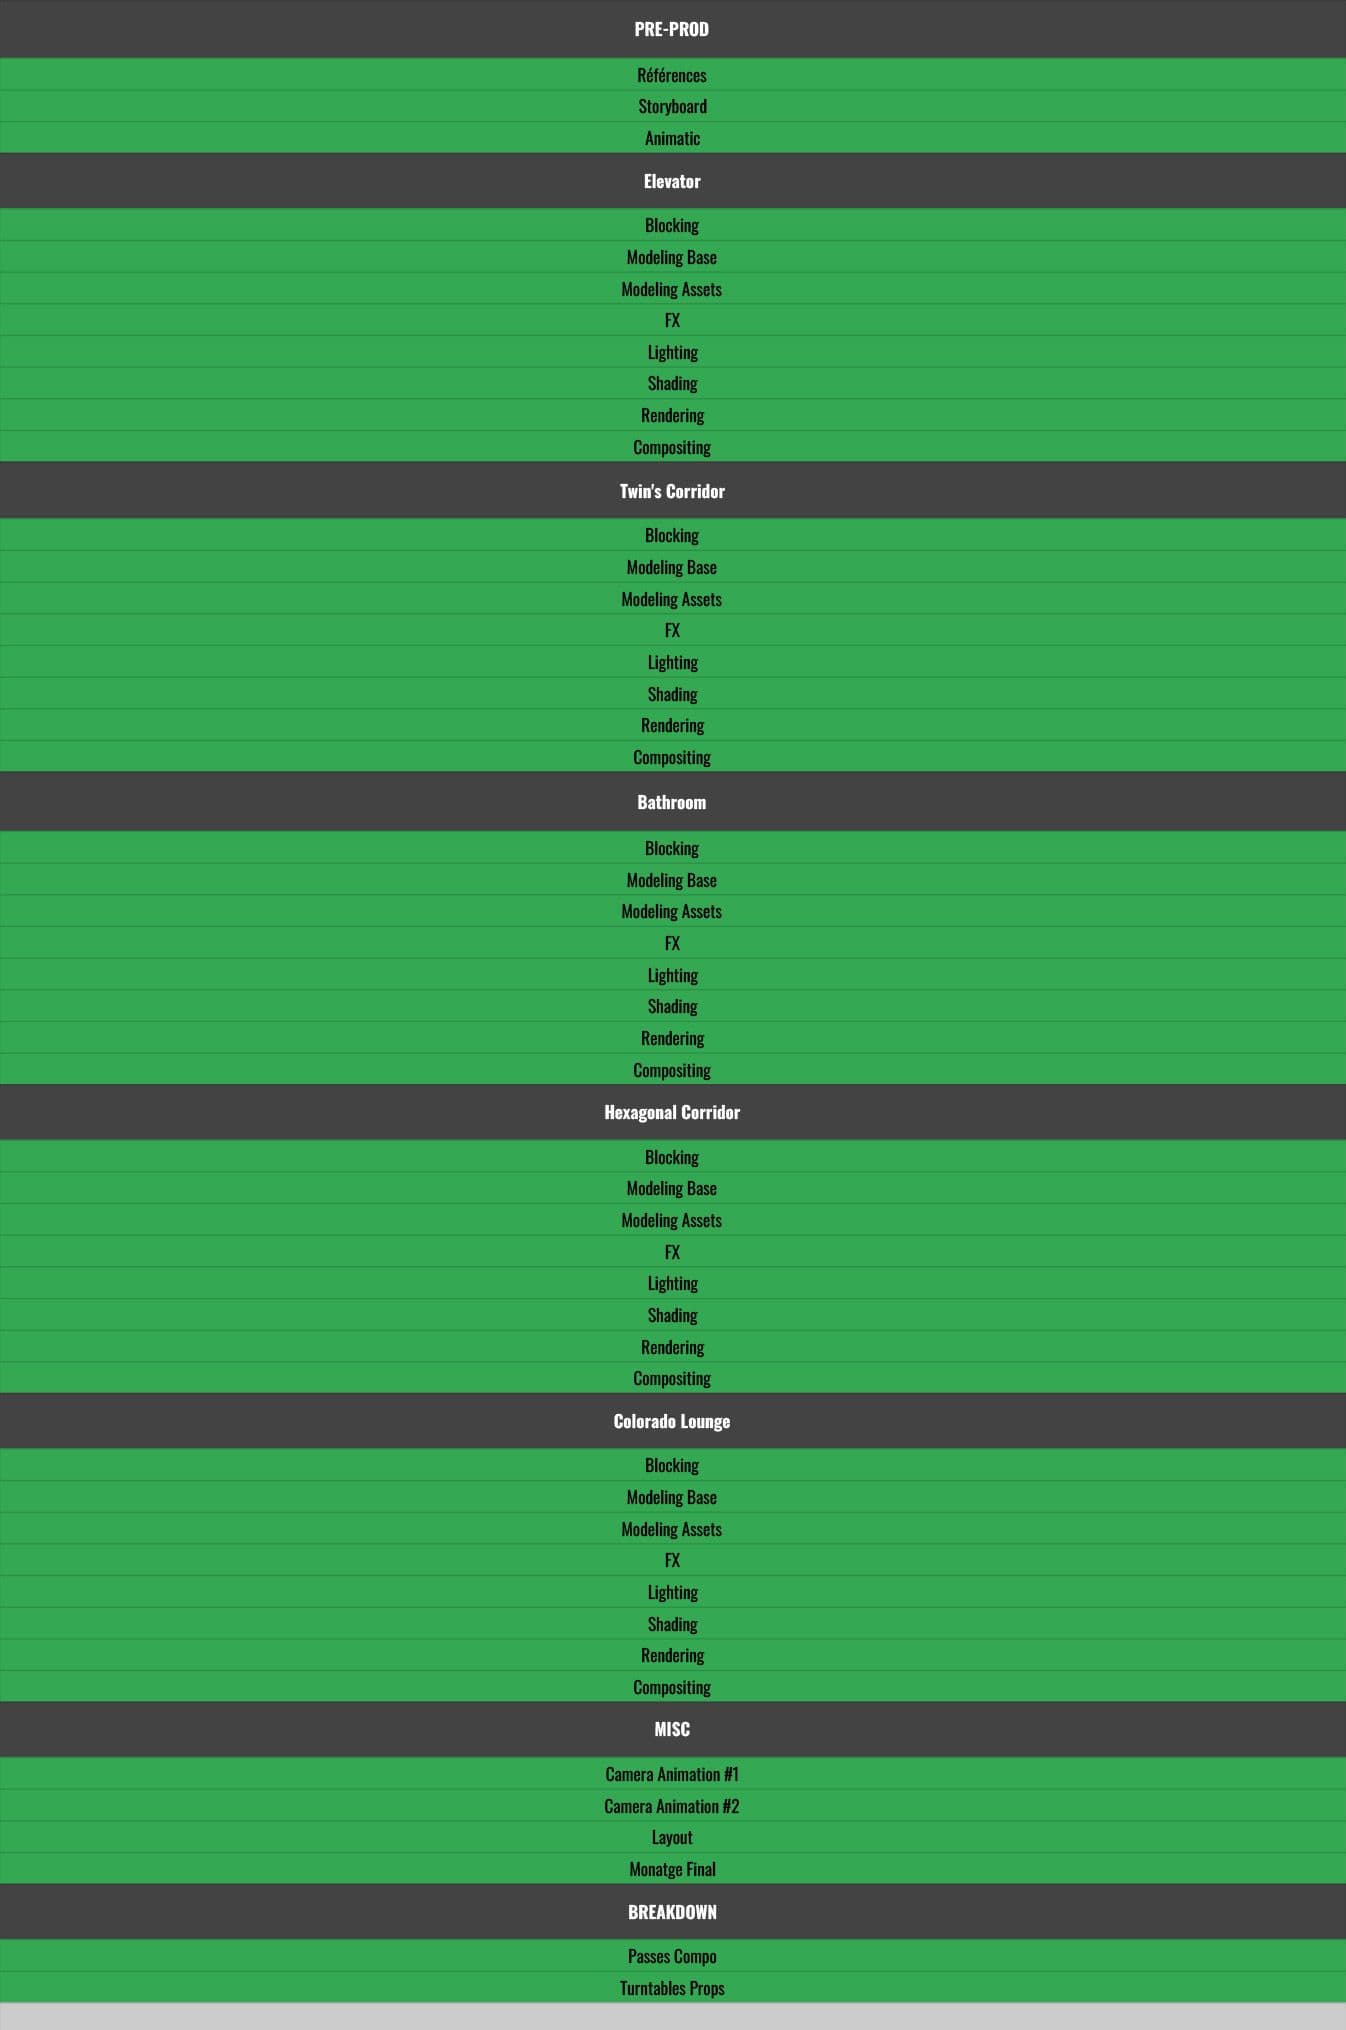
To understand my process, i’m going to present to you my workflow for this project:
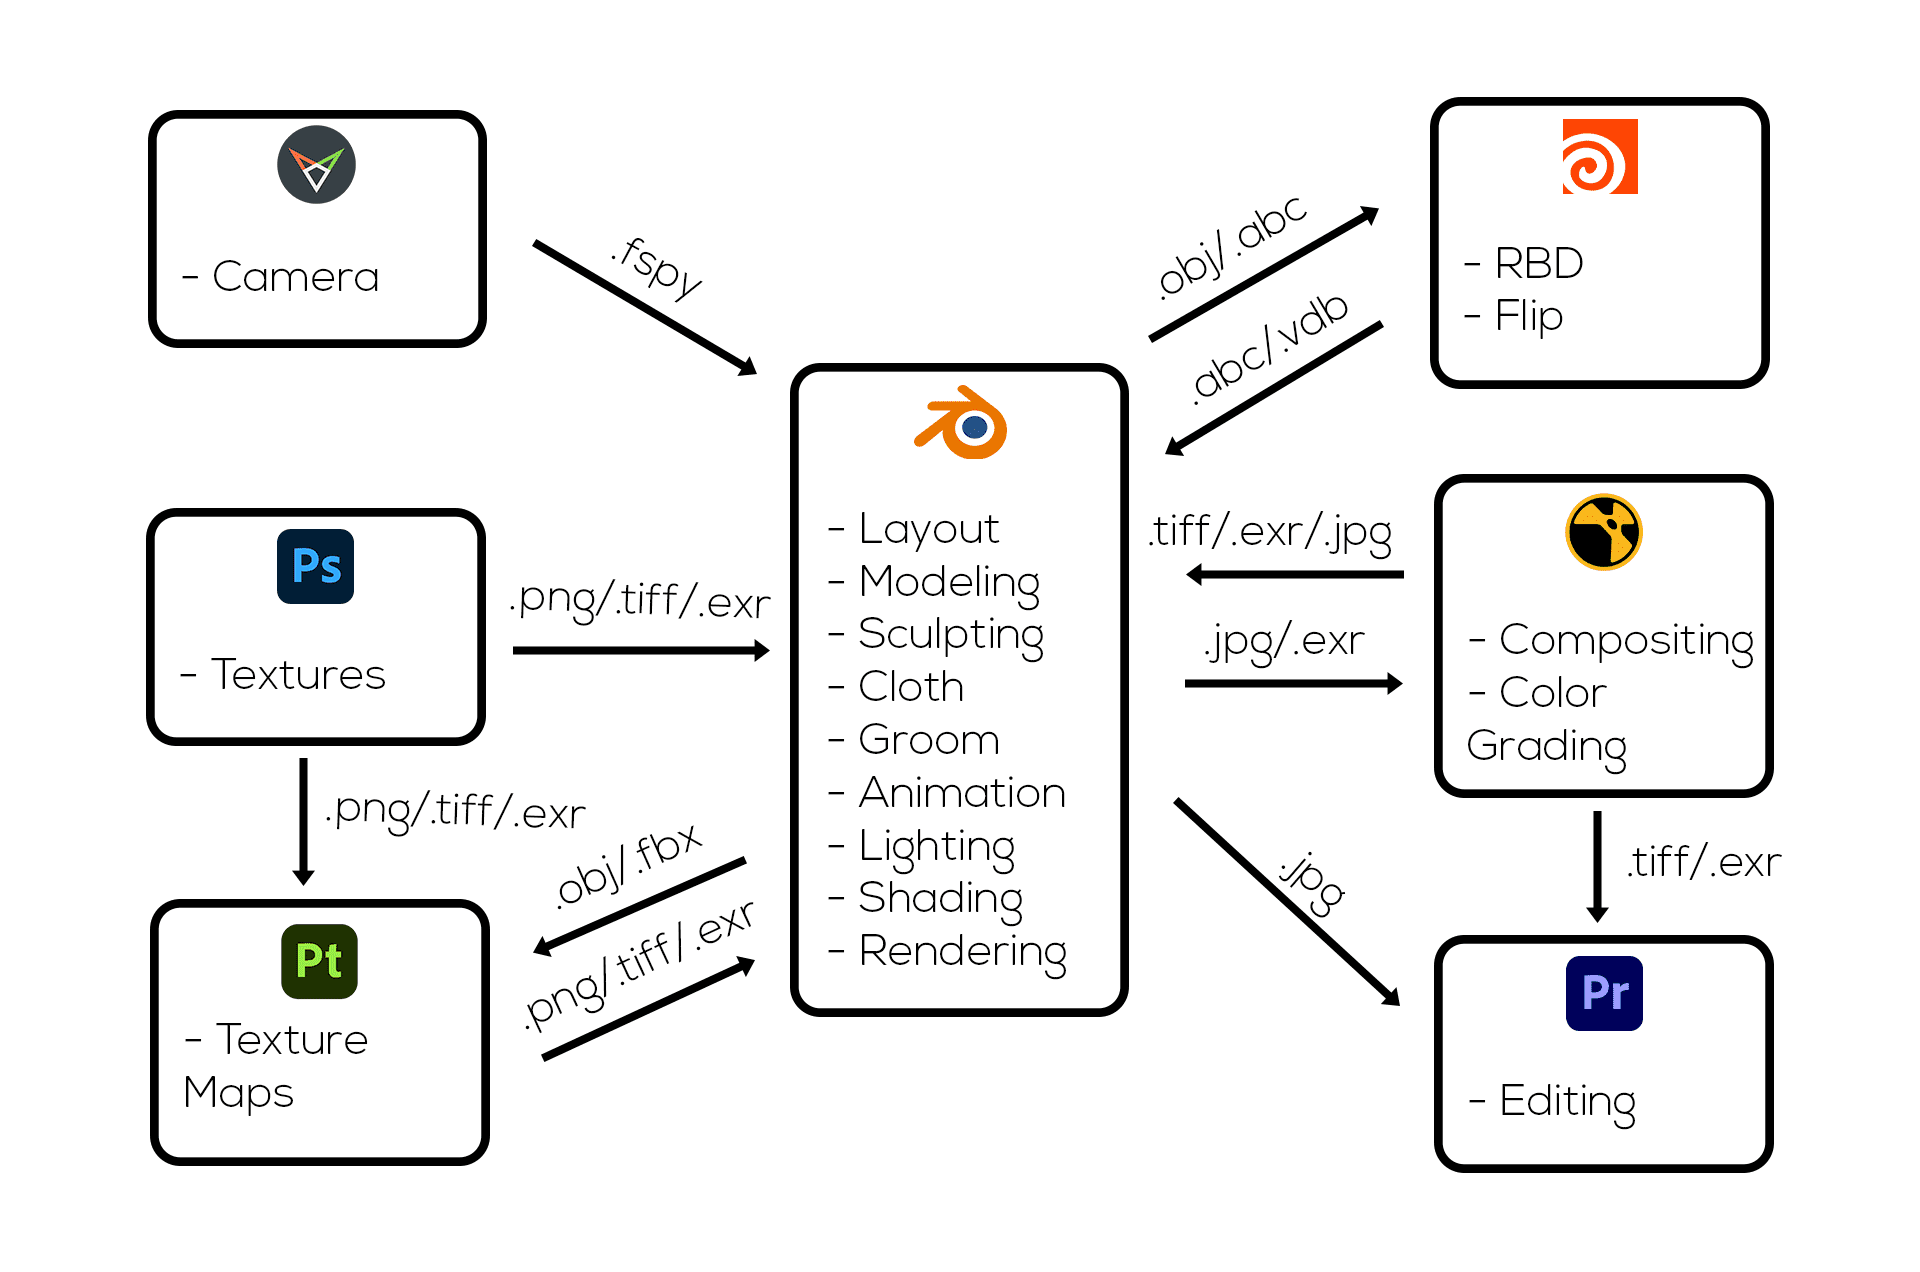
In order to be as accurate as possible I used fSpy, a tool that allows me to find the location of the real camera used on set as well as its field of view. I took one of my references from the movie and used it to block every environment out in Blender.
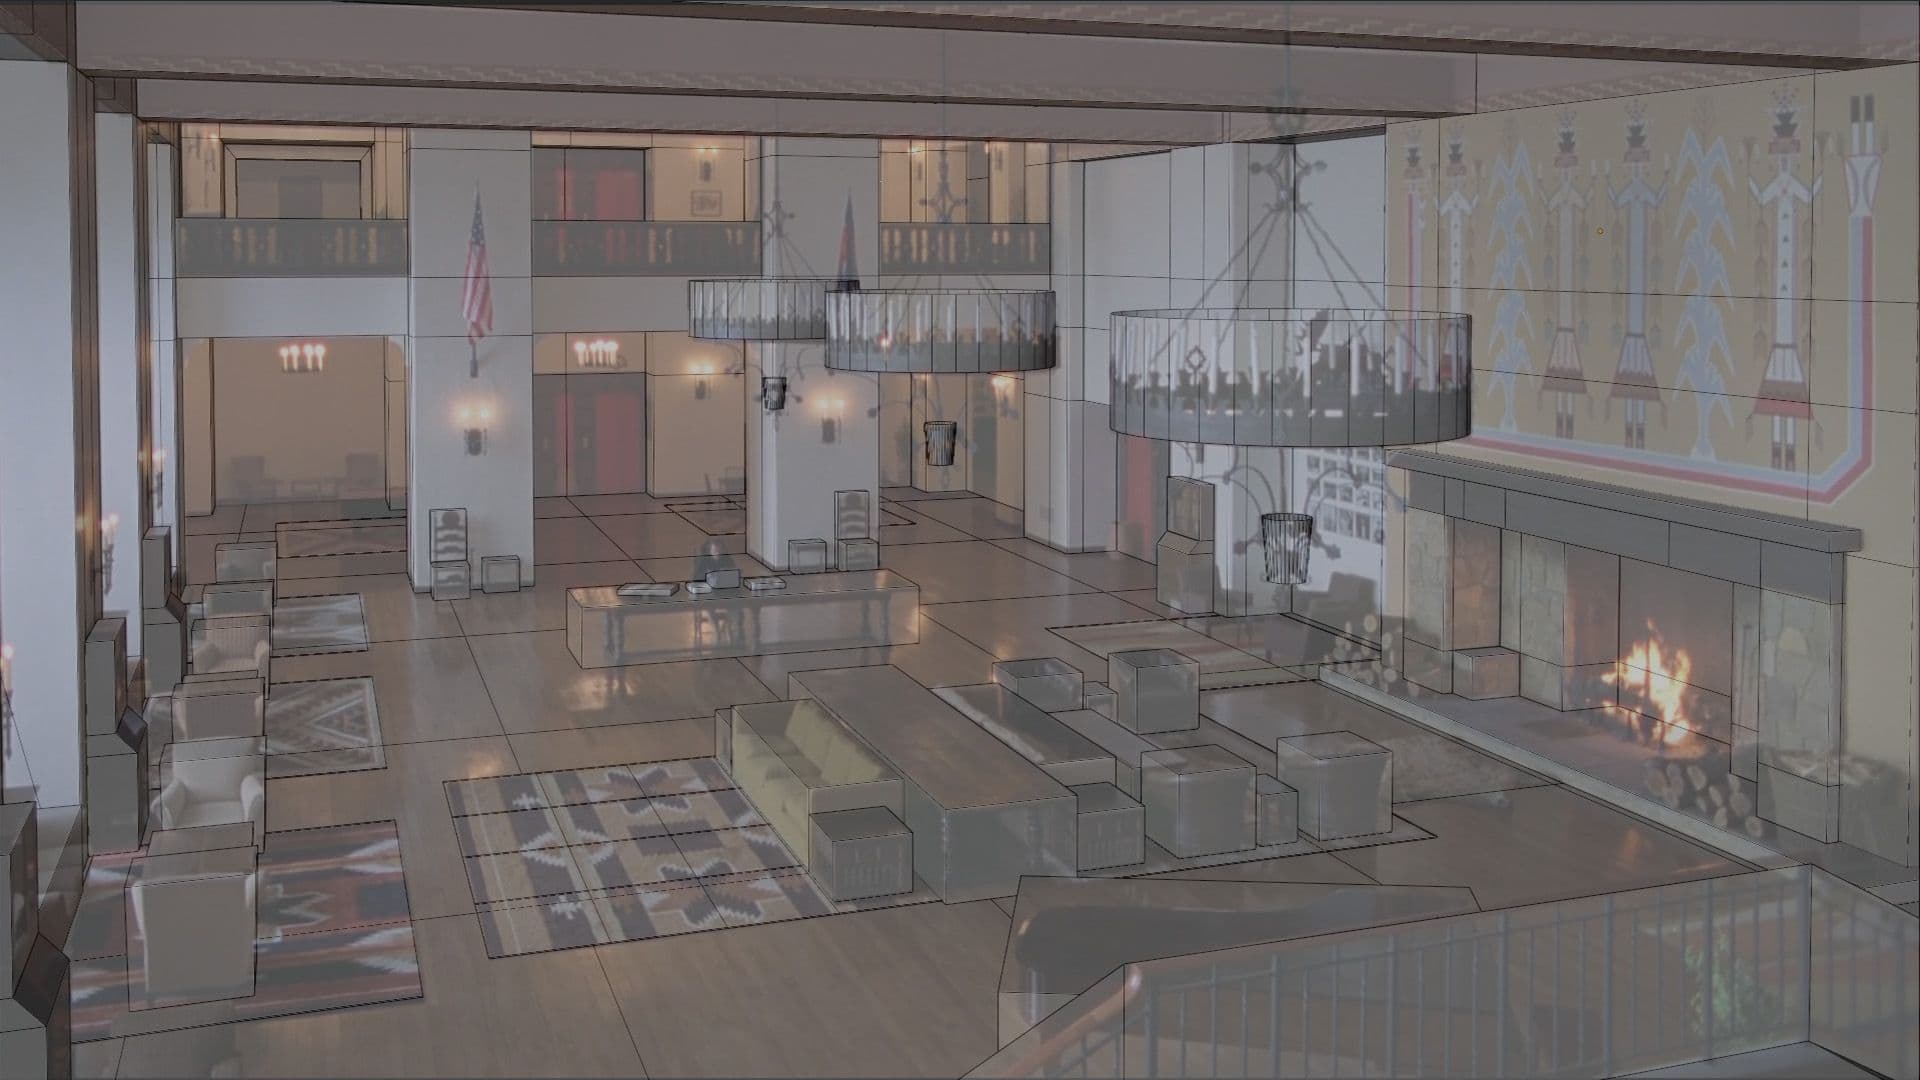
This method only gave me an approximation of the environment with the right proportions but it was a great starting point for the modeling part.
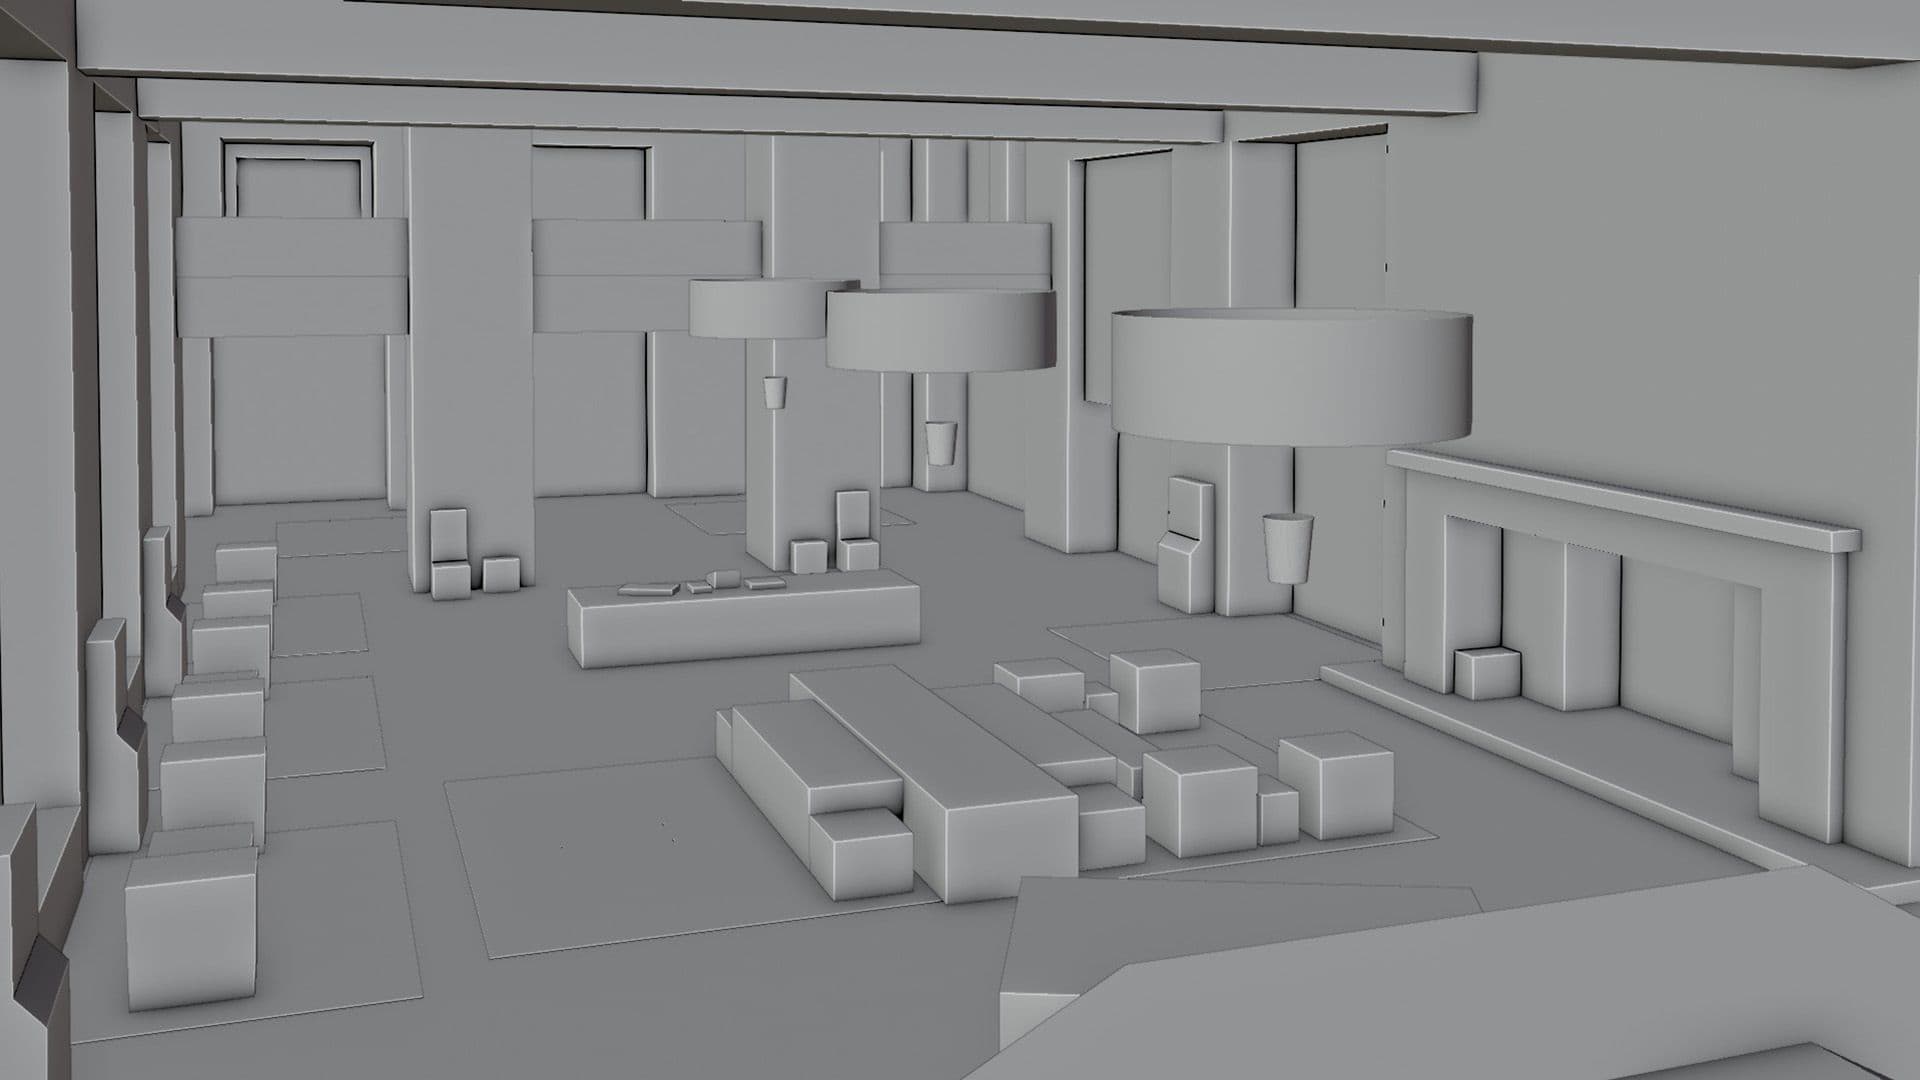
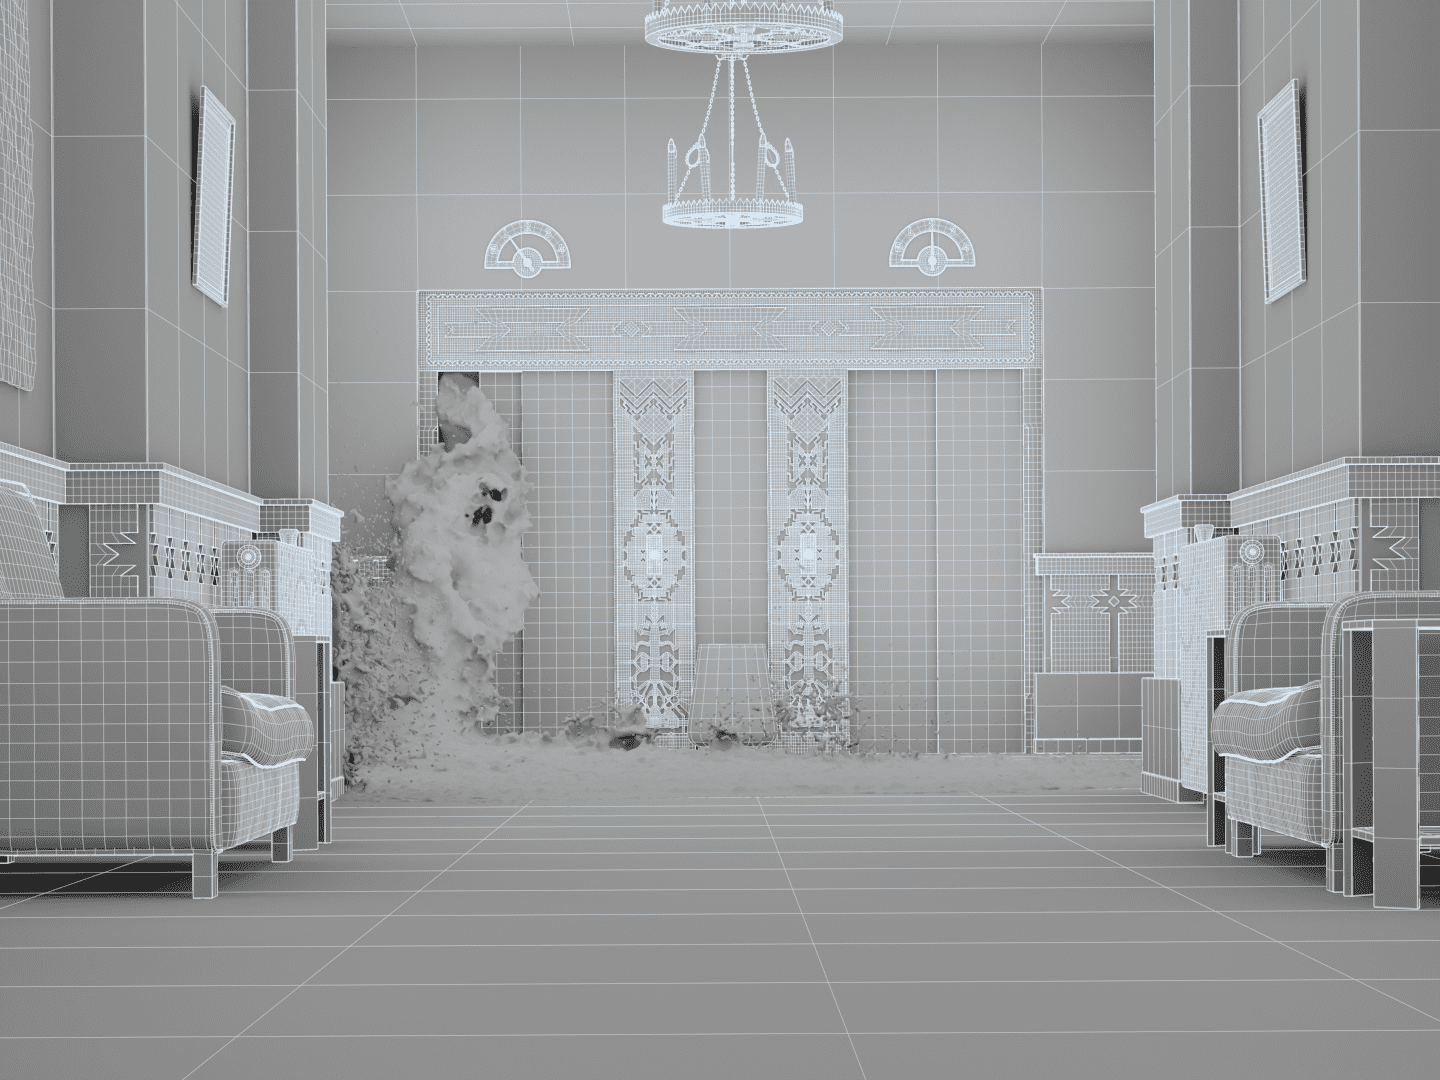
The modeling process was pretty straight forward. Using my references I was able to finish 4 environments in a matter of weeks. Only the Colorado Lounge, the biggest one, took me about the same amount of time as the others combined, to be completed.
I used the sculpting and cloth simulation tools from Blender because it was great for little tasks like breaking a shape or simulating some curtains and pillows - I didn’t feel the need to switch over Zbrush or Marvelous Designer on this project.

For this Short Film, I wanted to model every single asset by myself for several reasons. Mostly because it was my graduation project, so I wanted to demonstrate my skills and what I can create to professionals (and also because it’s fun to do so!)
As a result, there are over 60 production ready, high poly assets, with subdivision or subdivision ready, with packed UVs and PBR textures, distributed across 5 environments.
The only assets I didn't model were the animal's head and rug (that I then groomed), as well as the plants and wood logs found in the Colorado lounge
Once I had everything modeled with UDIMs, I switched over Substance 3D Painter to do my texturing. It was the first time I used this program for a real project; I had only used it a couple of times for school projects but nothing of this scale. Naturally, I was a little concerned, but Substance 3D is a really good user friendly software so I got used to it really quickly. I combined it with Photoshop to create my alpha patterns.
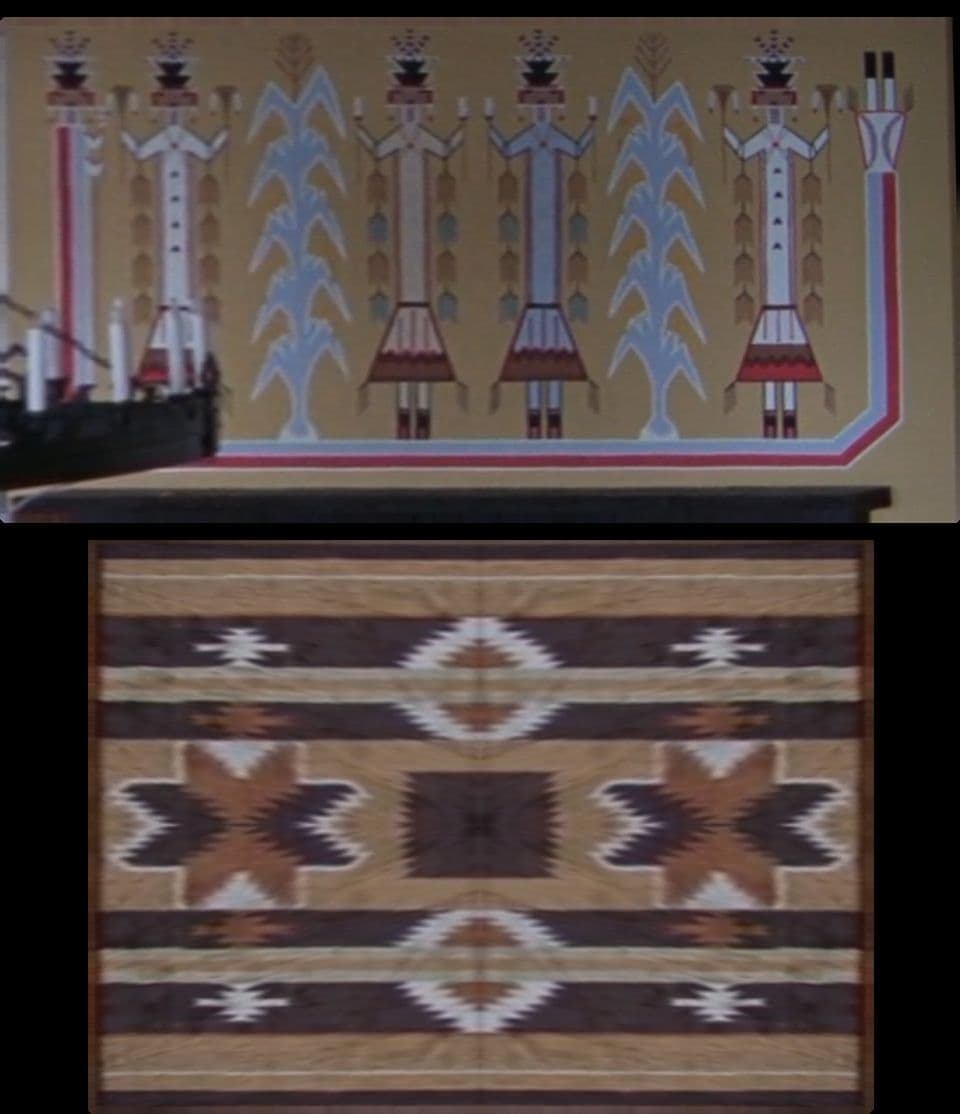
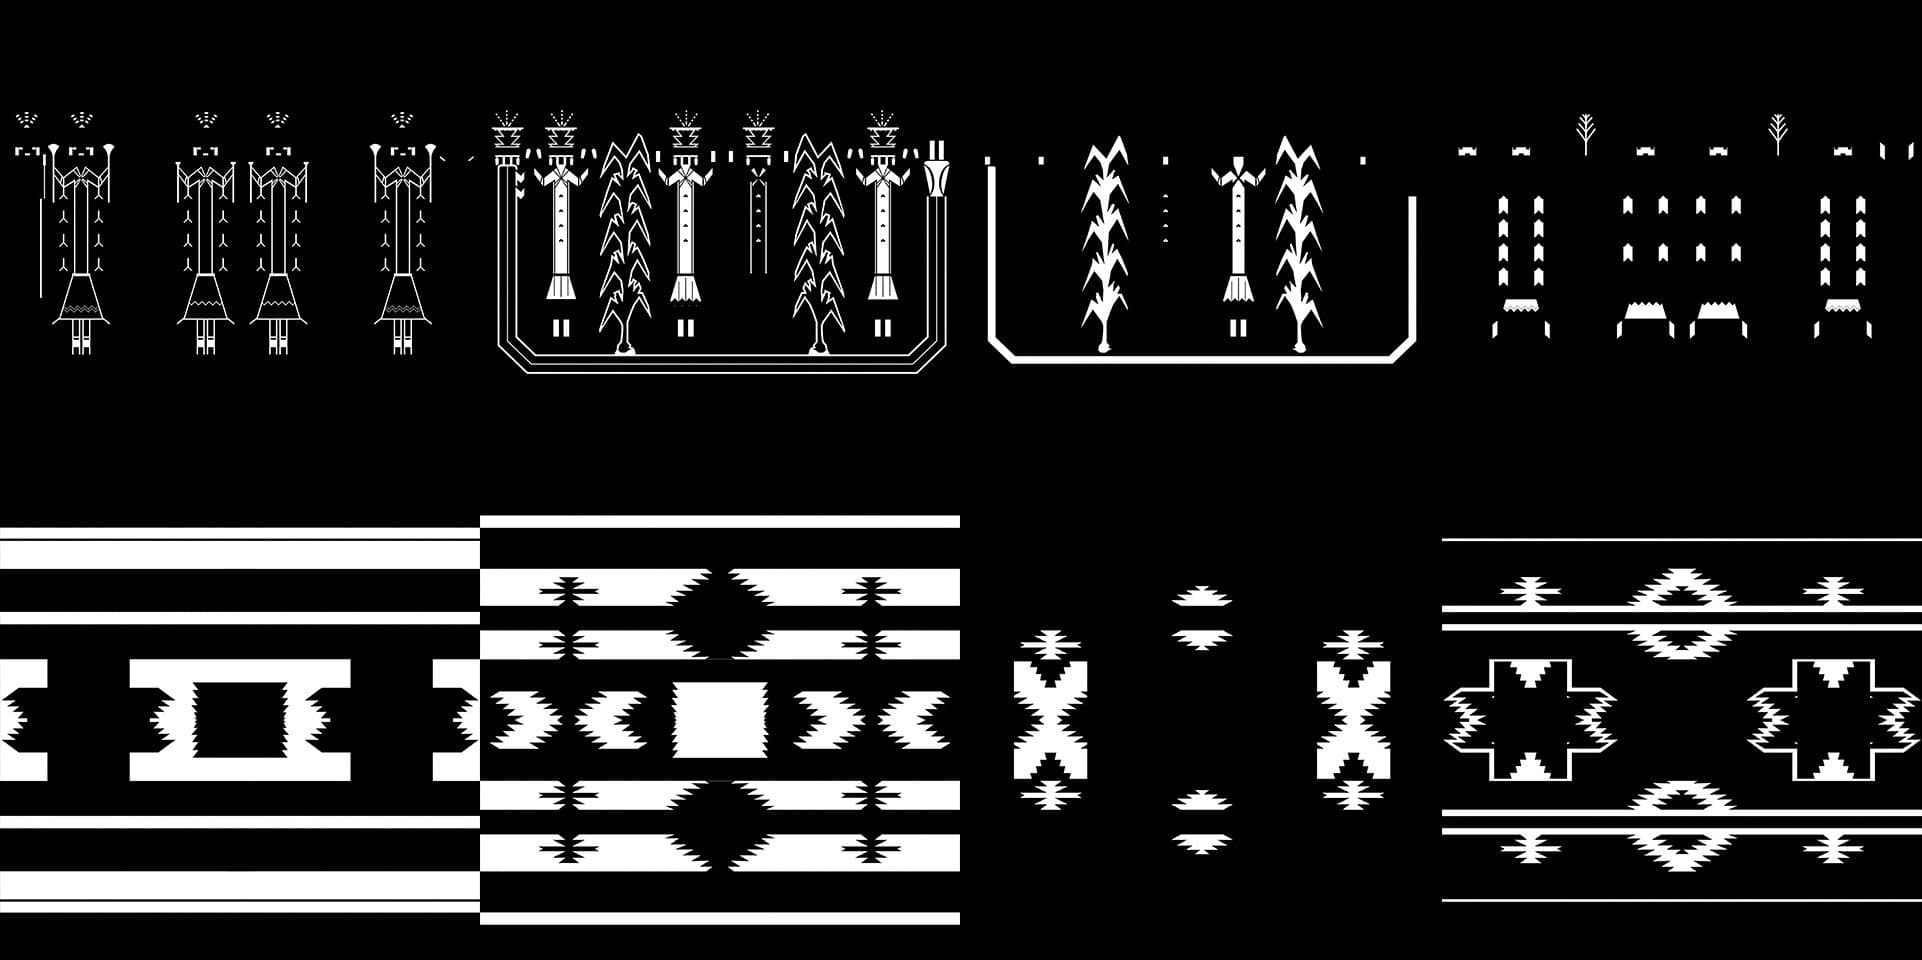
The struggle I had was actually to find the patterns so I could recreate them. For example, the sand painting on the fireplace and the rugs in the Colorado Lounge are not patterns that you can find online, so I had to figure out a way to extract them from my references. As previously mentioned I used fSpy to blockout my environments so I had a perfect camera to project my reference from, onto my blockout geometry. Therefore, I just had to bake this geometry as an image so I could then trace my alphas and use them in Substance 3D Painter.

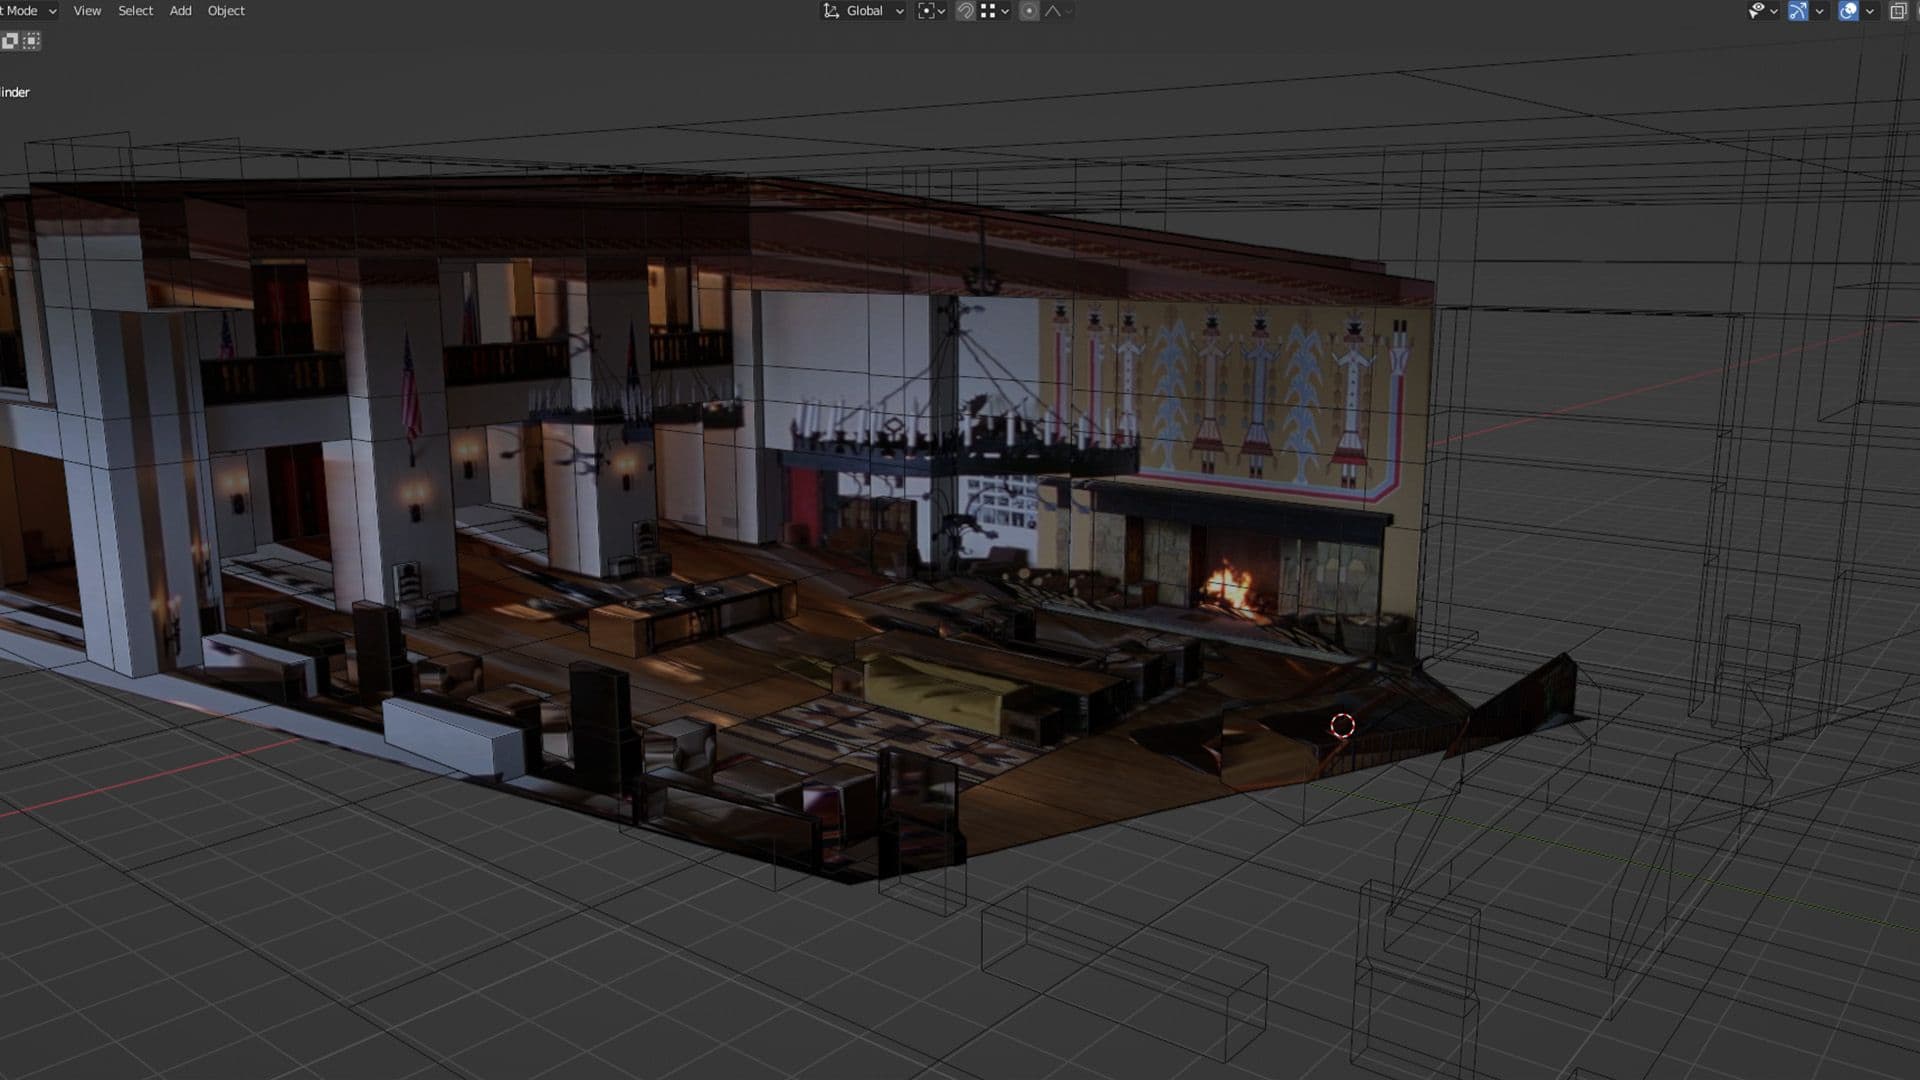
When I was done texturing in Substance 3D Painter I exported my textures to Blender to do my shading and lighting, I had to go back and forth in Substance 3D to get the texture right.
Since I used Blender, the render engine I used was Cycles. I had over 3000 frames to render. Cycles has a progressive rendering, made for the architecture of the new RTX GPUs. Since I have one, the rendering process didn’t take too long.
Rendering took about 1-2 minutes per frame for small environments, reaching 5-6 minutes per frame for the biggest one, when I combined the Colorado lounge, the bathroom and the hexagonal corridor. Overall, it took me about a full week, 24/7, to render everything.
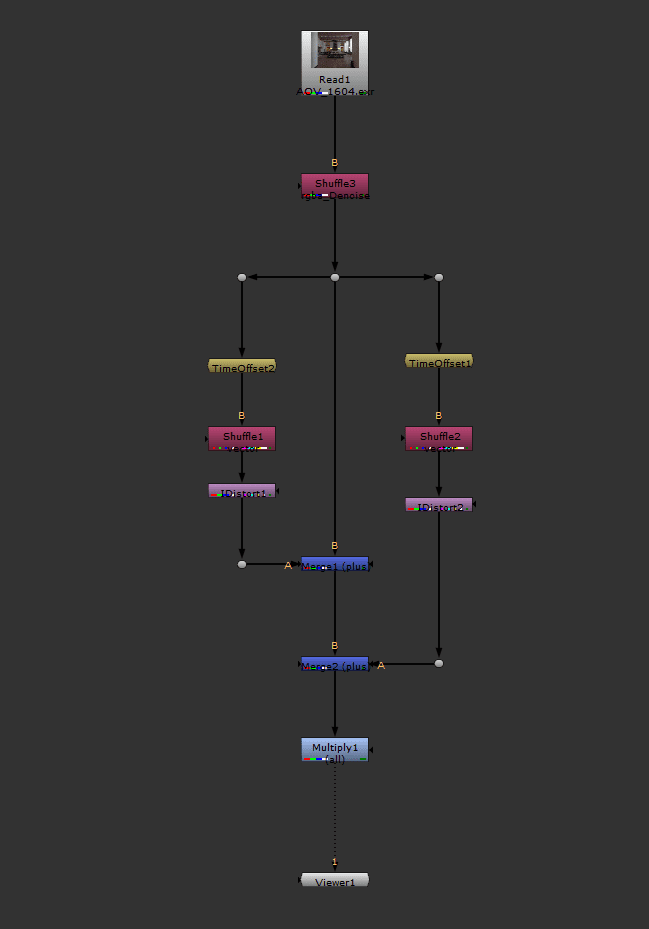
One issue I came across when rendering interior scenes, is the noise. Unlike exterior scenes, interiors need a lot of samples to obtain a clear image. I didn’t want to have too many samples since I had 3000 frames to render, so I used the Open Image Denoiser into Blender.
This Denoiser is great on single images but introduces some flickering on Animation due to the fact that there is no Temporal information. To fix this, I created a Temporal Denoise into Nuke using the vector pass and the IDistort node to combine 3 frames together, reducing the amount of flickering drastically.
As I mentioned, I worked in Nuke for the compositing part. It was a pretty straight forward process - the goal was to make the renders feel less flat and less 3D.
First I colour corrected my renders to match my reference as accurately as possible. I then added some stock footage elements like smoke and fire.
Lastly, I added my lens effects like some glow, glint, chromatic aberration, vignette, lens distortion, grain etc… to introduce some imperfection to my 3D flat renders. I also did a little bit of global colour grading to homogenise every shot.

Check out this video more breakdown content, with assets turntable and compositing passes.
That's it !
That’s it for my graduation project “The Shining Tribute”. Overall this project took me 6 months to complete with at least a month of Houdini Simulations which I saved you from…I hope you enjoyed this breakdown as much as I enjoyed working on this Film.
As I start my career, I look forward to working on amazing projects with amazing people and learning new skills and tools to improve and challenge myself!
You can find me on The Rookies, ArtStation, Instagram and LinkedIn.