Building a Stylized 3D Environment and Shot in Unreal Engine
Ethan Clark, a final-year student at Gnomon and 2022 Rookie Awards Finalist, gives an in-depth look at how he brought to life a stylised environment in Unreal Engine.
Ethan Clark, a final-year student at Gnomon and 2022 Rookie Awards Finalist, gives an in-depth look at how he brought to life a stylised environment in Unreal Engine.
Ethan Clark is currently studying at the Gnomon School of Visual Effects in Los Angeles. Starting as an oil painter, Ethan learned the fundamentals of art and painting at The Art Academy in New Jersey, where he also went on to teach oil painting classes. Additionally, he taught for Evolve Artist online.
Ethan brings his experience to world-building in 3D, and in this article, shares how he built a stylized 3D Environment in Unreal Engine.
Initially, this project was created over a 10-week period for an “Environment Creation for Games” class at Gnomon, taught by Nate Stephens. As per many classes at Gnomon, an open-ended assignment was given: “Create an environment”, and it was up to me to decide what and how to do this.

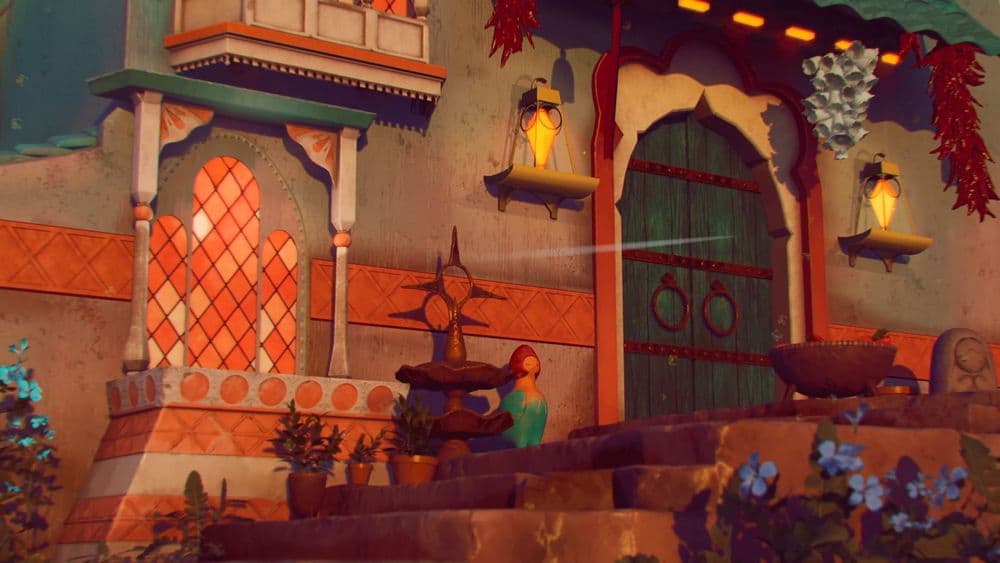
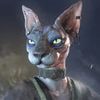
While many game art students choose to work on environments that are more gritty and moody, I wanted to create something scenic and peaceful. The type of environment that makes you want to take a deep breath and embrace the fresh air and cool breeze.
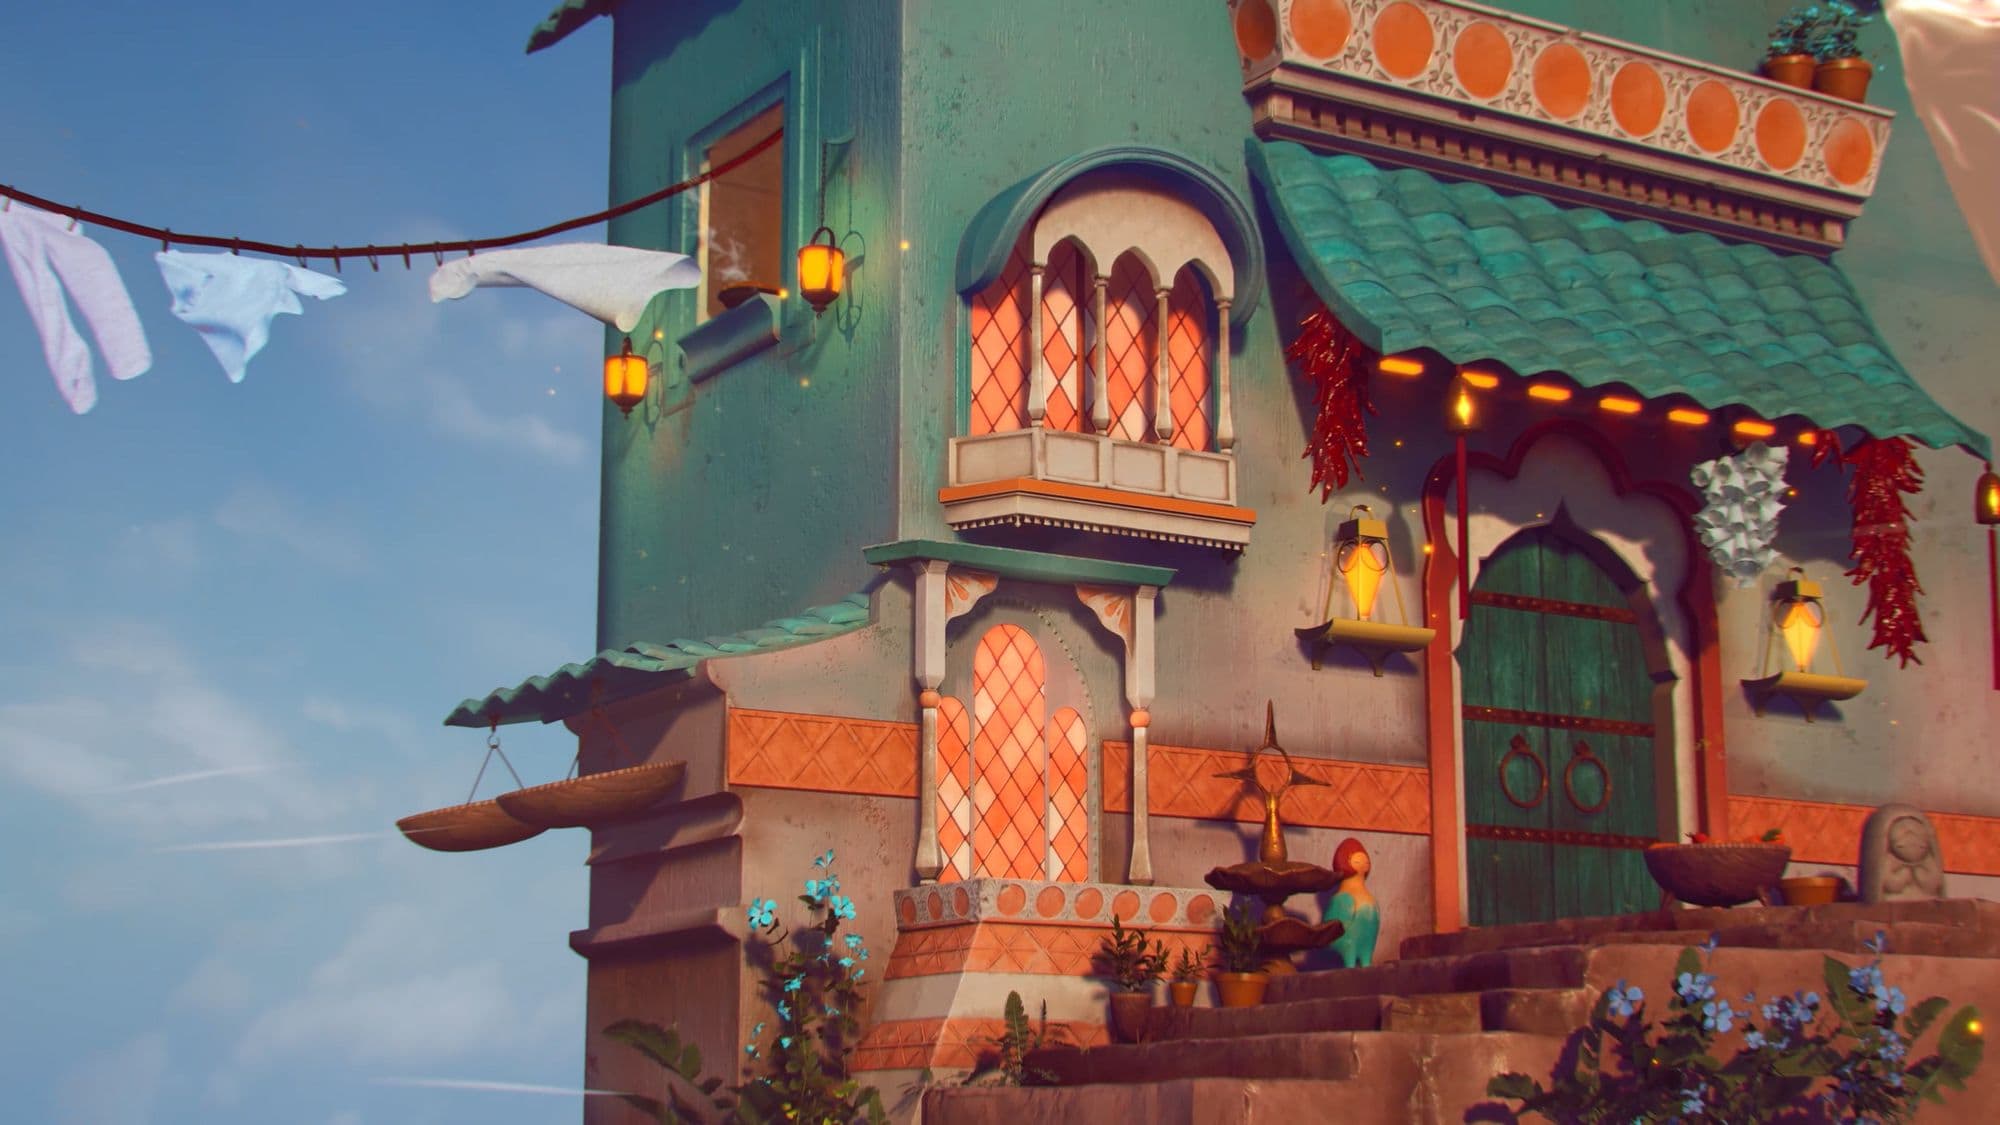
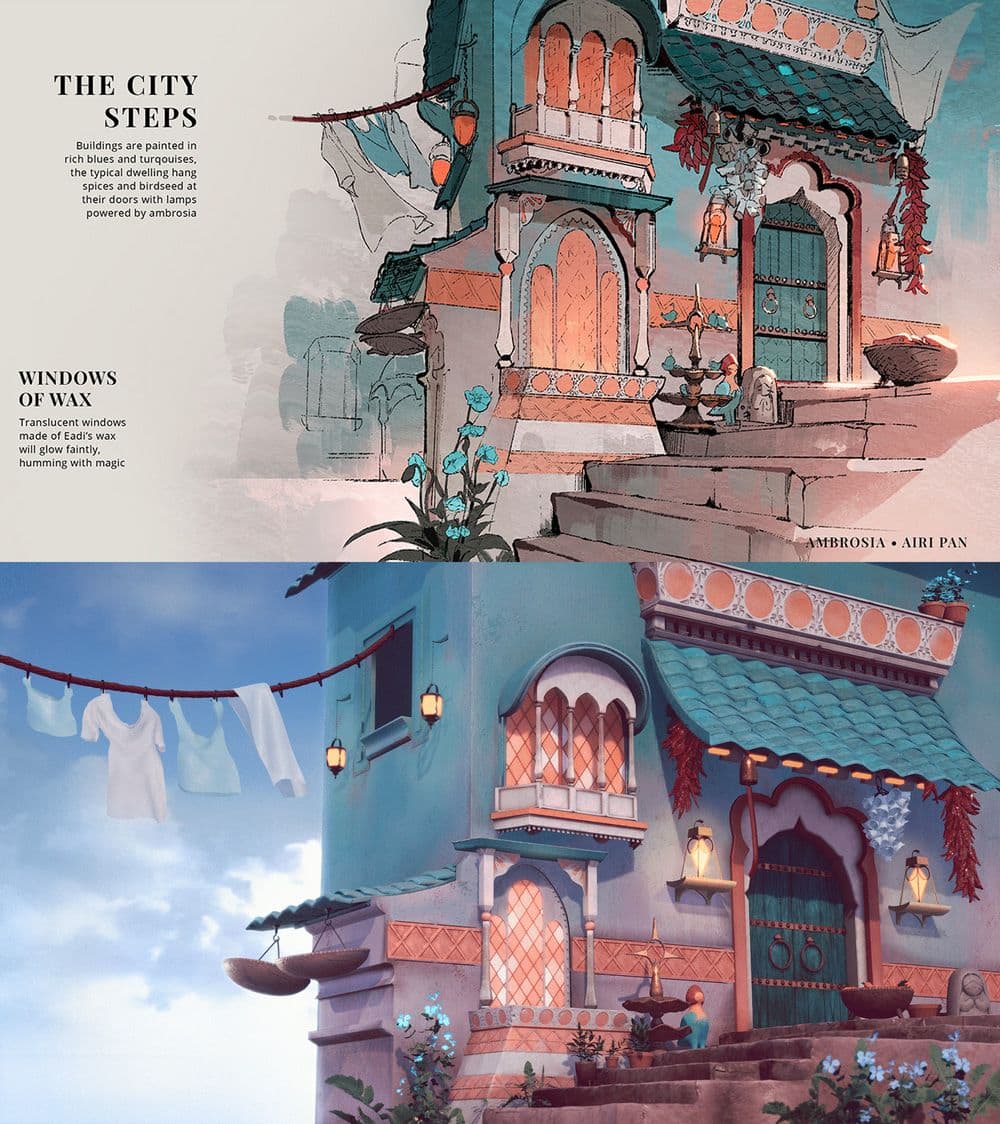
As soon as I saw Airi Pan’s "Ambrosia" concept art, I fell in love. But I knew that a concept as loose as this one would require some careful planning.
When working from a concept, creative liberties must be taken to preserve the integrity of the composition while still making the world seem believable in a three-dimensional space.
It is okay to force the perspective a bit for your beauty shot, but you don’t want to end up with a scene that looks like a Picasso painting when viewed from angles other than the beauty shot. Today, I'll try to show you how I achieved this vision.
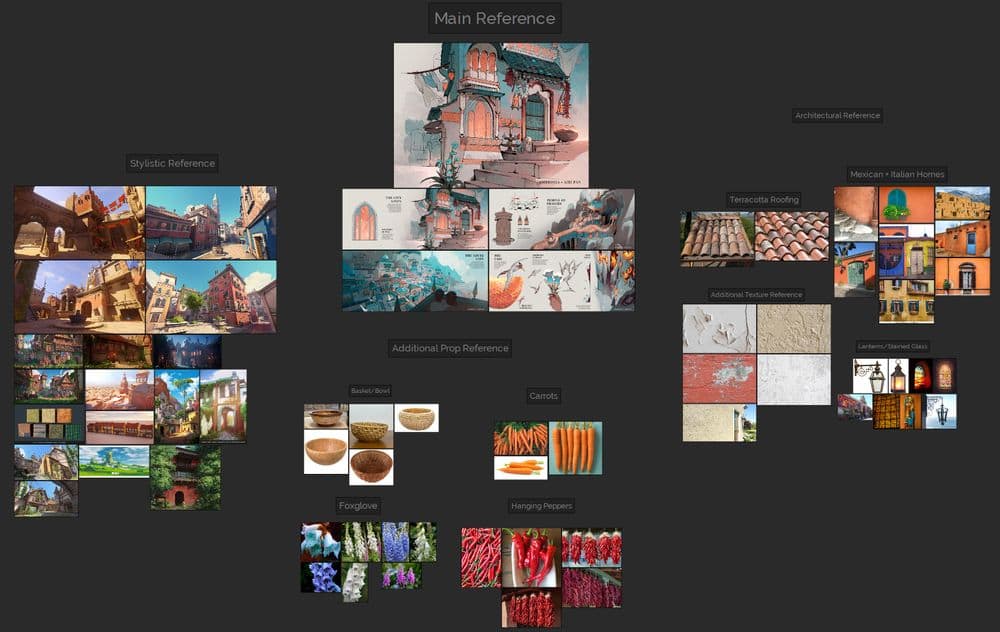
Early in the process, I tried to establish the tone and style that I intended for this piece. PureRef is a software that I regularly use to compile both reference pictures and inspiration for my work. It’s a very easy way to organise images and overlay them on your screen as you work. I created a PureRef doc to help me with texture, model, and stylistic reference.
I think that establishing a stylistic reference is extremely important, as well. It can be jarring if one object in a scene looks hyper-real while others look extremely cartoony.
Aiming for a certain style helps you regulate the realism slider throughout the piece. As with everything, the more reference you get, the better!
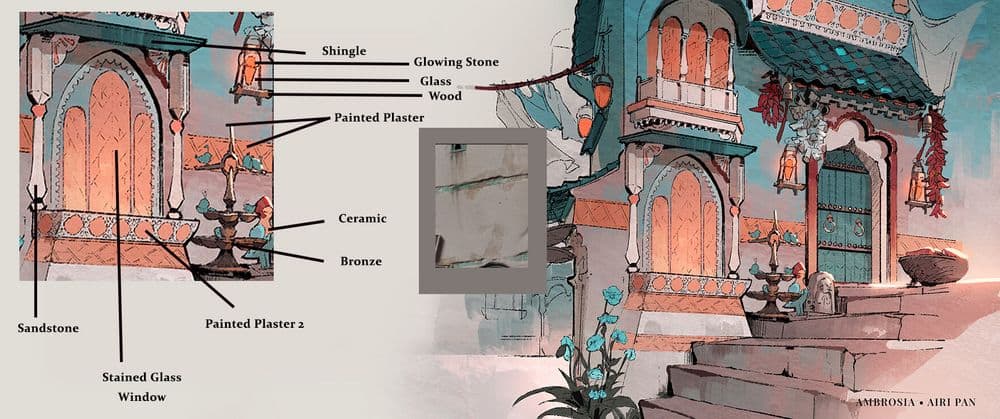
I also went back into the concept and established a material canon for the scene. I tried to interpret the materials of each asset in the scene logically. Writing them all down helps you find more specific and accurate references.
My biggest stylistic inspiration for this piece was the environment art from Blizzard’s Overwatch, and my biggest geographical inspiration was from the styles of Italian and Mexican homes.
In a stylised scene like this with a somewhat forced perspective, a blockout is essential. I model primarily in Maya, so I started by opening a fresh Maya scene and overlaying my reference image in my intended camera shot, which I call my “ShotCam”.
From there, it’s time to match the perspective of the scene. As I’ve learned, trying to match the perspective of an illustration is not a 1-to-1 process. You will rarely, if ever, end up with a 3D piece that matches your concept 100%, and that’s okay.
It is technically possible to match the concept 100% if you stretch and distort the meshes to create an extremely forced perspective, but this will compromise the nature of your piece and it will look incorrect from every angle other than your intended camera shot.
I intended to create a piece that looked best from my intended camera shot, but still made logical sense when viewed from other angles.
The process of matching your shotCam with your reference is just a matter of trial and error. I use the Maya starting grid, as well as a cube that I’ve inserted to represent the side of the building, and rotate the camera until it lines up with the desired perspective. Keep in mind that it is impossible to make an illustration’s perspective match 100% with a real-world camera. No matter how good the artist is, they are likely to be at least 0.1% off from the real-world perspective that your 3D camera will draw. What’s more important is to capture the feeling of the scene, and to match the silhouettes of the shapes as well as you can without compromising the integrity of the scene in other 3D views too much. Our job as 3D artists is to interpret the concept, not copy it mindlessly.
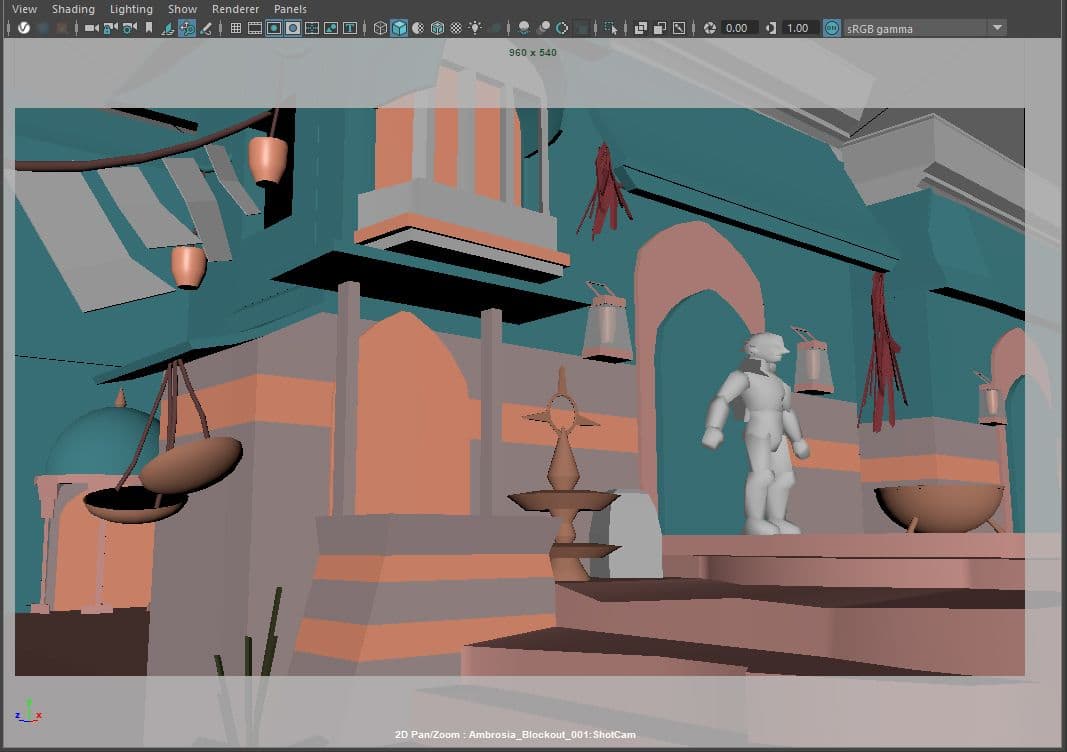
Additionally, before I start modeling, I insert a human model that I have scaled to match the proportions of the standard Unreal Engine player model, so that my scale will be accurate once I import it into Unreal.
Once my camera is set up and my scale is established, I begin my block-out process. These models only serve to act as placeholders, so time should not be wasted putting detail into them. They will all be replaced in the end with higher quality assets, and they are only here to establish the composition and proportions of the objects that I need to make. I do add basic colour on lambert materials to help myself understand what I’m looking at - modeling complex scenes in only grayscale can get a bit confusing after a while.
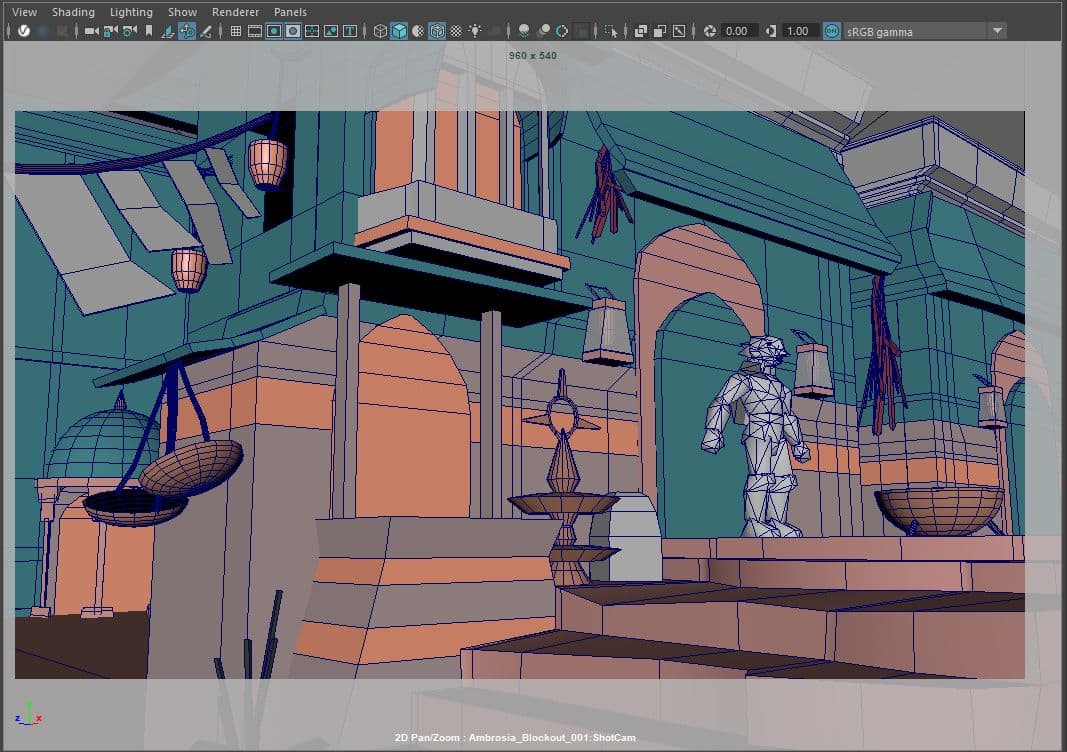
This is where the grind time begins. Plug in the headphones and put on a good playlist; It’s time to go through the block-out, and refine each asset one by one into low-poly assets that are sub-dividable and ready to be taken into ZBrush.
In ZBrush, small details such as cracks, engravings, and more will be sculpted in. Subsequently, we export our high-poly mesh from ZBrush and bake its details into a normal map on the low-poly meshes in either Substance 3D Painter or Marmoset Toolbag. My texturing was also primarily done in Substance 3D Painter. Below are some screenshots of the props that have been baked and textured:
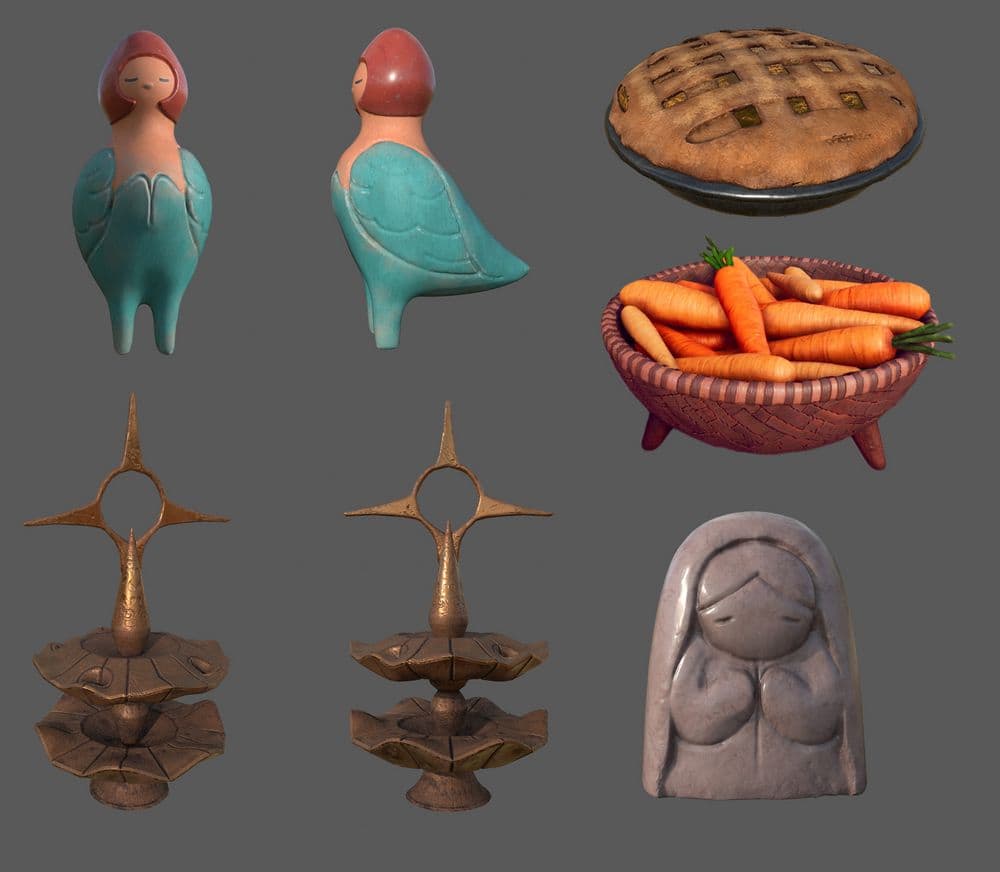
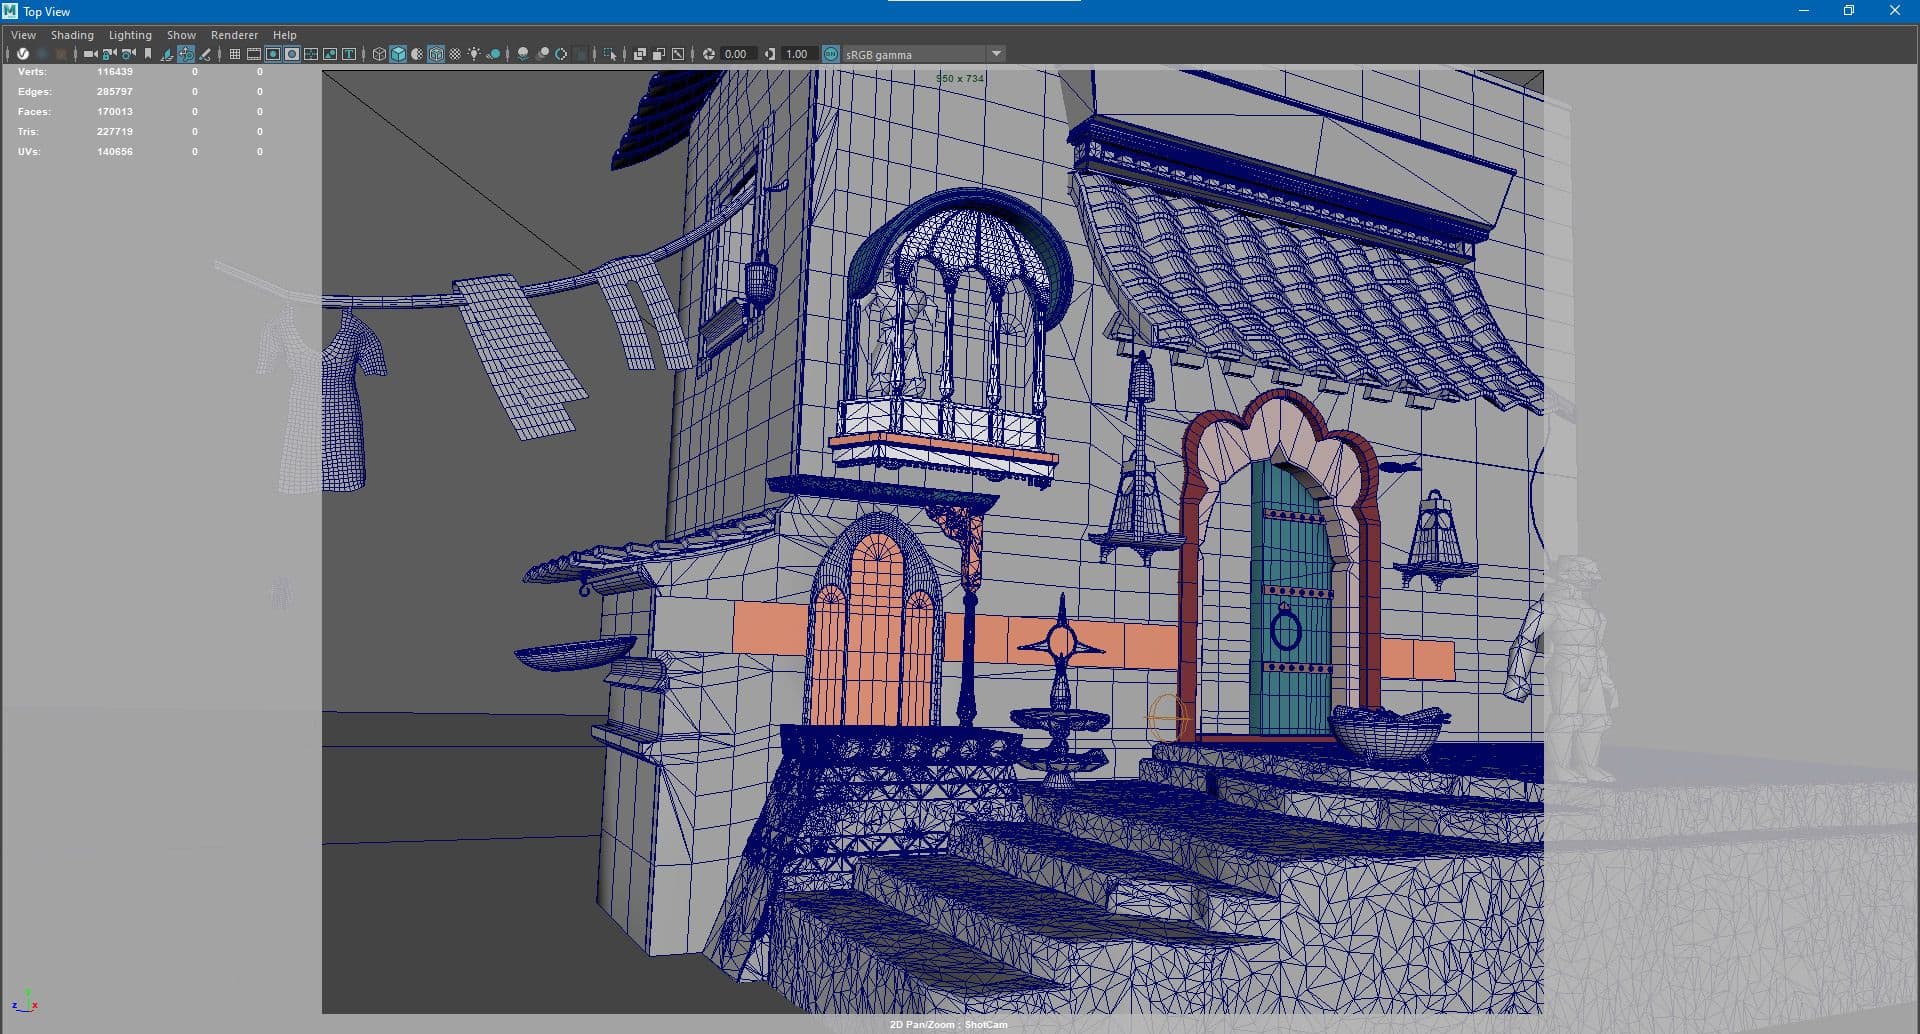
Many of the props in the scene were taken into ZBrush to create high-poly sculpts, and then decimated to make a new low-poly. Baking a high-poly onto a decimated mesh gives higher accuracy with fewer polygons. Therefore, many of the meshes in the final Maya blockout look “messy”, as their topology is decimated.
Additionally, some elements of the scene were planned to be repeated, so I only included them once in the blockout, such as the door and the hanging bowl.
Not everything had a high-poly sculpt. High-poly sculpts were required for assets with specific details such as engravings, that I felt were best suited for being sculpted in ZBrush. For assets that didn't need high-poly sculpts, I was able to get the level of detail I needed with texturing alone, either in Substance 3D Painter or 3D Designer.
The walls of the house are a central element and I wanted to make sure that I was interpreting the reference properly. In Airi's concept art, only a few painterly brushstrokes are used to represent a wall that transitions from light teal to pink. I interpreted this as a wall that was painted blue a long time ago, and the blue paint is wearing off in the lower half of the wall to reveal a pink-brown stucco or terracotta material. This look was achieved by creating two material variations in Substance 3D Designer, and then using Unreal Engine’s vertex painting to transition between them.
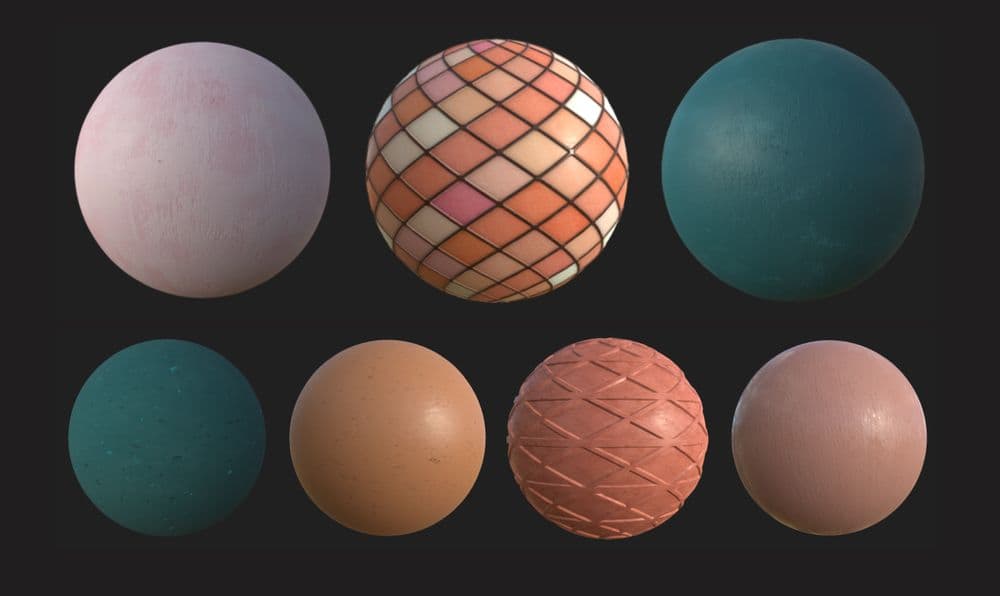
Several of my materials were made in Substance 3D Designer so that I could tile them repeatedly on several different surfaces. Pictured here are some of my materials including the pink and blue sections of the wall, the stained glass window, the roof tiles, the flowerpot, and the orange wall panels.
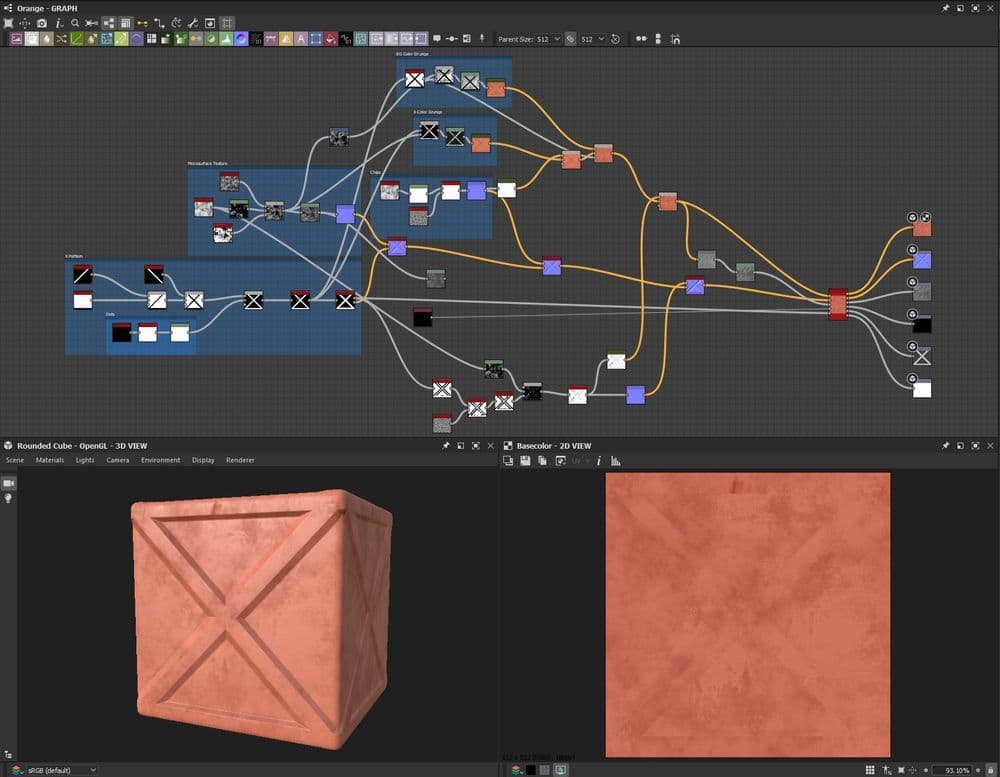
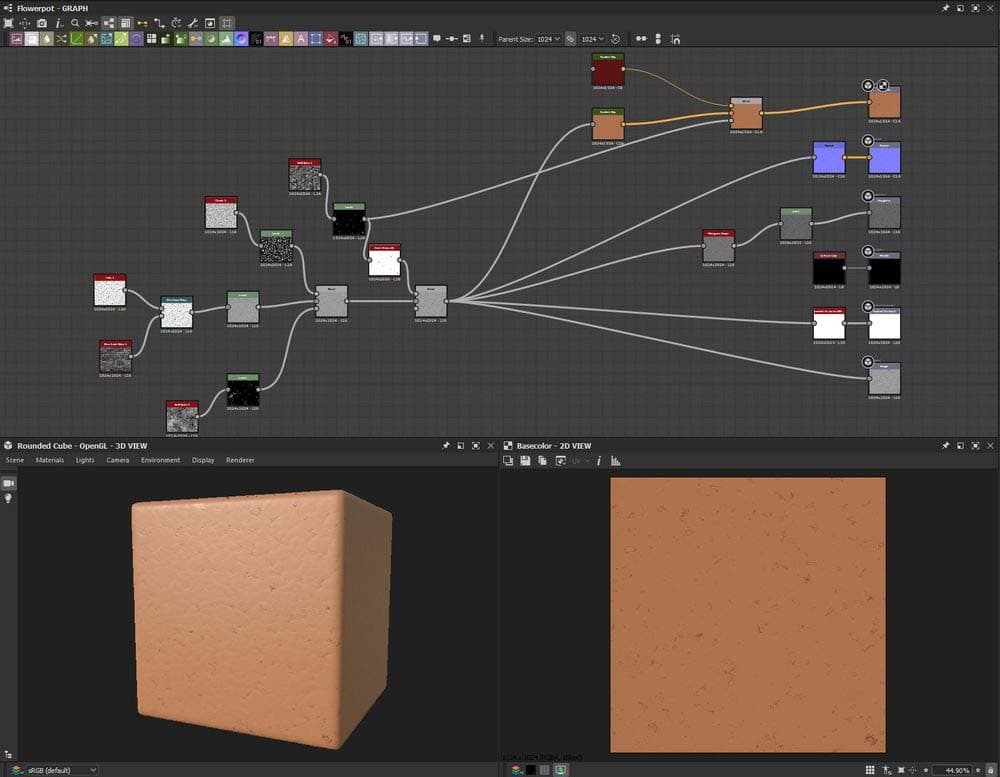
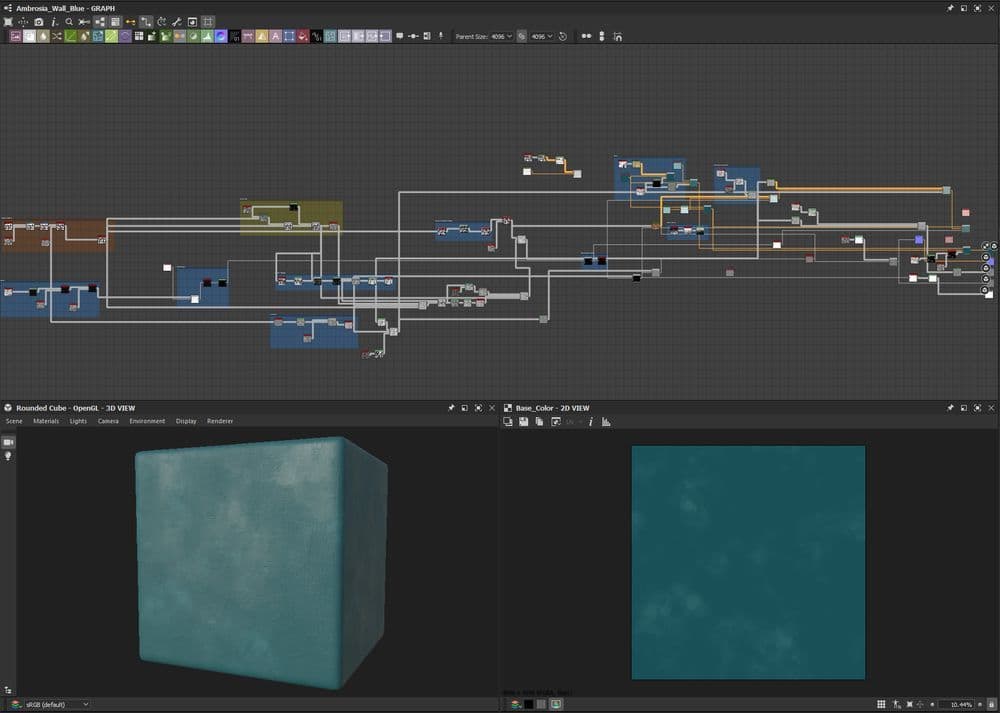
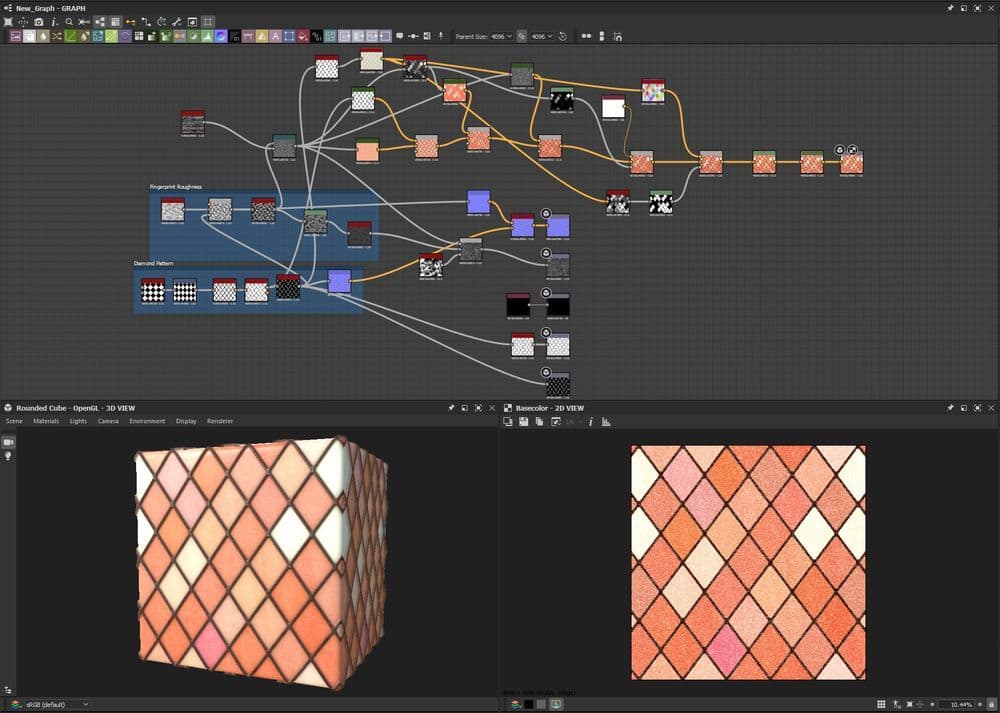
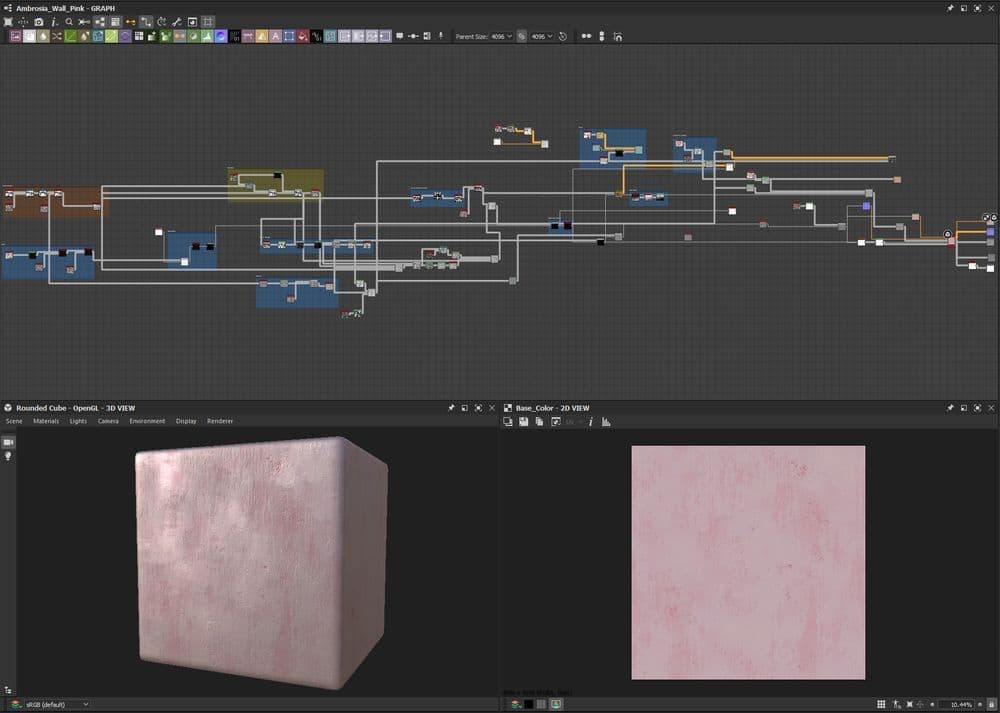
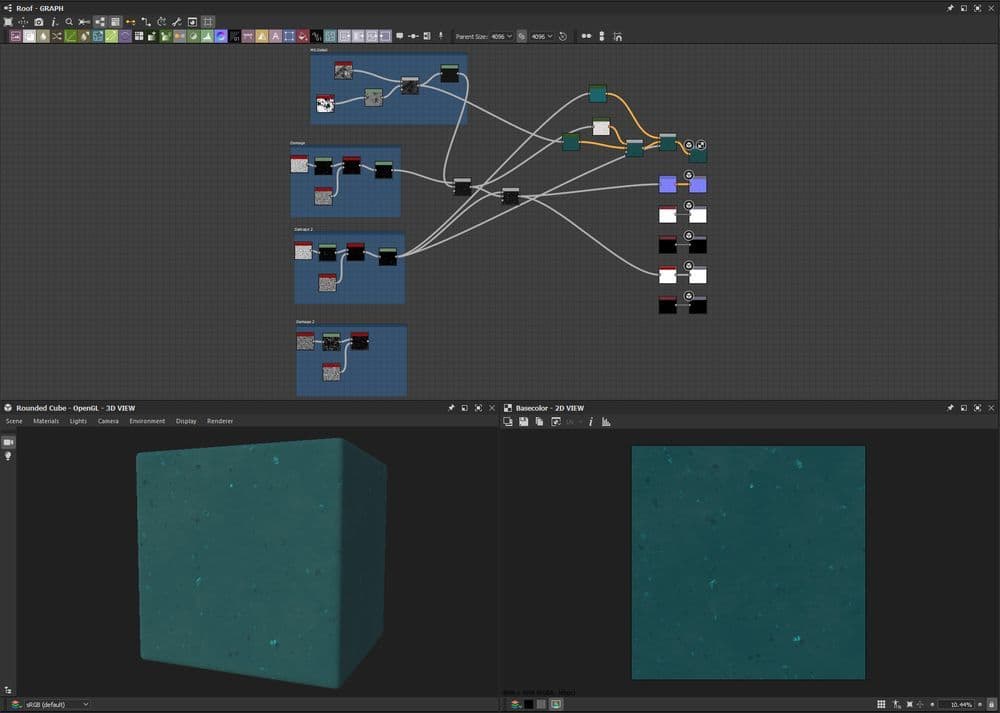
I’ve included some of my Substance 3D Designer node trees to demonstrate the workflow. Normally, I start with my height channel; the height will be the driving force behind all other channels, and I will use it to create the bases for my other channels.
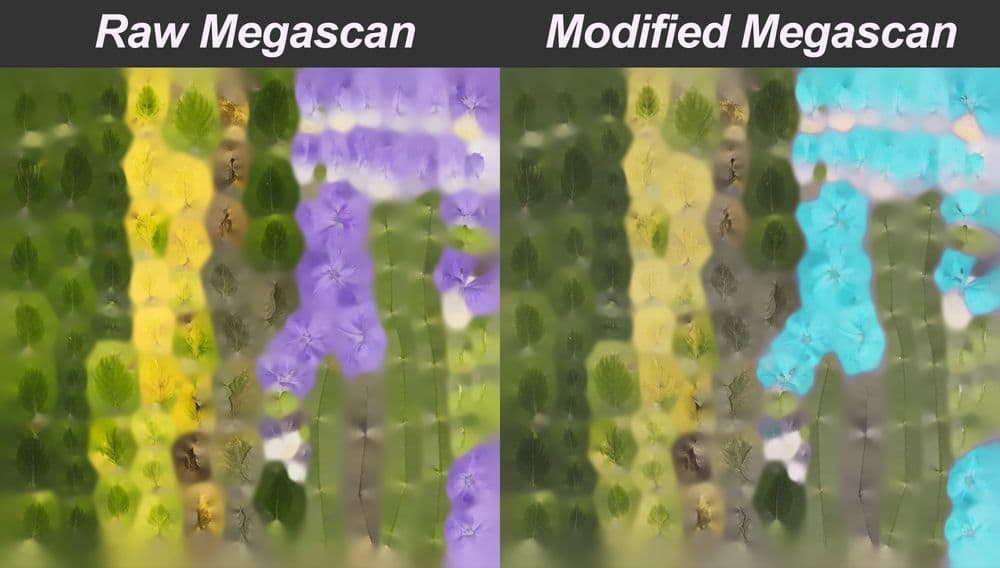
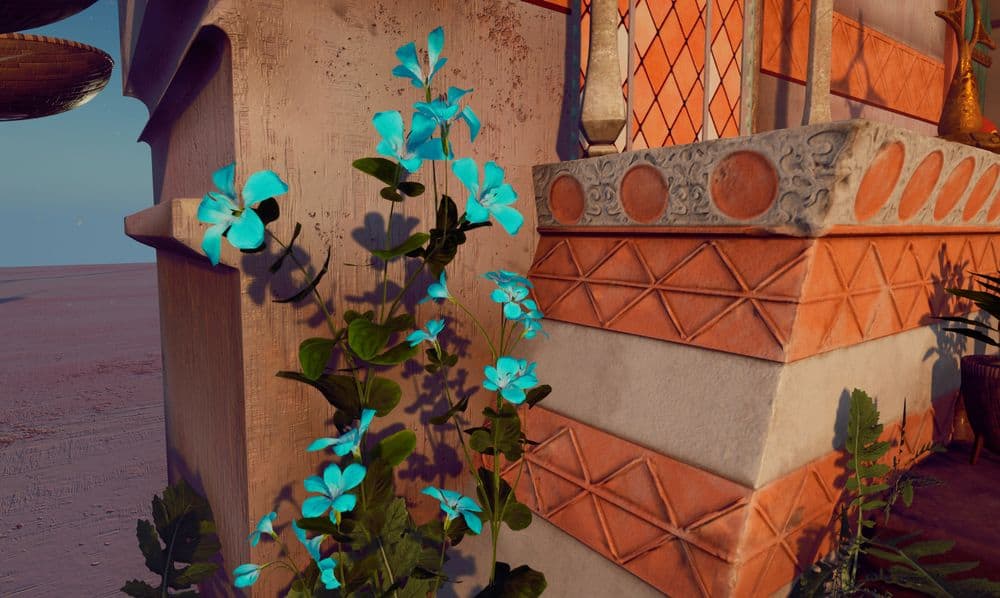
Once we enter Unreal Engine, we really start to feel the final product coming together. I found a few flowers and weeds that I liked from Quixel Megascans and took their textures into Photoshop to make them a bit more vivid and stylised. Megascans are a great resource, and can also act as a starting point for customised textures of your own.
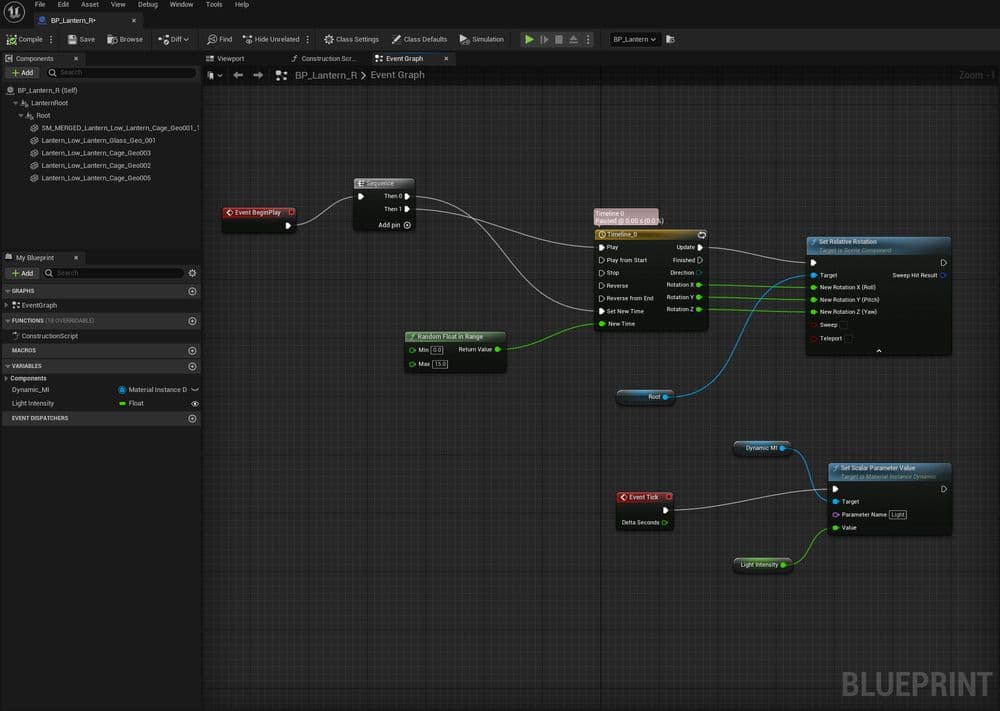
After arranging all of my modular assets in Unreal, it’s time to add some of the real-time movement aspects that make Unreal so great. I create simple blueprints to make the lanterns, peppers, and bells sway back and forth, and I use GrassWind on the foliage materials to make them appear to blow slightly in the wind.
I wanted to give subtle movement to as many parts of this scene as possible to make it feel alive. Just a tiny bit of movement goes a long way.
The stained glass windows and lanterns both use blueprints to make them flicker occasionally, as well.
Initially, I tried to use Unreal’s in-engine cloth physics to make the clothing on the clothesline blow in the wind. However, it did not meet my standard of quality, so I replaced it with an Alembic cache of an nCloth simulation of the cloth from Maya. In there, I feel that I have more control, and the quality is more consistent.
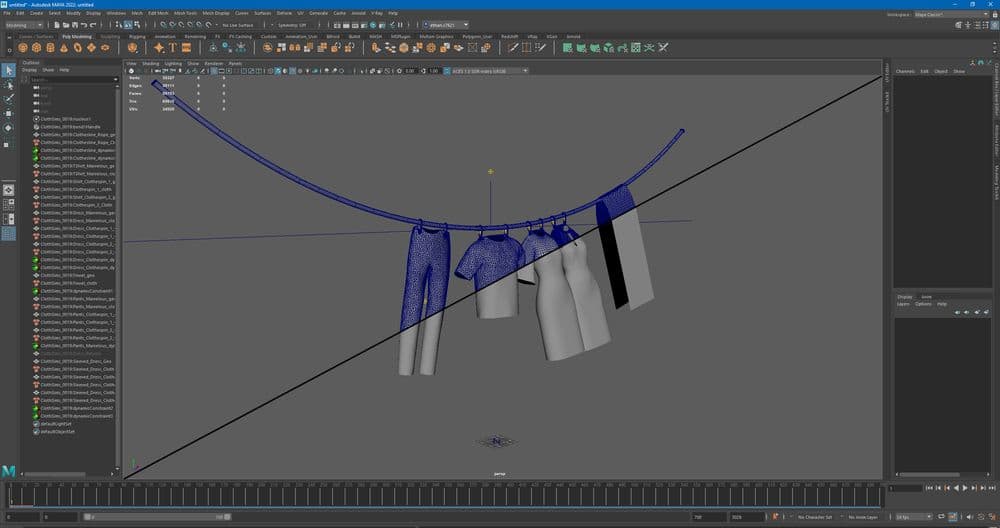
Clothing is exported directly from Marvelous into Maya, where it is constrained to the clothespins and simulated. Each garment is relatively heavy so I can get more accuracy out of my nCloth simulation. I am not overly concerned about the polycount since the simulation will be baked in when I export it as an alembic, so Unreal Engine does not have to calculate any simulation.
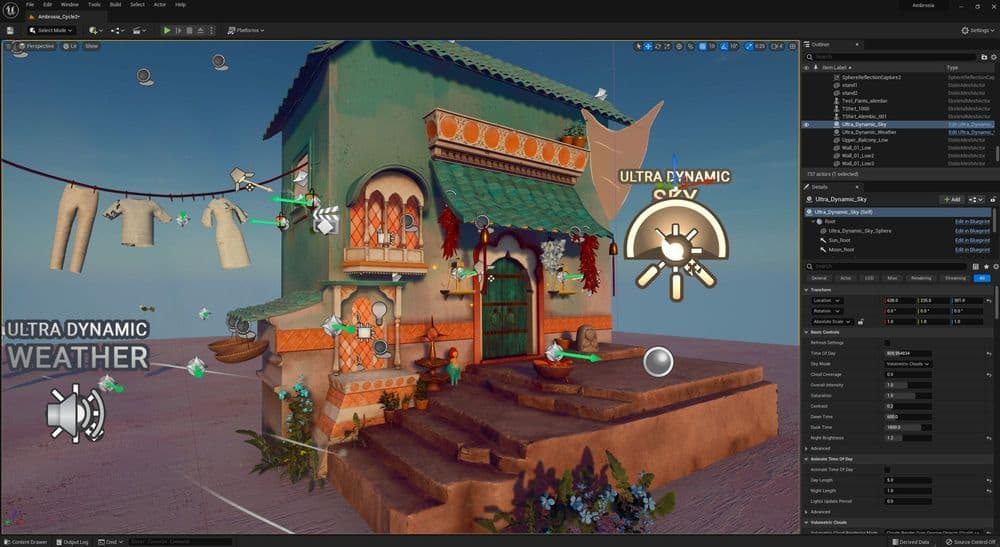
I revisited this project after Unreal 5 came out to see how good the new “Lumen” lighting was. While I was there, I added some more touches of life with Niagara systems.

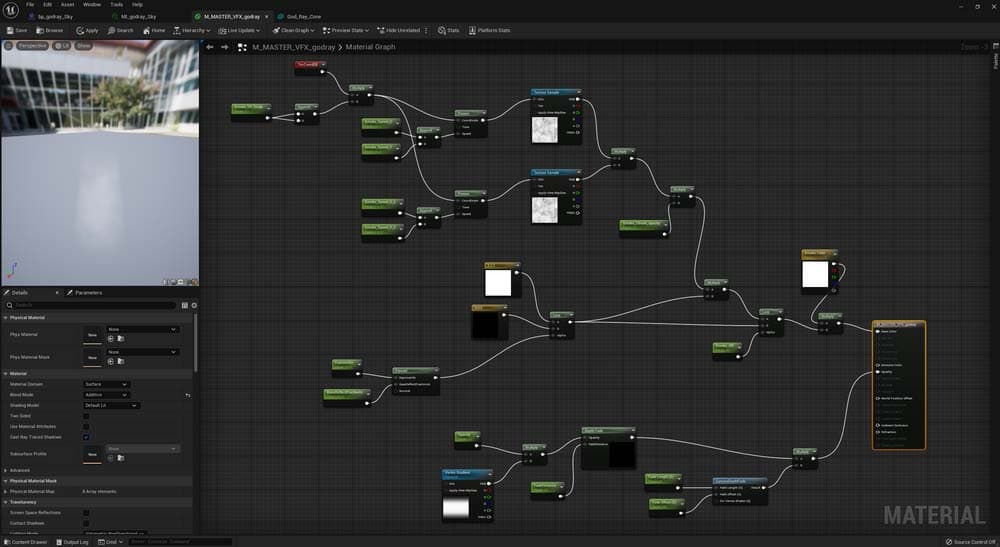
The detailed lighting pass shows off some of the things going on behind the scenes. I used many instances of cone-shaped geo with a "god ray" material on. Below you can see the specificities of the "god ray" shader.
In the base colour, there are cloud noise textures panning in both directions with controls on their scale and speed; they are being multiplied with fresnel, and have parameters exposed so they can be controlled differently for individual god rays. In the opacity, a gradient/ramp is driving the depth fade, along with a camera depth fade.
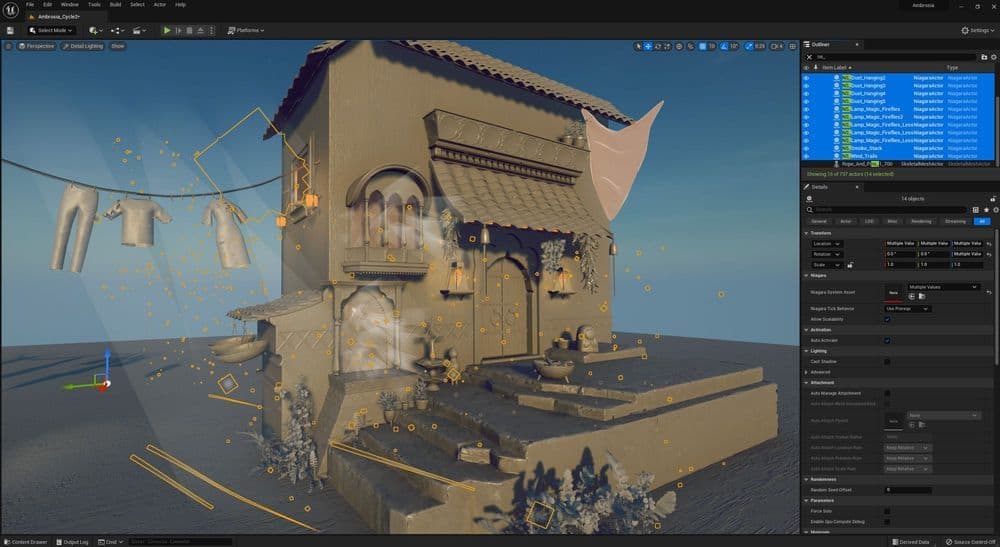
Back to the main shot, you can see here just how many Niagara systems are at work. Along with my god ray cones, there are Niagara systems for blowing leaves, hanging dust, steam coming out of the window, wind trails, and magic fireflies around the lanterns.
Niagara systems are relatively straightforward to set up, and there are presets that likely resemble whatever you are trying to create. Of these systems, the steam from the pie on the windowsill and the blowing leaves were the most fun to create.

The pie steam/smokestack started as a fountain emitter, with the emitted sprite being a translucent sprite of a cloud that I made in photoshop using a photo of a cloud.
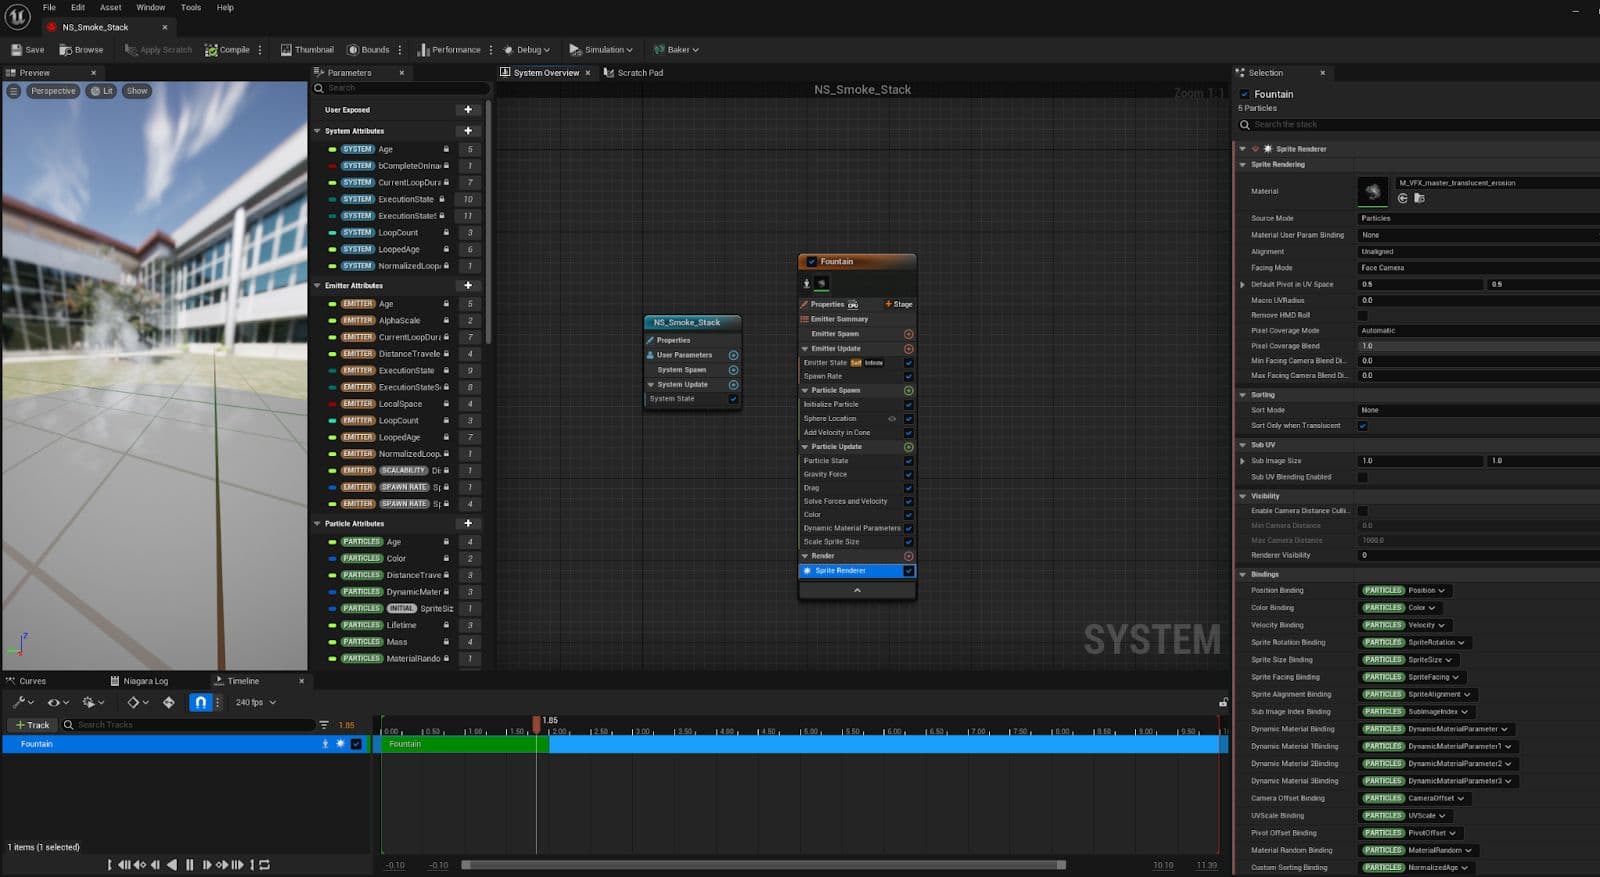
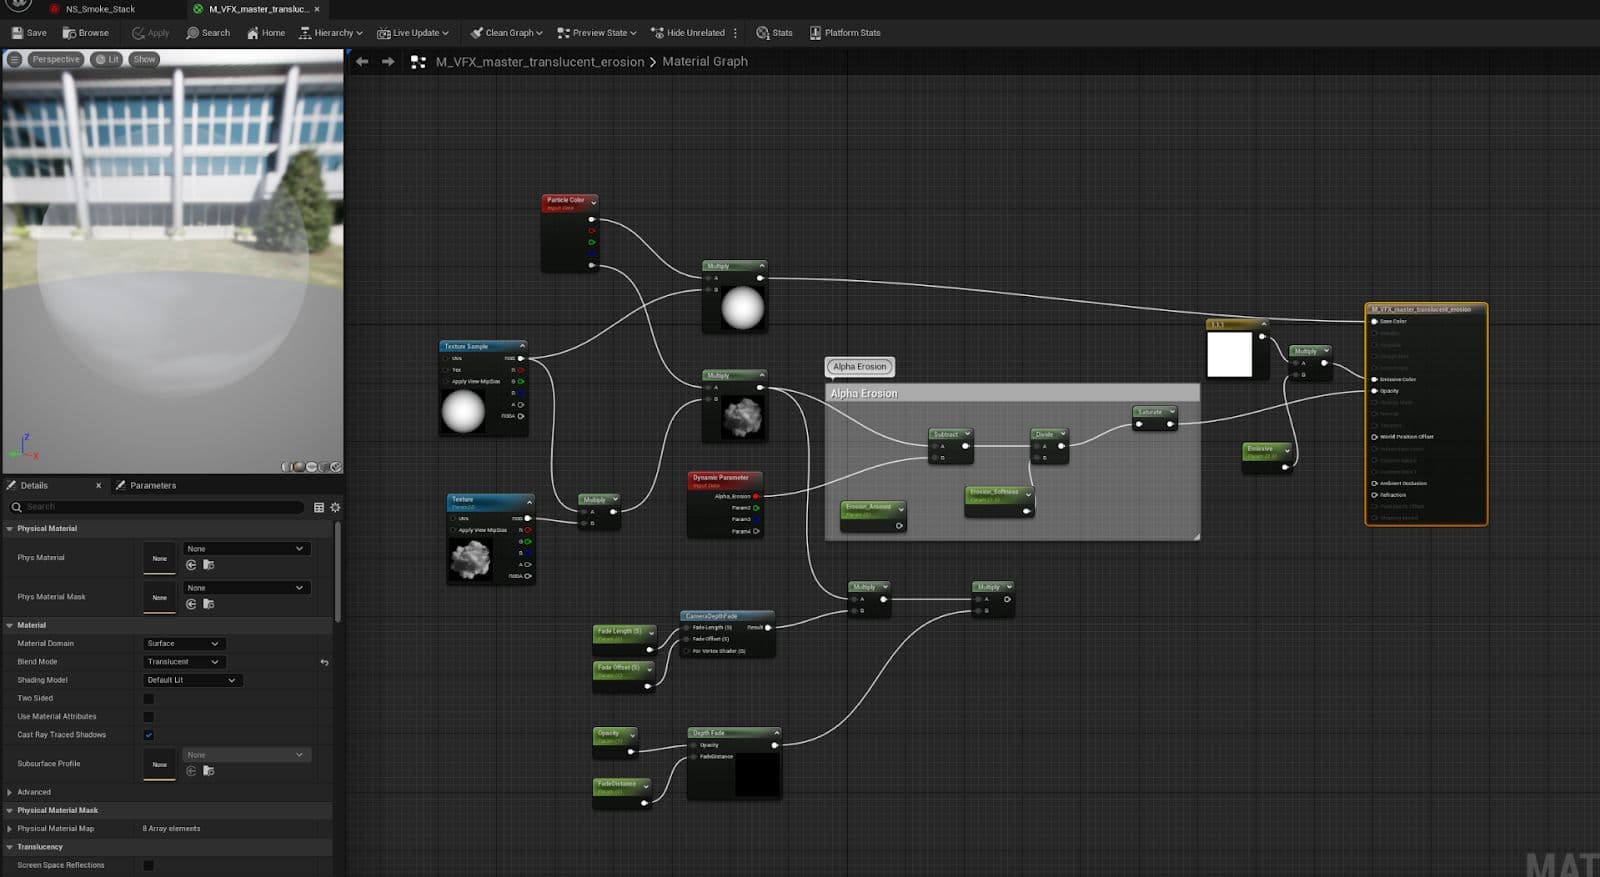
In the material, I eroded the alpha of the sprite and parameterised that attribute so I could tweak it later depending on how soft I wanted the smoke/steam to be. This became my master VFX material which I could use for fog, god rays, smoke, etc.
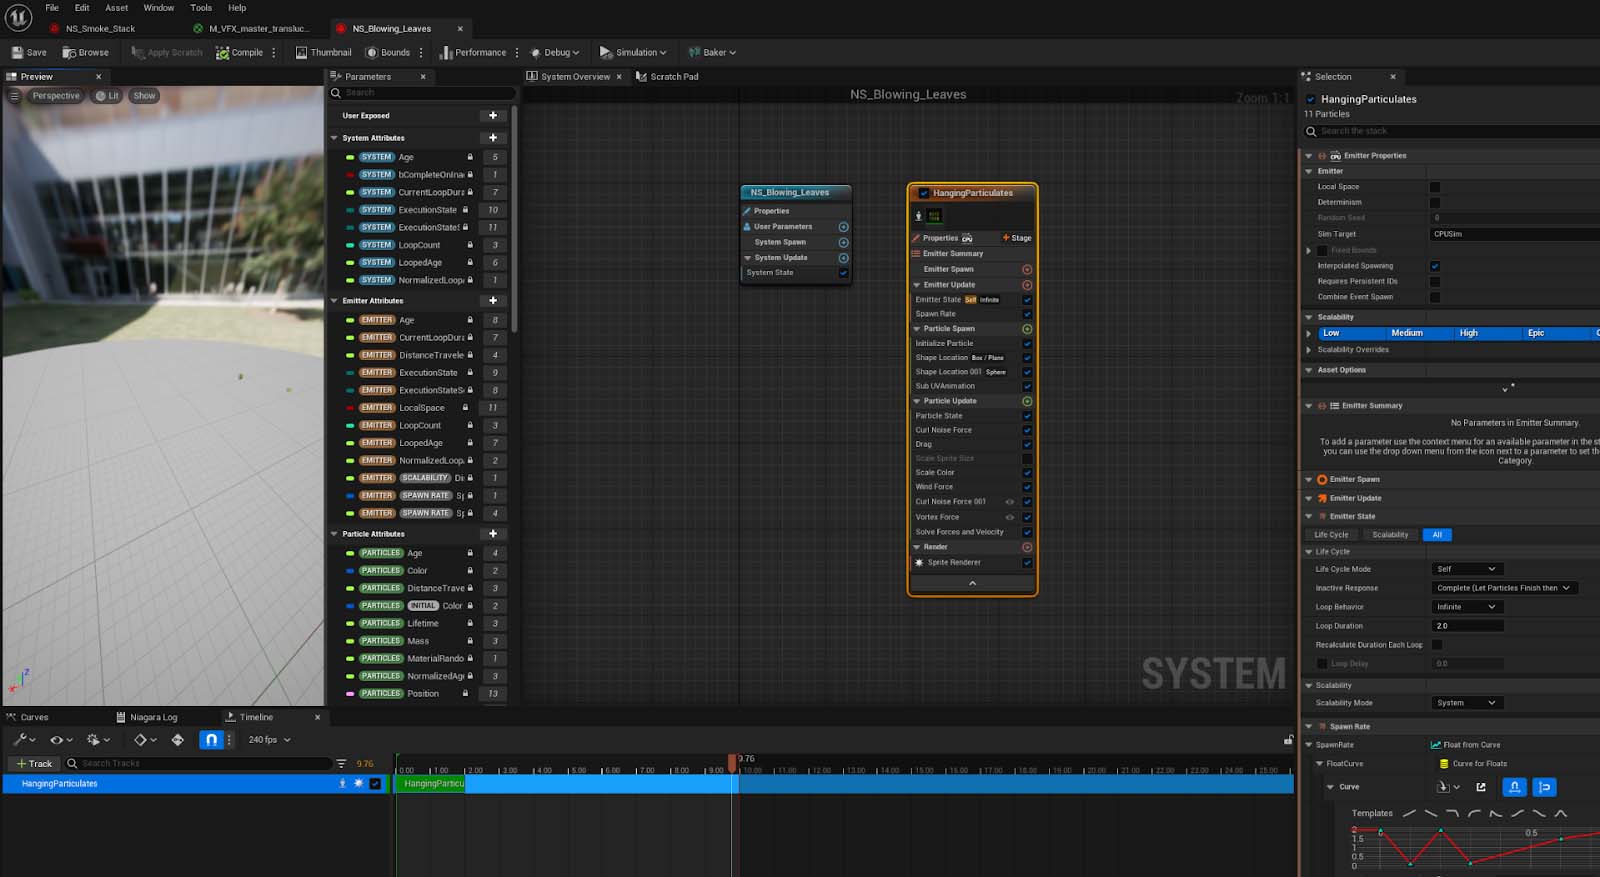
The blowing leaves started as a Hanging Particulates system, where I used a leaf atlas from Megascans as my sprite. They have curl noise, vortex, and wind forces so that they seem to be randomly blowing and twisting in the wind the way a leaf would.
When colour grading, much of the work can be done within a post-process volume within Unreal. The colours in the shadows, highlights, and mid-tones can be adjusted to help give the piece a warmer and softer look. Here’s a look at the same scene with and without the post-process volume.
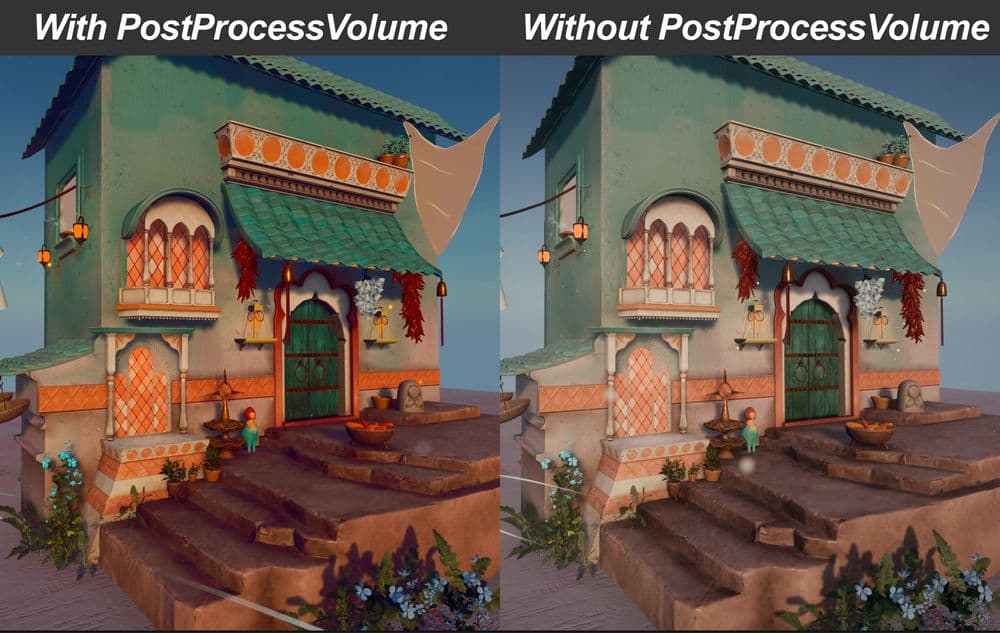
After using a post-process volume and going back, it always seems like the scene was dead and lifeless before. You think to yourself, “Wow, did it really look that bad?” But this is all part of the process!
While this is an Unreal project, it is not exactly intended to be played like a video game. It is more of a cinematic shot, intended to sit there and look pretty. Therefore, I have no qualms with using a bit of post-production outside of Unreal to help it shine.
I rendered the scene out of Unreal in 4K using the Movie Render Queue with settings recommended by Unreal in the documentation for cinematic quality renders. This is documentation that I saved the settings of on my computer and I highly recommend that you bookmark it yourself for the highest possible quality render.

With the Movie Render Queue, I am able to get render passes/AOVs out of Unreal to use in Nuke including Cryptomatte, Diffuse, and Reflections. The Cryptomatte is the most important for my purposes, I can use it to apply Glow and Grade nodes to my lanterns and to use ColorCorrect nodes on different assets in the scene that I want to colour adjust. Unfortunately, the ZDepth pass that you are able to get out of Unreal is not as good as a ZDepth pass out of Maya, but this doesn’t bother me much in this case as I’ll only be defocusing the scene a bit in Nuke.
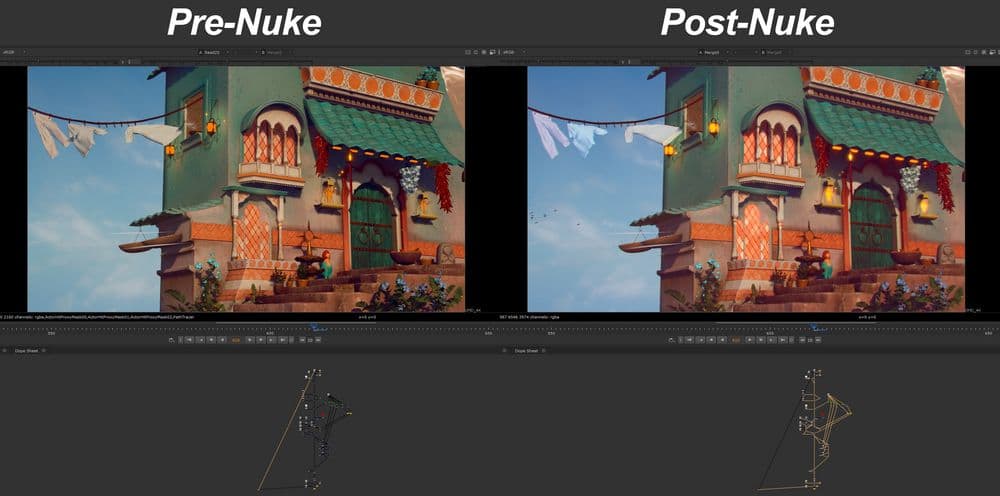
Going into Nuke, I was able to accentuate the colours the way I like them and give some glow to the lanterns through a relatively simple node tree. The clothing on the clothesline wasn't even given a diffuse in Unreal beyond a tiling cloth texture, as I knew that I could just adjust the colours later to make different coloured garments.
The Glow, Grade, and ColorCorrect nodes in Nuke are powerful yet simple-to-learn tools for making your projects really pop. I also used Nuke to fix some of the flickering that Unreal Engine tends to put out in video renders by colour grading specific frames. Some birds were added into the background as well from ActionVFX, which is a compositing element resource library.
Finally, I like to add some film grain at the end with the F_Regrain node, which lets you use preset grain stocks or sample grain from film stills.
Here is a before and after of the work that I did in Nuke to make the render shine:
Whether you are an artist for film, games, or animation, Unreal Engine is an excellent tool for composing beautiful shots quickly. It is not without its challenges, but the allure of a render-free scene is simply too good to pass up. Additionally, it takes work in all parts of the pipeline to give a scene life. From the way you model and texture to the VFX you include to the post-process and colour grading, you’ve gotta put in love at every step.
I hope I’ve shown you that Unreal can be used for more than just game-making, and can even be used as an alternative rendering engine to V-Ray or Redshift for beautiful stylised shots.
Additional thanks to Anton Napierala, Nate Stephens, Forrest Stephan, and Roy Yamaguchi for their Unreal Expertise at the Gnomon School of VFX that made this project possible. I'm forever grateful to my teachers at Gnomon for always pushing me beyond what I think I'm capable of, and I look forward to continuing to learn and grow as an artist.
Thank you for taking the time to read my article. I hope that it was inspiring, educational, or just kinda cool! If you have any other questions about this project, my other projects, or just want to get in touch, feel free to contact me via my social media. It's always a pleasure to meet other artists!
LinkedIn, Artstation, Instagram, The Rookies, My Reel.
You can also email me at: [email protected].