The Art of Anatomy: Sculpting and Rendering Techniques for Creating a Lifelike 3D Model
Digital sculptor and 3d character artist, Marco Pescuma, shares his process and tips for attempting a dynamic sculpting figure.
Digital sculptor and 3d character artist, Marco Pescuma, shares his process and tips for attempting a dynamic sculpting figure.

Marco Pescuma is a digital sculptor and character artist from Italy. His journey into the field of 3D started with a course of Maya, and a decision to study ZBrush and digital sculpting for the 3d printing field, on his own.
In this article he shares his process and tips for attempting a dynamically sculpted 3D figure.
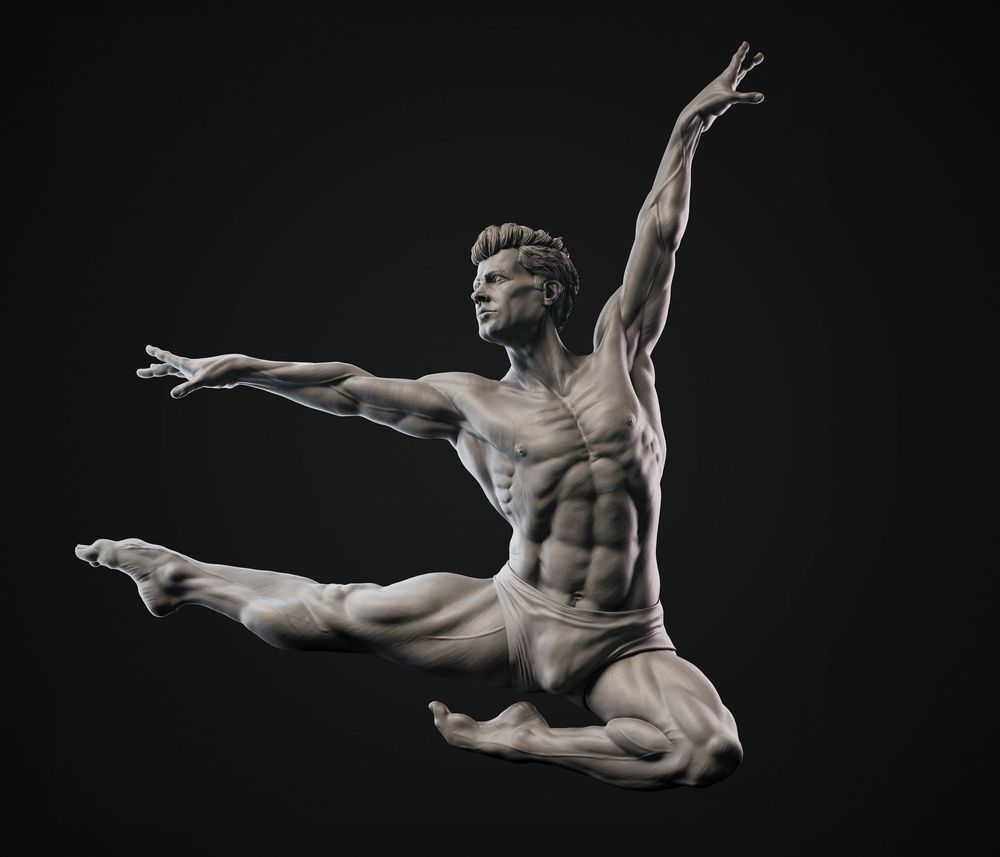
The ballet dancer anatomy study was my attempt to create a dynamic anatomy study focusing on dynamism and gestures. I chose a ballet dancer as a subject, because it covered all the things that I had in mind, to achieve my goals to elevate the project and to practice with both anatomy and sculpting in asymmetry.

The first step is to gather references. This is a very important and crucial step, to begin the project in the right way. I used PureRef to organize and categorize my references in order to have it clean and accessible while I was working. My main reference was the well known Italian ballet dancer, Roberto Bolle.

I studied anatomy from several books, and I can highly recommend these:
When it comes to anatomy, it’s really important to look also at the work of the old master sculptor and painters.
You can also find some really great YouTube channels on this topic such as Proko, Proko3d, Marc Brunet , and Drawing Art Academy. Even though the majority of these channels are mostly for 2d drawings, they are really great resources also when it comes to 3d sculpting.
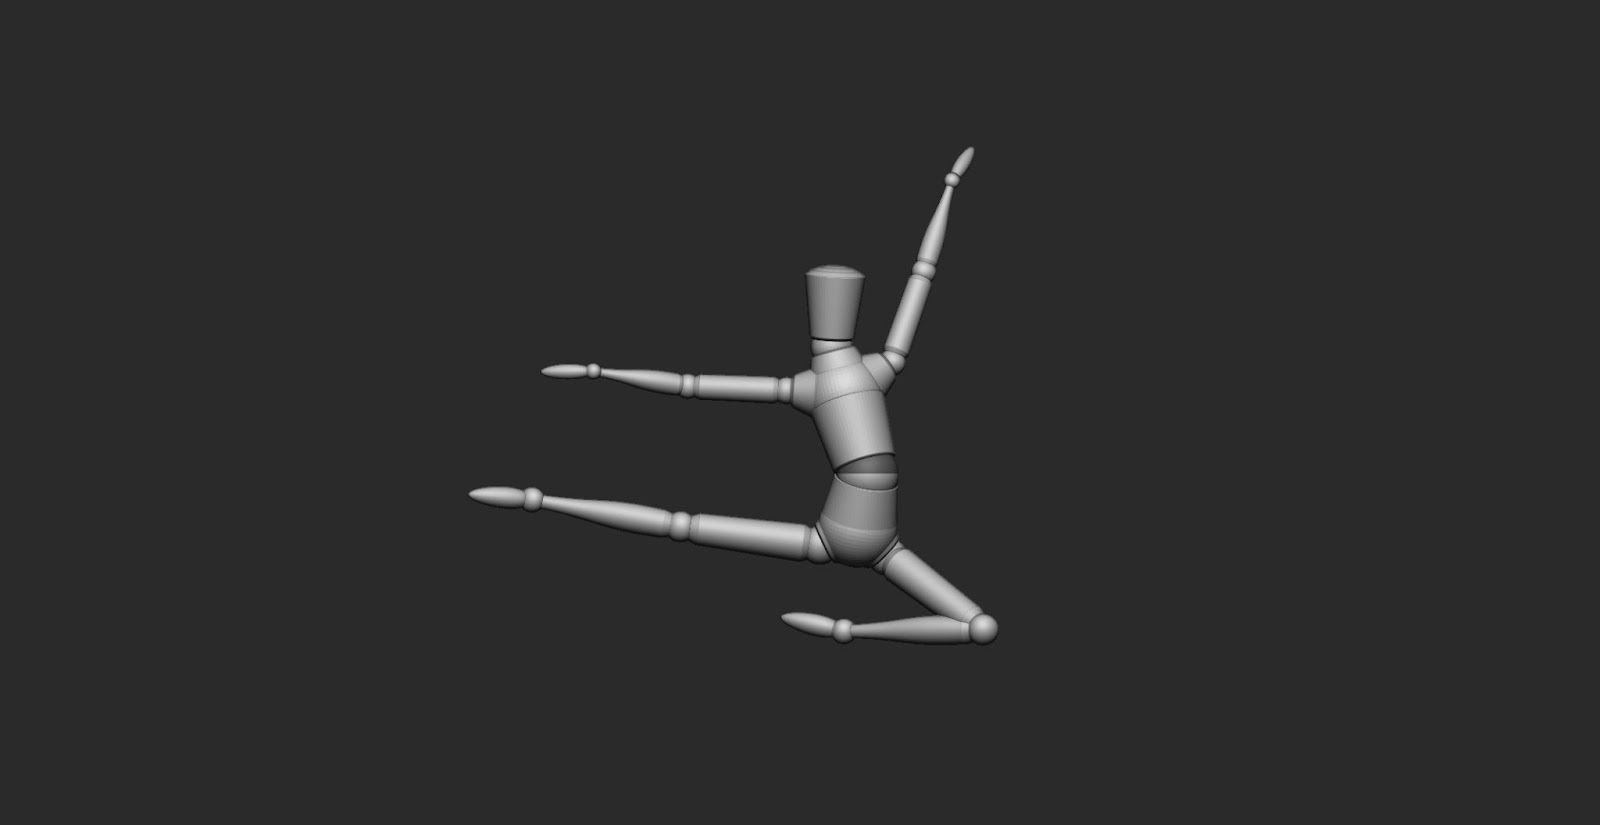
In this project the goal was to sculpt the model in asymmetry, because it is one of the best exercises to improve anatomy and sculpting skills. I started with the default mannequin that comes with ZBrush; you can find them under the lightbox/project/mannequin.
A great resource to see how a master sculpt starting from a mannequin in zbrush, comes with this example by Daniel Bel.

Once I had the mannequin loaded in, I started to manipulate it with the rotation tool only. Because the proportions are already there I didn't need to be worried about that at the beginning, considering that I could change the proportions later on, based on the project.
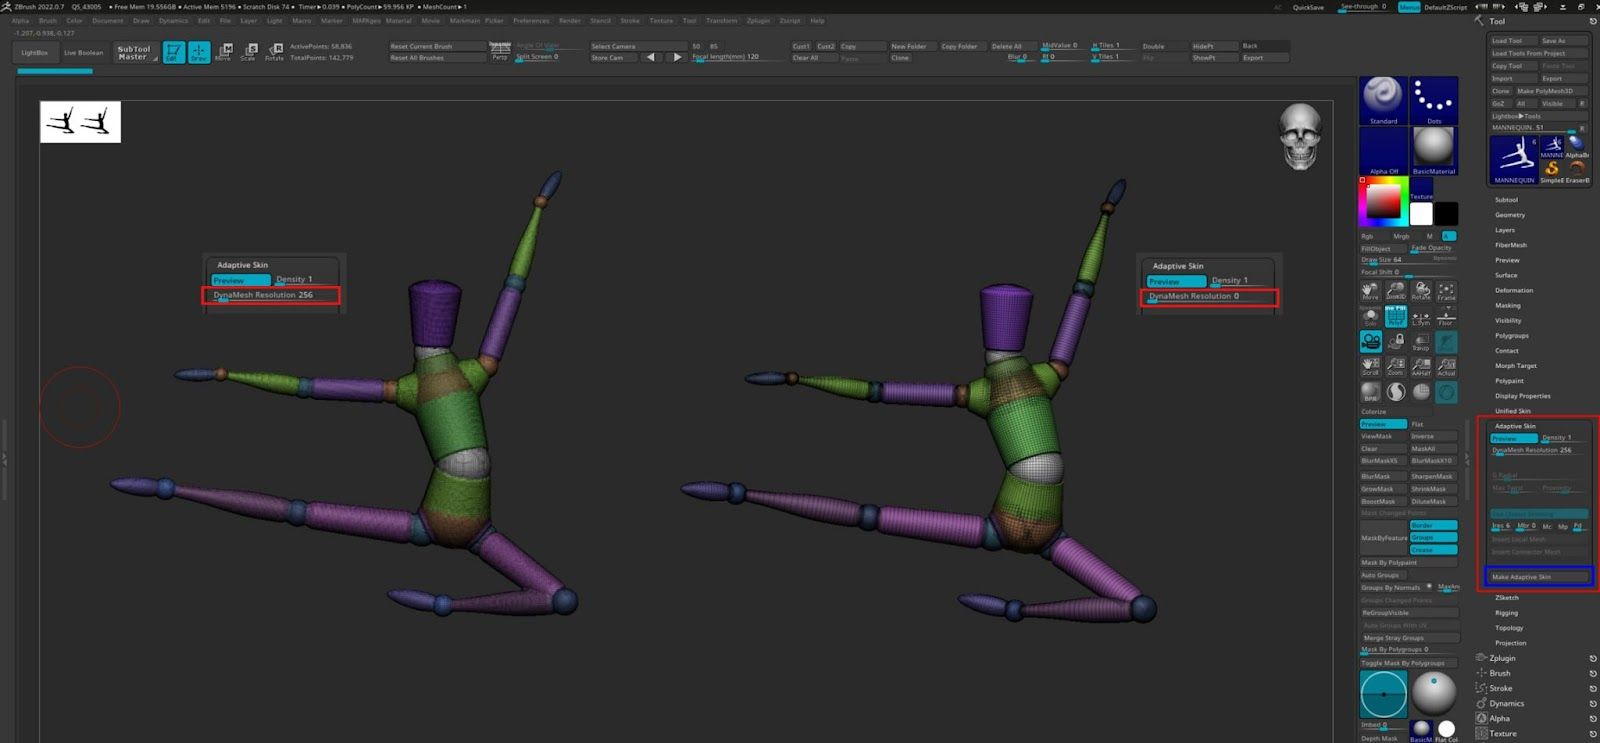
When I was happy with the pose, I transformed the mannequin that now is a Zsphere model, to an actual mesh to sculpt on top. On the adaptive skin palette, you can preview how the mesh will look, set a dynamesh resolution, or use a clean topology just by switching the dynamesh slider to 0. Be aware that you have to turn the preview button off and on again to see the preview updates. At the end, to have the actual model, I clicked on the Make Adaptive Skin button, and it appeared as a separate tool on the top right corner.
Once this is done, you can start sculpting! In the beginning, the sculpt can be ugly, it's very common however I wasn't worried about that. Adding some volumes is the first thing to do, the anatomical details will come after and with time.
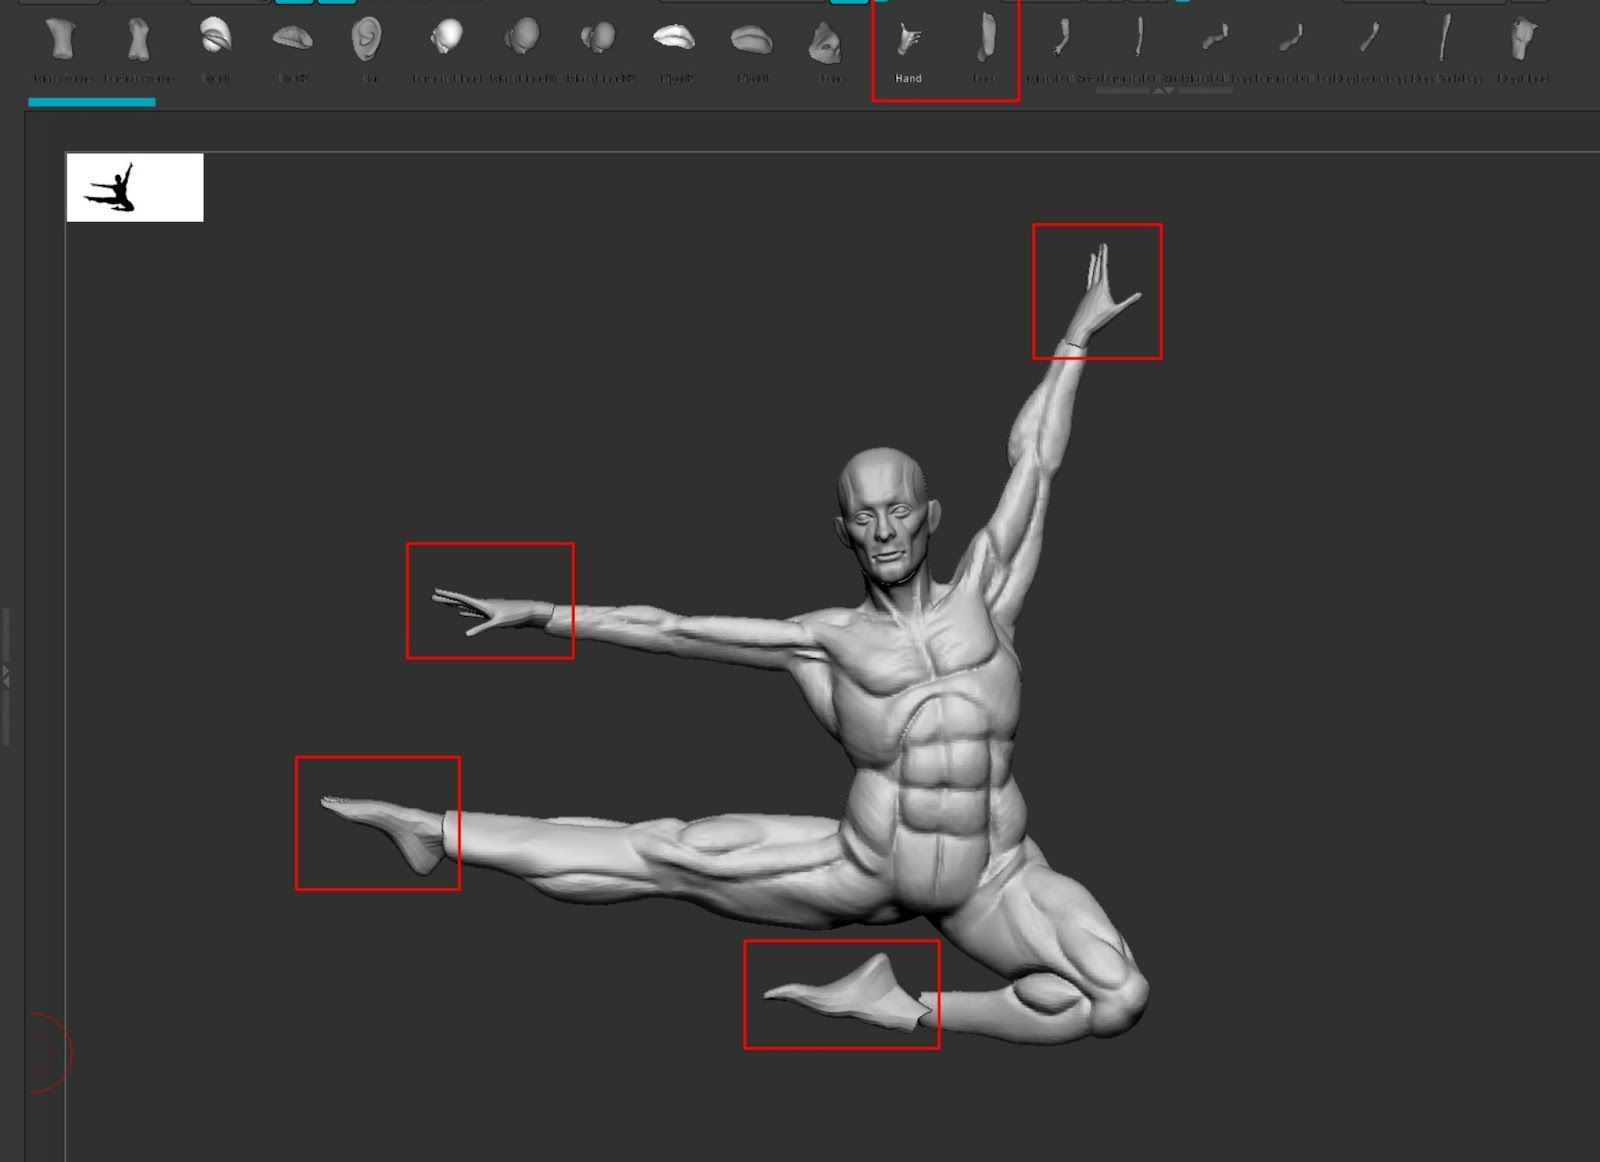
To speed things up I used IMMBpart brush that is shipped with ZBrush, for the hands and feet. This was so I had a base mesh to start from. Anatomy can be really difficult, so it’s only a matter of studying and practicing a lot.
In the early stages, it’s better to have the meshes separated. When you reach a good level of sculpting, you can merge things together just by using the dynamesh to have my sculpt as one solid piece. This is an important step, so before doing it, be sure to have duplicates of all the parts, so you can easily go back if needed.

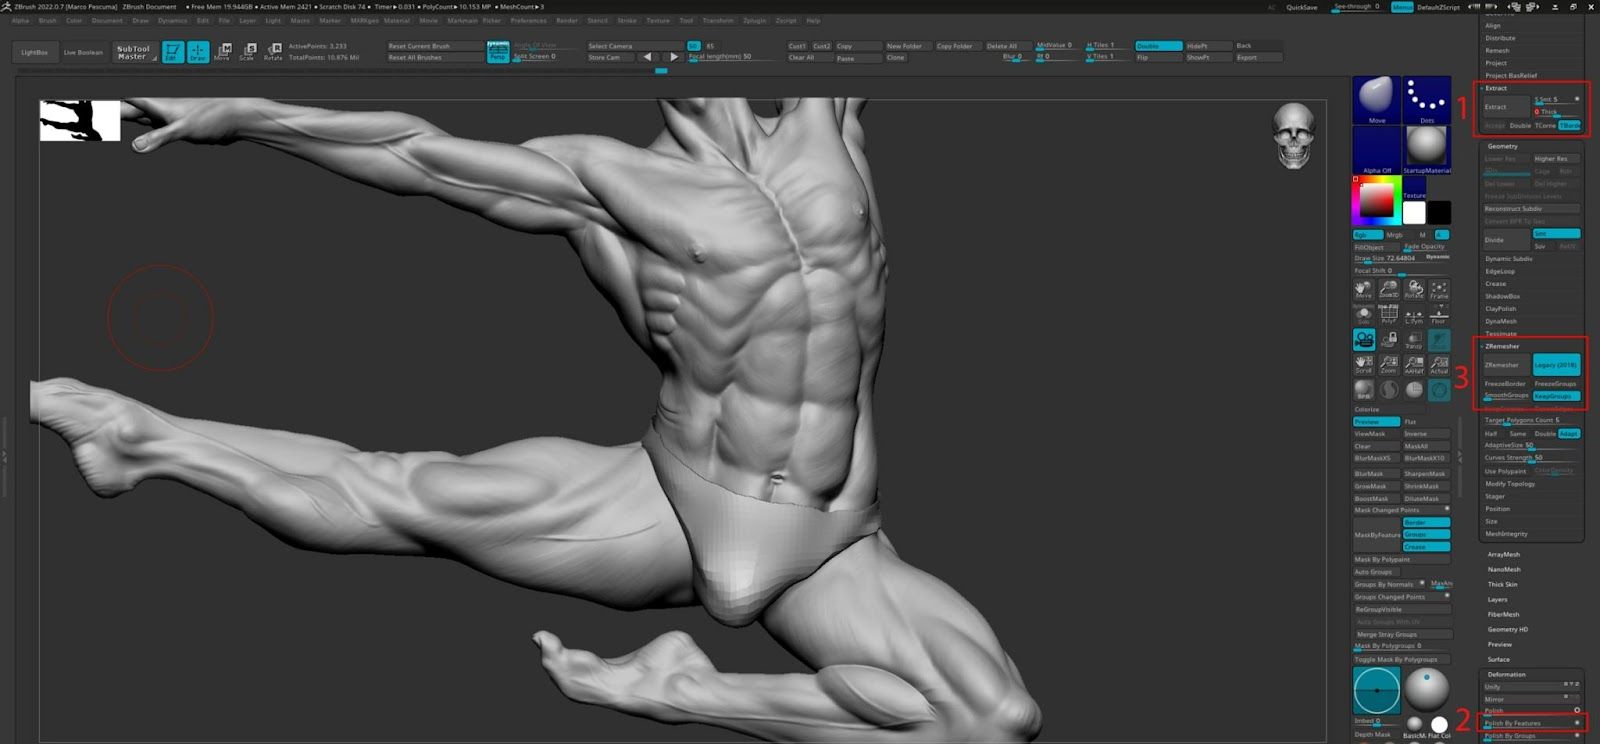
After the merging part, I was still in dynamesh mode, so I then switched to subdivision levels to have more control on the sculpt. This project was not meant to be animated, so a zremesher topology was good enough.
First of all, I made a duplicate of the model. To help the zremesher, I used the slice curve brush and the masking to make clean polygroups, and after that I ran a polish by feature (basically polishing polygroup borders and creased edges).
I then ran the zremesher with groups turned on and the smooth groups down to 0, as I have already polished the groups border. The final step is to project the details. With the dynamesh model selected, I just ctrl+click to the undo line to save the history state that I wanted to source from. Then, I selected the zremesher model, set the distance to 0.1 and just pressed the project history button for each subdivision level.


A very important thing to keep in mind is not to focus for a long time in the same spot of the sculpt; working on different spots and parts here and there, keeps the eyes fresh on the overall work. A really great help while I was working, came from ZBrush itself, as I could use the thumbnail on the top left corner to see the silhouette of my model. Also, on the top right corner there is the cam view: you can use any model you want to be in the cam view; for example, I chose a skull, adding a great reference directly in the ZBrush viewport.


There are a lot of techniques to sculpt clothes. In this case, I just masked the area of the cloth and I used the extract function in ZBrush to create a single sided mesh from the mask itself. In this particular case, I put the thickness to 0, because it makes it easier to manipulate.
Once I was pretty happy with the shapes, I used the polish by features to clean the mesh, and then the slice curve brush to make clean polygroups. Once my mesh was clean enough, I ran the zremesher with group turned on. Then, I gave the thickness that I wanted with the dynamic thickness feature.

When I had a decent mesh to sculpt on top, I used the clay build-up brush in conjunction with some dynamic cloth brushes that come with ZBrush.
When I finished the sculpt, I just decimated everything with the decimation master, and thanks to Gob bridge, I could easily send my model directly to blender with just one click. Considering that this was an anatomy study, I didn’t make the UVs, taking advantage of Blender’s mapping object mode that allows you to render without UVs. You can see how the gob bridge works in this video by Flipped Normals.

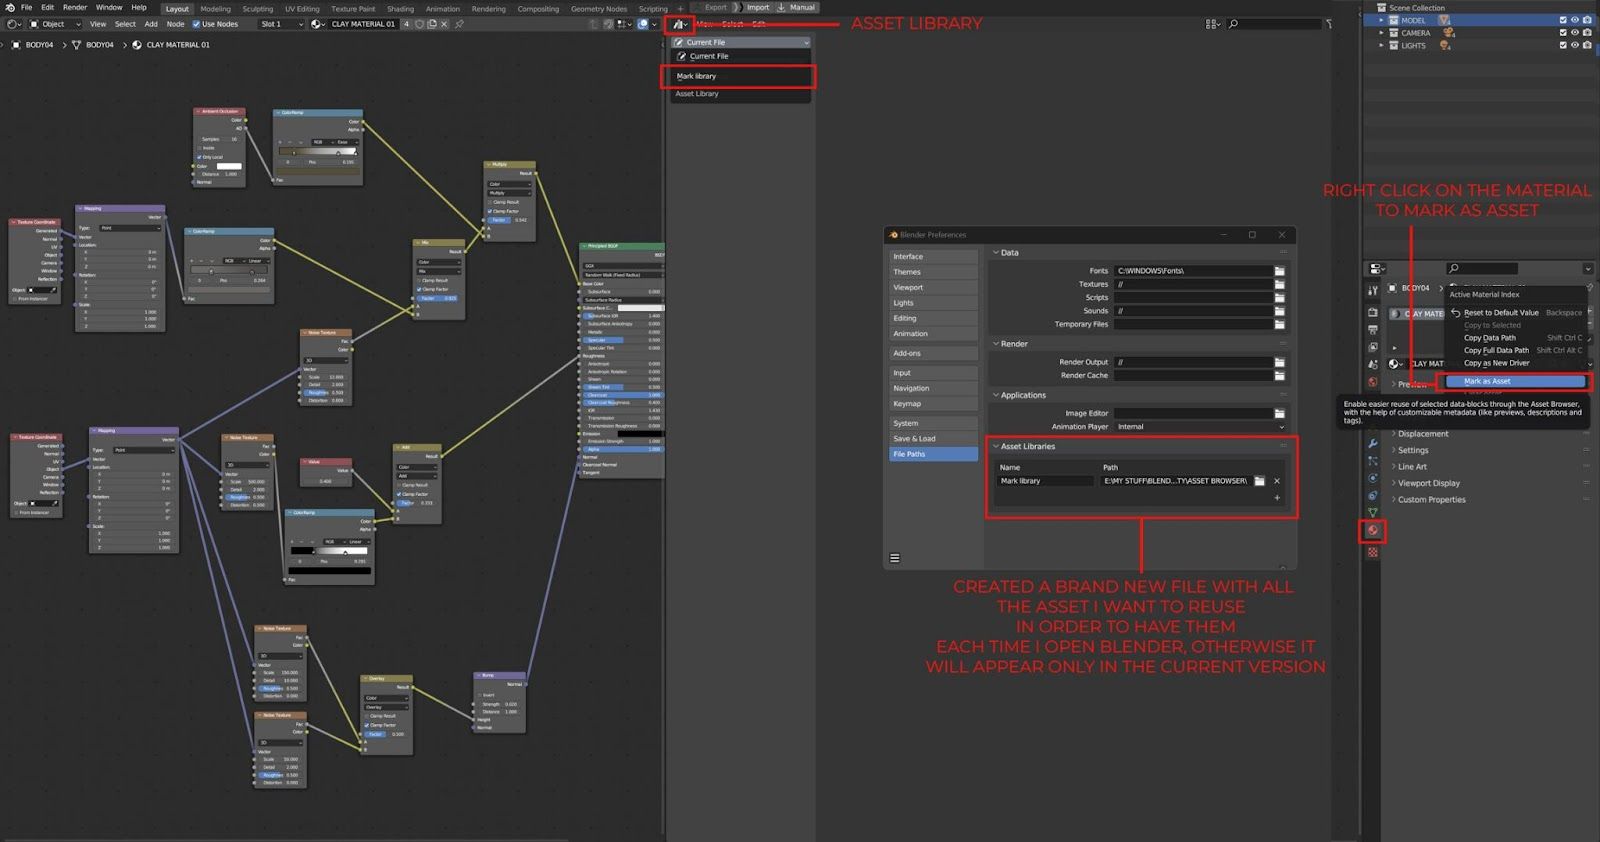
These are the nodes of the procedural material that I created for this particular project. As you can see, it's nothing too fancy, I just wanted something similar to clay. When the material was ready, I saved it thanks to the asset library, so that later on I could easily reuse this material in other projects, simply by dragging and dropping. Considering that this is procedural material, I could change basically everything based on my needs and projects. I saw this kind of setup in a video from the great Ryan Kingslien, you can watch it here.

For the lighting, I created four lights with a very simple set up. A key light as my the main light from the top-right, a fill light from the left that makes the shadows softer, and covers the part that are too black, and finally, the end two rim lights; one for each side coming from the back that helps to separate the character from the background.

When I am dealing with lighting in Blender I usually take advantage of a really useful function called 'false color'. Basically it generates a sort of heat map, based on the intensity of the lights. In this way I can control the exposure, knowing exactly what areas are overexposed or underexposed allowing me to tweak the lights more precisely.
Generally speaking, pure white and red areas means overexposure. Pure yellow areas are like a dangerous zone, all tints of green and grey are good. Pure black and purple areas denote underexposed areas. More on this topic scrolling down on this article by Sobotka.

The final step was to bring my renders into Photoshop, and add some correction with the camera raw filter. On top of that, I added some chromatic aberration, lens correction and graining. The final step was a little bit of color correction, with the selective color adjustment layer. All of these steps make the final image look less like a render.
I hope that this breakdown can be useful and that you are ready to explore your own anatomy practices in 3D!
You can find more of Marco's work on The Rookies, Instagram, Artstation.