
The Art of Creating a Game-Ready Piano: A Step-by-Step Breakdown
In this blog post, Ben Rodgers, a 3D artist and student at University of South Wales, shares his process of creating a game-ready piano from scratch.
In this blog post, Ben Rodgers, a 3D artist and student at University of South Wales, shares his process of creating a game-ready piano from scratch.

Have you ever come across a 3D render that made you question whether it was real or not? The creator of the render probably had the same intention. In this blog post, you'll get a glimpse into the mind of Ben Rodgers, 3D Artist and student at University of South Wales, as he details the process of creating a game-ready piano from scratch.
From reference gathering to modelling, sculpting, and optimisation, you'll learn how video game assets are made, the thought process behind them, and the software that's used. This post also comes with links to some useful tutorials that will help you take your own 3D modelling to the next level.
I’m a big fan of 3D renders which make you ask -”Was that real life or a 3D model?” That was my goal when making this piano, with the added limitation of making it game ready. Hopefully I can provide an insight into how video game assets are made, showing the steps I took, my thought process and the software I use.
The first thing I do when starting a project is to get PureRef open. For those who haven’t used it before, it’s a great program for making mood boards. You can drag and drop images into one big document and organise them to your liking. It’s quick and easy to use and overlays on top of any programs I have open. Perfect!
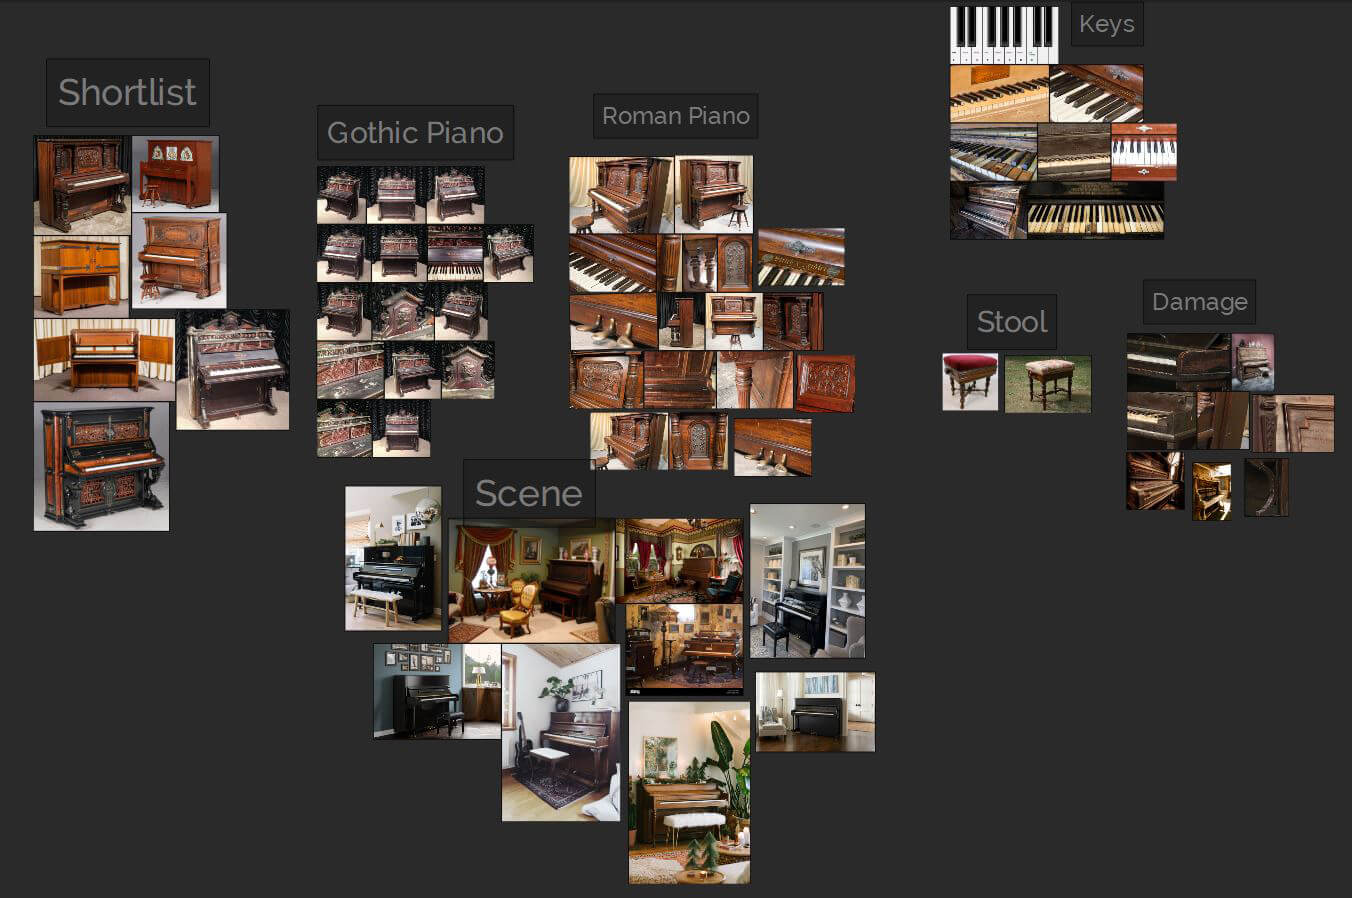
When I look for reference, I try to find websites which specialise in what I need. As I wanted a realistic final render, interior design websites were very helpful. Essentially I could see how professionals set up their lighting, composition and cameras and use that to help me build my scene.
I tend to find more unique reference by going to specific websites, rather than using an image search engine.
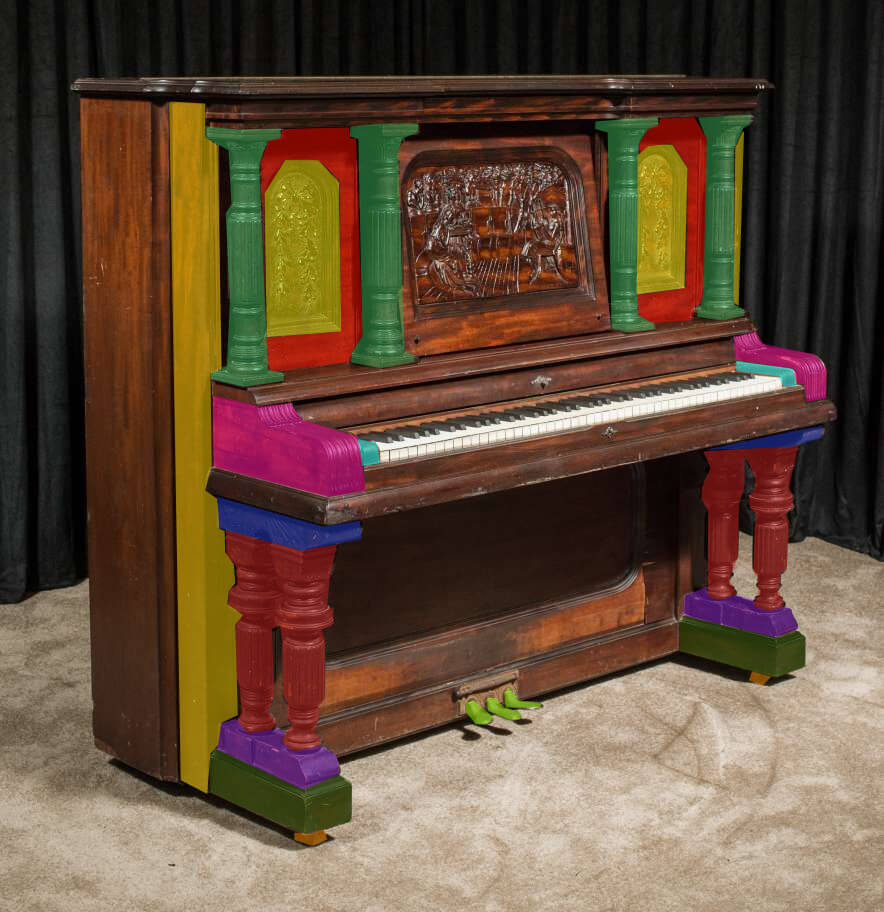
So now I knew how my scene would roughly look, I needed to make a decision on the type of piano I wanted to model. Following my own advice I found an antique piano restoration website. This had hundreds of pianos with high quality images from all angles. Exactly what I needed! I looked through and made a shortlist of pianos which would fit the scene and be fun to make. The two finalists were a gothic red and black piano and a Roman Style Upright Piano. The winner was the Roman Style purely because of the scene I wanted to build. If I was building a castle maybe the outcome would have been a little different.
3D blockouts are useful for a few reasons:
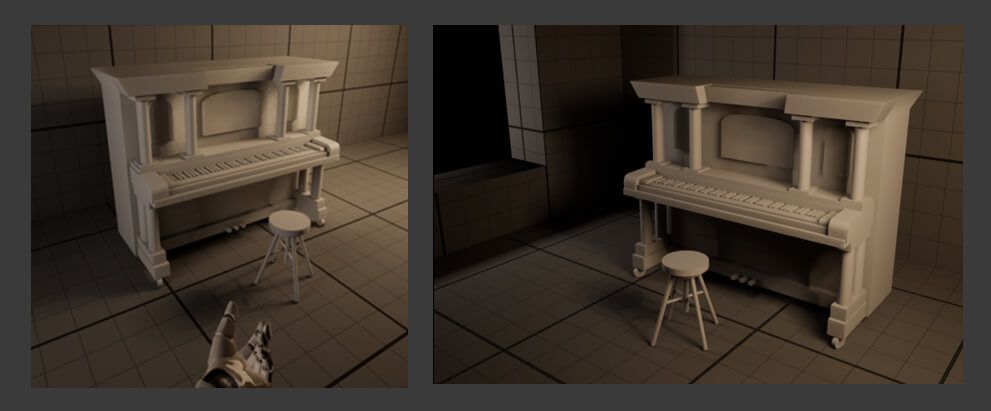
This is the first blockout I made - super basic with only the piano and walls. I used Autodesk Maya to model and Unreal Engine 5 to build the scene. A benefit to using Unreal Engine is the fact that it’s a game engine. This means I can move around the scene in first or third person, which I did to make sure the scale and positioning of objects felt right. This is more applicable to me as a game artist as the final result is to create game ready assets.
I sometimes get overwhelmed when creating complicated models, not knowing where to start or how everything fits together. One thing that works for me is to break the object down into modular pieces, this always makes things more manageable. A huge model quickly becomes ten smaller pieces, some of which can be repeated. Admittedly a piano isn’t super complicated, but for me it was a test of my modelling skills.
Before I even started I took time to plan the model, think about the topology and how I would unwrap and texture it. Planning always saves me time in the long run and the final result always comes out better. I also like to model in sections, this gives me a feeling of accomplishment after each part and provides natural breaks when working. Take regular breaks! Your brain will thank you for it.
A big part of my workflow is optimisation and reducing workload.
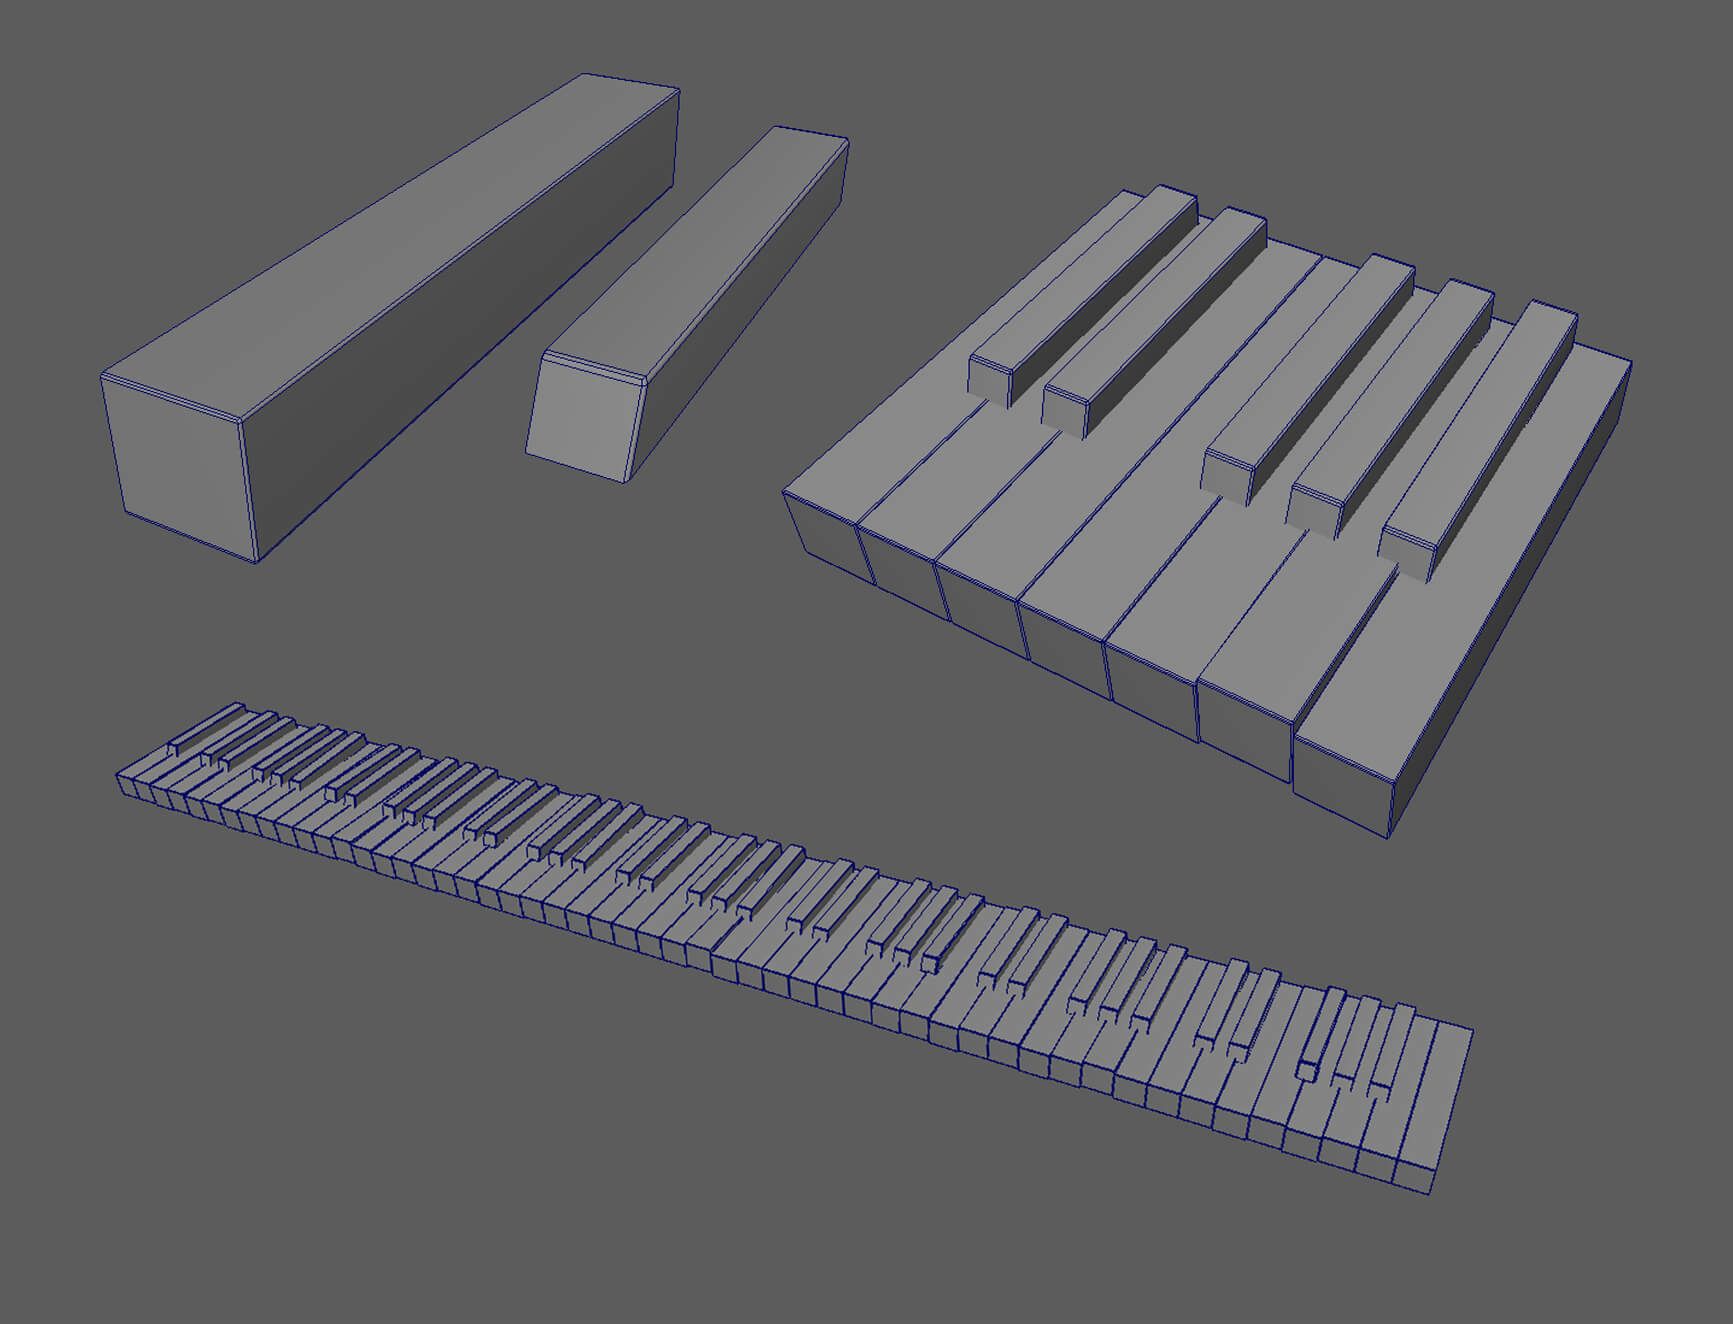
The keys are a great example of modular working. I made one white key and one black key. I unwrapped these and duplicated them to make an octave. I then grouped these and duplicated the octave to create the full set of keys. 88 keys made from 2 objects, all unwrapped and ready to go.
When modelling I make sure to unwrap each object as I go. This prevents the dreaded UV’ing day at the end of a model. (Even though I don’t mind unwrapping…yes I’ve already been told I’m odd). I don’t worry about organising the UV map until I have the model completed. But at this stage I know I will only use one map for the whole piano.
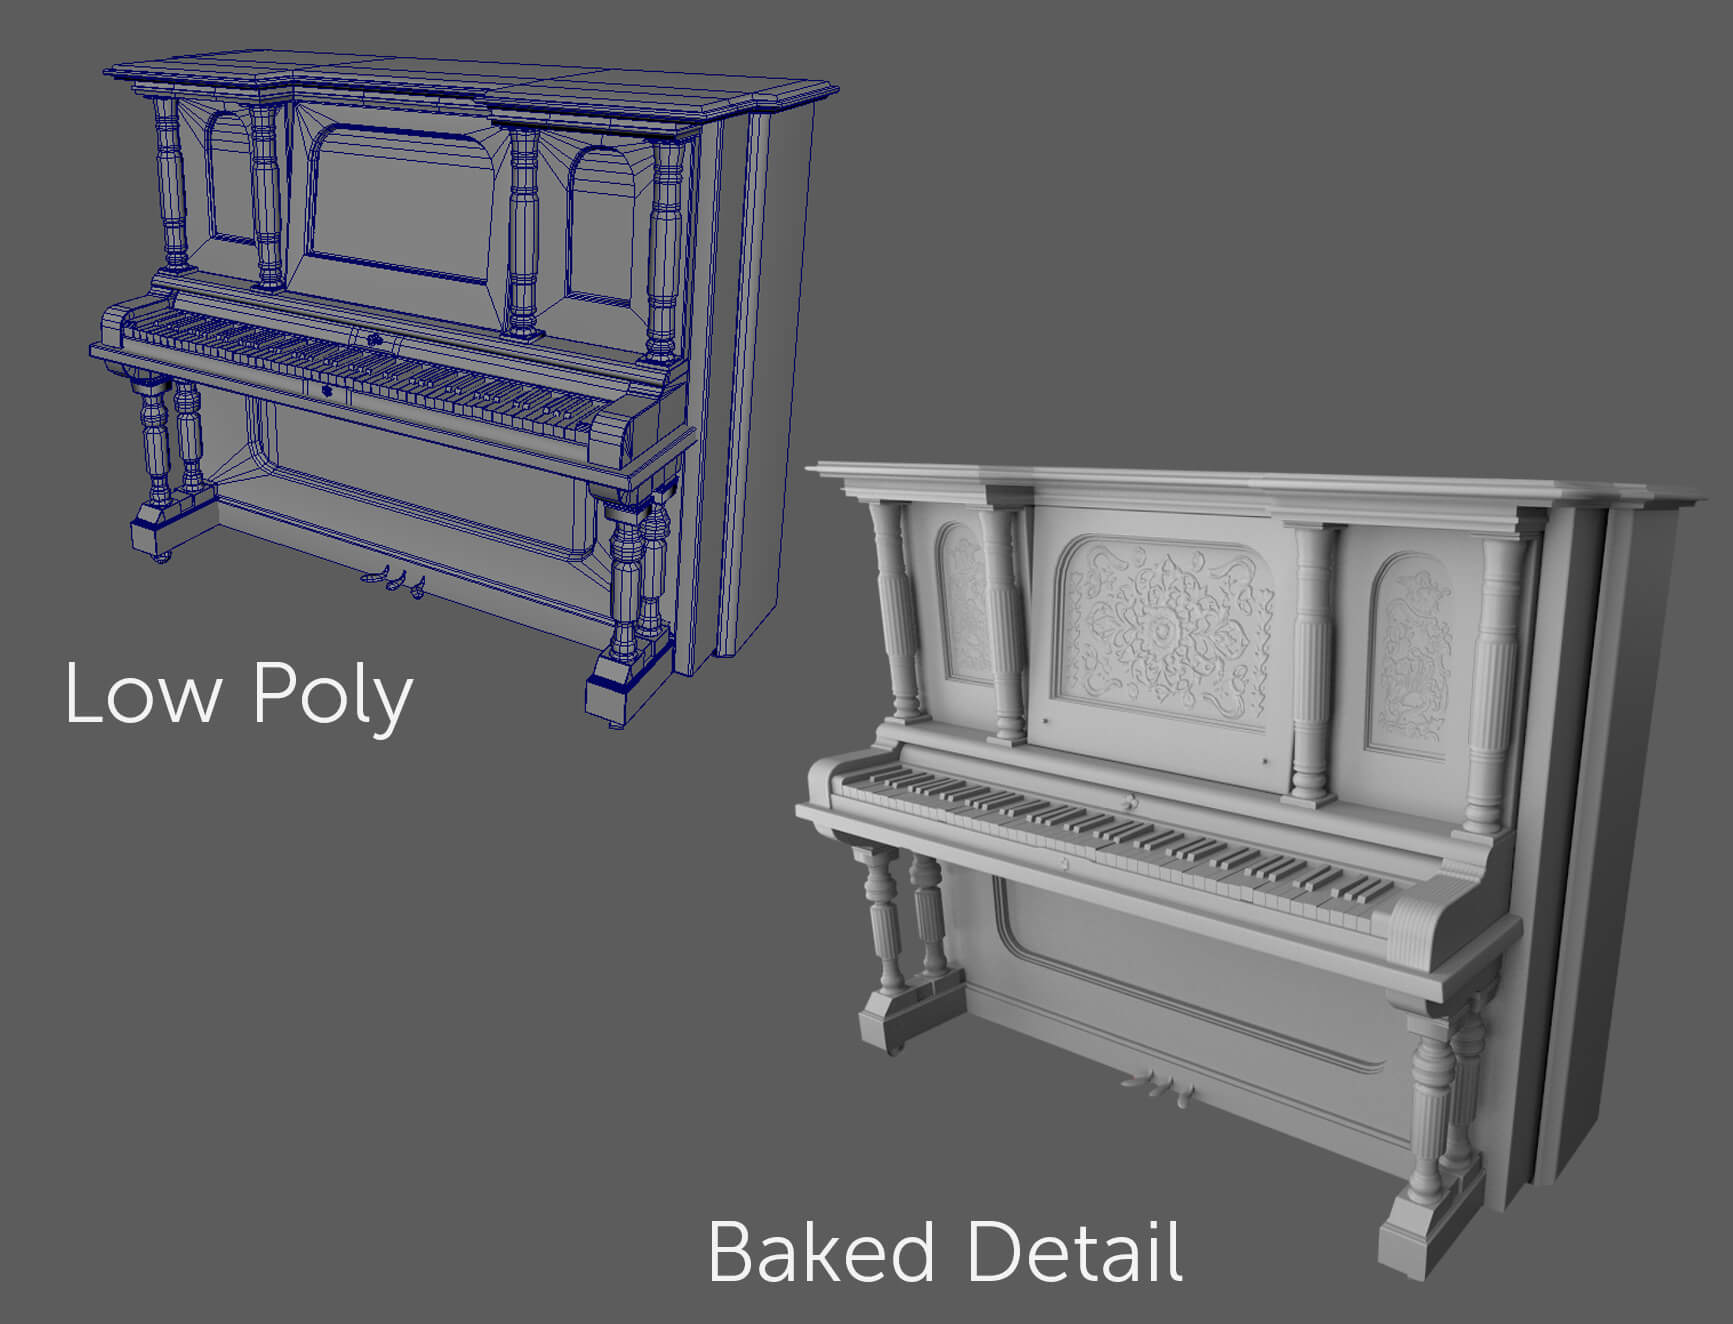
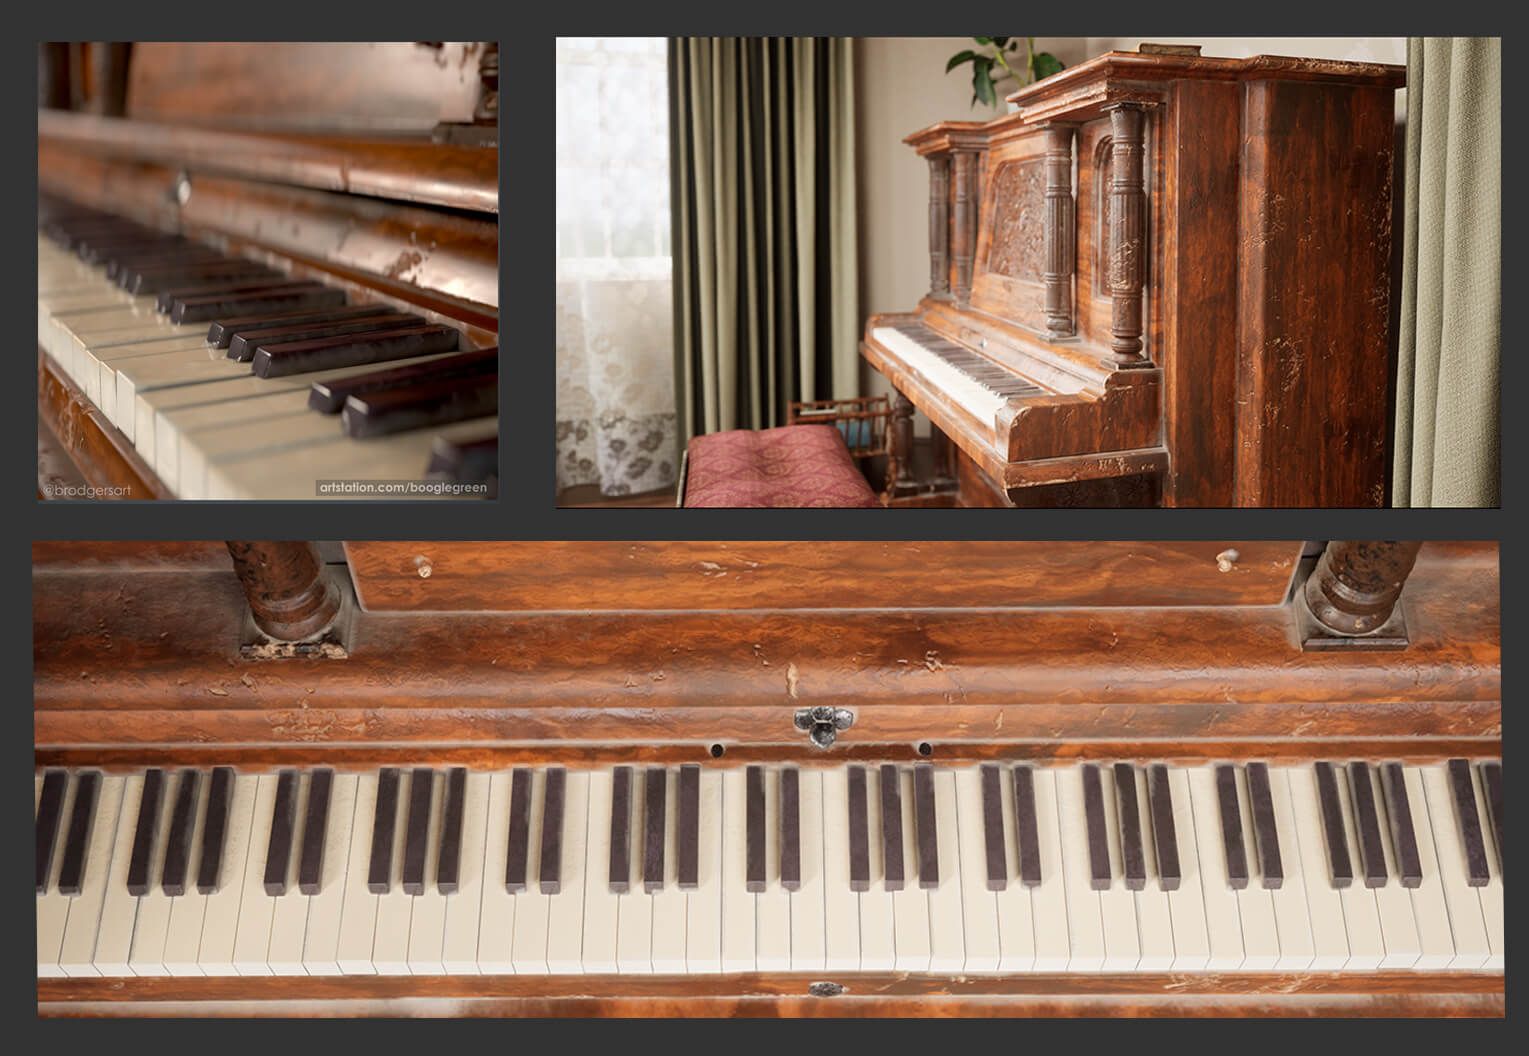
Once I had completed the piano I took it into ZBrush for sculpting. The plan being to sculpt damage and the ornate wood sections and bake this detail onto a lower poly piano. I had subdivided each part in Maya to make sculpting easier. My intention was to delete unnecessary edge loops later. Having clean topology makes these kinds of changes easy and non-destructive.
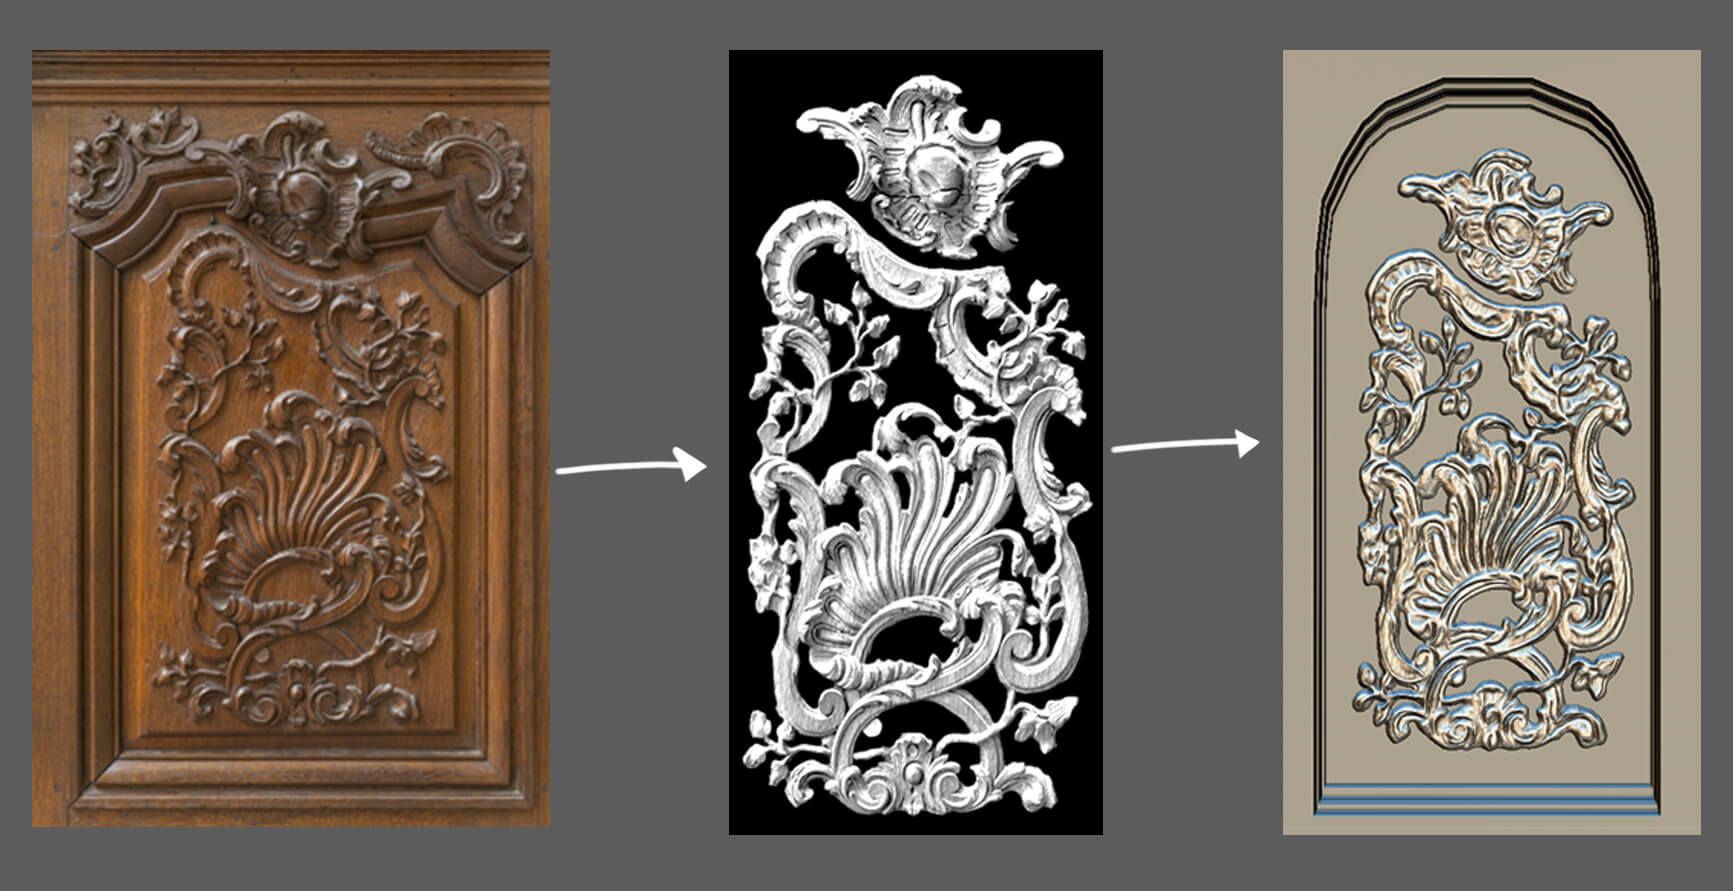
As ZBrush isn’t my strength I utilised the Make 3D tool. This takes a black and white image and converts it to a 3D model, like a height map. Textures.com has some free to use images and textures which I like to use as a base to work from. For the ornate wood carvings I downloaded some images I liked, I then used Adobe Photoshop to combine these into one greyscale wood carving image. I also cleaned up the edges ready for ZBrush. After importing the image and using the Make 3D tool, I refined and sculpted the 3D model. I mirrored the side carving and repeated the process for the centre carving.
Now I had my high poly sculpted piano, I needed a low poly to bake the detail onto. This meant deleting those unnecessary edge loops from earlier. If you have already unwrapped the model make sure not to delete any edges with UV seams on them. I also deleted any faces which the player wouldn't see. This would all depend on the game camera, position of the asset and whether it can move. For example, if the player can knock the piano over, I don’t want to delete the bottom faces.
I took both the high and low poly pianos into Adobe Substance 3D Painter for baking and texturing.
When texturing I like to keep my file organised, I use folders and try to name each layer. This keeps everything separate and manageable and I can find what I’m looking for. This is easier said than done but a little time spent doing this will save a lot of time later on. This seems to be a recurring theme in my workflow.
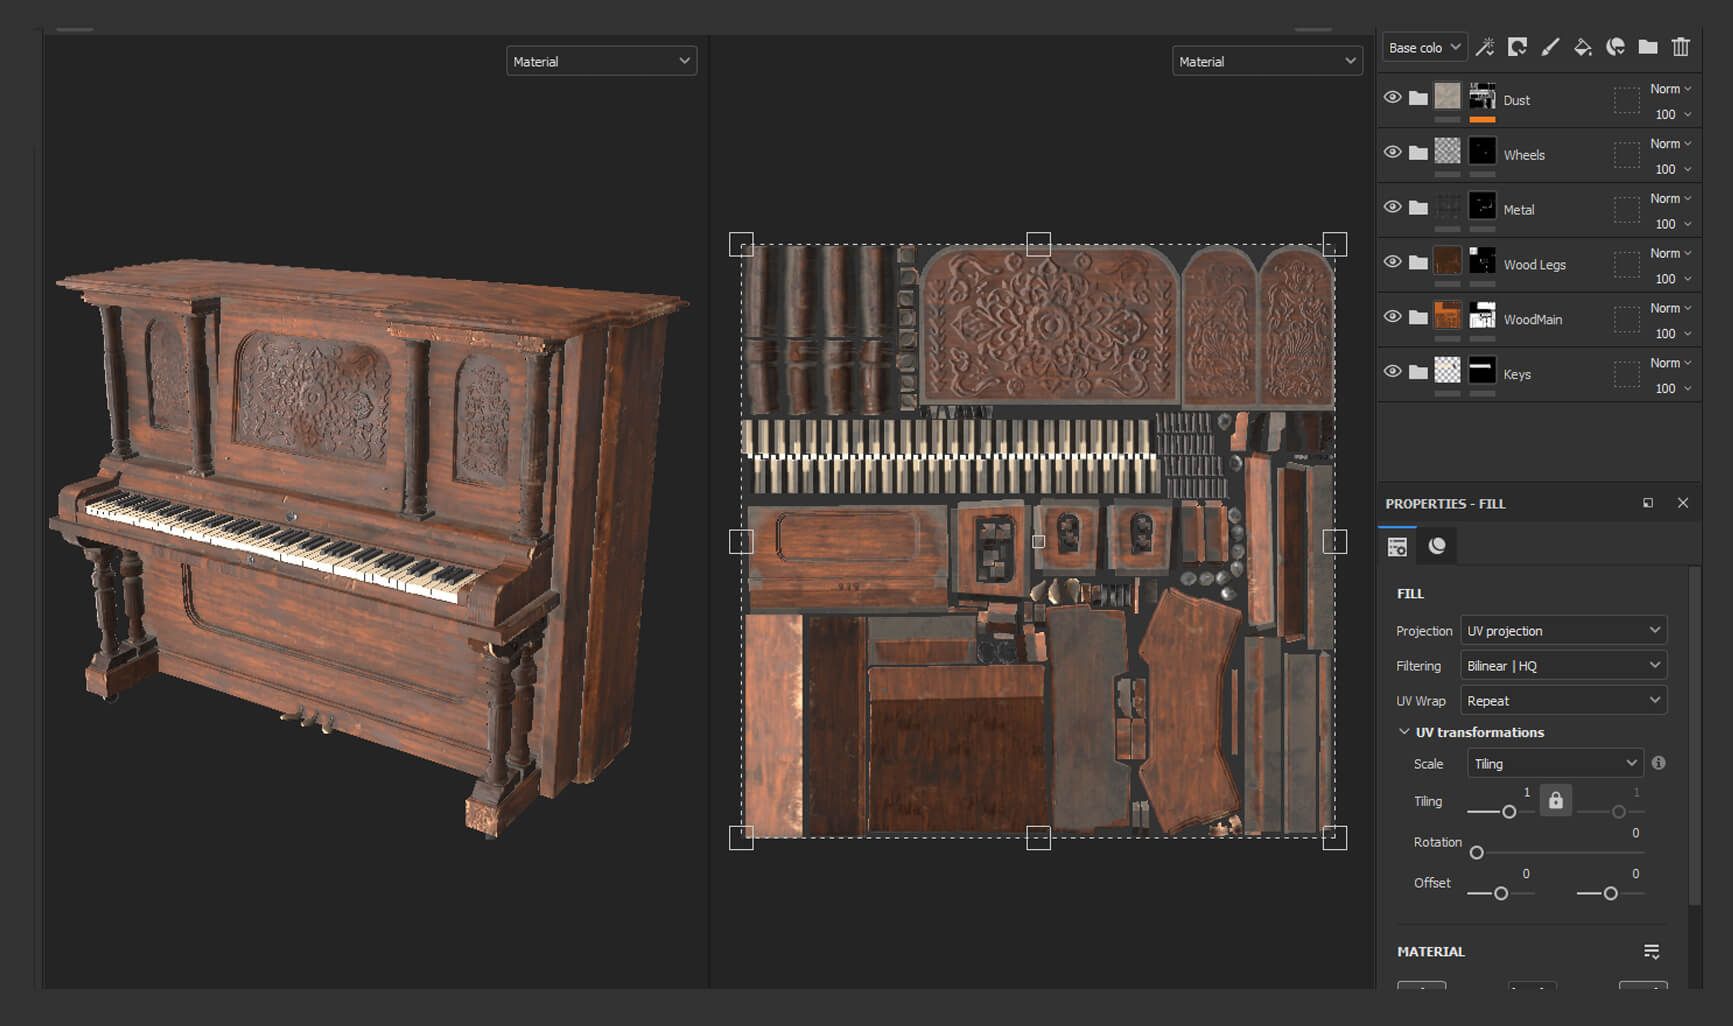
Another benefit of using folders is the ability to mask them. I can put many layers into a folder and make changes to how this shows on the model at a high level. Studying the built in smart materials in Adobe Substance 3D Painter was a great help to me. Both to see how to make and keep a texture organised. I also followed this great tutorial when starting out.
As nice as the smart materials are, I wanted to create my own wood texture for this piano. This meant I had full control of every aspect of the texture. I won’t go into too much detail but to start I made a few fill layers of different shades of brown. I gave each layer a different level of roughness too. I used masks and directional noise fills to give a wood grain effect. I also used the warp filter on the masks to add subtle variation to the wood grain. With only a few layers this built up a surprising level of depth to the wood.
For the extra damage I created a few fill layers of lighter coloured wood which cover the whole piano. I put these into a folder and masked it. Then using generators and manual painting I applied damage exactly where I wanted it. All with the freedom to edit any of the fill layers. When you add varying height and roughness into the mix, this is a quick way to add lots of detail. All this combined gave a realistic and natural looking wood texture.
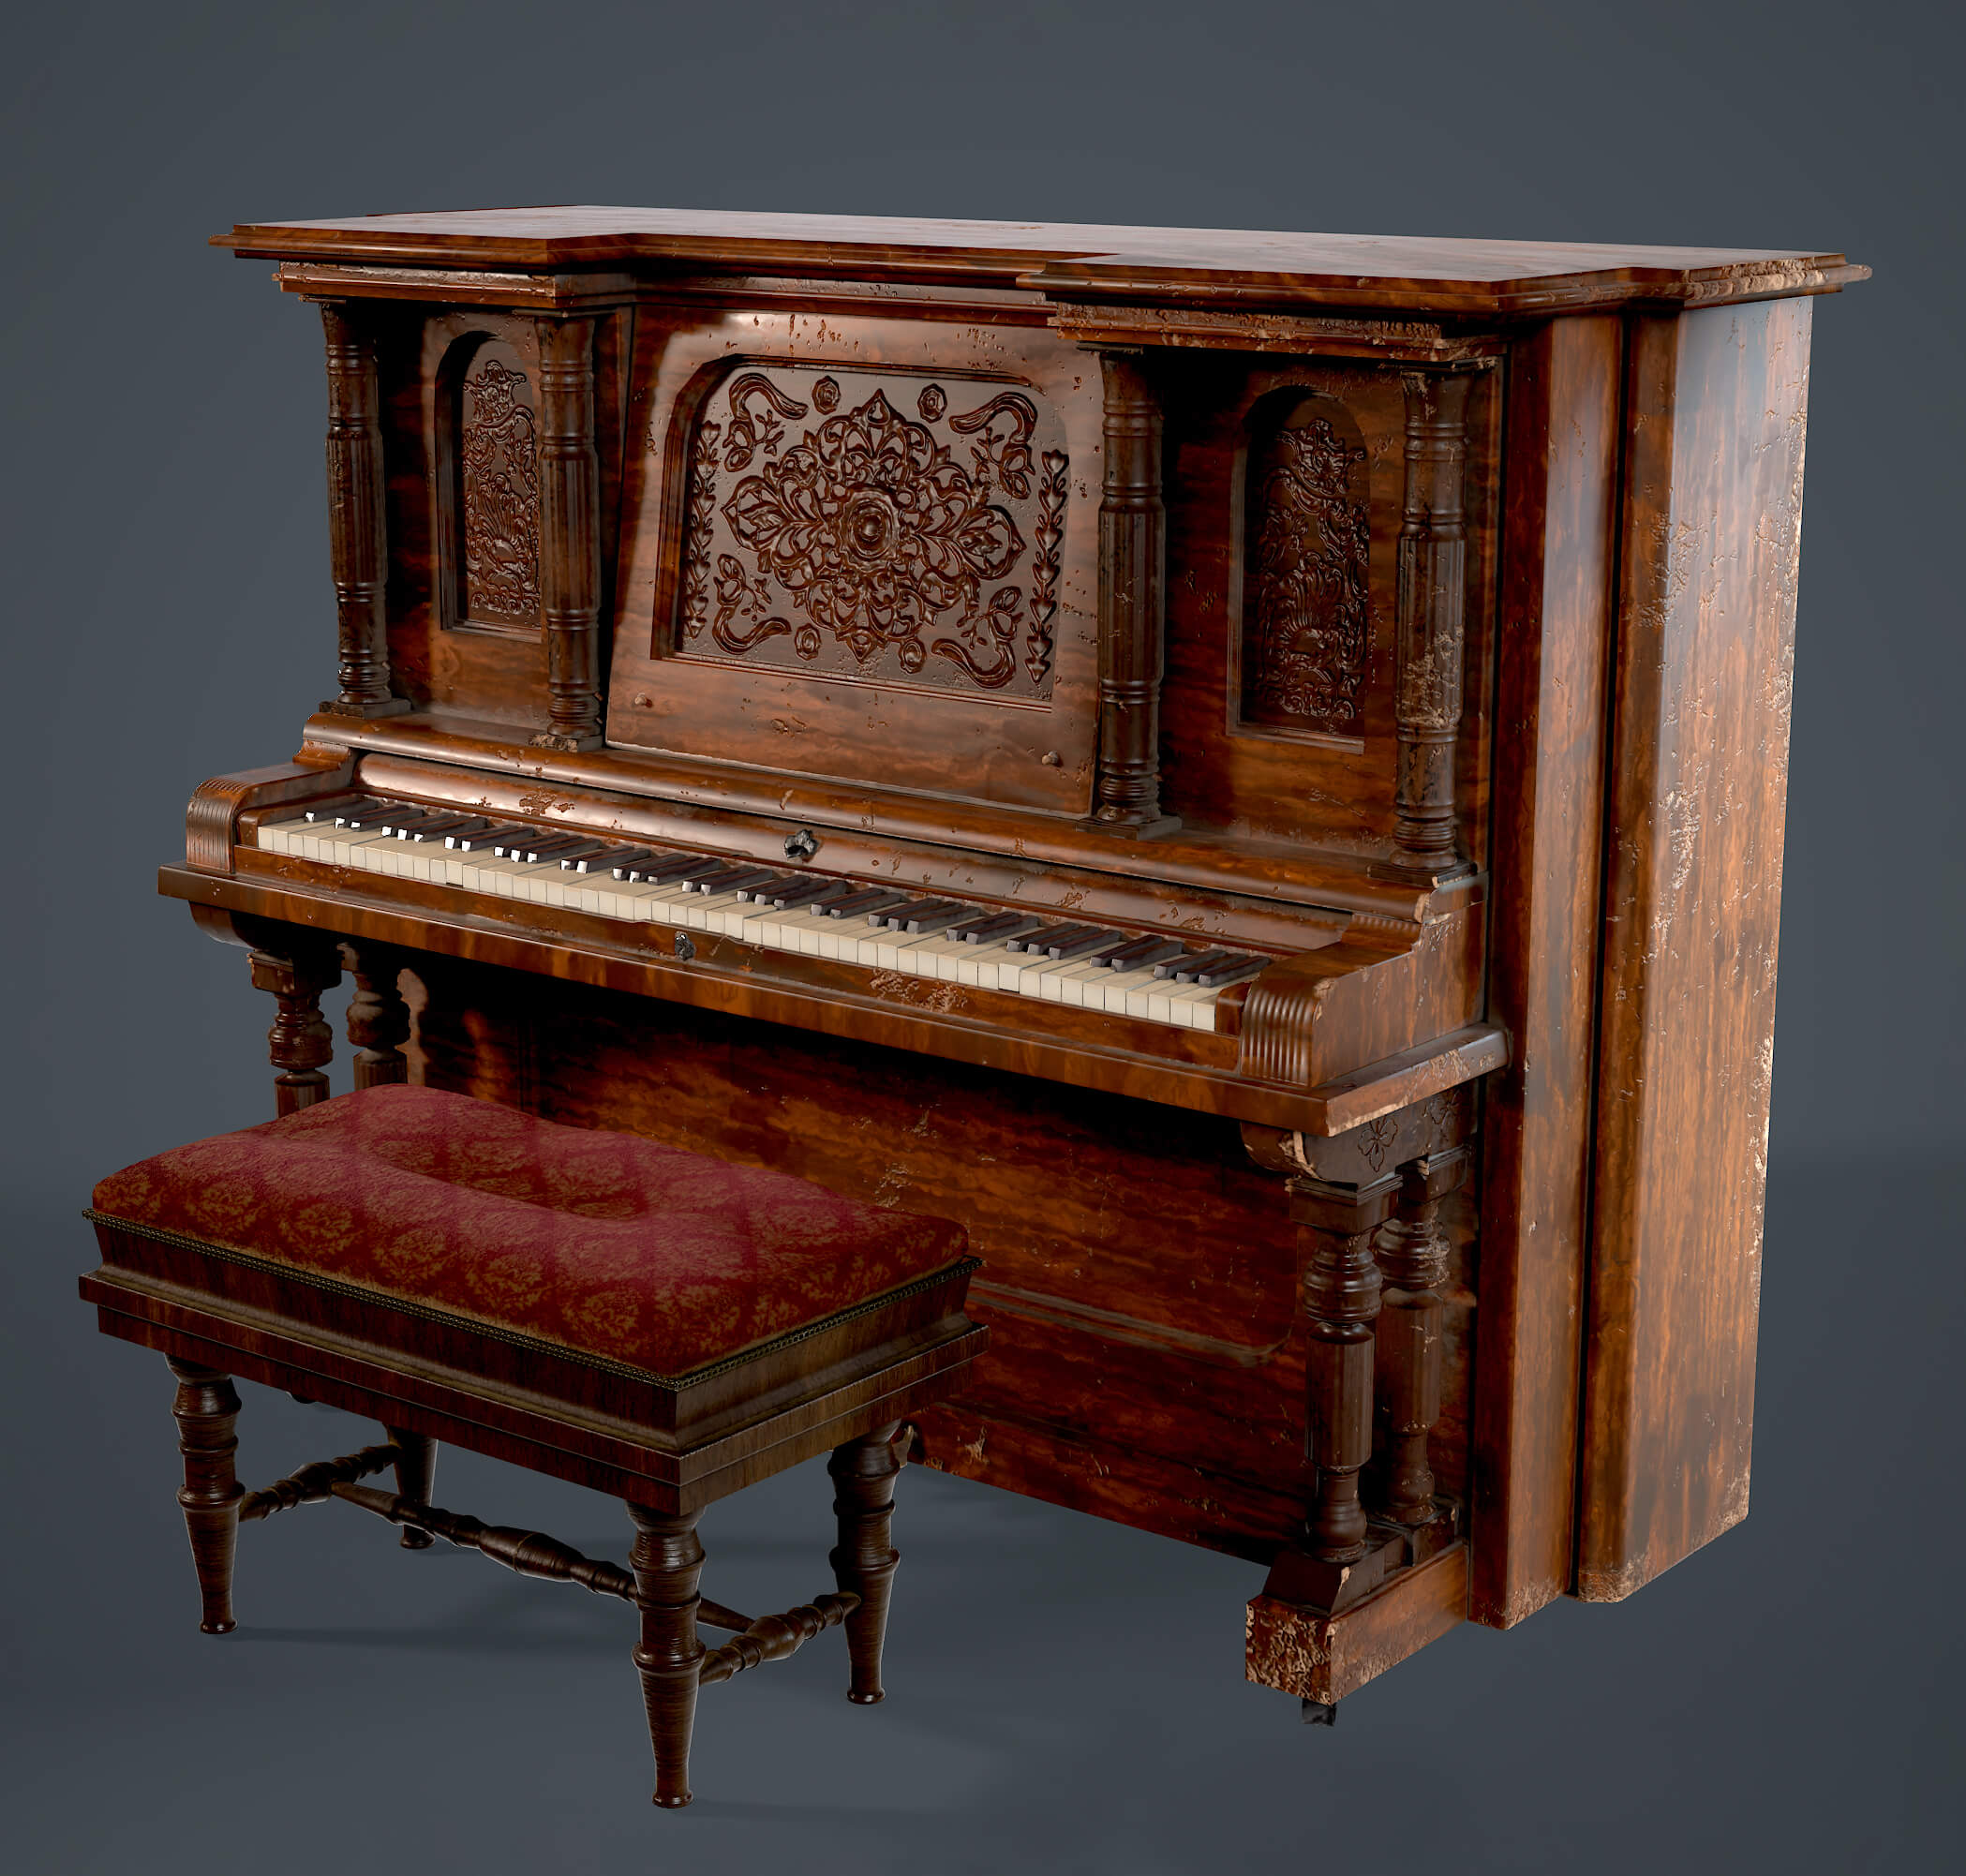
Whenever I finish an asset I take it into Marmoset Toolbag for some nice renders. I use this program to showcase single assets as it’s relatively simple to set up a camera and lighting. For these renders I used a three point lighting setup, trying to highlight different areas of the model. I also turned on ray tracing for more realistic shadows.
Part of making a game ready asset is optimisation. One way to optimise is to reduce texture map sizes. I tested 4k, 2k and 1k maps to see the difference in quality. At a distance the difference is minimal, but the closer the camera gets to the asset, the more noticeable the changes get. When creating the texture I need to know some things about the final game. Does it use a fixed camera? Can the player get closer to the object? Is it first or third person? All of these factors play a part in deciding which texture map size to use. Whether it is a hero asset or background prop will also affect the level of detail needed.

Another optimisation is reducing poly count. This isn’t as important as it used to be given how powerful consoles and PCs are now. But being aware of how many polys an asset uses is good practice. If the difference between an asset looking blocky or realistic is only a few hundred polys, it’s probably better to use the extra polys. If a background prop uses 100k polys, best to reduce that. This all depends on the situation though and there is no one size fits all answer.
After testing I decided on using 4k maps for the renders, 2k maps for a first person game and 1k maps for a third person game. The piano isn’t going into a game at this stage though, so these are all hypotheticals.
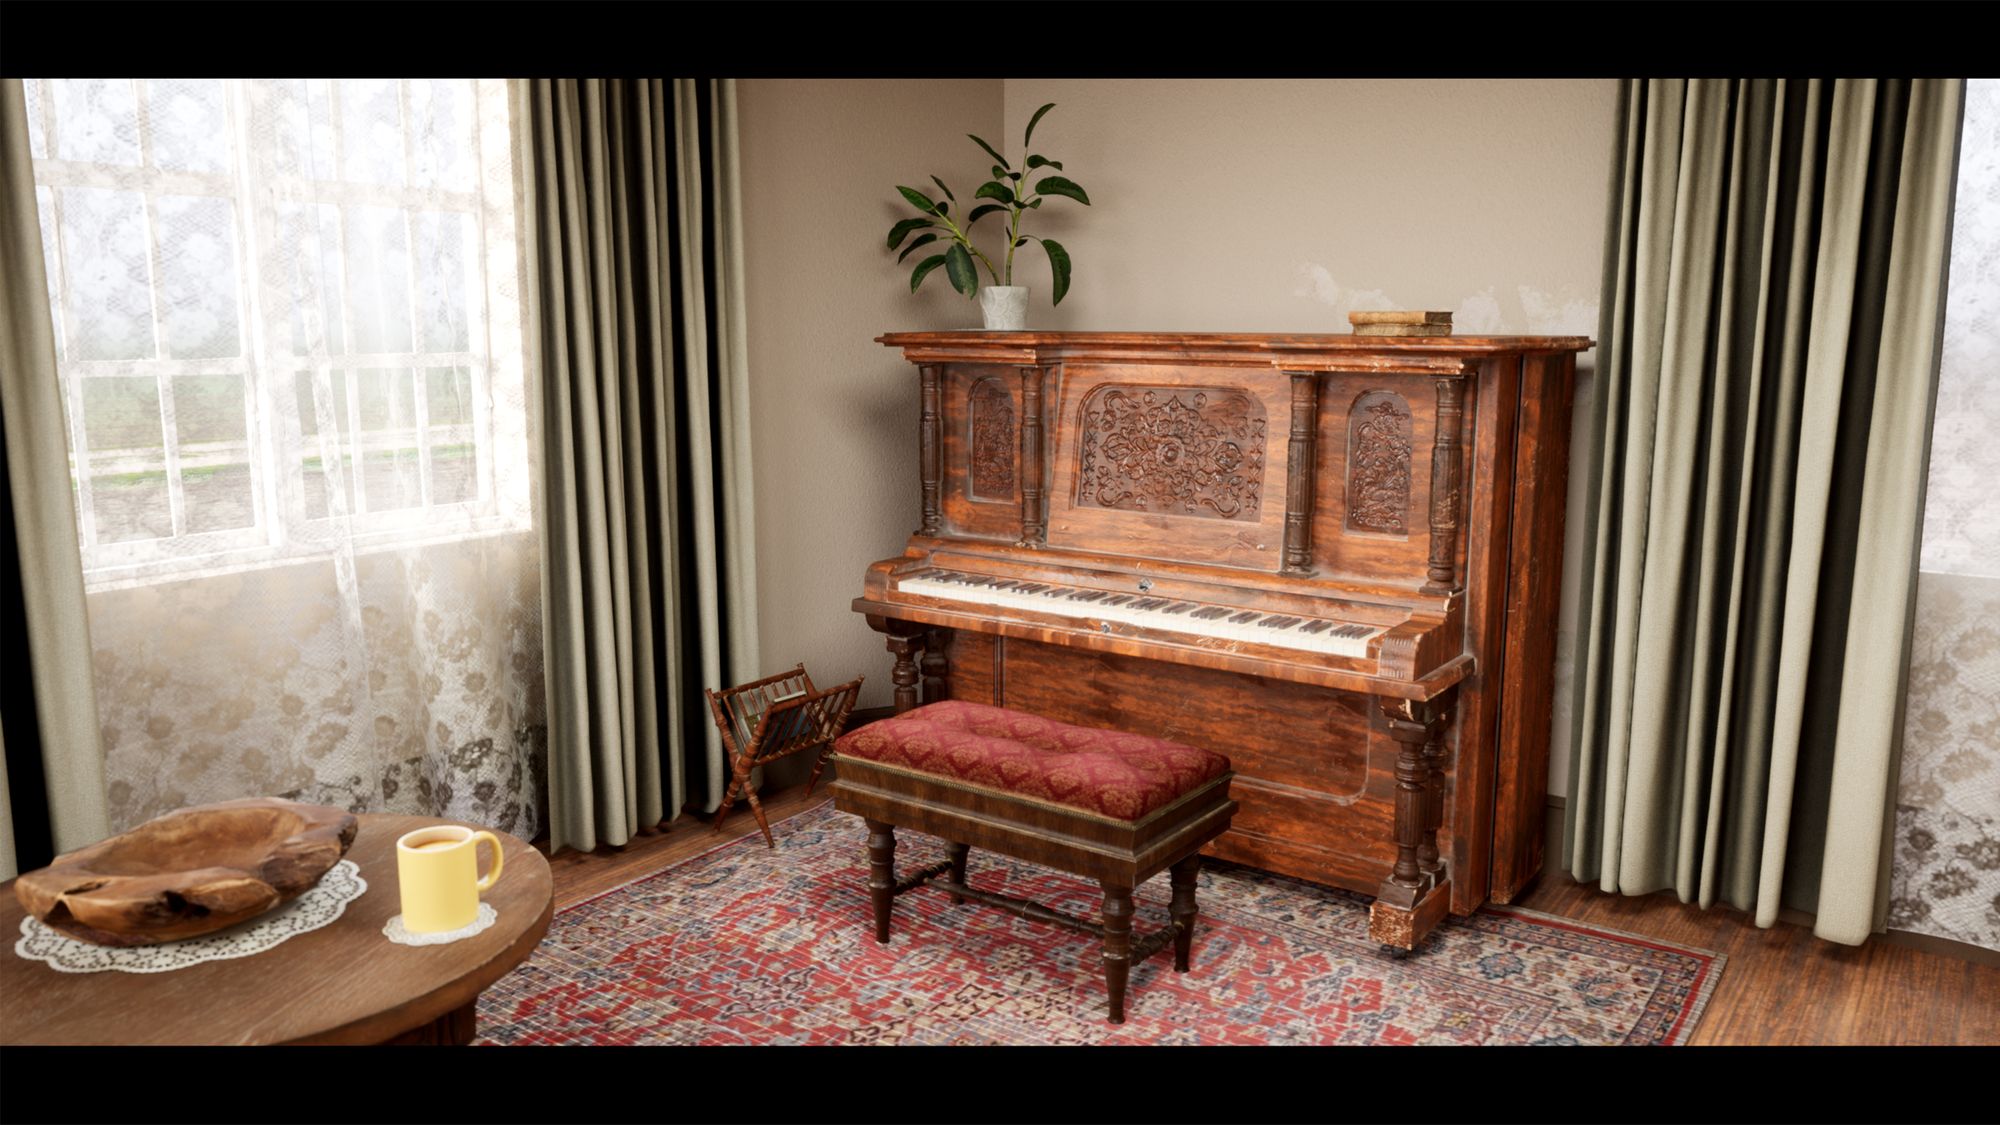
Now I had the completed piano I moved onto the scene. Each week I would show my progress to anyone I could and ask for feedback. It’s easy to get lost in the details and not see the bigger picture, so don’t be afraid to show your work in progress and be prepared to make changes.
The scene went through many iterations, both the surrounding assets and lighting. This is one area I would improve in future with better planning. For some surrounding assets I decided to use Unreal Engine’s Megascans library. This saved me time and let me focus on the piano. Don’t be afraid to use third party assets when set dressing, but always make it clear where they came from.
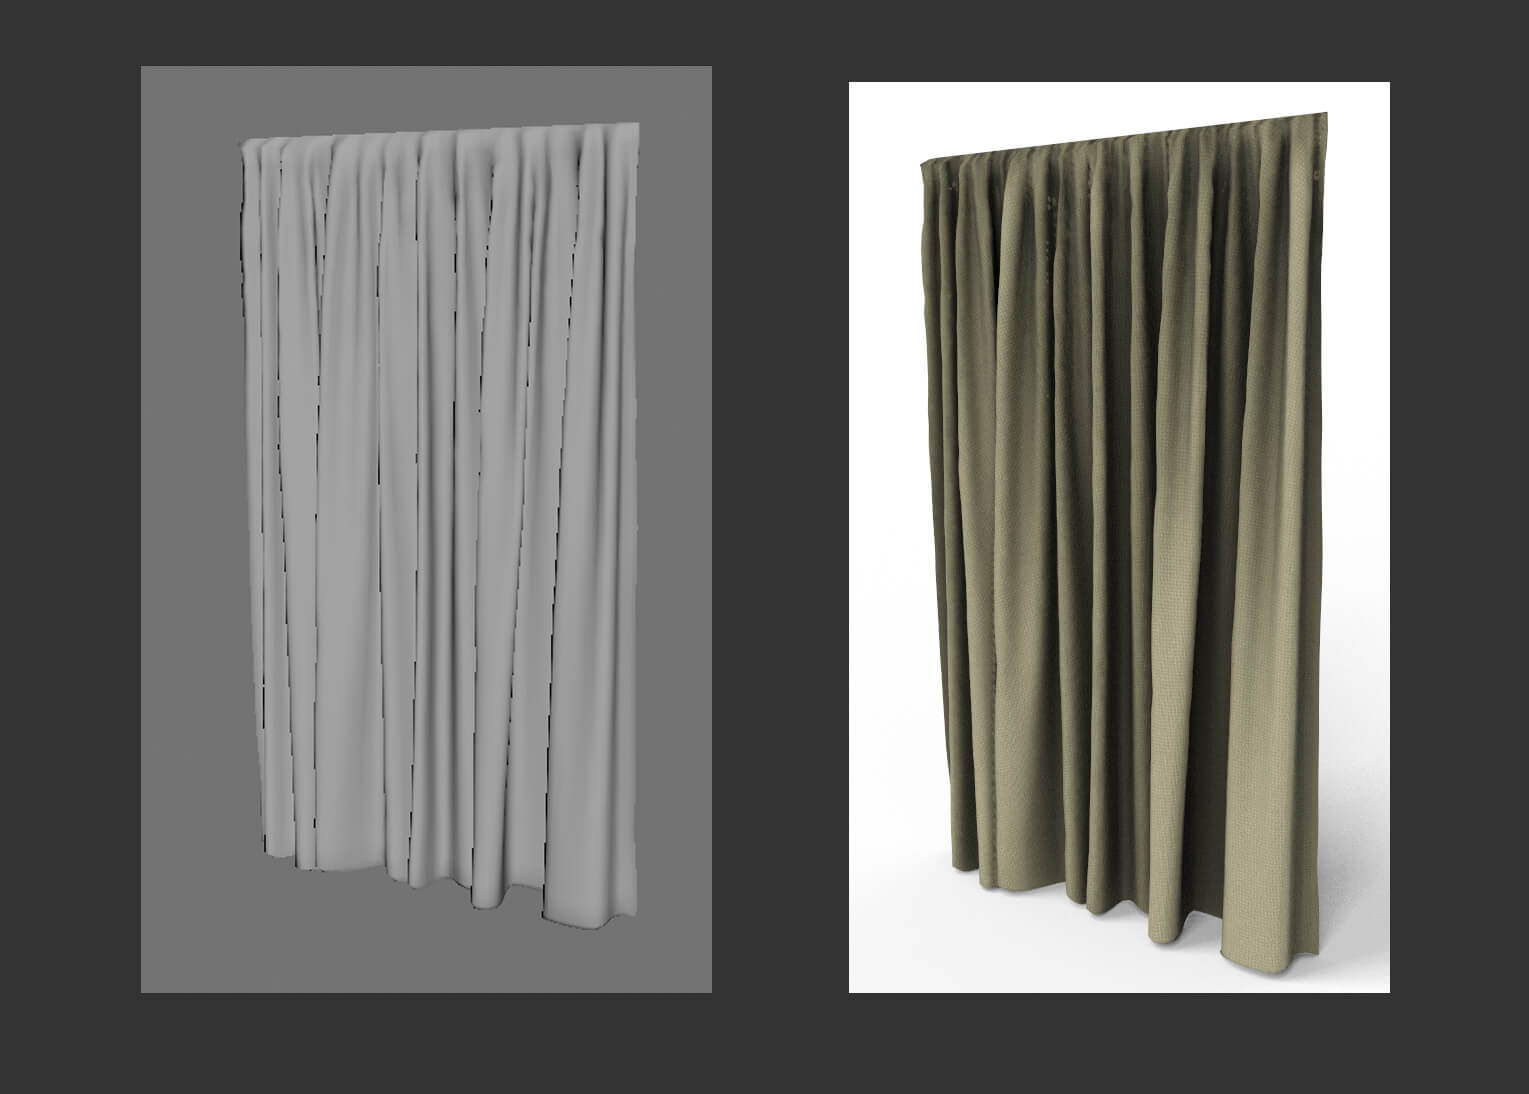
Out of the surrounding assets I made, the curtains were the most interesting. I tried to make them in Maya, but I wasn't getting the results I wanted. So I decided to try Marvelous Designer instead. I hadn't used this program before as I assumed it was only for making clothing. But making curtains was simple with a tutorial. Once I retopologized in Maya it was ready to texture. This texture was simpler than the piano, but I made sure to capture the fabric weave.
Once I was happy with the scene I decided to test Unreal Engine’s ray tracing features. I also used a HDRI to light the scene. It’s a bit too in depth to go into here, but this video from William Faucher was a great help with getting set up.
I also learnt how to get high quality renders in Unreal Engine when making this scene. Before I had used the high quality screenshot feature but was never happy with the results. They were a bit too blurry and didn’t do the models justice. The solution was to use the movie render queue and render one frame at 4k. There are a few tutorials showing how to do this, but this was the one I followed.
Now everything was set up and I knew how to take high quality images. I clicked render and then waited…for a while. Ray tracing takes time to render. Grab a book, make some food and leave it to do it’s thing. One bit of advice, do a short test render to make sure everything is in focus before setting off the final render. This is a mistake you only make once.
For the other shots I had some fun with the camera. I played with the depth of field settings and camera position to try and get some cinematic shots. I stuck to using the rule of thirds and leading lines to keep the piano as the focus.
Once I had my renders I took them to Adobe Photoshop for some final tweaks. I adjusted the contrast and added a subtle vignette. I try to get the shot I want at the rendering stage to avoid too much post-processing. But adding some final touches can elevate the render from good to great!
I try to look at every project as a chance to try something new. Making this piano improved my modelling and texturing skills. It also gave me the opportunity to try some new rendering techniques. I’ve already started to use these in new projects and will continue to do so.
I’d like to thank The Rookies for inviting me to share my process. I hope it has been an interesting read!
You can find more of Ben's work on The Rookies, ArtStation and Instagram.