Creating a 3D Interior From Ideation to Execution
Éanna O’Brien takes us through the process of creating his interior 3D render that won him an internship at Wētā FX through the Rookie Awards 2022.
Éanna O’Brien takes us through the process of creating his interior 3D render that won him an internship at Wētā FX through the Rookie Awards 2022.
Éanna O’Brien is an environment and prop artist in Melbourne, Australia. So far in his career, he has have been fortunate to work at Big Ant Studios, Dekogon, and intern at Wētā FX thanks to the Rookie Awards.
In this article, Éanna takes a deep dive into his creative processes and techniques, gives a detailed breakdown of his project, and shares valuable tips to help you achieve success in your own 3D interior project.
In this article, I will guide you through every step of my project, from ideation to execution. I highlight the specific techniques and strategies to bring this project to life. I made this project while doing the environment art bootcamp at Game Arts Academy.
Before immersing myself in the project, I took the time to collect references, seek inspiration, and brainstorm story concepts for various environments. This exploratory approach helped me identify the most captivating narrative and intriguing environment.
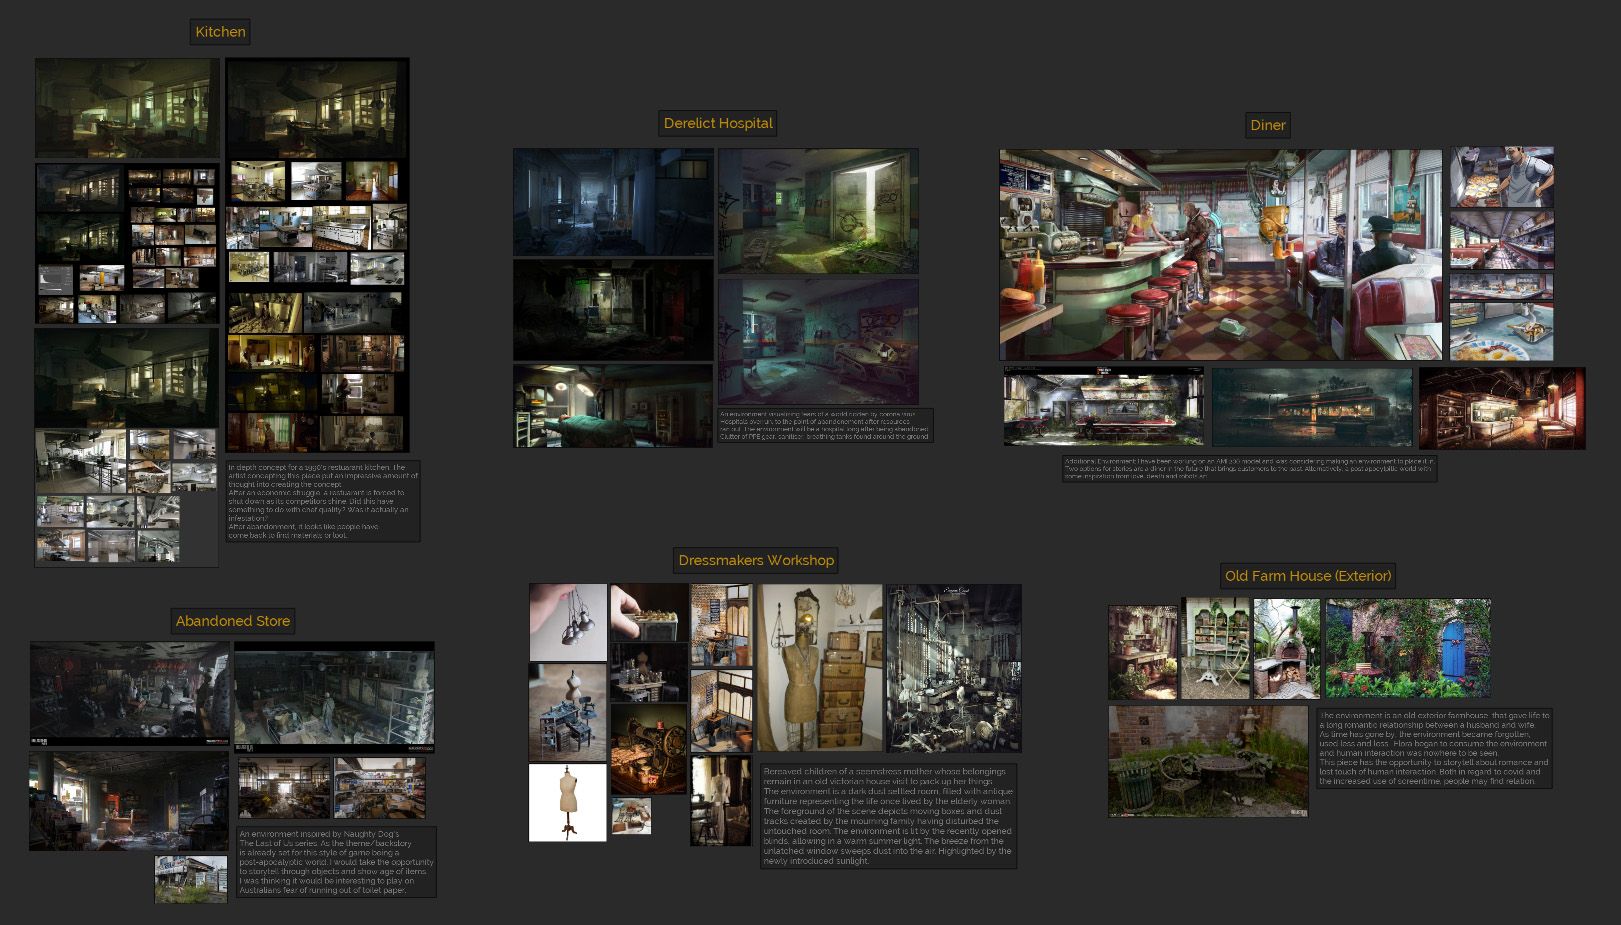
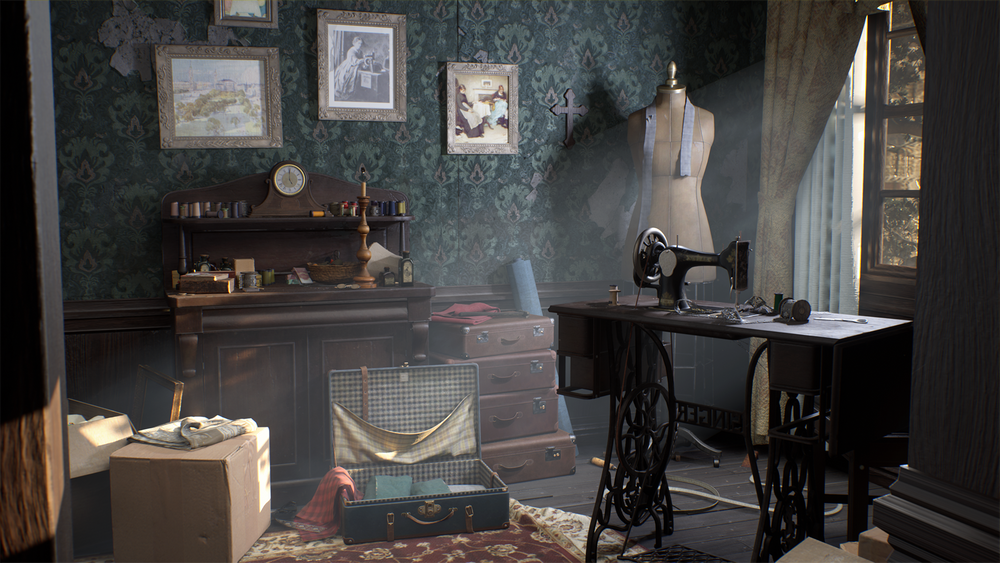
After exploring these concepts, I decided to develop the Dressmakers Workshop. This later evolved into a Seamstress’ home workshop.
It's crucial to think like a writer and understand the narrative you're trying to convey. The better you know the story, the more authentic and convincing your environment will be. In taking the time to understand your characters and their surroundings, you will create a world readers will want to explore further. So, don't rush the process, take your time, and get to know your story - it will pay off in the end.
Sourcing a range of references is crucial for creating a believable world. I don't complete my pure ref before beginning a project, but, it's essential to have a solid foundation and continue to refine it as you go along.
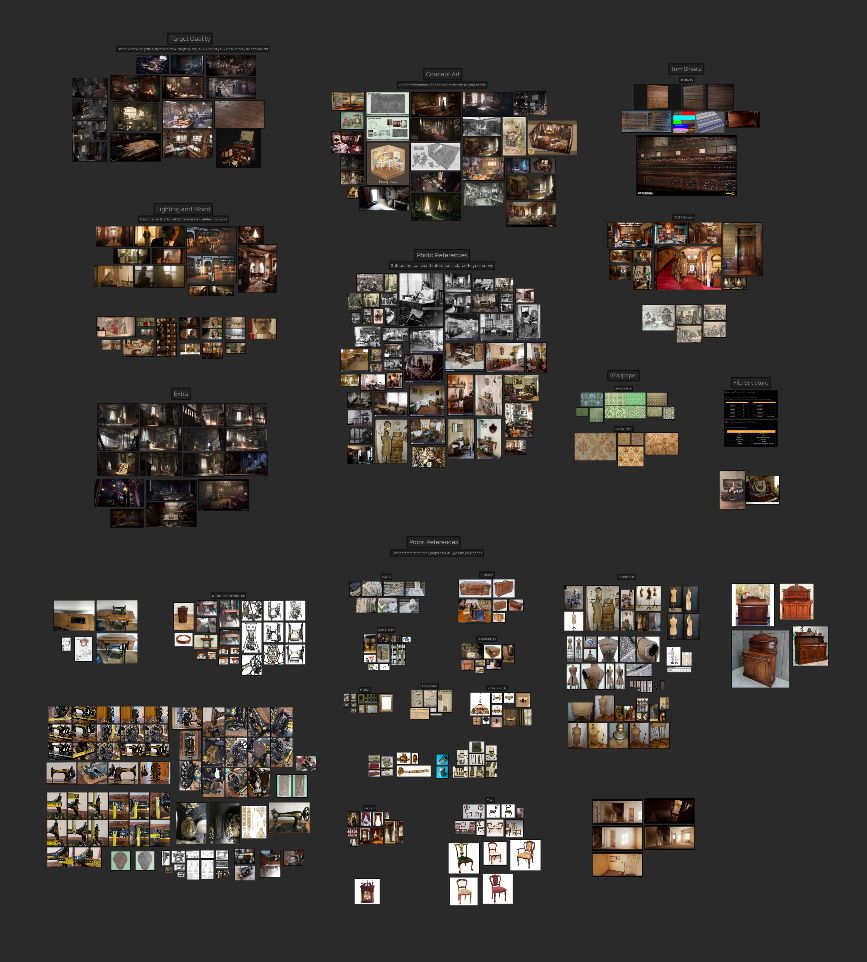
Besides gathering references, I stress the importance of research. Take time and put in the effort to acquire knowledge about your project. For this project, I read articles about the sewing profession, the life of seamstresses in England, architecture and more. It was inspiring to read about the lifestyle and challenges seamstresses faced.
As you gather references, it's a great opportunity to start organising your project. I personally choose to use Trello to set up stages and tasks, but pick your poison.
If you read environment art articles, you know that the block out stage is a crucial part of the project. It is essentially laying down the foundation for your project. This stage's primitive nature allows for iteration and experimentation without significant time investment. It’s an opportunity to explore composition, scale, density and design.
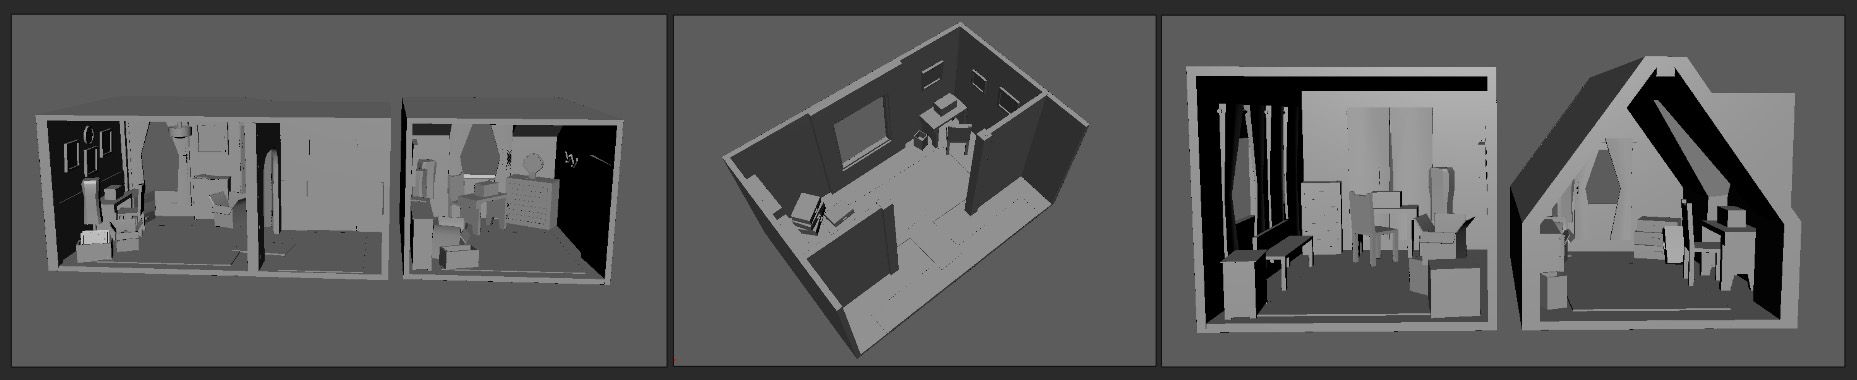
I merged aspects of various block outs, handpicking and integrating the favourable elements. I then built out modular proxy pieces and set up the block out in Unreal Engine 5. Spending a little extra time to set up rudimentary lighting.
The beauty of having modular environment pieces is that you can iterate and expand later if you decide to do so. I ended up expanding my environment as I already had the pieces required. It’s beneficial to show potential employers your understanding of developing modular environments.
After completing the block out stage, it’s a great chance to get feedback. People can help you identify potential issues before progressing too far. This stage is by no means pretty and it's not meant to be, don’t be scared to ask for critique.
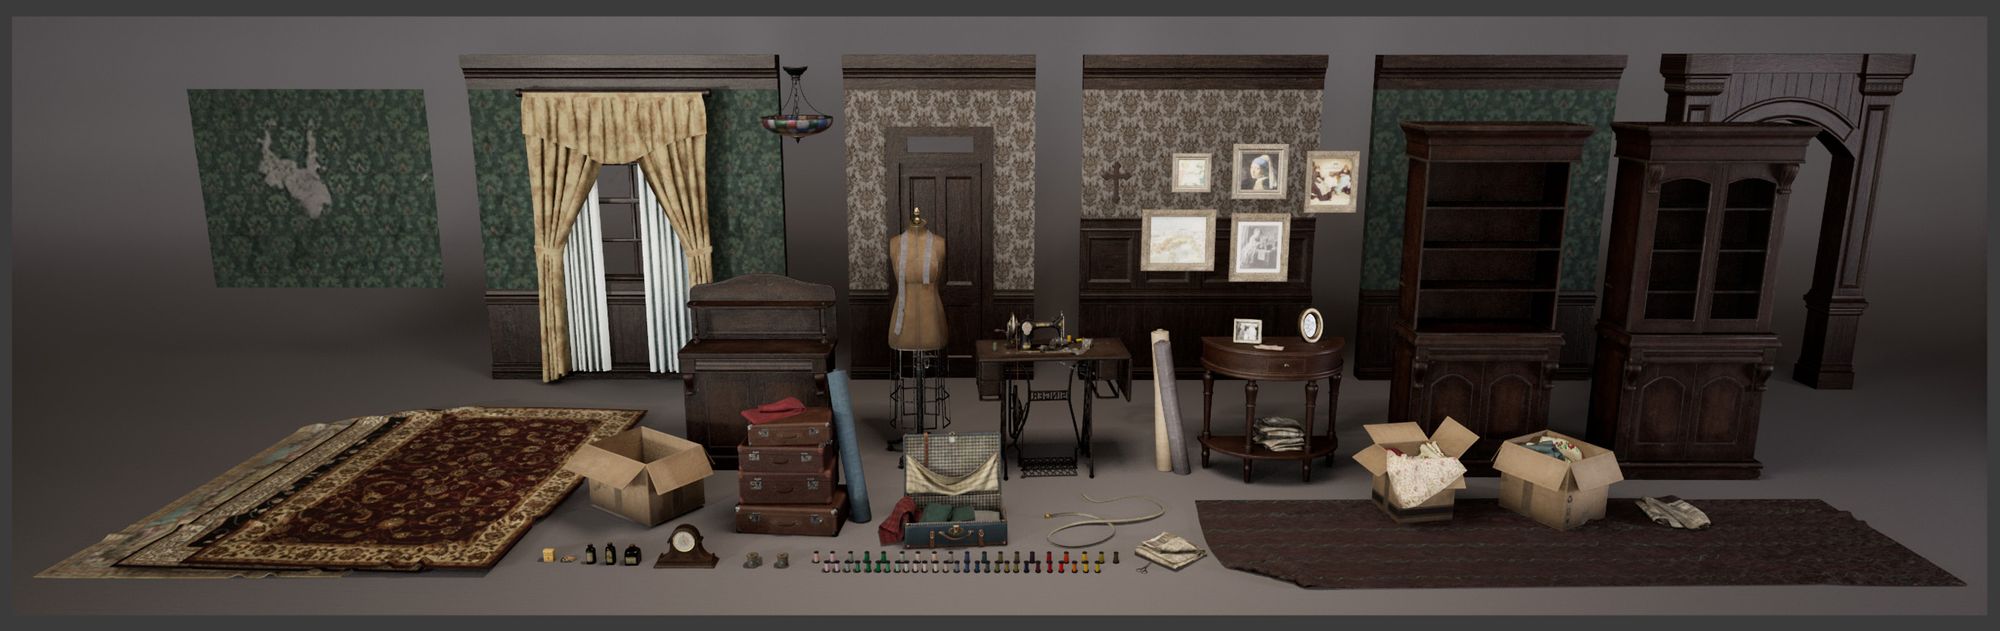
After completing the proxy environment, I began modeling my props. While there are benefits to working on multiple props simultaneously. I decided to take individual props to completion. This approach provided a sense of accomplishment and helped me maintain motivation.
For each asset, I gather more references and consider its purpose in the environment. Then, I categorised props into hero, basic and low priority based on importance. This is essential for the scope of the project, you should avoid wasting time on less important tasks. In certain instances, I found precise blueprints for assets, which made the modeling process smoother.
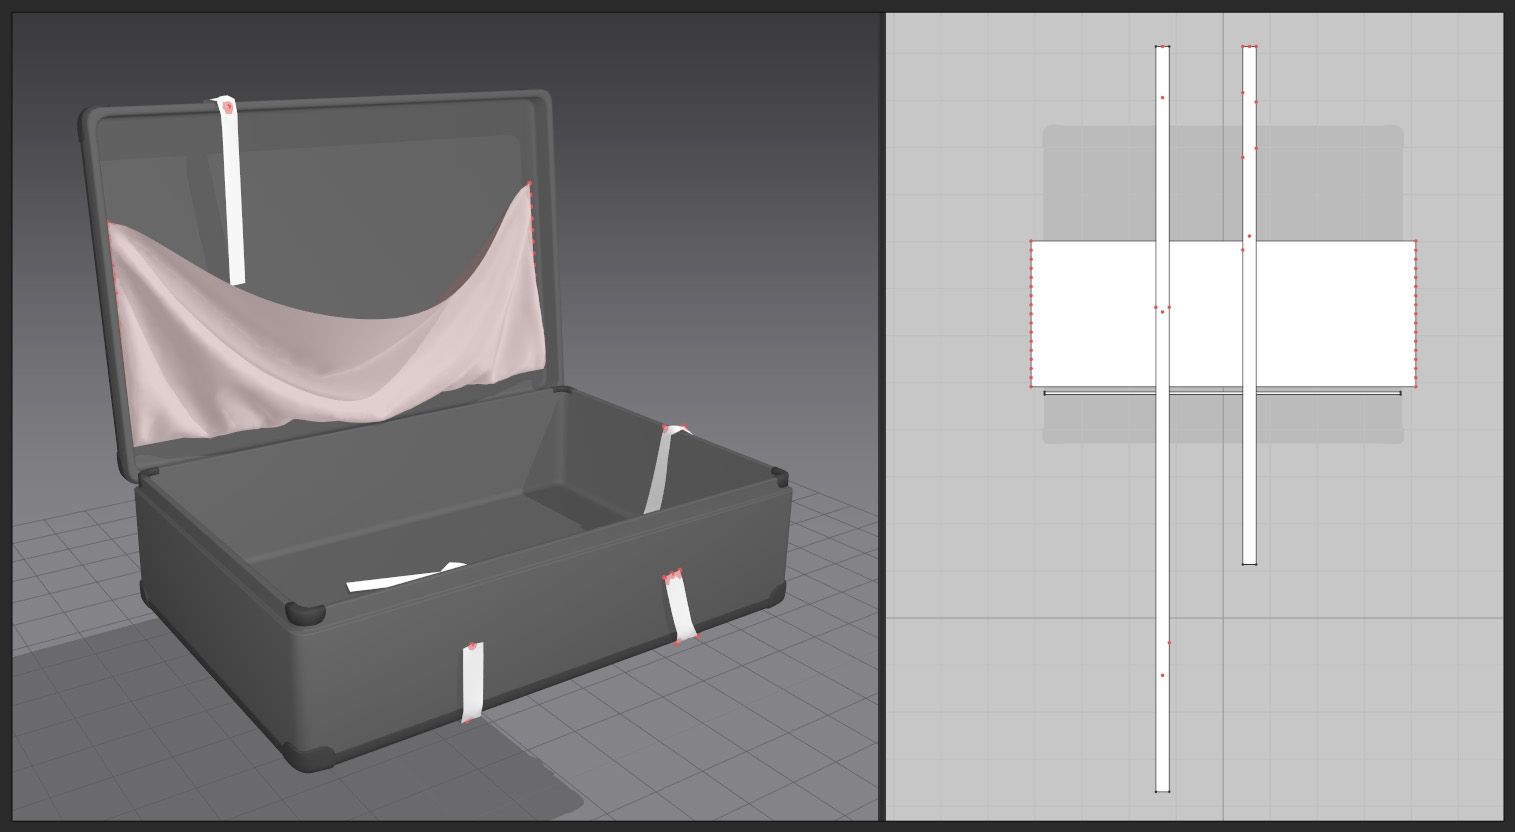
My primary modeling workflow was sub-d, high-to-low modeling in Maya. For specific tasks like cloth simulation, I used Marvelous Designer. It's a powerful tool for creating fast and realistic cloth simulations. It was crucial in bringing the props to life and adding authenticity to the scene. The briefcase, newspaper, folded fabric and curtains utilised MD. For the briefcase, I used simple cloth simulations and pinned the edges connecting to the lid. I also played with the type of material to achieve the desired simulation. If you are unhappy with the sim, you can drag around the cloth in real time to iterate. I applied these methods to both the pocket garment and straps.
Another software I utilised for my modeling is ZBrush. I love to jump into ZBrush and get my hands on assets where possible.
The ornate features on the picture frames were carved in ZBrush. First, I ensured the base geometry had enough resolution that I could paint a clean mask. Utilising the lazy mouse functions, I painted my mask, inverted and blurred it. Then I extruded the mesh out and polished using the deformation settings. A neat trick for enhancing the features is to add a new layer, smooth the mesh and set the layer to -1. The benefit of doing this on a layer is choosing how much you want to influence the mesh.

ZBrush is also a great tool for wood props, I gave each of mine a pass, adding damage to the edges where appropriate. One option for this is to use the trim smooth border brush with a square alpha and carve away as desired. There are a few other brush options which can help achieve this effect, commonly trim dynamic.
After finishing the high, I go back to my unsmoothed Sub-D mesh or a prior version I duplicated to use as my base for the low. Then I further optimise and unwrap the mesh using Maya’s UV tools. Ensuring I met texel density, had correct padding and straightened UV’s where appropriate. I choose to bake my assets in Marmoset Toolbag for its bake groups, paint cage and paint skew functions.
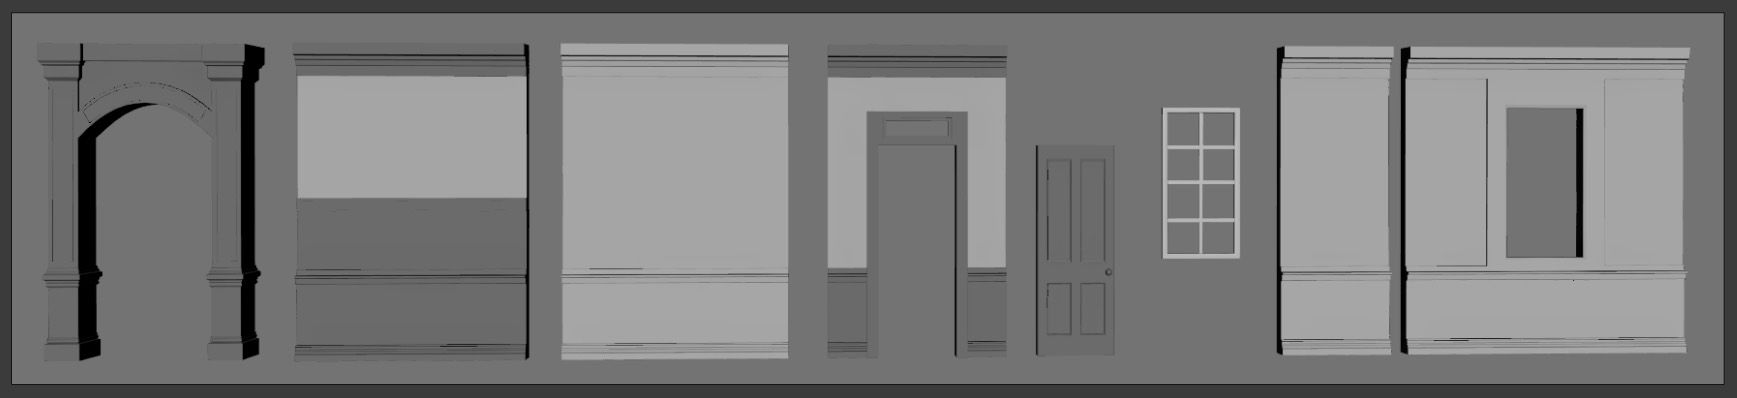
I love the texturing stage, it's another creative opportunity to add depth, detail, story and realism to your environment. When it comes to creating trim sheets, I start by doing a quick sketch of how I can use the 0,1 space in Photoshop. Afterwards, I made a quick 3d model sketch to check texel density.
In this project, I wanted to learn more Substance 3D Designer and chose to tackle my wood trim sheet there. It was a fun challenge which provided me the opportunity to iterate and alter the textures. If I had modeled the trim sheet, I would need to re-bake to alter the trim. I used my wood trim on the modular building pieces, windows, religious cross prop, door and archway.
I also followed a wonderful tutorial for embroidered fabric by 3D texture geek. It was perfect for my project and helped me deep dive into Substance Designer shape creation.
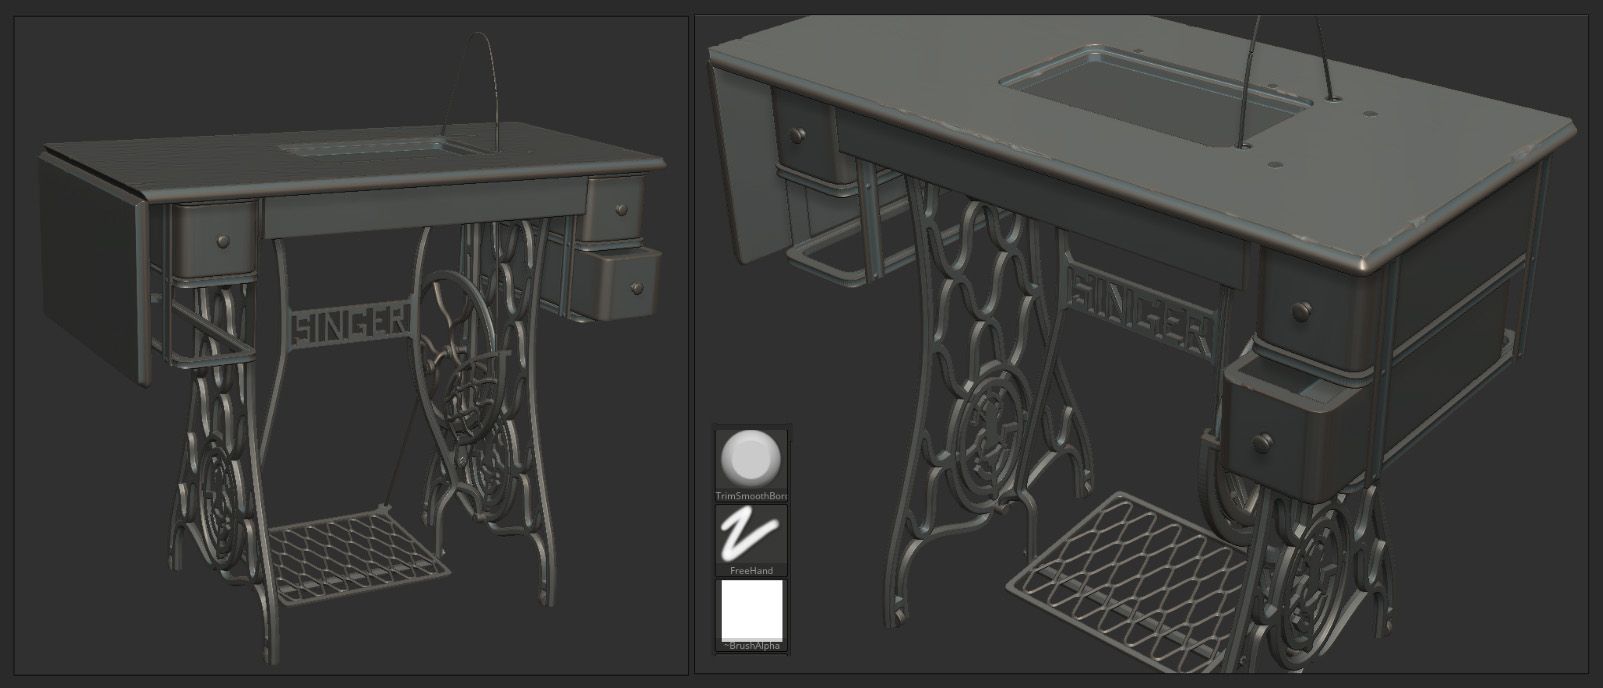
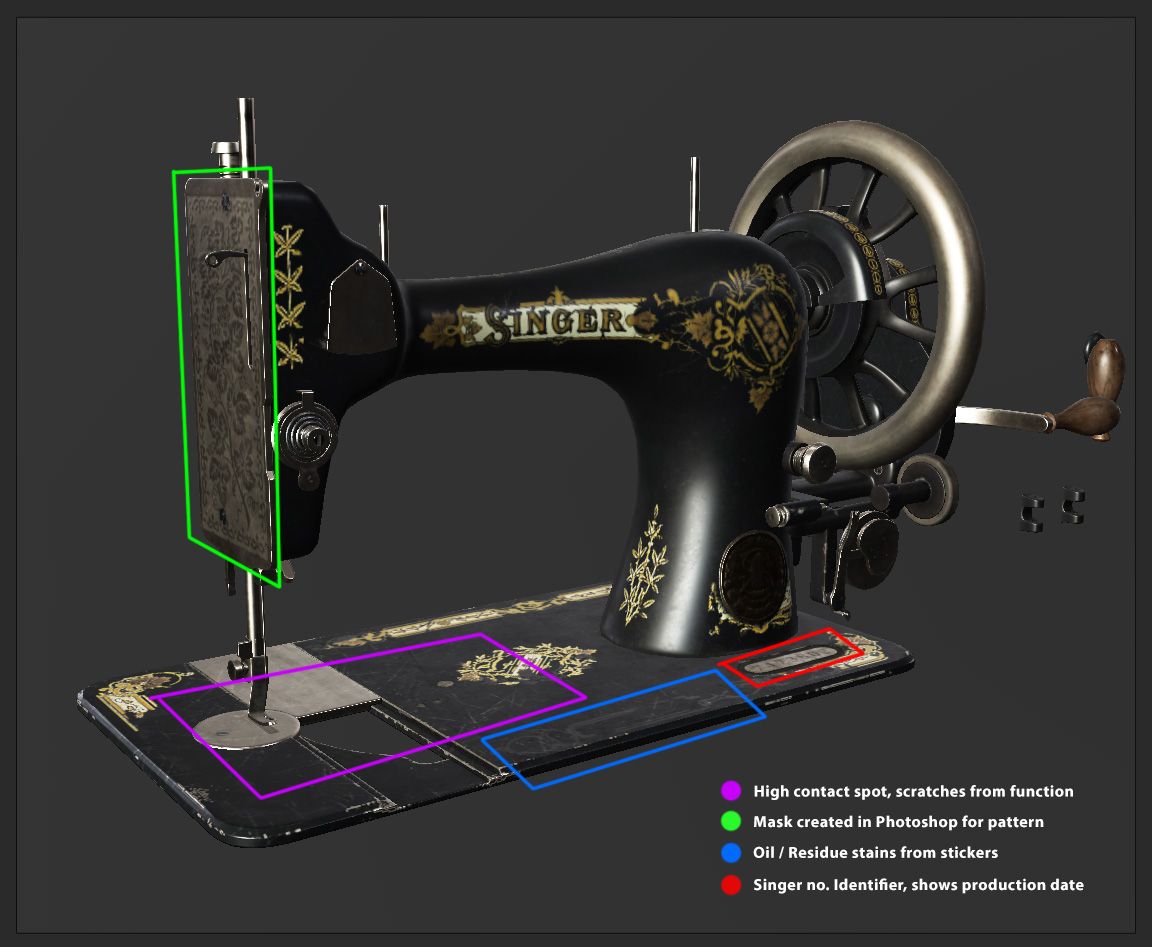
When it comes to texturing props, I jump into Substance 3D Painter. For the sewing machine, I analyse how it's built to understand the layering of materials. I first setup base materials and organize them with ID maps from my bakes. It's important to use correct PBR values for accurate materials. A quick google and you can find exact values and use Substance Painters PBR checker tool.
On each of the materials, I start with adding general breakup. Nothing is ever 1 colour, so I start with subtle colour variation. In combination with generic roughness variation, you already have a nice base. From here, I’ll get more intentional. I break down where damage occurs, how dust and dirt builds up and find any other details. It’s important to examine your references to accurately represent the material.
Substance 3D Painter is a powerful tool for creating and refining textures on 3D models. One particularly useful feature is procedural masks that use baked maps. By using these masks, you can add detailed and realistic break-up to your textures. These can then be further tweaked manually to achieve desired effects.
While the procedural masks are a great starting point, it's important to remember that they may not always be perfect right out of the box. If time permits, it's worth taking the extra steps to adjust and customise them to suit your needs. This will help to ensure that your textures are unique and tailored to your specific project.
Another helpful tool in Substance 3D Painter is anchor points. They expose an element in the layer stack and reference it in different areas. I use them to automatically generate paper tearing and glue residue as I paint away the sticker. By utilising anchor points, you can save time and achieve consistent texture results.
For both efficiency and consistency, I create base materials and make smart materials. The material can then be applied to various props and adjusted as needed on each level. This ensures your textures remain cohesive and on-brand. I use this method for the wood on my sewing table, chiffonier, bookshelf and hallway table.
I had no prior experience making environments in Unreal Engine before this project. Thankfully, there is an abundance of resources online for developing shaders in UE. I created a master material with various elements to allow for variation. One complex shader utilised object space texture tinting. I tinted the thread spools based on position in the world.
It's important to iterate, you'll discover unexpected combinations which improve your scene.
I also utilised vertex painting for the wallpaper pieces to paint paper peeling. On top of this variation, I utilised a variety of decals sourced from Megascans to add more texture depth. Yet another wonderful resource for pushing your environments further and setting things into the world.
Megascans are an amazing resource for helping streamline the process of environment creation. There are a few considerations to make before implementing them into your scene. Be careful to match the texel density of your project with the assets you bring in. In my case, looking back, I notice the cardboard boxes I made and Megascans used are not matching.
Additionally, you should consider editing the Megascans textures where appropriate. I wanted wallpaper with gold glossy embossments, for a more grande look. This is a common aesthetic for the time and place. I grabbed wallpaper textures from megascans, masked out the embossed area using colour range in photoshop and tweaked the roughness levels.
Finally, don’t become too reliant on Megascans, it may result in a loss of creativity, lack of skill development and may not be what an employer wants to see. This may vary depending on why you are developing the project and what you want to get out of it.
If you want to grow as an artist, the feedback loop is a crucial part of development. I can’t tell you how many people helped me learn, improve and develop through this project. There are countless places you can reach out for critique. Whether it's discord communities, forums, direct-messaging on ArtStation or in your surrounding circle. It’s important to understand that everyone can have valuable feedback. It doesn't matter if they are students, teachers, professionals or someone without any understanding of 3D.
Another thing I want to address is that through seeking feedback from multiple sources, you might end up with conflicting opinions. Everyone has their own opinions and biases, first remember to stay open minded. Try and identify the common themes and issues, there may be underlying connections. If you are unsure, don’t be afraid to seek clarification, they also might not be attached to their solution. And finally, use your judgment, it's up to you how to incorporate it and make the final artistic decisions.
Since developing this project, I have learned a new range of compositional techniques beyond what I used. I’ll address what I focused on at the time and feedback I received which could have improved the piece.
When it comes to creating 3D scenes, there's a lot to consider in composition and design. I started by flying the camera around aimlessly, identifying angles that looked good. Once I found something that interested me, I duplicated the camera and continued exploring.
As I continued to refine the shots, I focused more on the rule of thirds as my main compositional technique. I thought about utilising leading lines to guide the viewer's gaze. I had to move assets around or alter their angle to achieve the desired effect. I also paid attention to tangents, which can cause issues with composition, adjusting prop positions to avoid them.
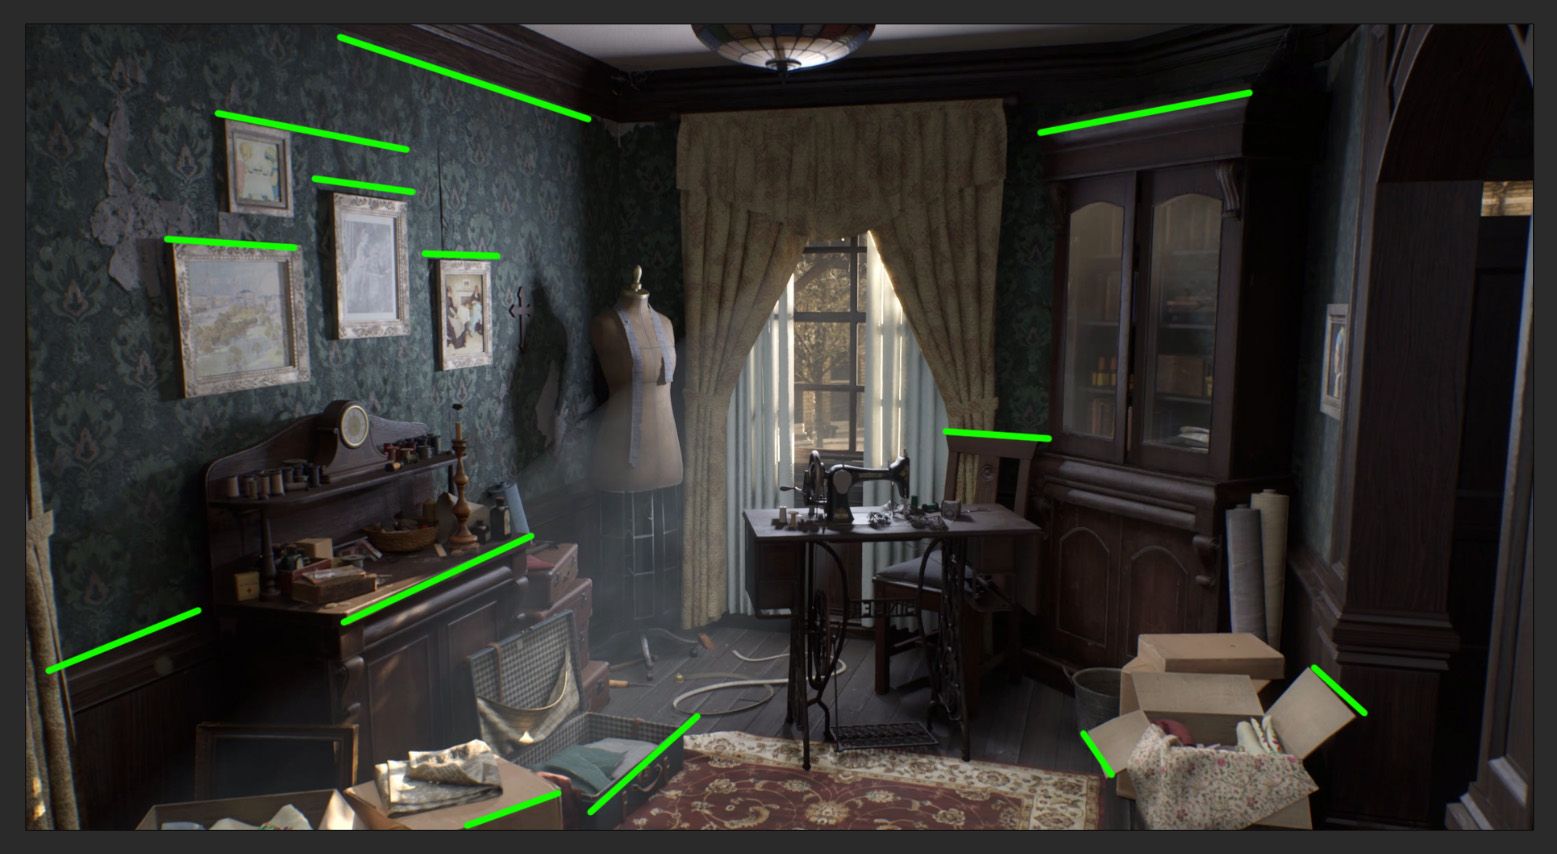
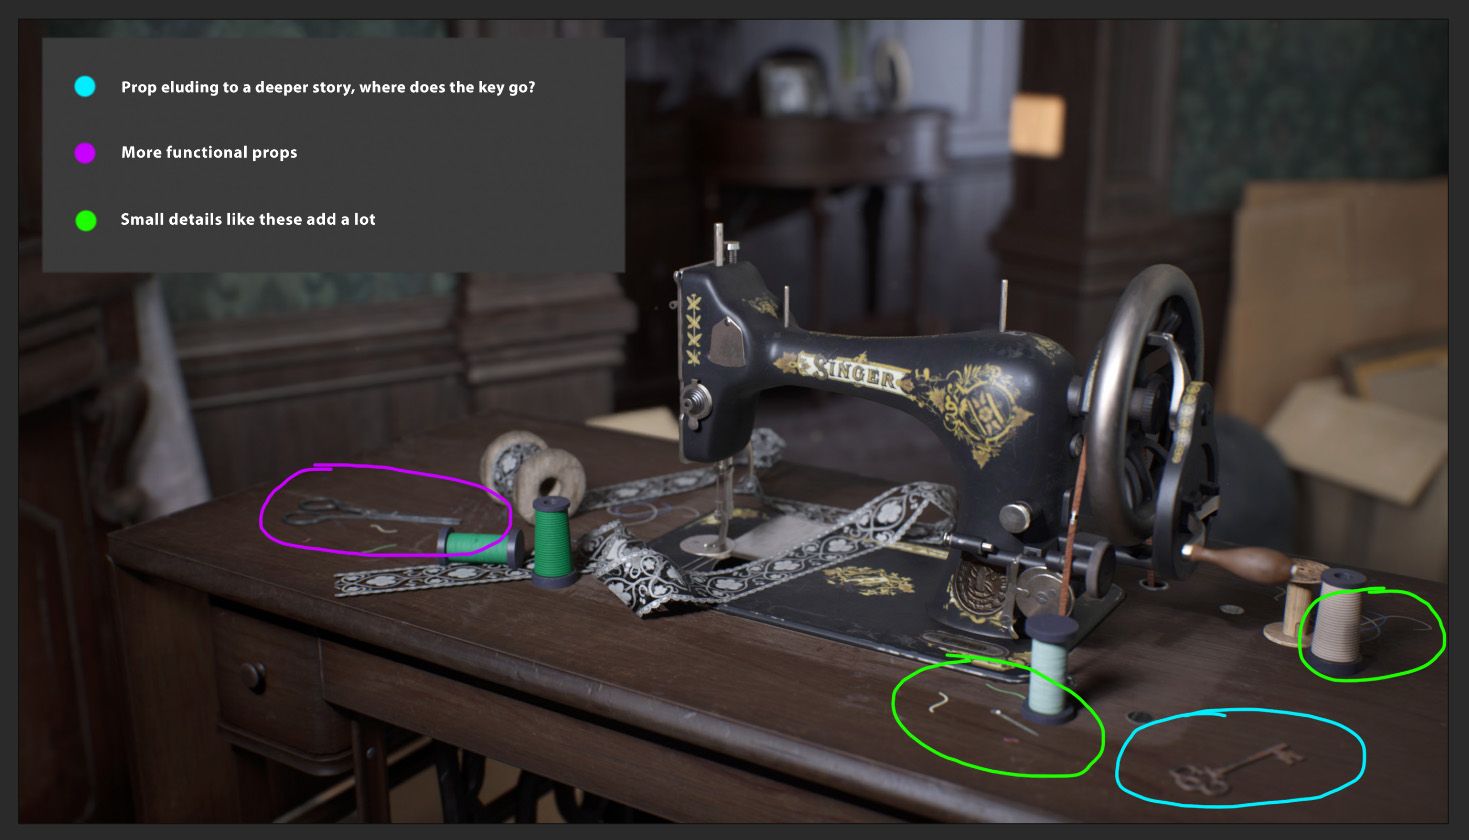
One technique that I found particularly helpful was the use of prop islands. Prop islands are a way to organise and group similar or related assets together in an appealing way. Placing assets with similar themes, colours, or shapes together, you create visual interest and a sense of harmony.
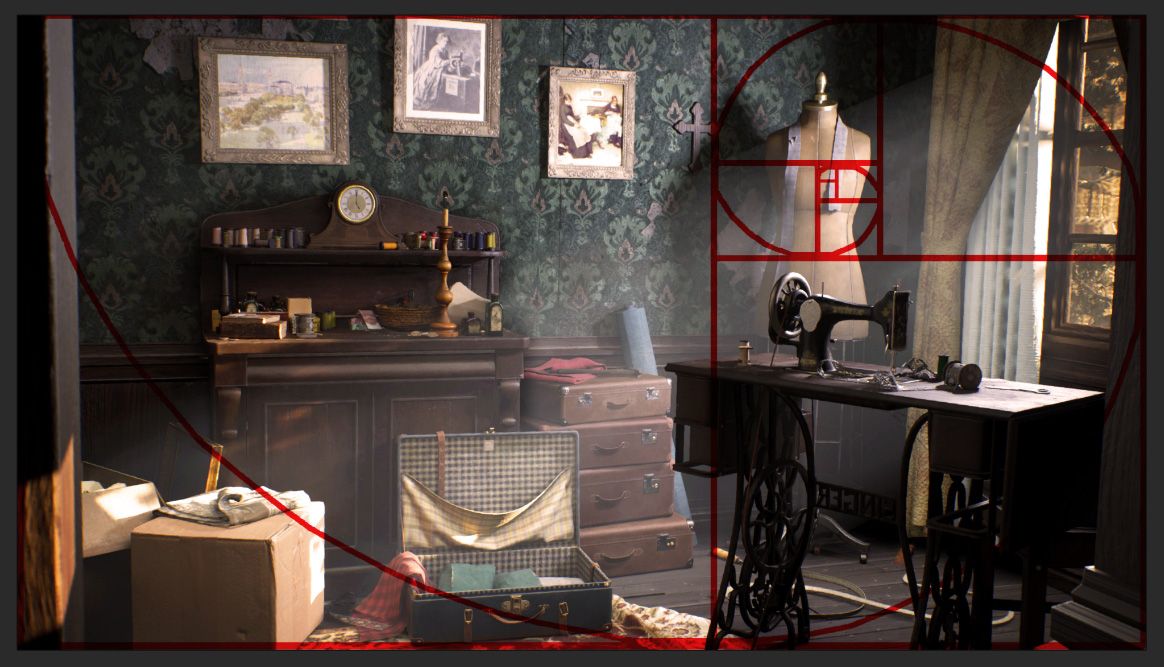
I reached out for feedback and received useful suggestions for improving the composition of certain shots. For example, tilting the camera and zooming in on a key shot would have achieved the Fibonacci spiral. This would have added an extra layer of visual interest to the scene. I want to highlight the importance of seeking feedback at every stage of the process. And, being open to making changes based on that feedback.
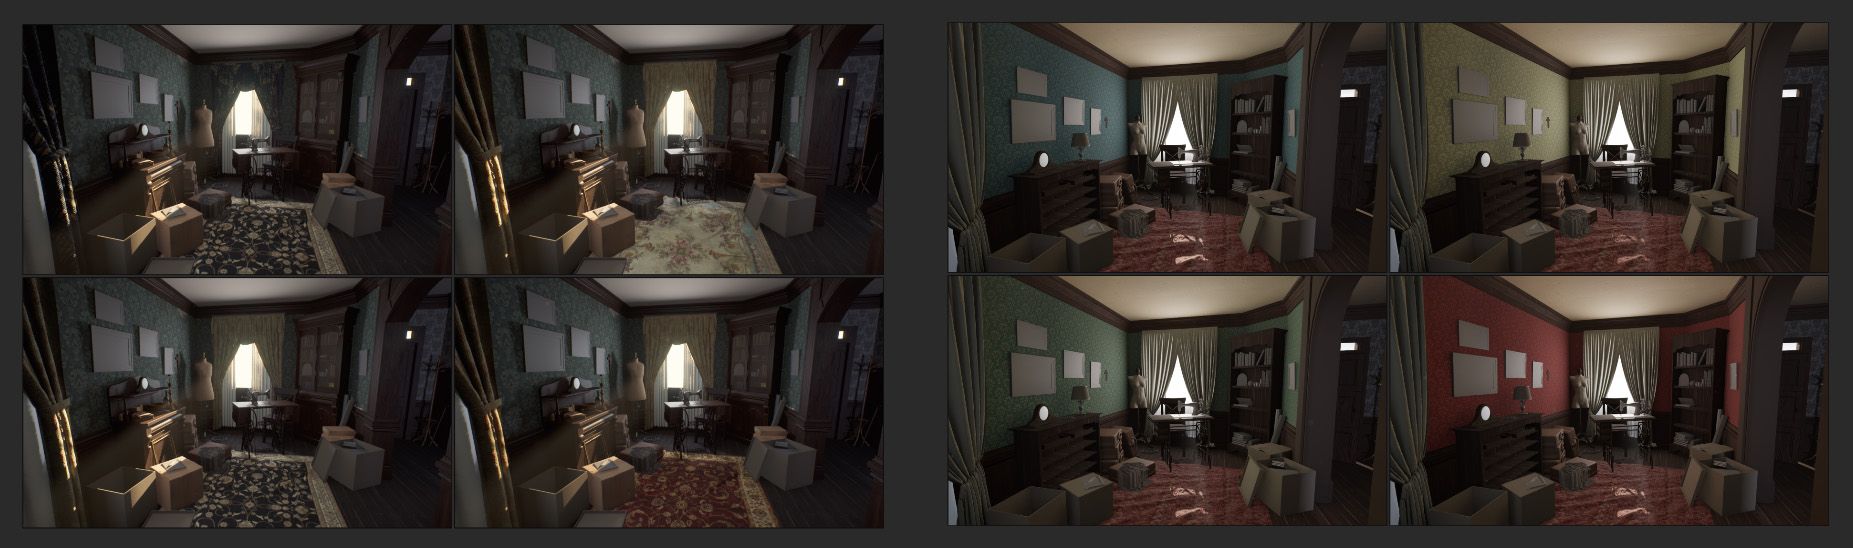
Lighting a 3D scene can be a challenging process, especially for those who are new to it. I found that using Lumen was helpful for instant lighting visualisation. This made it an excellent tool for my beginner level knowledge.
When lighting the environment, I explored a range of different colour schemes, from chilly blues to hazy oranges. I found that each of these had a significant impact on the overall feeling and mood of the scene. After some time, I settled on a more neutral setup. I also experimented with different angles and positions until I found a nice balance.
Throughout the lighting process, I received valuable feedback from the art community. This helped my untrained eyes identify and address issues. It's important not only to seek feedback but address it. I was able to create a more polished and effective lighting setup.
Overall, lighting a 3D scene can be a complex and challenging process. Taking the time to experiment with various lighting elements, it's possible to create a visually stunning and engaging environment. If you want to take it further, you can use tools like DaVinci Resolve to create a colour look up table. Looking into film cinematography can be a great inspiration.
It's natural to feel compelled to keep refining and enhancing your environment. I kept finding myself identifying opportunities to improve my project towards the end. However, it's crucial to recognise when it's time to draw a line and finish your work. By accepting that you've built something and taking the time to reflect on what you've learned, you're in a better position to do even better in the future.
Thanks for reading through my article, hopefully you have something you can take away from it. It’s a challenge to get all the information I want in one article, so please feel free to reach out if you have questions.
The opportunities that this piece has opened up for me have been nothing short of incredible, and I couldn't be happier with the results. I had the honour of being selected for an internship at Wētā FX, thanks to the recognition I received after entering the Rookie Awards. For any students reading this, I highly recommend submitting your work to their competitions - you never know where it might take you!
Being surrounded by such incredible talent during my time at Wētā FX was both humbling and inspiring. I am so thankful for the support and guidance I received from the team there, and the experience had a significant impact on my career trajectory.
I would also like to express my gratitude to everyone who provided feedback and assistance throughout this project. I have learned so much from the art community, and their support has been invaluable. The creative community is truly awesome, and I'm privileged to be a part of it. I am excited to see where my journey in the world of 3D art takes me next. I encourage others to take risks and pursue their passions, as you never know where it may lead.
You can reach out to Éanna on LinkedIn.