Creating a Still-Life Environment with Substance 3D Painter and Rendering with V-Ray
In this article, Elizaveta Gaevaya will take you through the creative process she employed while working towards achieving a moody, cinematic still-life scene to refine her skills in V-Ray and Substance 3D Painter.
Elizaveta Gaevaya is a Rookie Awards Finalist Winner for the 2022-2023 3D Animation and Career Opportunities categories. She recently graduated from Gnomon with a 2-year Certificate in Digital Production, specialising in look development, modeling, texturing, and lighting. After graduating, Elizaveta received offers from multiple companies that specialised in both film and games.
In this article, Elizaveta will be sharing her workflow, techniques, and insights into her process for creating her award-winning entry and offering helpful tips on how to make your work stand out.
The Rookie Awards 2022-2023
Introduction
Hello everyone, my name is Elizaveta Gaevaya and I am a Look Development Artist. I am very excited to be able to share my project's breakdown.
Before working on this project, I only had a few months of experience with Substance 3D Painter, however, I quickly realised how amazing it truly is. By creating high-quality textures and referencing the images of each particular object I wanted to include in my scene, I was able to create a life-like environment.
In this article, I wanted to share my working process to create one of my favourite projects I made called ‘Forgotten’.
Once a project comes to mind or if you're strongly inspired to start another, never be afraid to try out new ways of going about certain obstacles. There's a certain beauty to taking a new route when it comes to exploring new techniques or expanding a skill set.
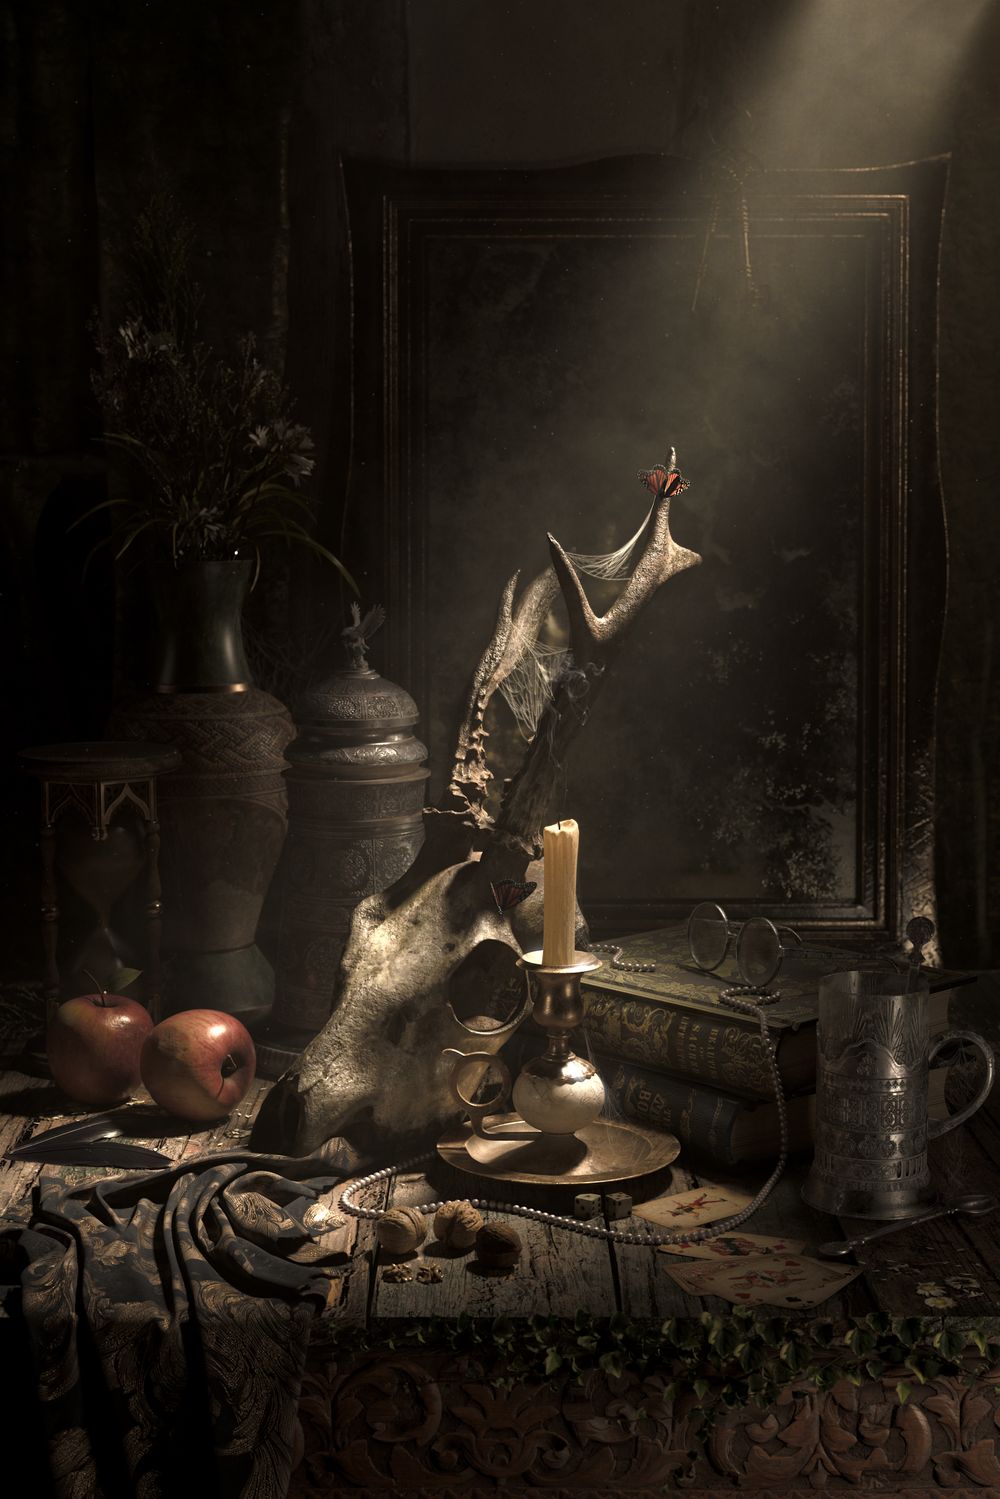
Forgotten Final Render
Submitting to The Rookie Awards
I first heard about The Rookie Awards back in 2022 when I was in my first year at Gnomon. At first, I did not fully understand the significance of it and how beneficial it was for students like me to have personal projects shown on such a platform. After submissions opened, my school gave a presentation as to what The Rookies are and why it is important to make a submission. I decided to put up my favourite projects and their breakdowns. My ultimate goal was to try my best to win an award and become a Finalist.
After a successful 2022 submission, I decided to submit for the 2023 awards. During the following weeks, I fully prioritised my projects' quality as well as finalizing anything that was not at its full potential. I had many of my professors and close friends encourage me to finish my submission as I was trying to juggle classes at the same time. In the end, I was very glad to have everything ready to be shown off at the highest quality.
Something that I believe to be very important is to always document your progress for any project that you work on. When I was first working on 'Forgotten', I made sure to keep my renders once I made progress to see how far I had gotten and make comparisons with older ones to see whether or not I actually liked the changes I had made.
Whether it is laying out your rough blockout or instancing your textures, presenting your working process and showing how you got from point A to point B is key for a successful portfolio. After presenting your final render, I strongly advise including any technical or artistic breakdowns, points of interest, as well as any creative thinking processes.
Opportunities Await
Opportunities arise, connections are made, and your work is widely recognised once you submit your work to The Rookie Awards:
Submitting my work benefited me with much more exposure to the industry as people started to recognise my work.
I stood out more once recruiters, industry leads, and professors saw the amount of awards I had for my submission.
An incredible amount of people started to connect with me after I became a Finalist Award Winner. Professionals from various companies began expressing their interest in my work.
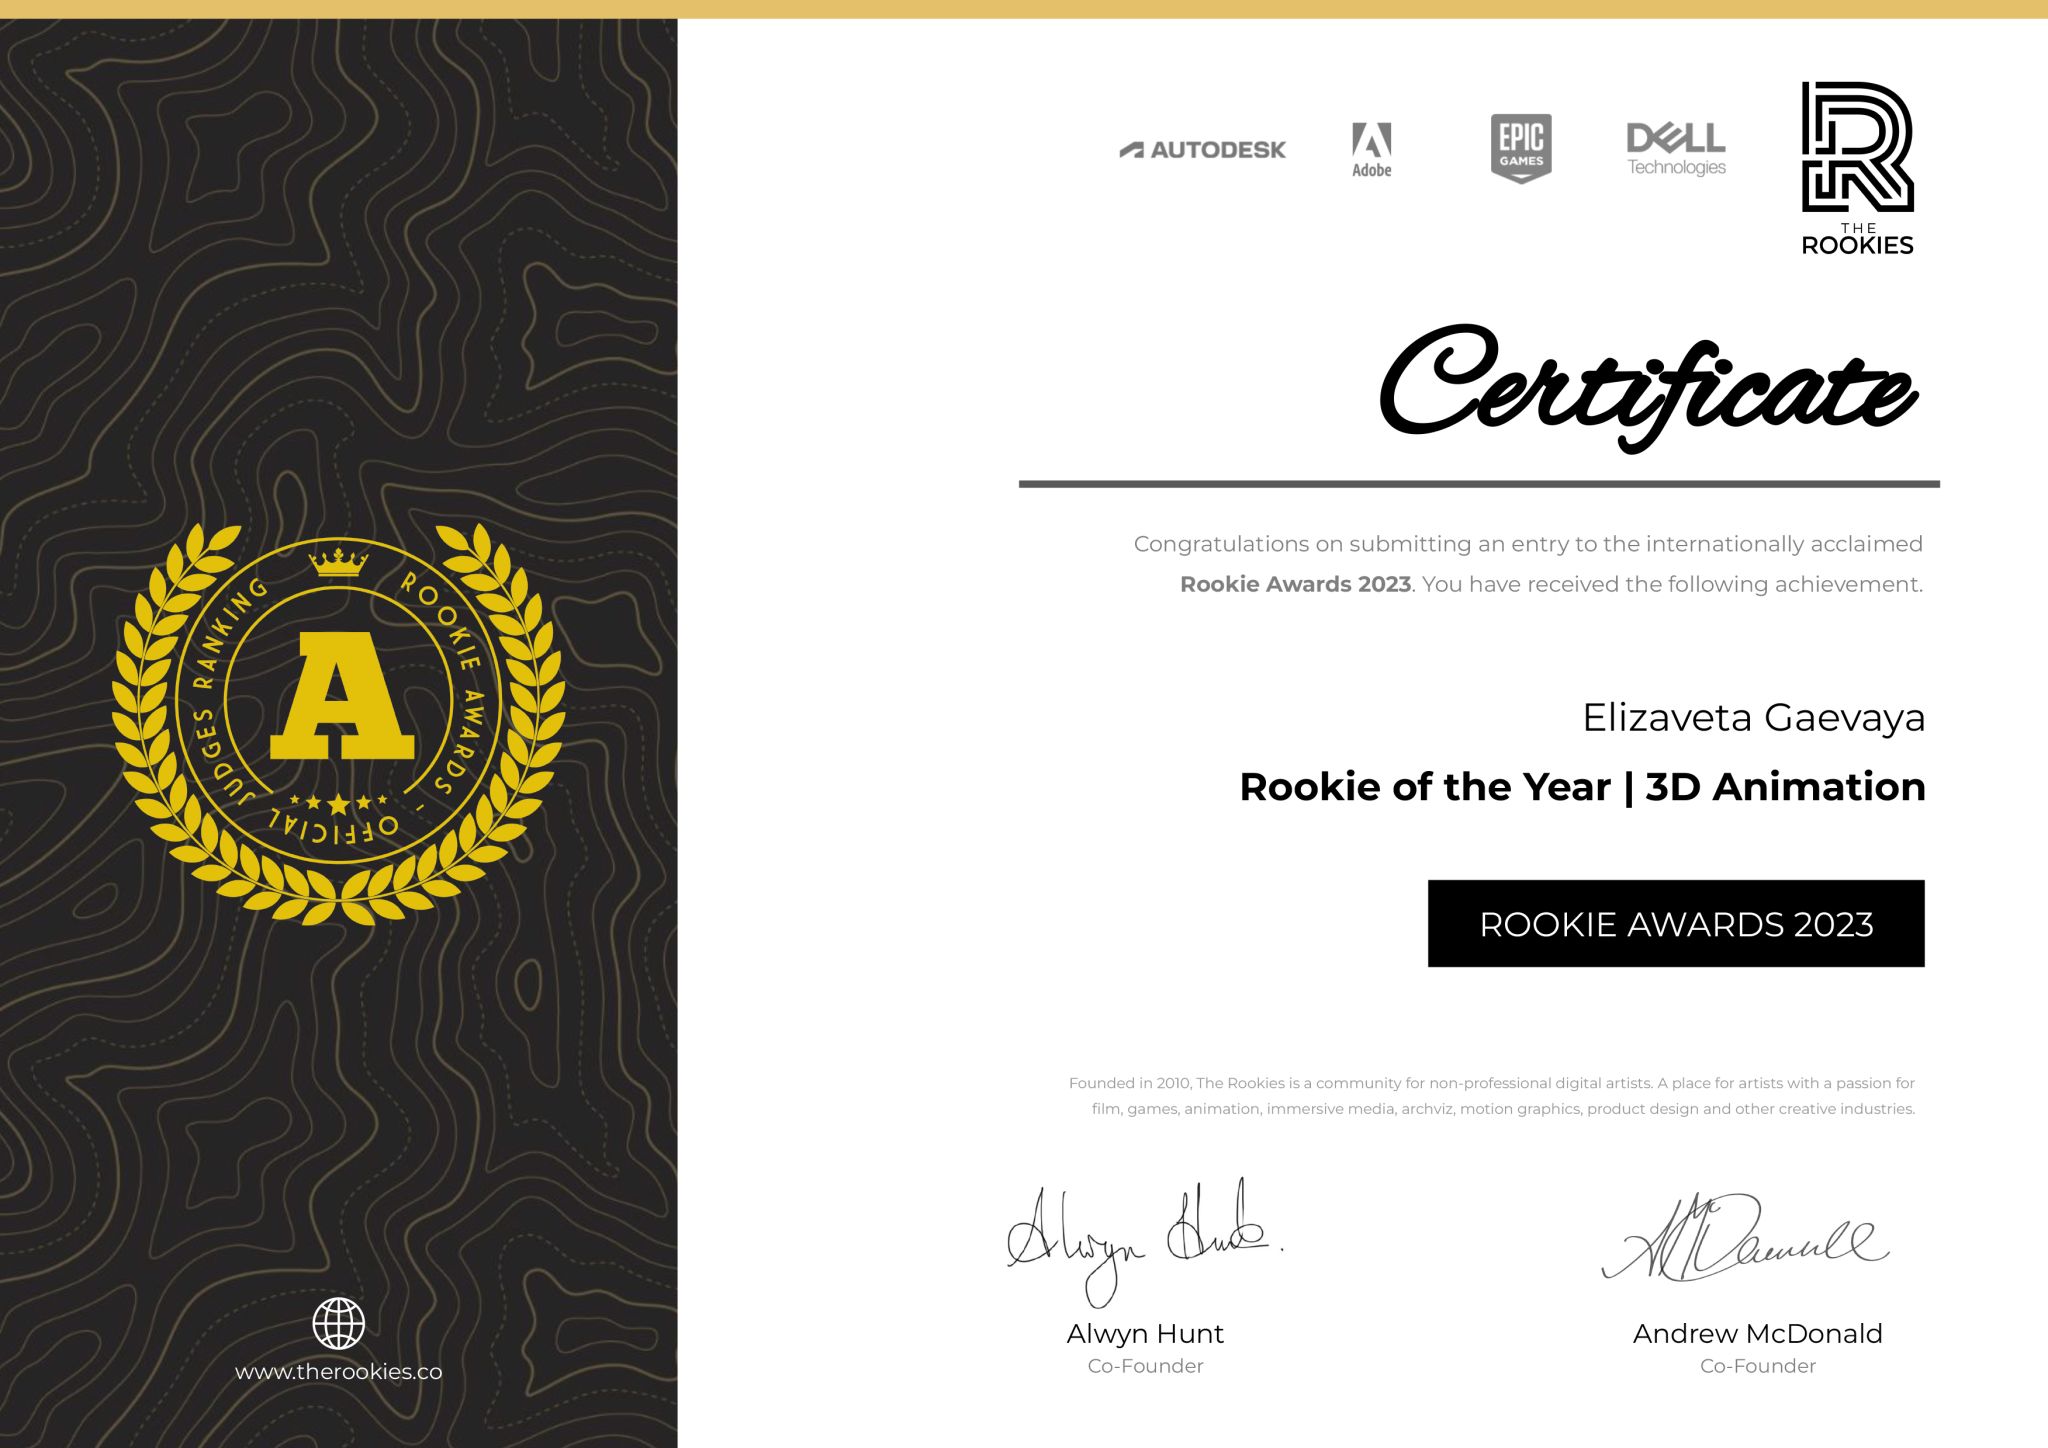
The Rookie Awards 2023 - Official Judges Ranking
If you stay true to your work and consistently practice in the craft you desire to specialise in, the opportunities become endless...
Project Objectives
My main goals for this project were:
Successfully make the audience feel as though the final render was a still-life painting. I wanted to create a highly detailed and realistic environment that tells a haunting story of once-treasured items now 'forgotten'.
Explore the vastness of Substance 3D Painter and see what it is capable of doing for realistic projects.
Building more confidence in the software I use on a regular basis.
Since a very young age, I have been fascinated by the haunting beauty of Renaissance paintings. This piece was created for a class called Texturing and Shading 2 with Tran Ma. I started this project wanting to learn more about how to create realistic objects using Substance 3D Painter. I chose to create a still-life piece as it gave me the opportunity to explore many different variations of textures.
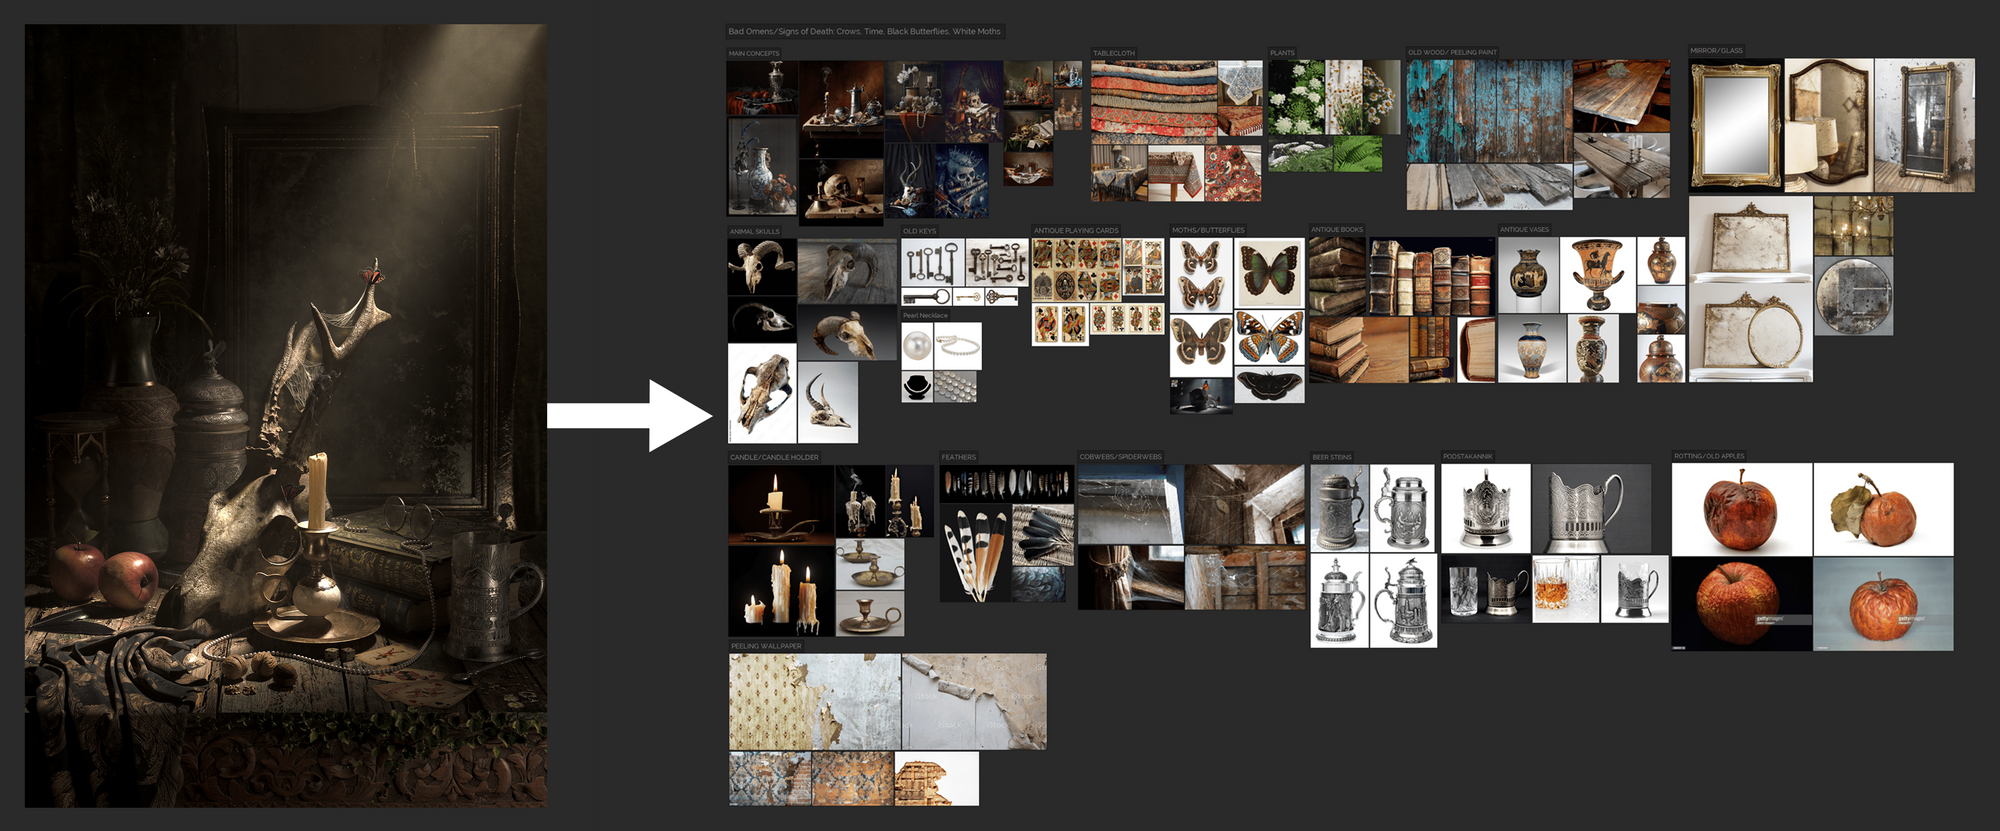
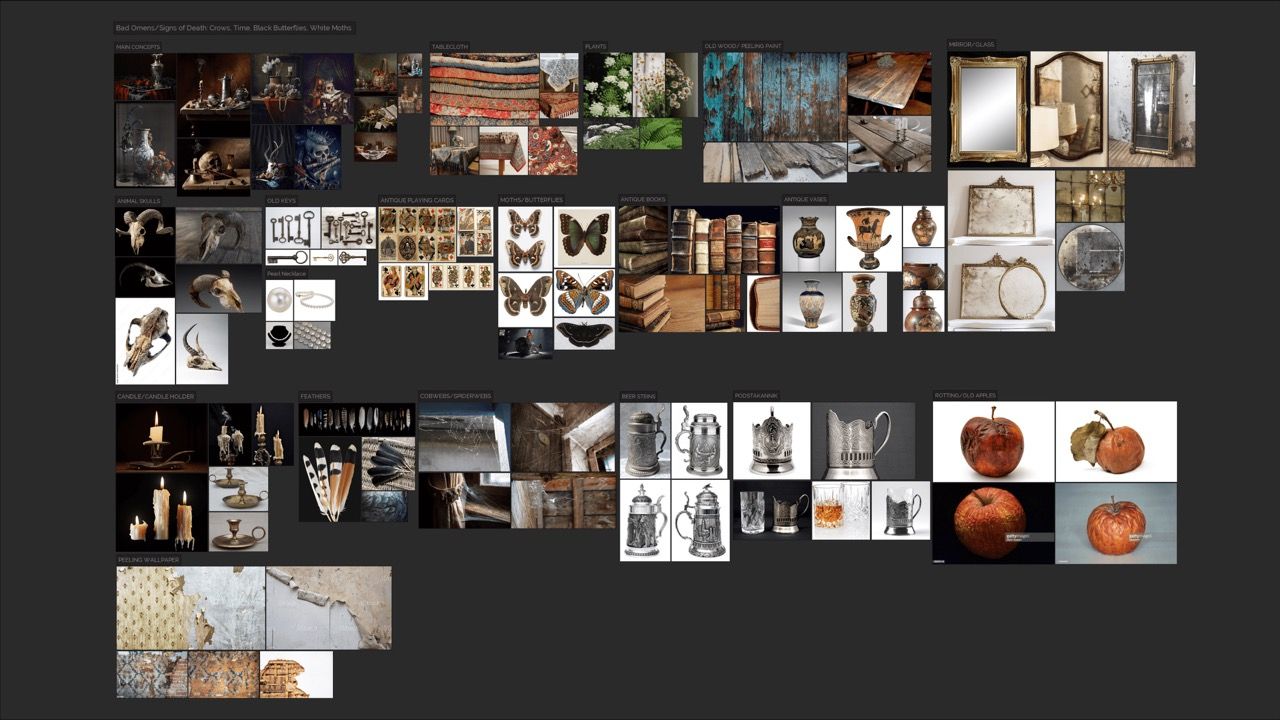
Throughout the entire project, I relied heavily on the reference board I created. I made sure to have as many images as possible of every asset I created for the environment in order to create the most accurate textures for the scene. Gathering references is something most artists underestimate the importance of, however, this is definitely something everyone should take their time to do.
Reference Board
Once I knew what I wanted my project to look like, I began scouring the internet for images that I thought would look most interesting. When I first began the project, my professor, Tran Ma, advised me to use more references than I initially had. After taking the advice, I not only had a much easier time modeling my assets but texturing was also no longer a challenge.
When you first create your reference board, keep in mind that you will either be adding more images to it or discarding some you no longer need throughout working on your project.
References
At the start of any project that I make, my reference board generally has a few images. As I progress further, I continuously expand my board to have as many variations as possible of one specific asset I would be making. Think of your reference board as a previsualisation of what you want your final image to look like; Expand your vision by imagining how your scene will look in the end.
Reference Board
Blockout
Before beginning the blockout process, I asked many fellow Gnomon students for advice on what to do for my project. I needed to come up with a concept or find a reference I would base my project on. Because I wanted to prioritise this class, I chose to create something I would enjoy working on and that would stand out from the rest of the class's work.
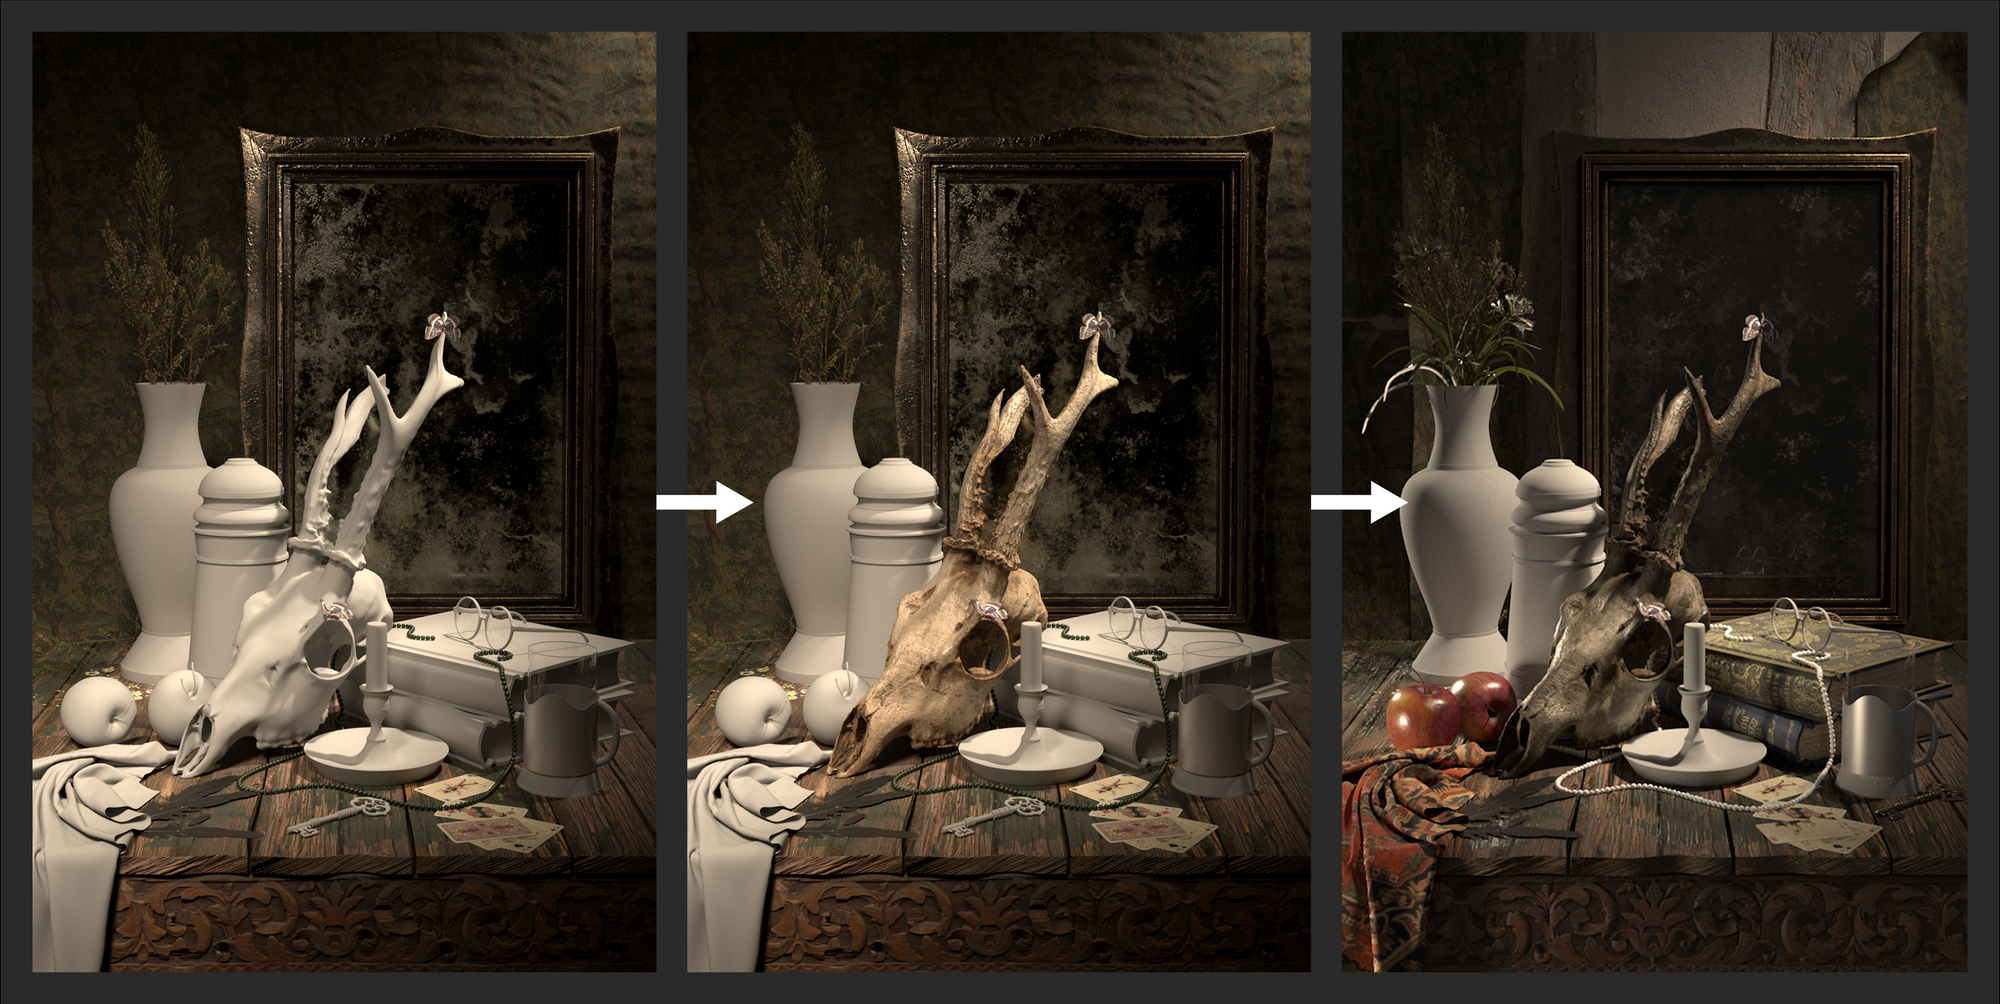
After careful consideration and brainstorming all the advice I was given, I decided to go with making a still-life piece. Once I felt like I had a good amount of references to start my project, I moved on to blocking out my environment, setting up a good camera angle, and adding simple lights in Maya.
I strongly believe that having a strong blockout of your scene sets you up for success. By having as many details as possible, you essentially pave your way to having a more solid understanding on how everything should look by the time you start modeling your assets. Your blockout provides a starting point and the foundation to visualise the forms, composition, and overall look of the environment.
Just like many still-life paintings, I decided to go for the more 'traditional' angle for my final render. By having my camera point straight to the area of focus, I had the option of grouping my assets and replicating the 'dense' and 'overcrowded' look that I was going for.
The overall planning should be relatively flexible. This part of the process should be easily adjustable in case there are any changes that need to be made. Think of it like setting up the foundations of a house; You must have the base constructed before the rest of the details can be added. Although you may already have a clear picture of what you want in your head, ideas may change or certain obstacles will be encountered which could throw you off from being on the right track. If such scenarios become real, it is best to experiment with other ways of accomplishing a specific task. This will not only expand your technical skills but will also help you overcome obstacles on future projects. It is important to note that at the blockout stage, nothing is set in stone and can easily be modified before you move on.
Early Look Development Process
By the time I had finished my blockout, I began to texture my models. I started with bigger forms and worked my way to the smaller details.
I soon became infatuated with making all of my assets look as old as possible. I added a layer of dust to give everything an aged look. This part was actually somewhat of a challenge as I wanted everything to look as if someone had placed these objects all together and never touched them again.
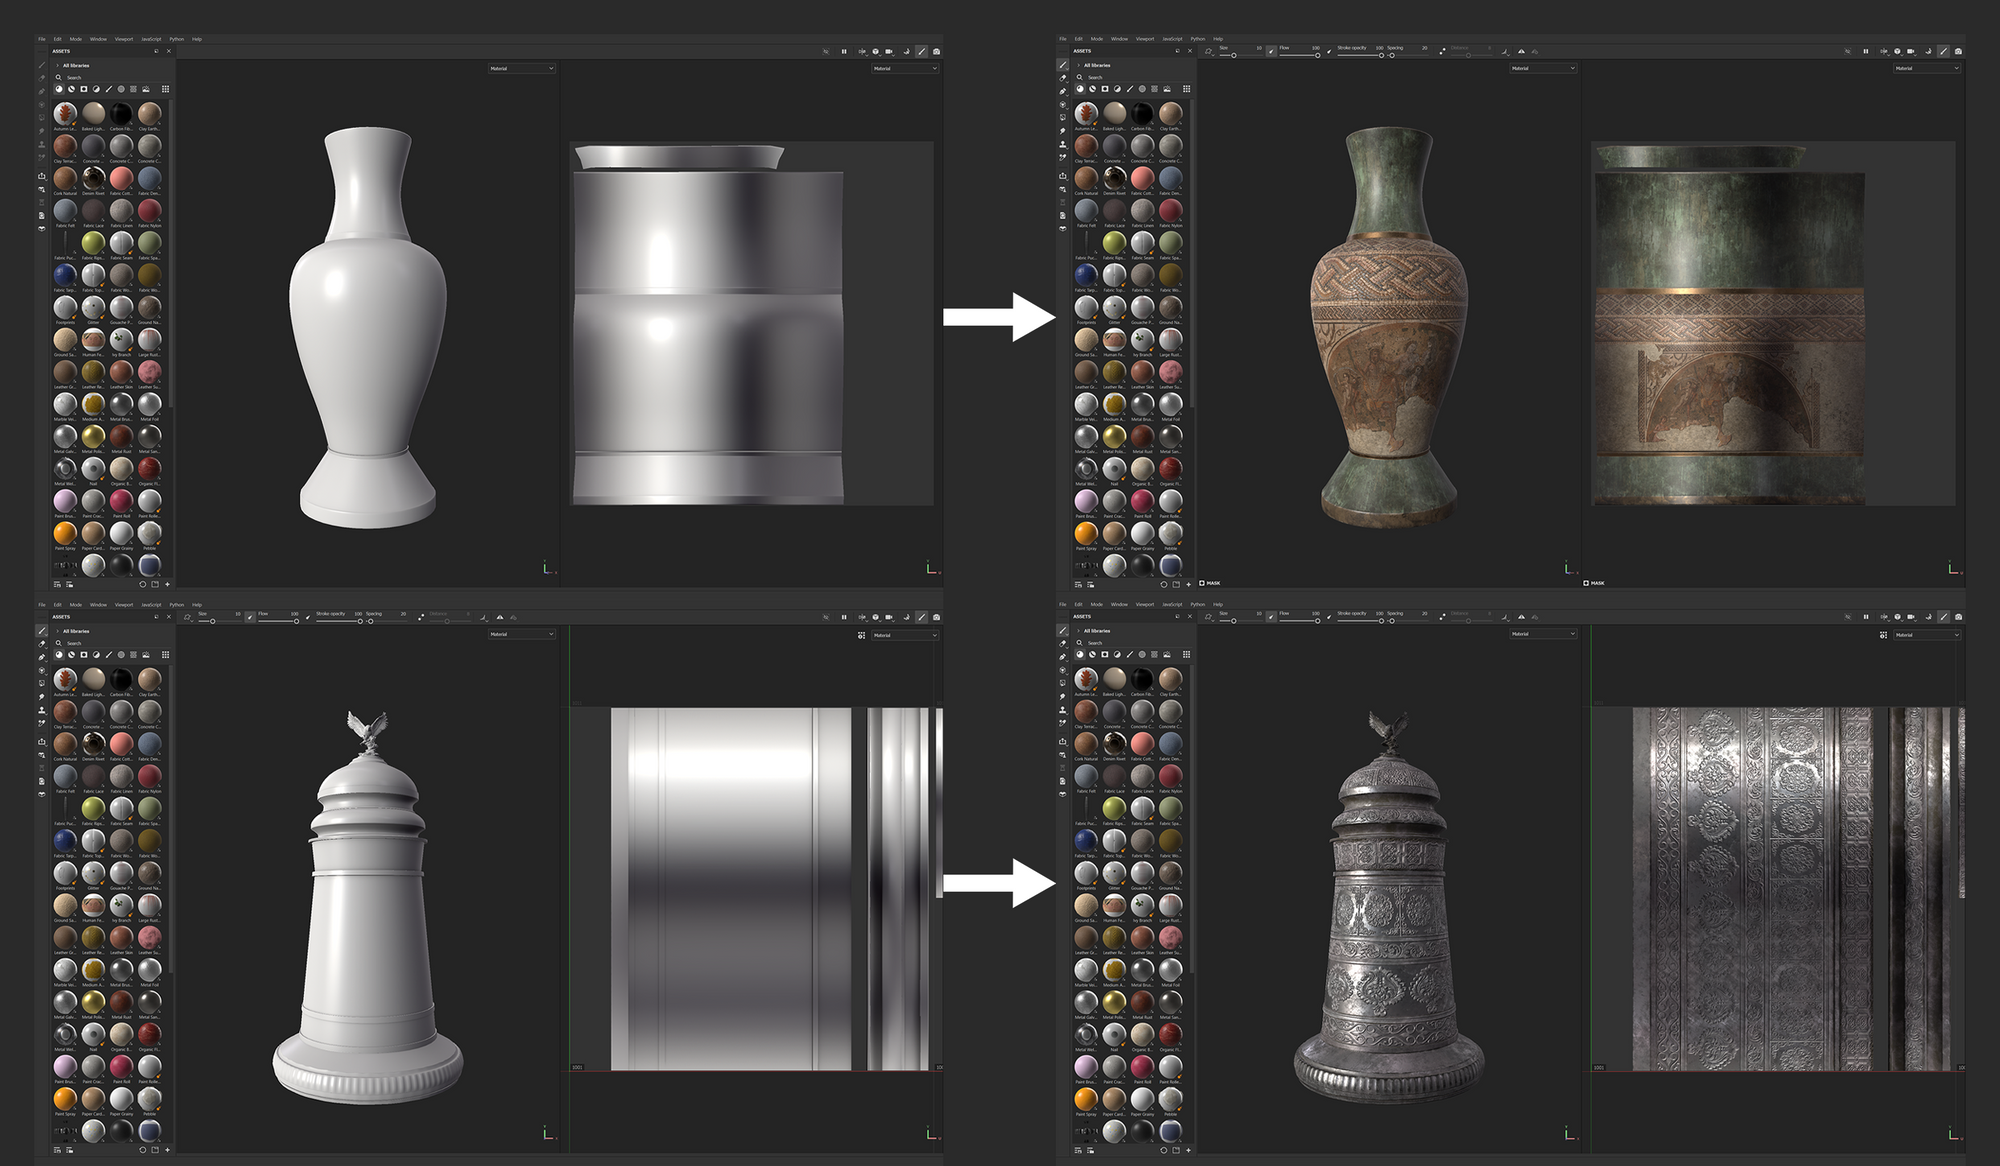
UVs for Alpha Masks in Substance 3D Painter
Another important thing I learned during this process was that modeling and texturing go hand in hand with each other. If the models are done well in the beginning, the texturing process will be more enjoyable and the end results will be much cleaner.
When I texture with Alphas in Substance 3D Painter, I make sure that my models all have UVs that are as straight as possible. As a result, I can easily work with my assets and not have to worry if my designs will come out crooked. Below is an example of why it is important to keep your UVs clean for this type of workflow.
With the help of Alphas, I can easily go from having a bland model to something that looks more intricate and interesting to look at.
Before and After Using Alpha Masks in Substance 3D Painter
Because of the way I set up my UVs in Maya, I was able to experiment with Alpha Masks in Substance 3D Painter. I soon realised that I was able to use any kind of mask I wanted as long as it was black and white and could easily be read by Substance 3D Painter.
Lighting and Post-Processing with Nuke
As I continued working on textures, I came to the realisation that lighting would be a huge aspect. Being a fan of anything eerie, I wanted to make my audience feel as though this environment had been abandoned, yet remains...'forgotten'. Therefore, I decided to consistently update my lighting as I went along until it felt perfect.
Lighting and Comp Finalization Process
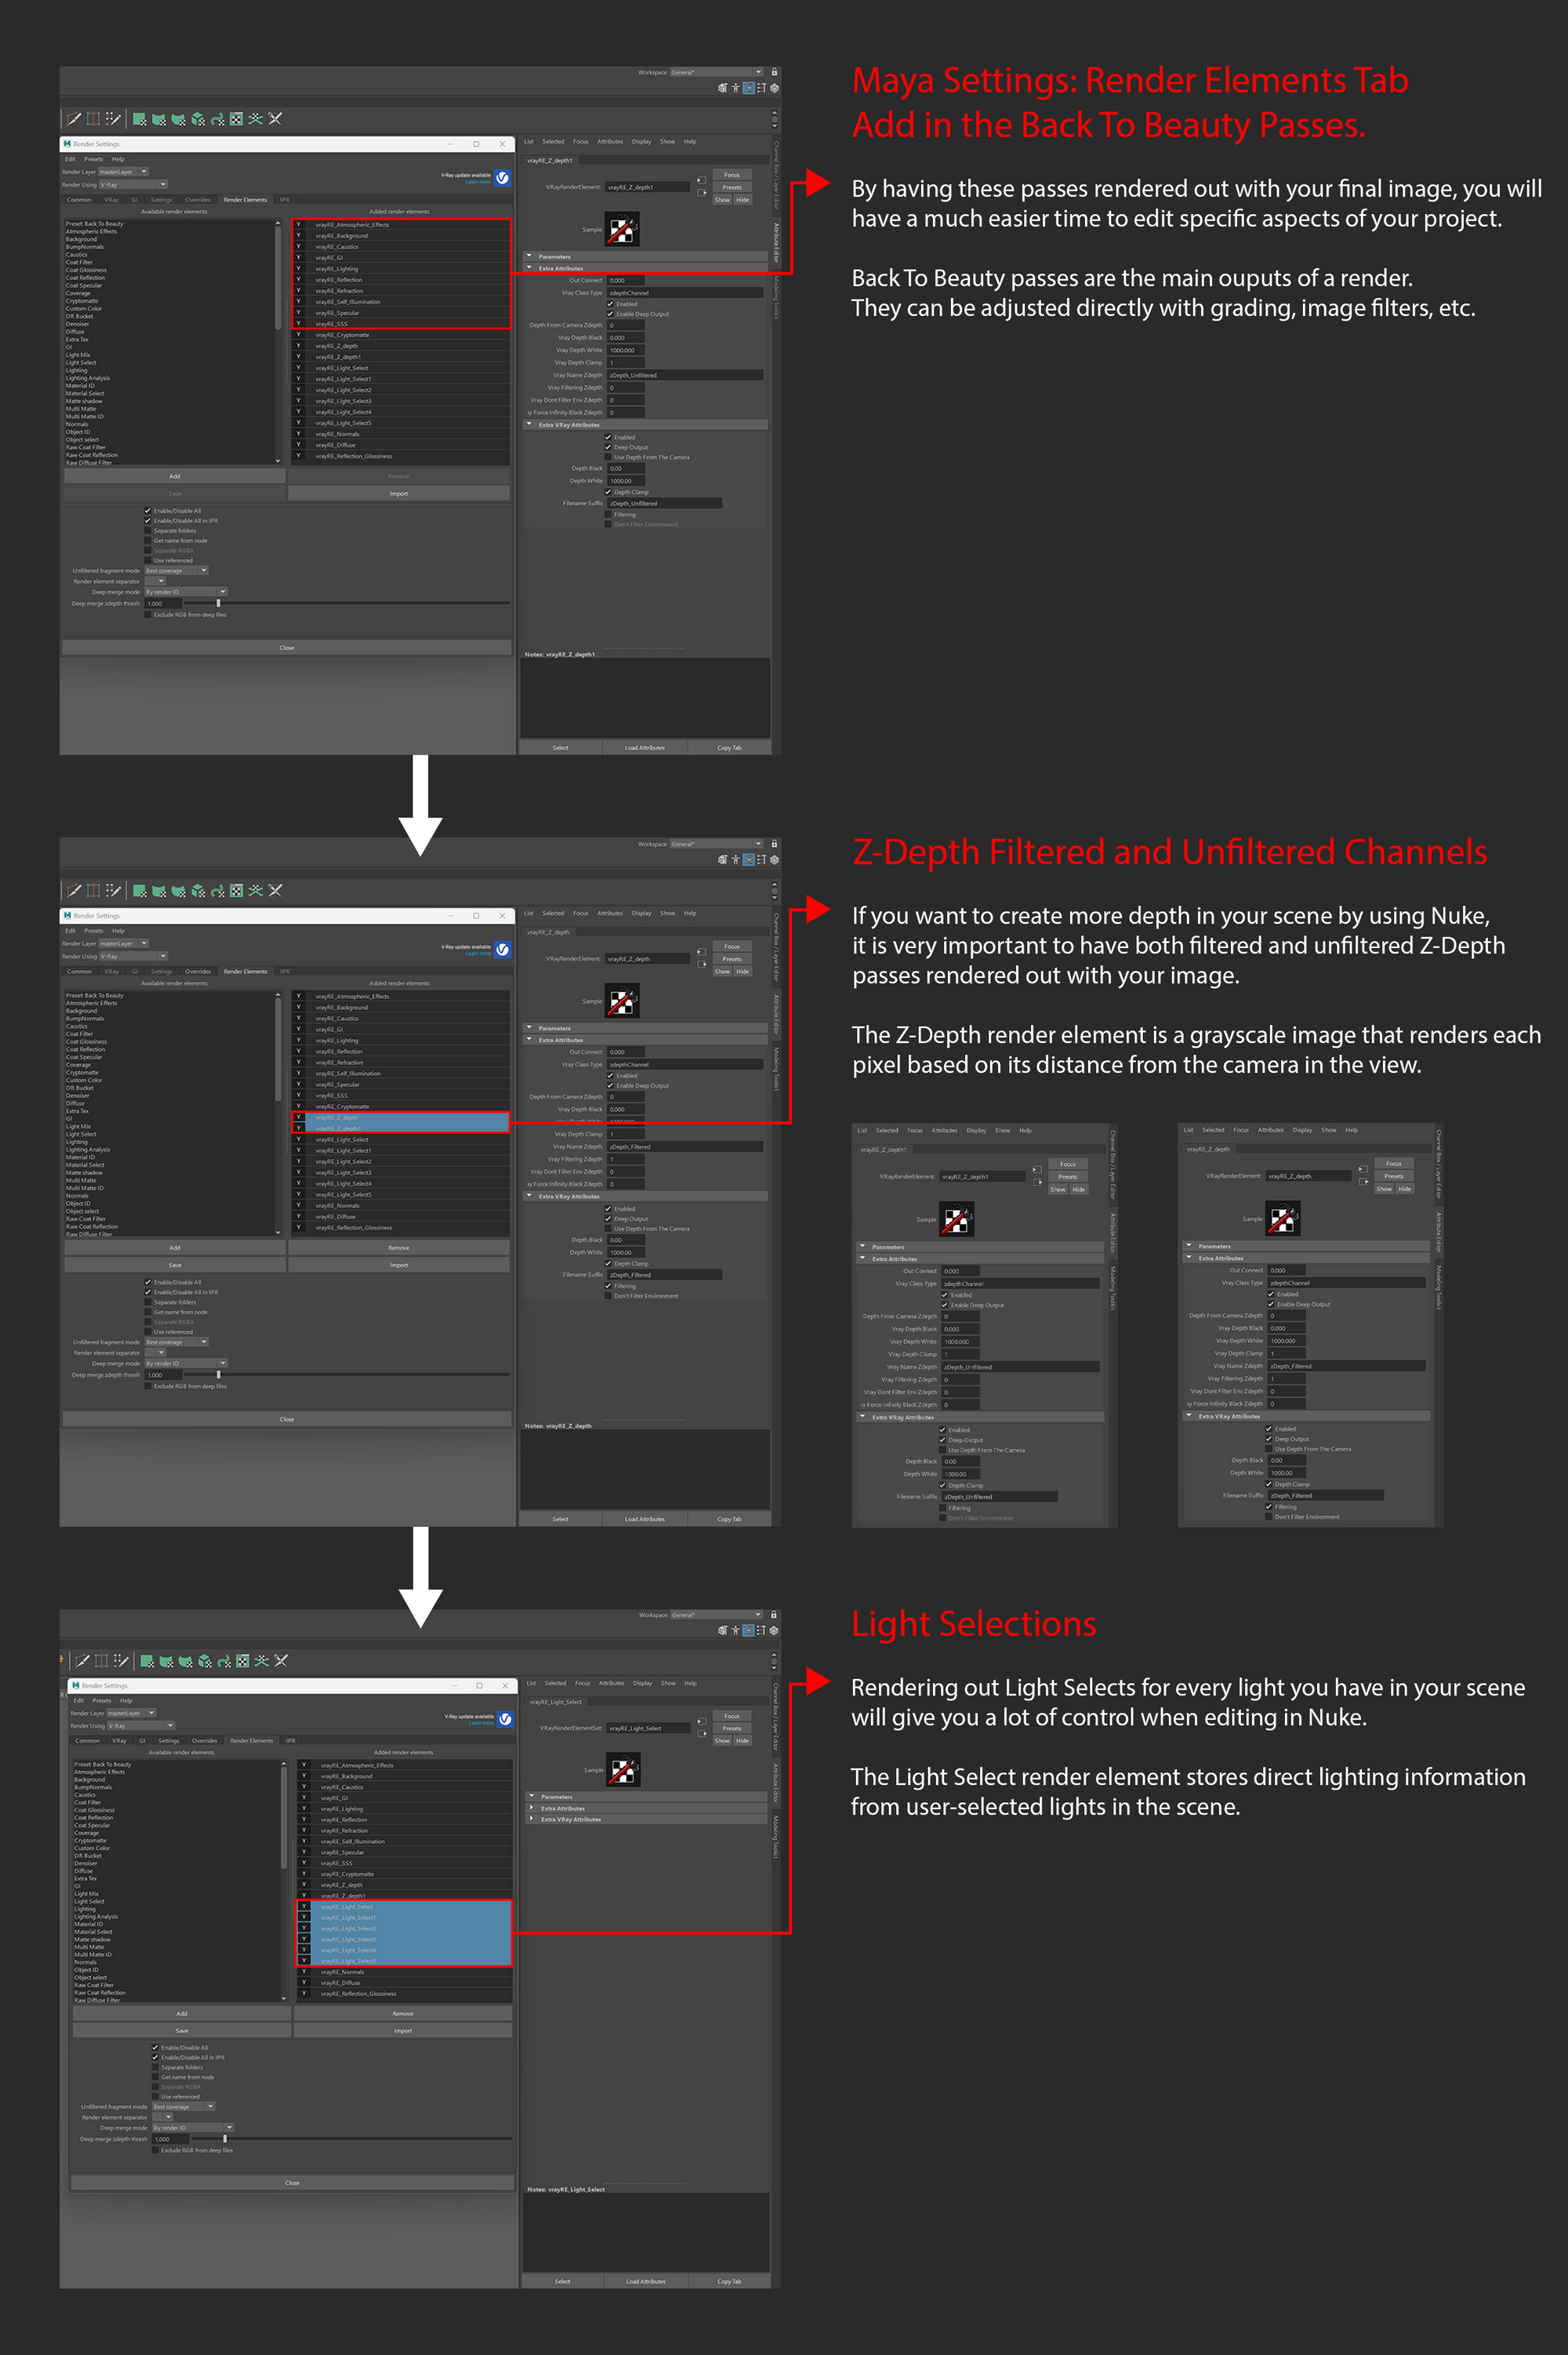
Before rendering your final image, it is very important to have the correct channels added to your render settings. The ones I use are 'Back To Beauty', 'Z-Depth', and 'Light Select' for all the lights in my scene.
The Z-Depth render element provides information about each object's distance from the camera in the current view. It is important to have a filtered and unfiltered version of Z-Depth. The unfiltered version is for the purpose of using utility nodes in Nuke such as ZDefocus. The filtered version is generally used for adding atmosphere to a scene.
The Light Select render element represents the lighting contribution from one or more user-selected lights in the scene. Each Light Select channel can output one of the predetermined contribution types. By using the Light Select render element, specific lights in the resulting render can be captured and adjusted in colour, temperature, brightness, etc. in a composite without the need to re-render.
Additionally Rendered Channels
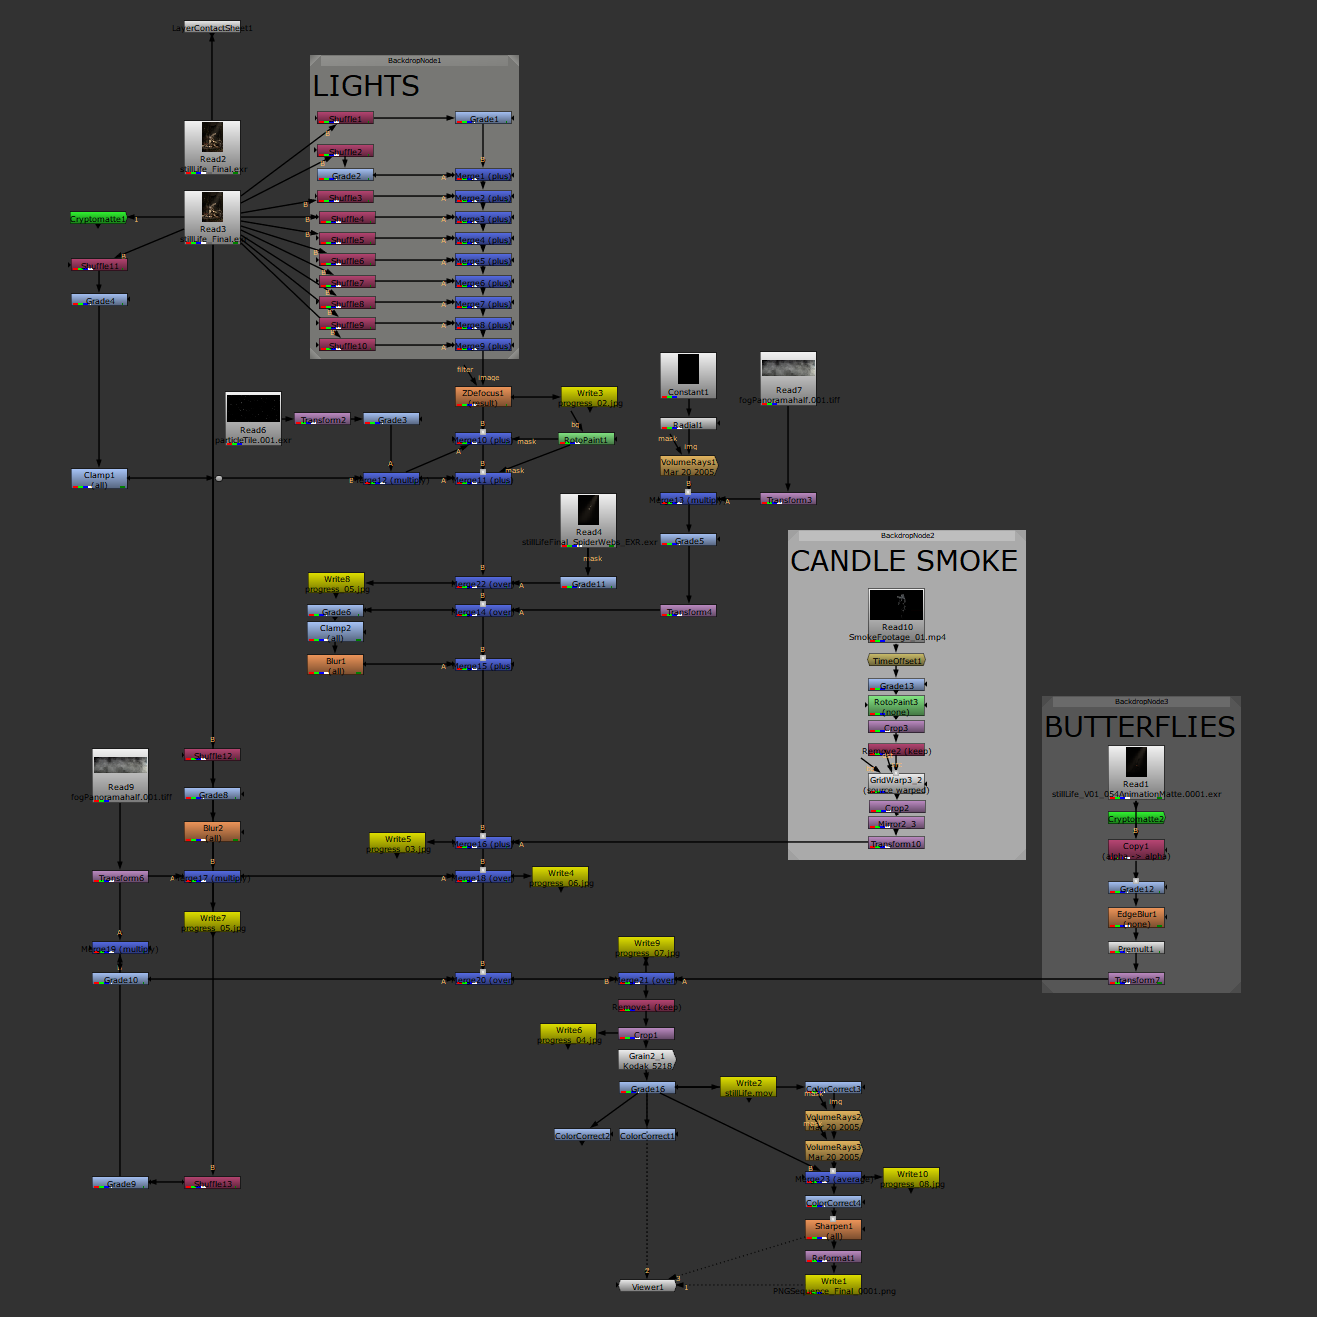
One of my professors, Miguel Ortega, taught me how crucial it is to have the correct channels added before starting anything in Nuke.
Forgotten Nuke Tree Breakdown
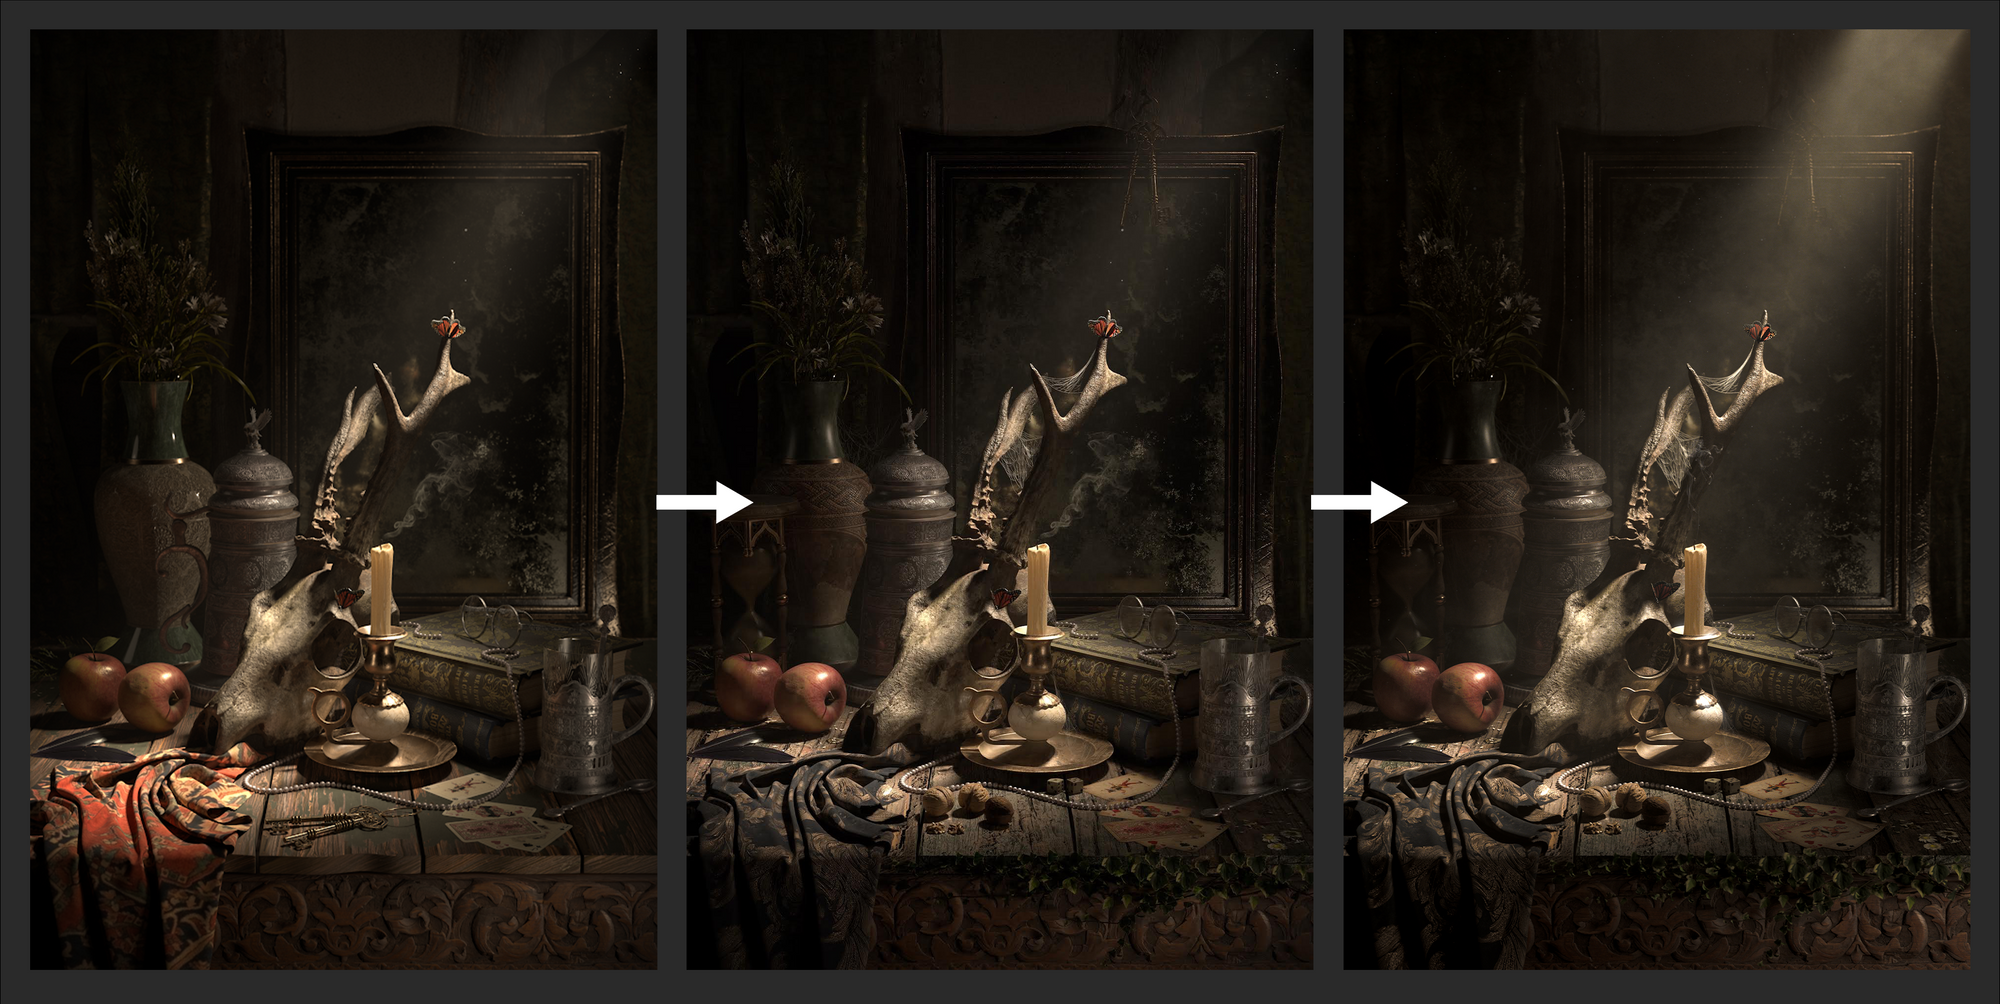
Once I had all of my channels set up, it was easy for me to composite everything else that I wanted to include such as a brighter god ray, fog, smoke coming from the candle, dust particles, colour grading, and more.
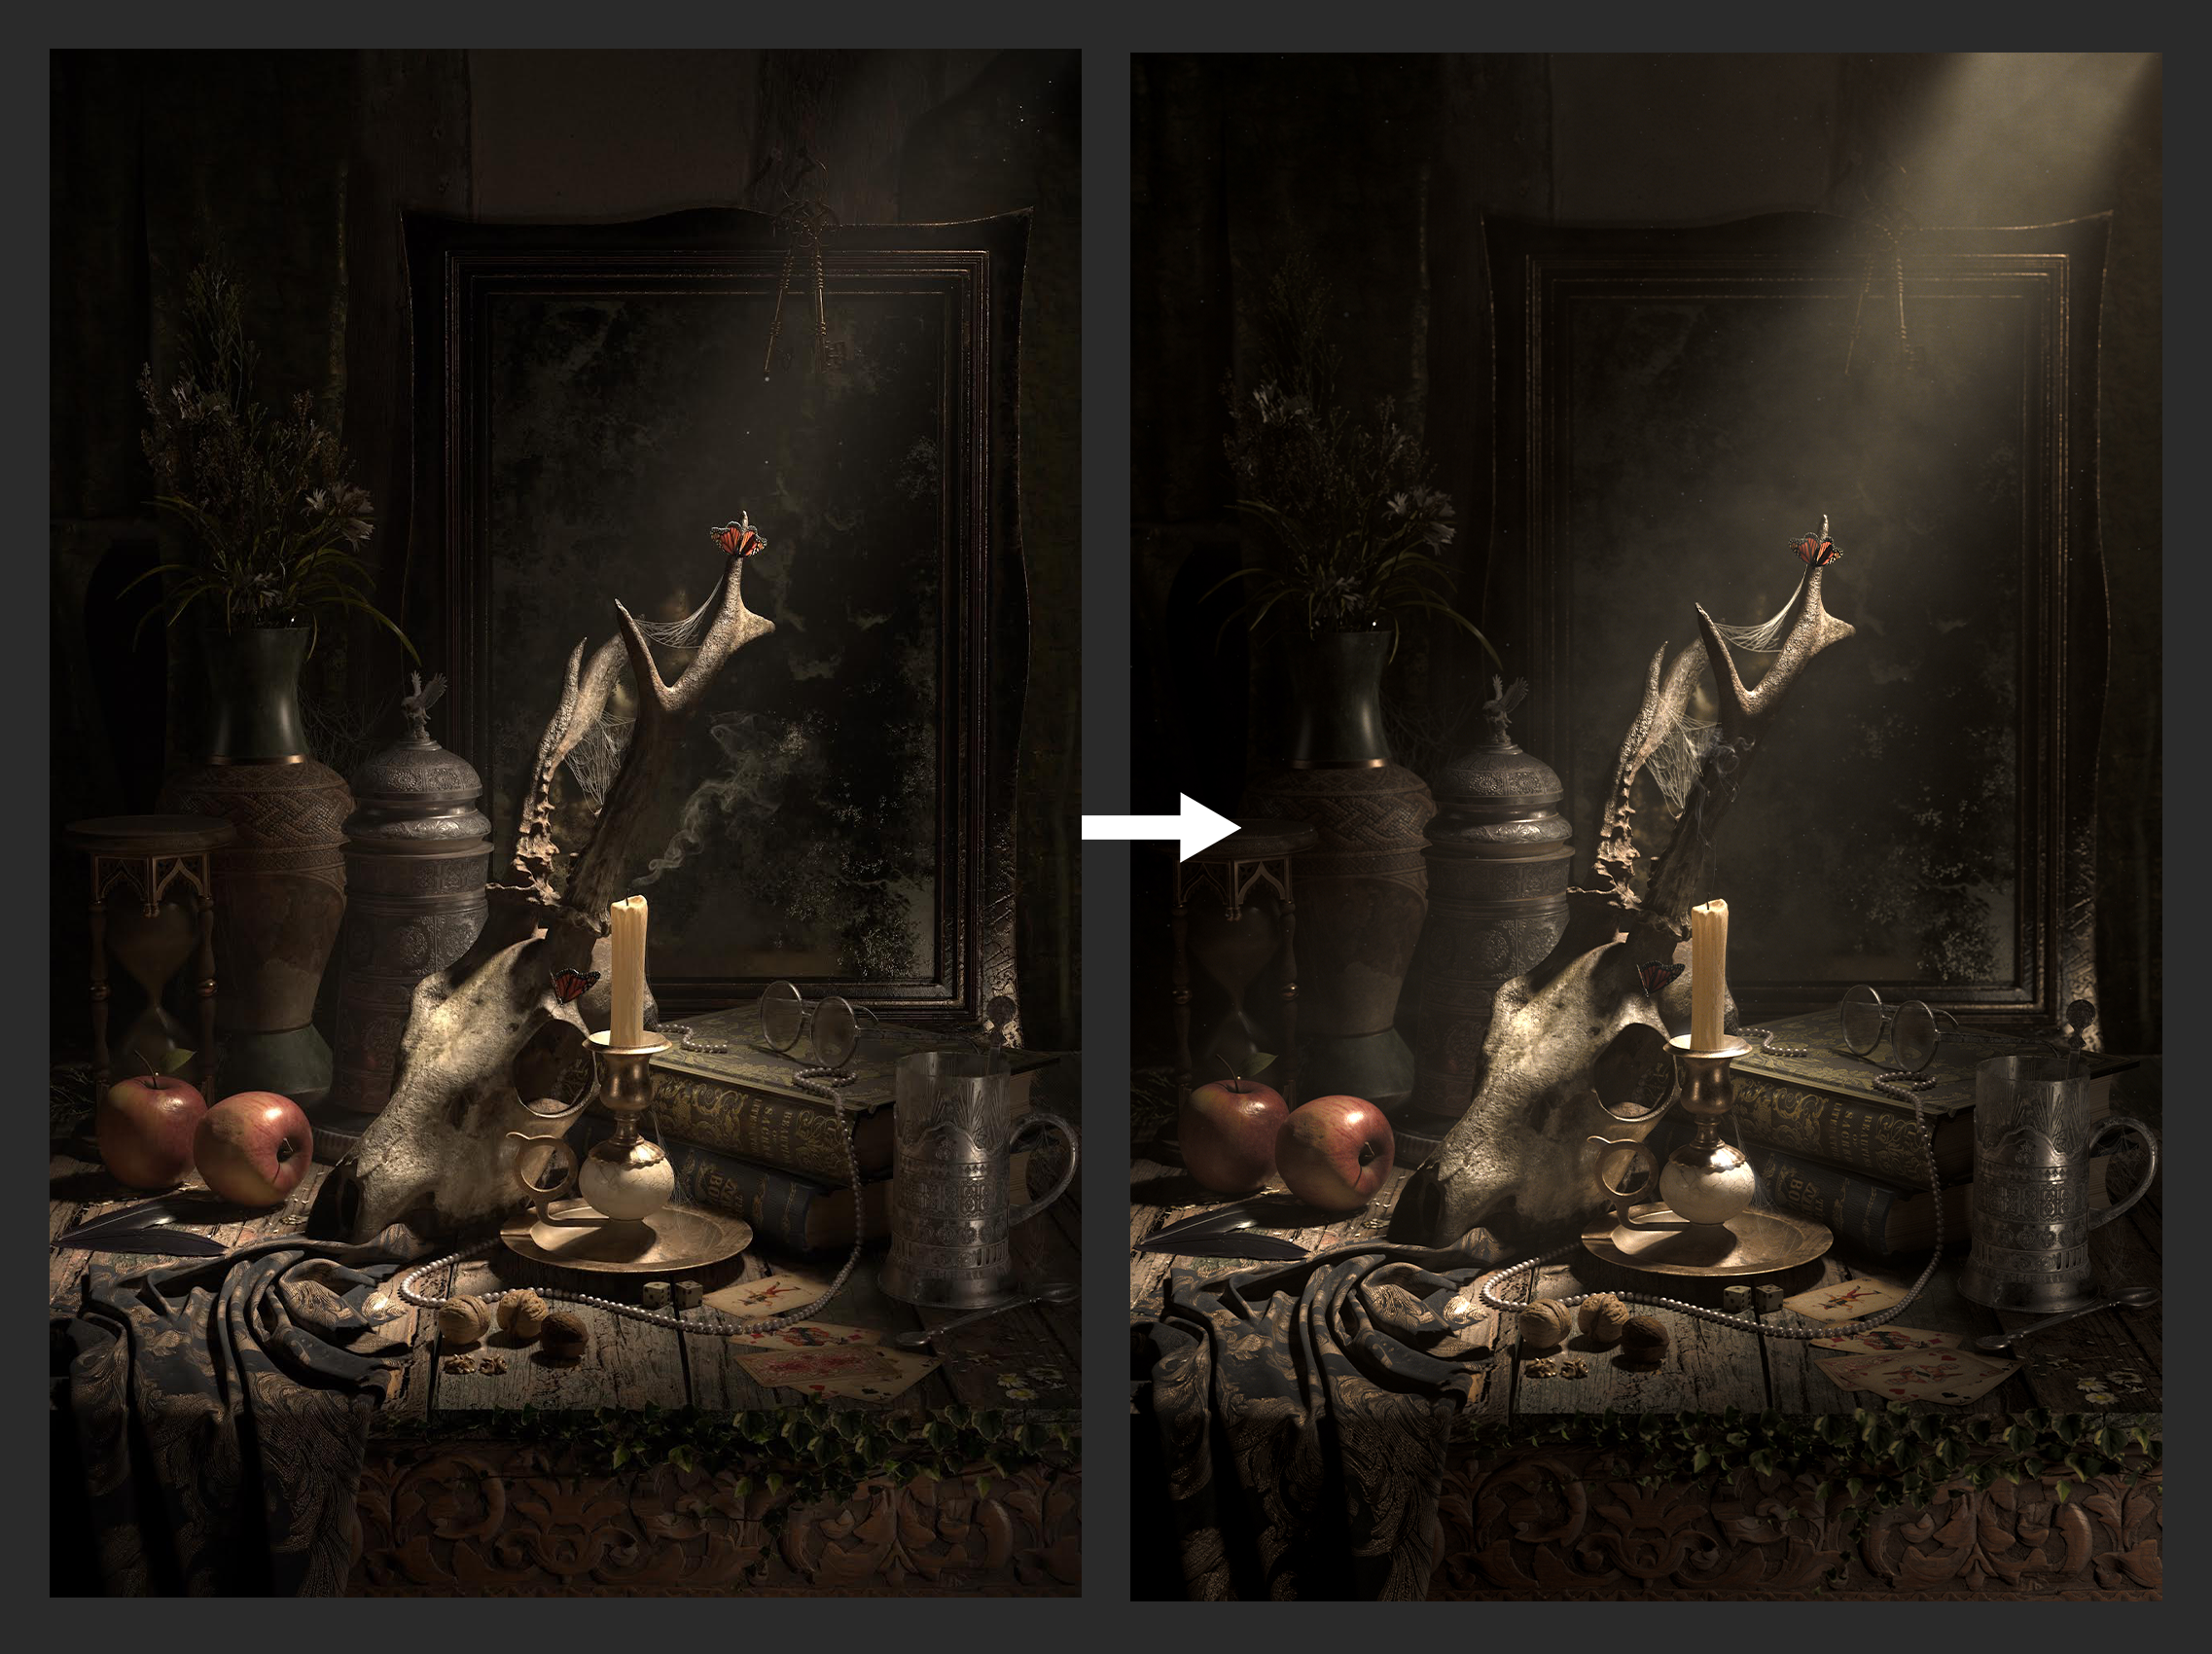
Before and After Compositing in Nuke
Because I wanted my final render to look as moody as possible, using Nuke was the best way for me to achieve that. By comparing these two images, you can see that the added depth makes it look more cinematic. As for the cherry on top, the eerie look was achieved by nudging Colour Correct and Grading nodes.
0:00
/
Forgotten Final Render Breakdown
A breakdown of your Nuke composite is also extremely beneficial to put on your reel, as it shows your working process and how you progressively got to your final outcome.
Final Outcome and Look Development Renders
This project was the initial spark that set me on the path toward becoming a Look Development artist. Many aspects of this project reflect my personality which made the process very enjoyable.
In my opinion, artists should choose a project that they will ultimately want to see finished. Every piece should be made with passion and the will to see it through.
0:00
/
Forgotten Final Render
After finishing my final piece, I also wanted to create separate renders that show off the final look for my most important pieces in the scene.
0:00
/
Forgotten Final Look Development Renders
Conclusion
Creating a successful environment requires dedication, time, and a lot of patience with yourself. If at any time you feel stressed or come across obstacles, it is best to try another route or focus on other aspects of the project and come back to the issue.
There will also be a point where you feel as though the project is not perfect. However, it is important to leave your comfort zone and expand your skills. To be an artist is to grow every day and consistently practice your craft.
Thank you so much for reading and I hope you enjoyed the breakdown of my project! I wish the best of luck to anyone who wishes to create realistic environments using V-Ray and Substance 3D Painter.