
Learn the Process of taking a 2D Concept to 3D Render
This is an extensive article written by Think Tank Training Centre student Diego Aguliar about his Zbrush and Mari project named The Handmaiden.
This is an extensive article written by Think Tank Training Centre student Diego Aguliar about his Zbrush and Mari project named The Handmaiden.

This is an extensive article written by Think Tank Training Centre student Diego Aguliar about his project named The Handmaiden. Diego goes into detail about the modelling in ZBrush, texturing in Mari and the groom process in X-Gen. We love the thought process that's gone into creating this final render. An absolute must read, if you're about to start a project.
At the beginning of this project, my mind was set on a key advice for process of concept selection. An article from a fellow Think Tank student elaborates more on this advice:
"One of the fundamental pillars of a project is the story behind it. That’s why you should give yourself enough time for the concept selection.” - Tomás Sackmann, Don Quijote: Complete 3D workflow from 2D Concept Art.
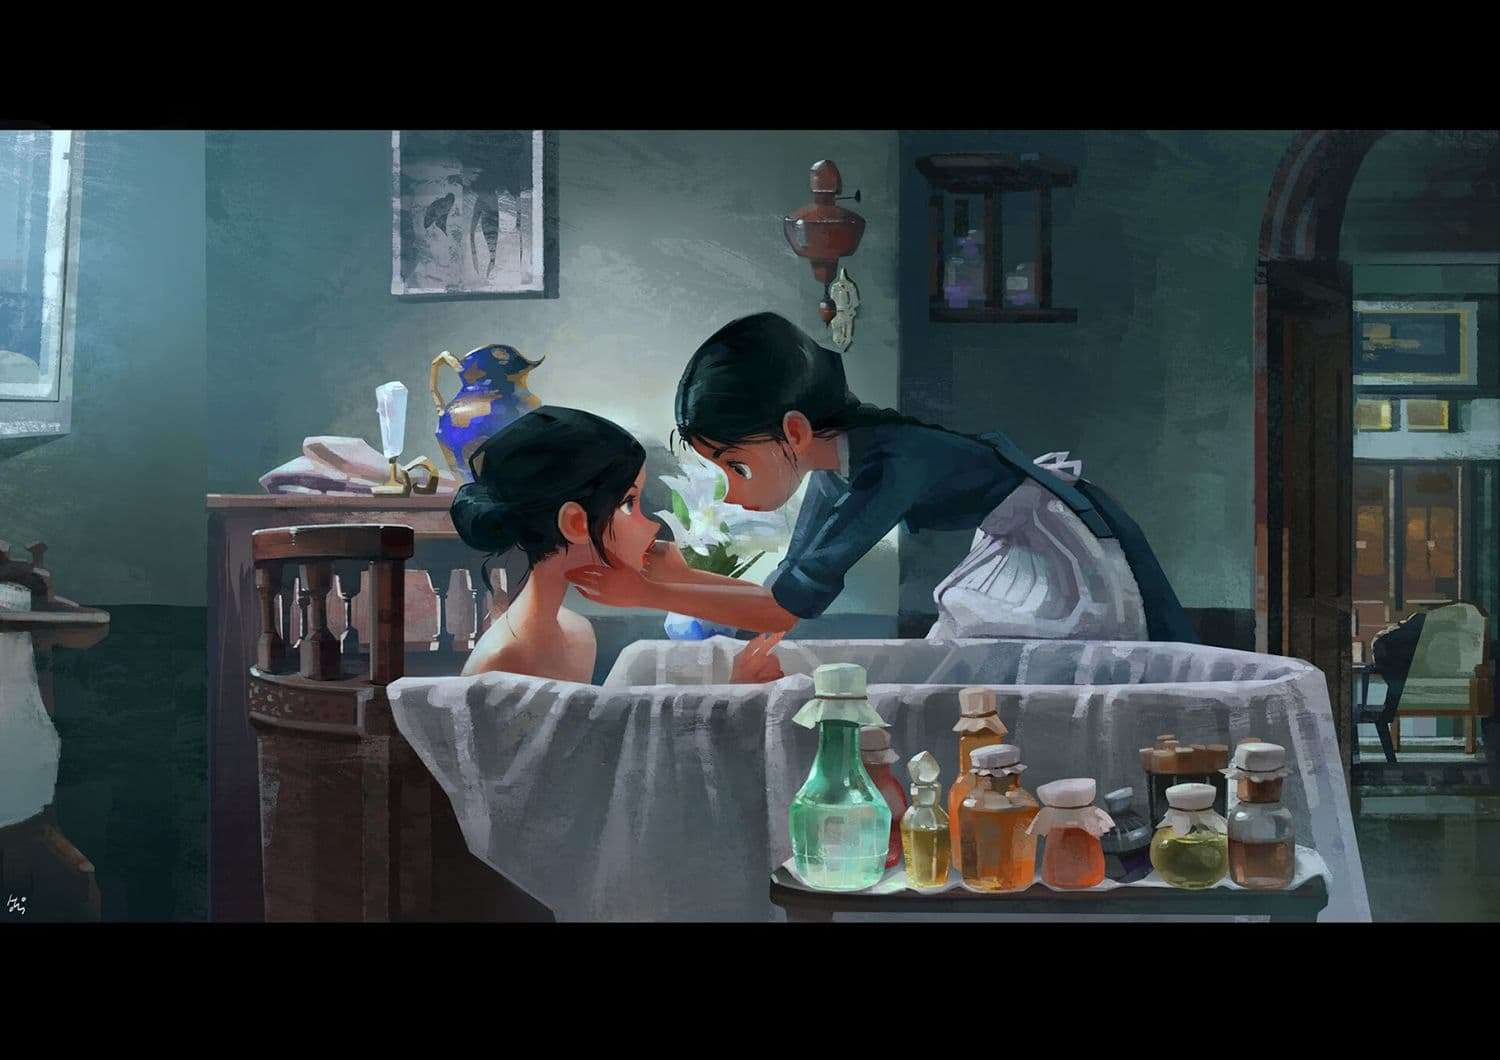
It was the same situation for my selection process. And while searching, I came across the magical and amazing work of Jihyun Han. It was at first glance—love at first sight for her craft.
It was rich in Shape language, and the amount of tension and intimacy made this a very special artwork. Both were quintessential elements to recreate in the entire process of translating the emotional turmoil inside of the scene to a 3D setting.
Fortunately enough! Her artwork is based on a movie called The Handmaiden. This was an important resource in the development of these characters. Now, it’s clear what is the story behind the piercing look, filled with tension they share and how will this benefit towards the outcome. The trouble now will be, recreating everything in a limited set amount of time.
While this concept is a stylized image. I wanted to achieve this scene to look like a believable scenario. And maintain the characteristic look that made this piece special. Thus, gathering all the resources that could fit inside of the setting. Furniture, materials, setting, and most importantly, the actresses for the real life characters. Not with the purpose to make them life-like, but to make them proportional.
It may seem like a very worn out advice. But, it'd surprise you to know how many artists neglect the foundational aspects of perspective. Myself included.
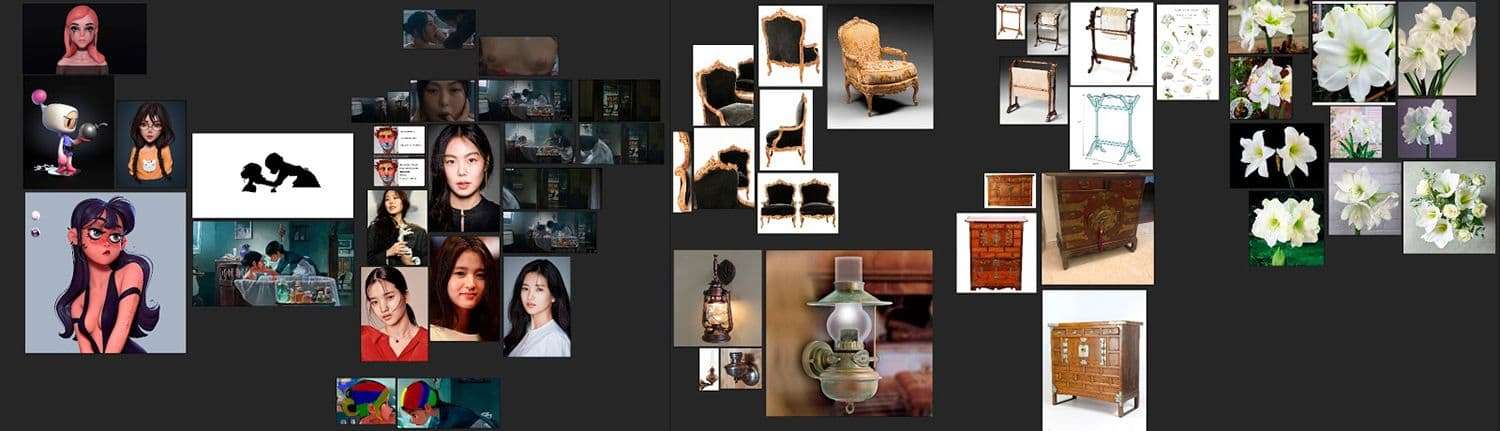
I “organized” my reference images in a way that could make sense to me. Separating those objects that were hard to read for my workflow. I gave a big emphasis to the style of 3D that I was going for. Stylized 3D, is personally a hard feat to achieve. So, if you’re good at stylizing a model quickly enough, you’re way miles ahead of me.
Believe it or not, I did manage to understand my initial thoughts when looking at my reference file. Regardless of how cluttered it looks. But, I highly encourage you to do better. Organize your references in a manner that is neat, easy on the eyes, and labeled by elements. It’ll make your work easier. And, you’ll soon realize what is important of each image and which reference is a smaller resource.
These are the softwares I personally prefer for any workflow:
In order to avoid boring the reader with overwhelming details. I’ll elaborate on the development of both characters. Specifically:
Looking to the original artwork. You’ll be able to realize right off the bat the big tension that could be cut with a knife between these characters. Solely by looking at the locked up eyes and the subtle, yet alluring interaction presented between maid and the noblewoman. Their names in the story are Lady Hideko and Sook-hee.
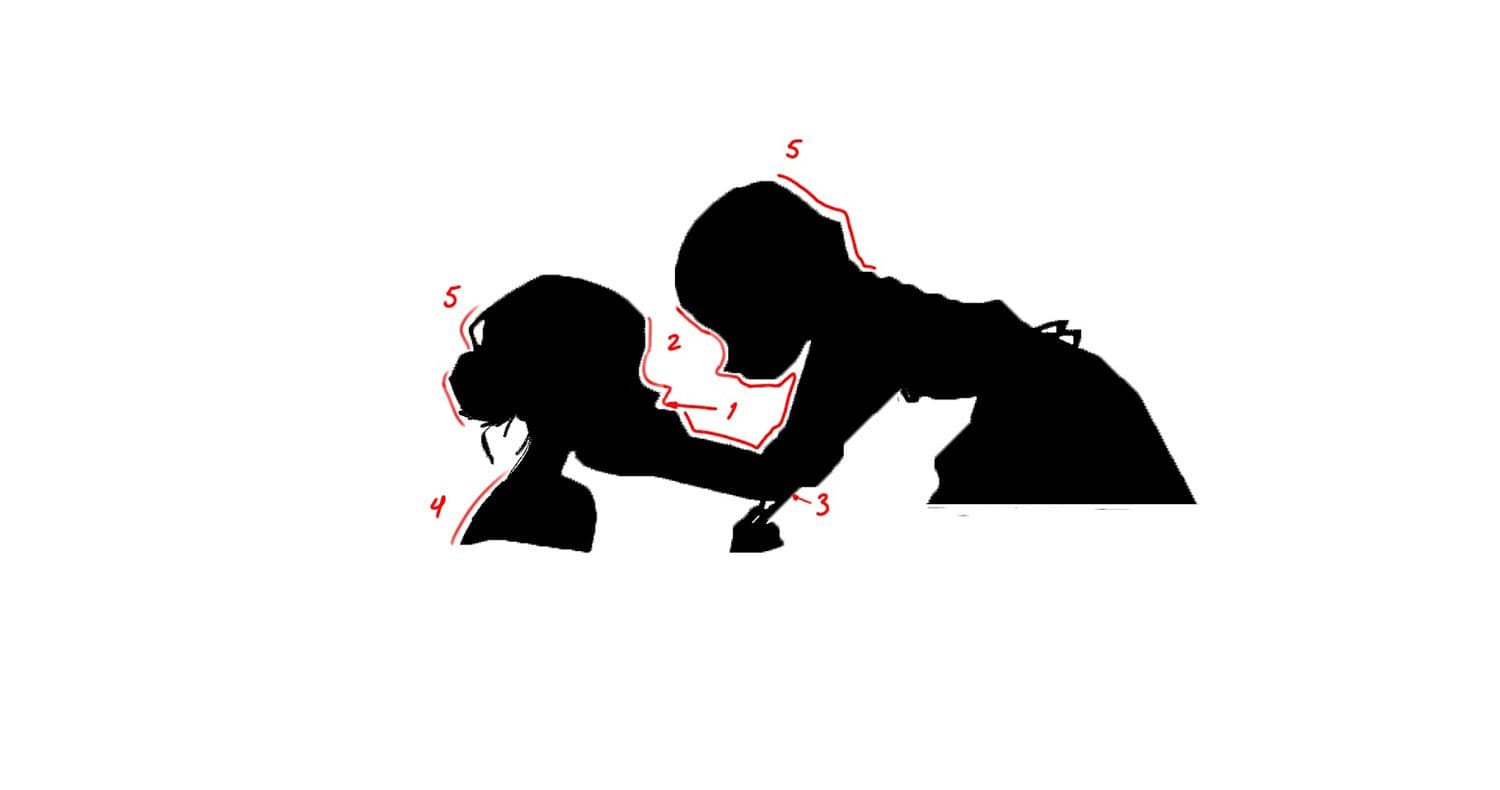
Before starting any project, I highly advice to make a silhouette out of your key character(s)/main assets. Then, define landmarks that you consider to be essential to the shape of the shot. What those landmarks are and which priority or function they’ll serve in each project, depends entirely upon the criteria of each artist.
My landmarks were many, but decided to prioritize on only 2, there was a lot leeway for the rest. But, only landmark #2 and #4 were imperative to follow.
Landmark #2 became a window to give way to the compositional support of midground assets. While #4 became the definition for provocation. An excellent and overlooked observation given by my peer.
Related Article: The Importance of having a Back Story for Character Creation
Why #4 differs from the original artwork (A fair claim). It's due the position of both characters. Since, moving either of them just a bit could result in many major changes to the overall shot. So, compromises were made and positioned the noblewoman as inviting as possible.
Having this visual information as support. Blockout begins, setting up a camera with a proper focal length can be tricky for new 3D users. If you're delved enough into the concepts of perspective and photography, you're good. If not, Practicing these fundamentals is crucial for this line of work. It may seem like a very worn out advice. But, it'd surprise you to know how many artists neglect the foundational aspects of perspective. Myself included.
Honestly, I had started this with a somewhat clear-ish idea. I didn't see the environment clear enough. Yet, I knew both characters had to look the best from the overall setting, that was my priority.
It's not a written rule. it's something I personally prefer doing since being a character artist is a goal I wish to fulfill.
I began blocking out with simple shapes for all the assets. Start everything simple, don't stress too much over details at the beginning. Everything will develop and get ironed over the course of each project.
I used a mesh sold by Sergei Katsukov - Stylized Basemeshes for a quick-pose alternative. I like these basemeshes for their versatility when it comes to posing big portions of geometry.
If your project includes animated characters, I recommend watching a tutorial on retopology. FlippedNormals' Youtube channel is an invaluable resource for anyone interested in 3D. They elaborate more on the importance of having a clean and even topology.
Personally, I opt to retopologize characters after sculpting, regardless if they're animated or not. It's good practice. And never hurts learning more about proper retopology for production. Riggers will need good models with good topology! Be good to them and listen to their feedback.
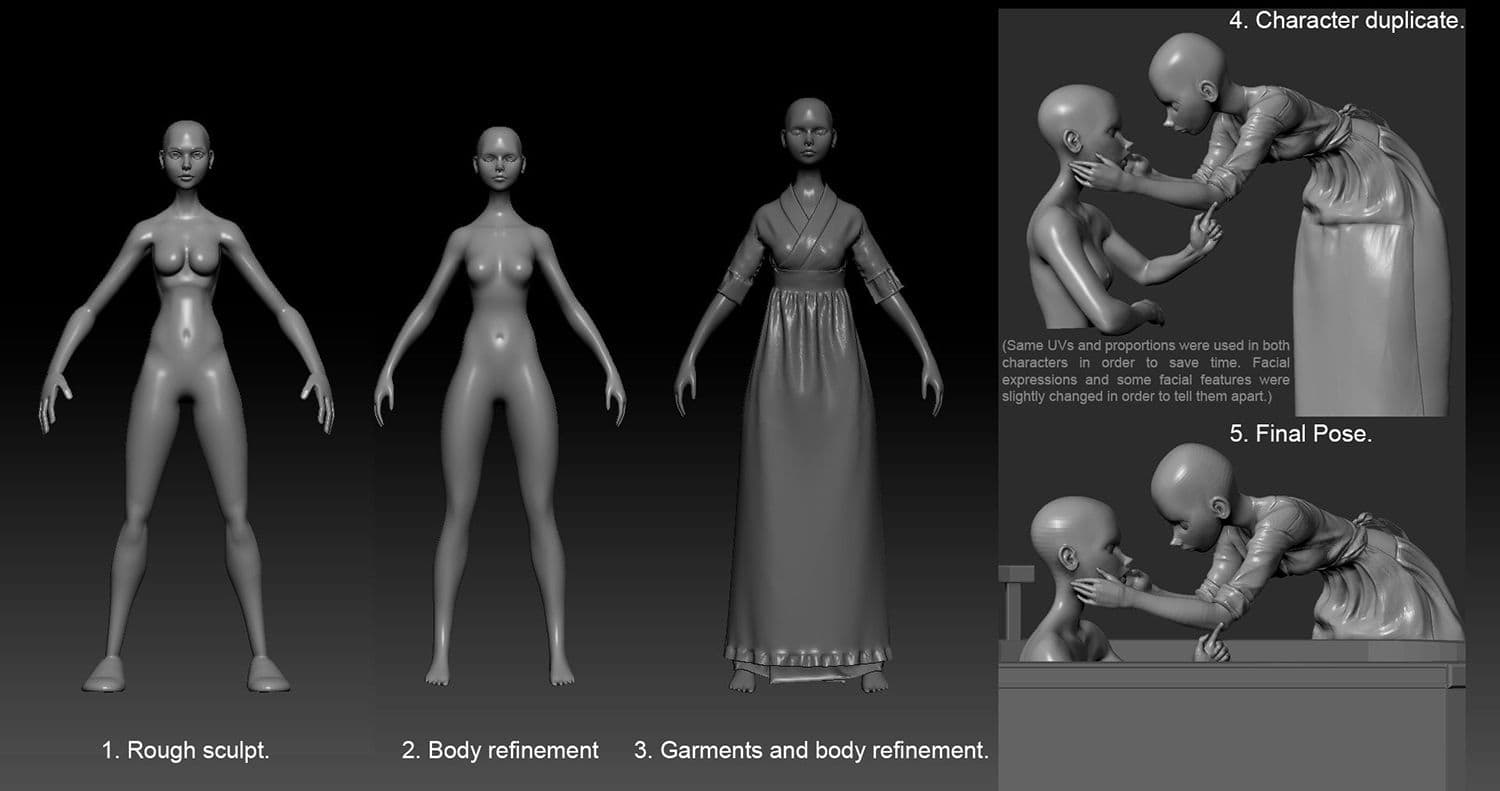
With both characters close enough on place. I began the process of modelling an entire stylized body. For this particular project, a single model for both characters would work. Since they shared many similarities in shape.
Focusing mainly on making it look as stylized as possible to the artwork. With not to much concerned for precise anatomy. Next, retopologized that sculpt inside of Maya and extracted the UVs. Finally projecting this new model onto the high sculpted model in ZBrush. This will get all the necessary details to continue with the sculpt.
Credit where credit is due. For time saving, I opted in using a pattern that fits the setting of the scene and the movie. Then, modified it to make it look as close as the artwork. Evgeniya Petrova's hanfu was the best choice. Her library is diverse with a lot of detailed clothing patterns. Professionaly presented and each works like a charm.
At this point of the process, you now have a low polygon version with UVs which will be more versatile to control. This will allow all the details for correct projection and posing in the high density model. Next, Transpose Master to position everything in place without the need of rigging. Then, switch back and forth adjusting the highest subdivision levels inside the sculpt. Looking for any odd looking shapes in the pose.
The projection tool is a satisfying feature as it is tricky. Beware, topology will often end up being projected in unwanted areas. Some geometry will end up overlapping, and changing position all over. Forcing you to look for those loose vertices and place them in their correct flow of geometry. A nuisance, but it's manageable with the right projection settings and the always handy ZProject brush.
Another quick tip to consider before performing the projection process. Store a Morph target on the non-projected subtool. Run the projection, then start looking for any oddities. Once the rebel topology has been located. Fairly use the Morph brush tool to send them to their correct flow of geometry.
Now, if you ask "why do I need my topology in place?". Good question, this deters any weird bakes inside of your displacement textures. These errors will show in your bakes, which in turn will show in your renders. That will not be the best to see in final presentation.
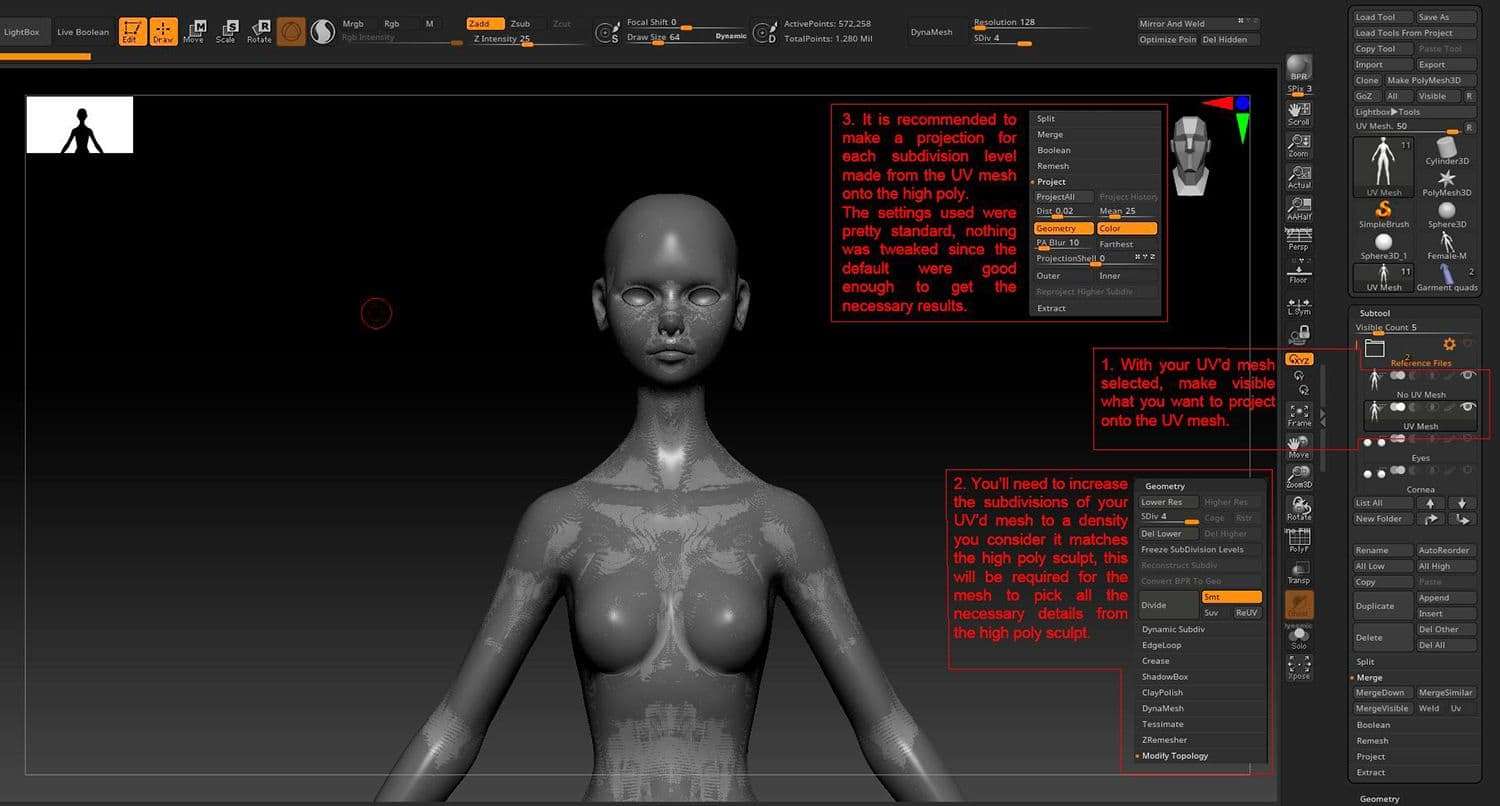
The image above shows the explanation on how to use the Projection tool and Transpose Master. Both features are straightforward enough, and you can support these bits of information with a little search online if you feel you want to kow more.
I am aware of the existence of ZSpheres rig for posing. And honestly, I find them to be more time consuming than this alternative. But, you're not bound to either process. The objective is to have your mesh posed, regardless of the method. Experiment, fail multiple times or succeed at the first try, it's all part of the learning process. Own the method, do not allow yourself to be owned by it.
To aid yourself with the positioning process. I recommend exporting the main camera from your 3D scene using the FBX format. Most likely, your 3D software has a setting that will export camera-only files to be used in another 3D application. Beware, before ZBrush 2019 there was no way to import/export a camera inside of the application. So, if you have ZBrush 2018 or below, this will not work.
However, you can still make good use of Lightbox or the Transparency slider. Roughly, match the viewport to your scene and adjust it as best as you can.
The rough down to this:
This is the rough down for posing characters. Make sure to reflect the body language of your subject. Since more often than not, it's essentialy the big part of giving character to your characters.
If there are any TexturingXYZ newbies. Don't worry, I'm pretty much a beginner myself as well when it comes to using these textures. Because of this, I had to figure out a simple way of using these maps. Without compositing in another software. I plugged them in Mari and started projecting, straight out of the package.
I want to make clear. The camera distance is not enough to render all the micro details in these textures. But, adds a bit of "realism" to the stylized scene. If your aim is for a realistic 3D portrait, you'll have to look for a better method of compositing these packages. A starting point would be to check a few articles from Texturing XYZ (TXYZ).
It is possible to bake the Displacement maps made in Mari inside of ZBrush, which is better to do so in the long run. But, in my case, ZBrush gave some odd errors when attempting to bake the map made with Mari. UV issues with the model, most likely.
Due to this, I extracted a different displacement map from ZBrush. Having now 2 textures, one made in Mari and the bake from ZBrush. Don't worry, there's a way to connect 2 displacement textures on a same model. I'll elaborate more on this later.
The texture pack used for this project was the Female 20s Multichannel Faces #02. It's the proper texture for this project, considering the character's age and complexion.
To set up a displacement channel in your Mari file, keep in mind 'resolution to film gateway'. With this particular shot distance, 4K could give good enough results.
Yet, I decided to go 8K out of a whim and because I'm used to work at that resolution with these textures. As stated before, 8K is best for close-up projects like portraits or bigger objects.
Not a written rule, but it's a recommendation to get the best out of these textures.
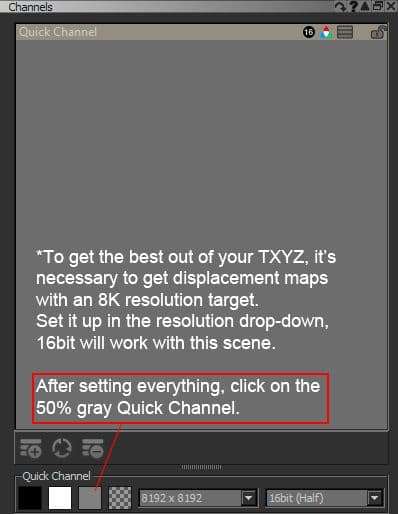
As presented, observe I'm indicating the 50% Gray Channel. Displacement dictates deformation of geometry, supported by tesselation. The render engine will interpret height and depth based on grayscale. Which Black = depth and White = height. Being the mid-point the best starting place to start your displacement textures.
To explain tesselation shortly (since I'm not technical enough to describe it). If your topology does not have enough resolution to reach those high and low points of the texture. Tesselation will subdivide your geometry and edges as many times it's defined by the user. Until it's resolution is good enough to reach and simulate that elevation.
Usually, the best use of TXYZ would be to project every detail of the texture onto the UVs. Thoroughness and attention to detail is rewarding at the end. It's quite appealing to see the projection struggles and hardships pay-off. Projecting and painting over the model, baking and erasing so everything makes sense. All this to get a subtle reaction when the light and global illumination hits your model. A subtle effect, but one that makes all the difference when rendering.
Unfortunately, for me, I couldn't afford to be as thorough this time. The clock was ticking, and every second mattered at that moment (I must mention, this was for a final project). I had to sacrifice some quality in the "realistic" department if I wanted to meet the deadline. The best way to approach this, would be to work in a non-destructive manner. Making it as procedural and quick as possible, with little projection work.
Extract a set of seamless textures from the displacement map from TXYZ would be my best bet. If you want to know a method to make quick seamless textures. There's something simple, yet useful I recently learned (I didn't apply it in this particular project, but still would like to share it).
If you have Substance Designer, make a new Substance graph.
If you DON'T have Substance Designer, you can always opt for the traditional method. Photoshop has a variety of workflows for you to make a seamless texture. I would recommend researching a bit on open platforms, it's a fairly simple process.
Texturing this particular model needed simplification. Tiling with procedural nodes. Revealing these layers with the aid of masks proved to be a good substitute to paint through process.
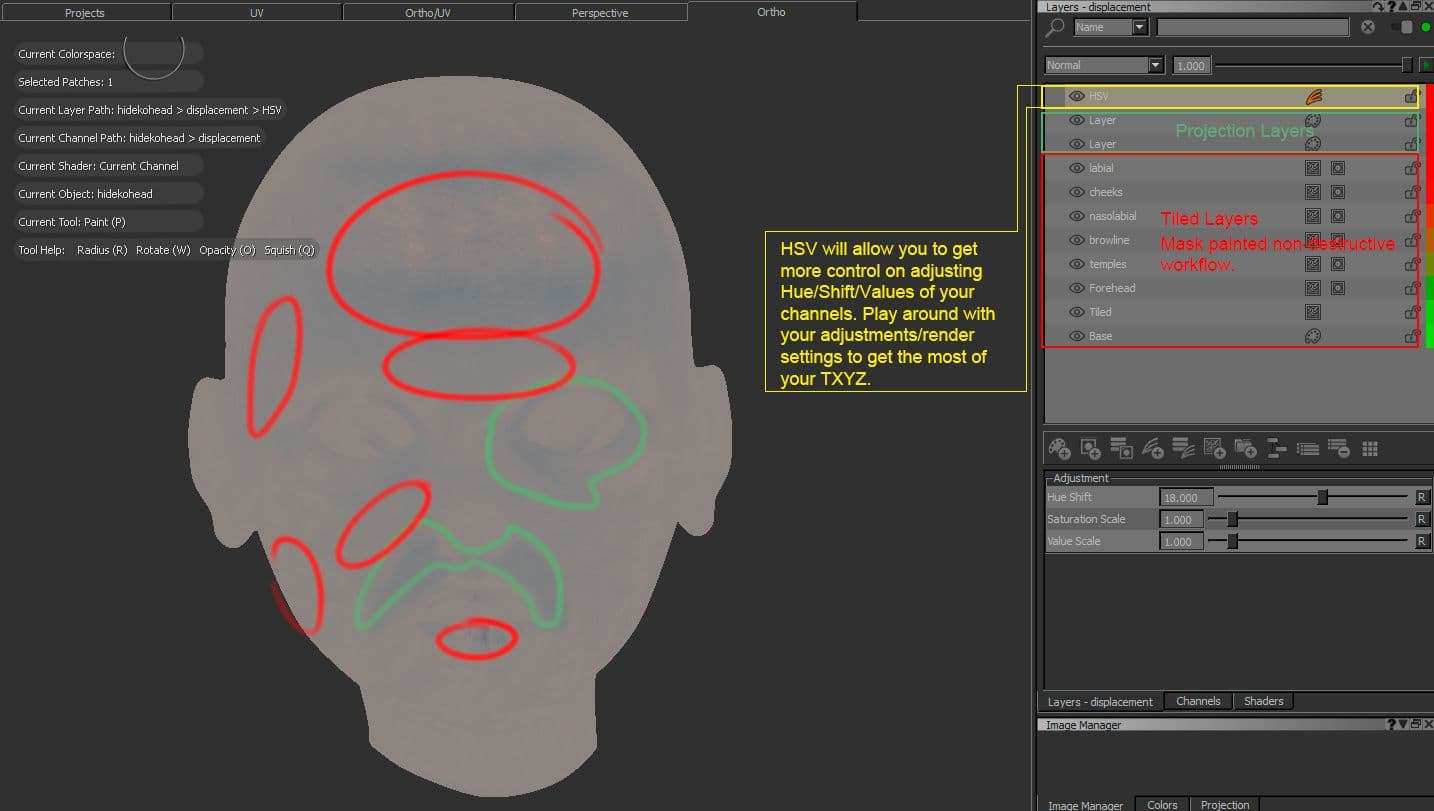
It became a good learning experience. Before this, I resorted completely on the manual alternative. Spending days on getting every area matching to the respective facial zone. Making sure everything blends in a proper manner at the time of presenting.
The versatility of this relies on the manipulation of your seamless textures. Scale and rotation play as important factors to get your desired results. You'll become quite familiar with these nodes the more you work with the software. Don't fear to fail, no first attempt will give you the amazing skin result you wish for (But, if it does, kudos to you! Keep up the good work).
An additional note. There is a piece of information you should keep in mind. And it will help you considerably on the process of texturing skin — Langer's lines. A good reference, which will give you a better idea on how to texture with your seamless textures and the paint through tool.
Never forget that good foundations, lead to good results.
Once you have all the textures setup in a way that makes sense and it's close to reference. Start the process of painting through with your TXYZ displacement map manually over the model. Blend your seamless textures properly. Make sure it's good enough so your eye is unable of noticing where a seamless input begins and where it ends with the aid of paint through.
Blending every patch of texture, following skin and expression. Context is important. Imagine if this character had a good, long, happy life or if he/she has faced adversity, anger, and worries.
These markings will give a more insight on the character and personality to the viewer. In this case, the noblewoman has a clearer skin. With little to no deterioration, due to all the cares imposed by her noble family. And, the maid surely will show more lines of expression and wrinkles.
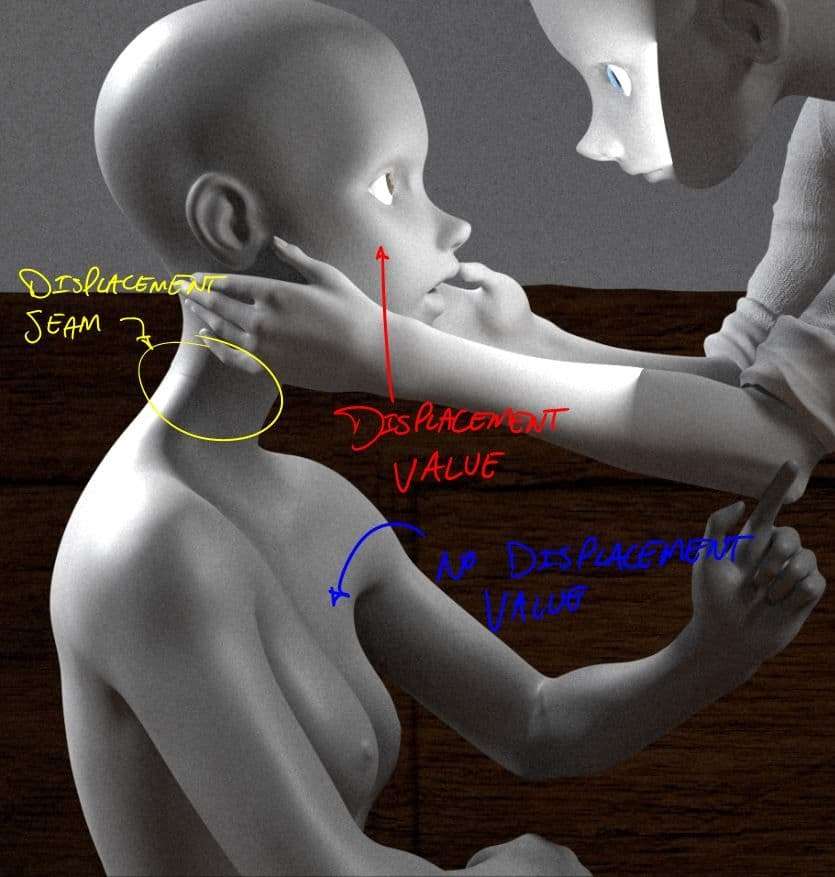
Be wary of this when texturing displacements. An oddity encountered during this project, which gave me a couple of headaches for a few days. And, the answer to this problem was as simple as the solution.
Displacement seams. With this particular problem, only one UV tile had texture — the face. As presented already in the project. But, the rest of the body was not included. Hence, since there's no displacement information on the body (since it was treated as a different UV Tile). The render engine will represent that UV as a separation in geometry and will cause a separation of geometry.
A mistake on my part. But something that's fixable by exporting the other parts of the body as separate objects. Then, import them inside of Mari at the same project. Objects tab > Add Objects > Import the missing parts of your character. You can now continue with texturing! Make sure you give proper and similar displacement values to the rest of the body so it matches at rendering.
After adding displacement value to the rest of the body, the seam was gone.
Once you have exported your displacement textures. Setting the maps generated from ZBrush and Mari inside of Maya is next. Inside the scene and with UV'd models ready. Your necessary workspace for this task will be the Hypershade.
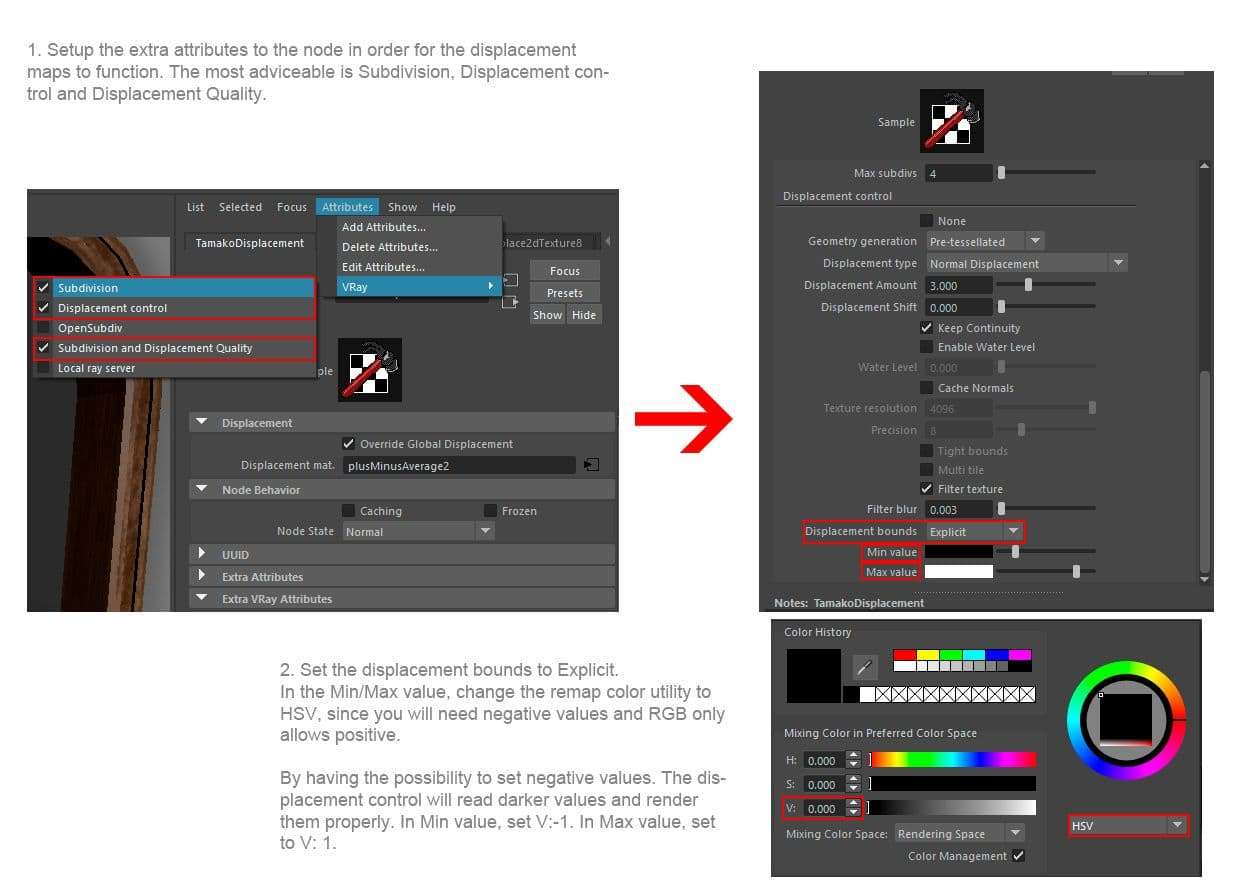
First off, create displacement nodes in VRay by selecting your object. Then, head to Create > V-Ray > V-Ray Displacement > Apply single VRayDisplacement node to selection.
This is the starting point for making a displacement shader. But, we are far from over in getting the textures to work. Next, it's necessary to set up the correct settings to continue.
Unfortunately, understanding the technical aspects of Displacement is another breakdown / tutorial by itself. But, if you're interested in delving more into it. I recommend introducing yourself to a lecture covered by FlippedNormals. Start with that and work your way up.
It's better to explain the set up in a visual method. As stated before, trying to explain the technicality of it can leave a lot of new users bewildered. Good for the sake of being brief on what are the necessary settings to get the textures up and running. But, do be mindful of the foundational aspects of shading. Having a skin texture is one of the many elements to make a character look life-like.
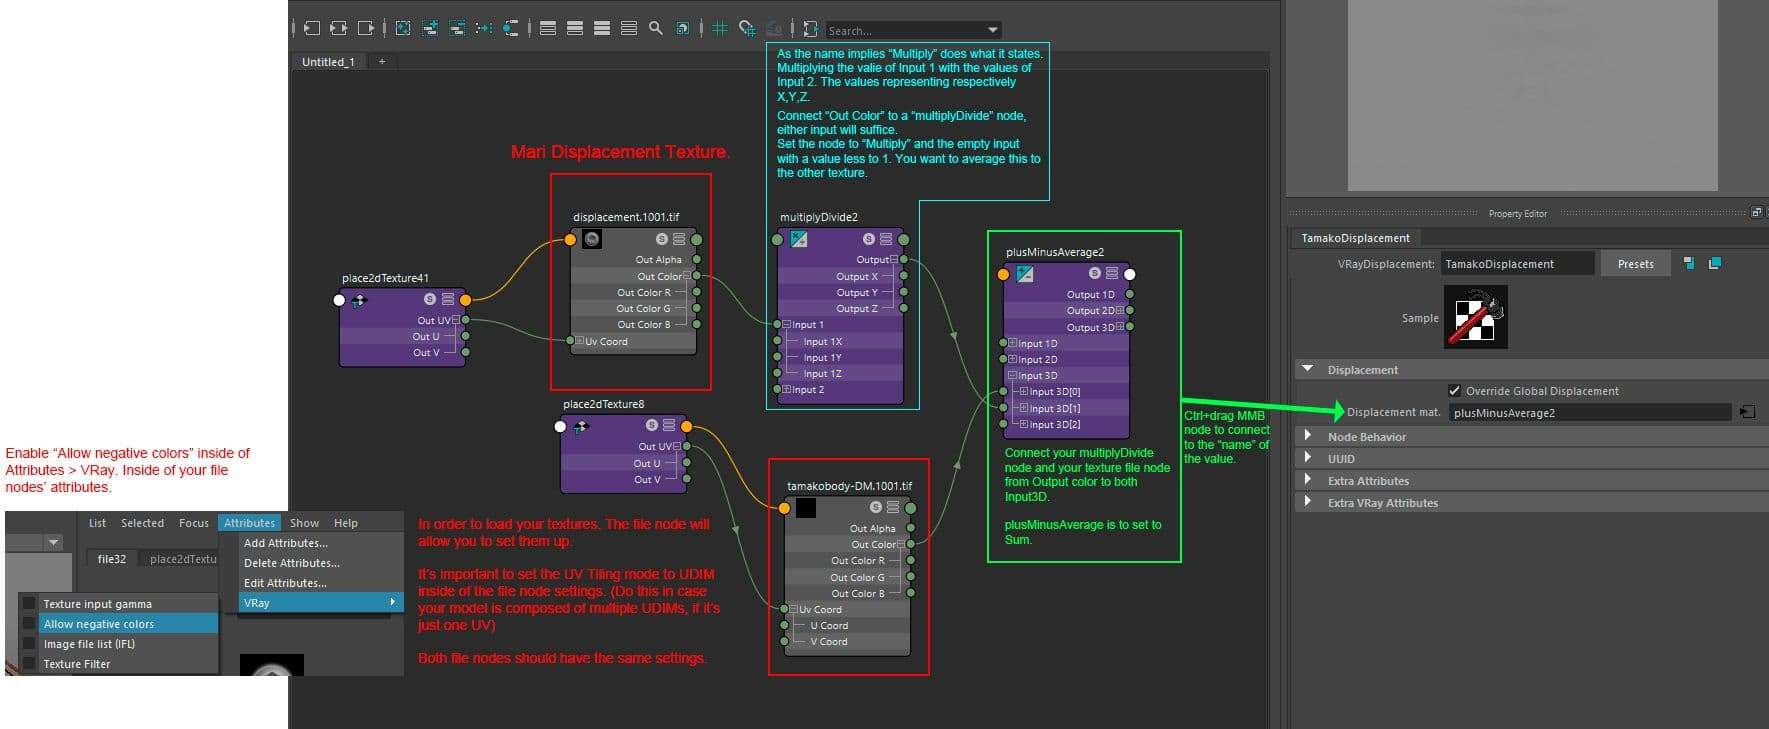
I'll leave the technical explanation to the official word. If you want to know what are the functions of the nodes used in this procedure or any node for that matter. Autodesk's website has a pretty good explanation on these functions.
This is the point in which I have to say, and I'll do so out of a whim. TexturingXYZ's multichannel maps are a delight to work with. With incredible results each time. The reason being, displacement, wrinkles and pores packed into a single multichanneled image. RGB channels corresponds to primary, secondary and terciary details (displacement, wrinkles, and pores).
Take this projected image into your render engine. Now, the Multiply Divide node will allow the control for the intensity of each RGB channel. If you want more detail on pores, giving a higher value to the Blue channel will reflect this change. More depth in wrinkles? Green channel's got your back. Mix as you see fit and experiment with the value of each channel to get different results.
This concludes the topic of Displacement skin with TXYZ. And I reiterate, it's a single component of a compound of textures. Which will be supported by your well structured model and it's UVs. Make sure to develop each of these with great attention to detail and care.
I'll be addressing the methods on creating hair. The workflow for Xgen, using guides. Tips on structuring said guides and adding modifiers to give breakup to the grooming.
Personally, hair is one of the most important features. Since, of course, hairstyle is at it's most THE trait that gives character to your Character. It's a very good way to tell more on the personality. Well kempt hair with a sense of fashion, stylized to impress, ready for a ball. Or, perhaps a more fuzzied look, reflecting looseness, and a nonchalant carefree attitude.
It's an element that will test and move your imagination. And you'll have to know the technicality of obtaining that right, in order to get the set of hair you're looking for. But, the more you do it, the more you will adapt yourself to creating your own way of tackling the task of giving a personality to the grooming.
By researching a bit on the theory of the flow of hair, you'll be able to realize something quite interesting (Yes, there's theory in hair). Observe that the strands are not coming out in a lawn-like fashion or straws. Instead, there's a waviness and curvature to the root of each strand. As well, there are areas that define the behavior of this flow.
This tiny preamble leads to a vast case of study in medical practices. I recommend researching more on this subject. And, oh yes, medical articles are quite the resource for Character development, get used to look for them.
Quick tip, your hairline to the glabella (eyebrows) has an average height distance of 8 - 10cm. Keep this in mind when you start adding guides and while painting your mask.
To start setting up your guides in Xgen, you must not forget that at this point your characters must have UVs. Otherwise, you will not be able to create masks. These masks will define the areas of your geometry that will generate the proxys of hair.
I'll briefly give out a quick run-down of what the UI is in Xgen. The most common tools used inside of it. The deformer tab, utility tab and how to simply connect your groom to VRay's hair shader. And, what to keep in mind when generating your guides and working with this feature.
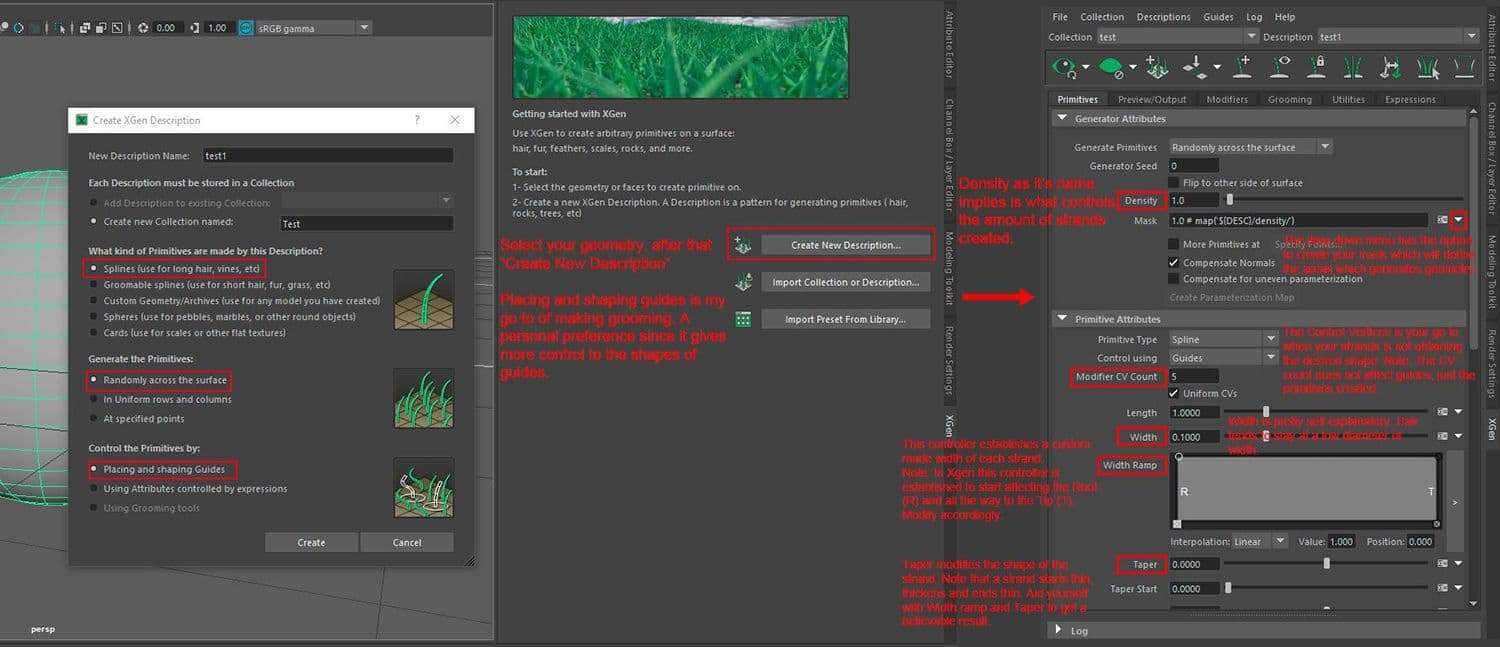
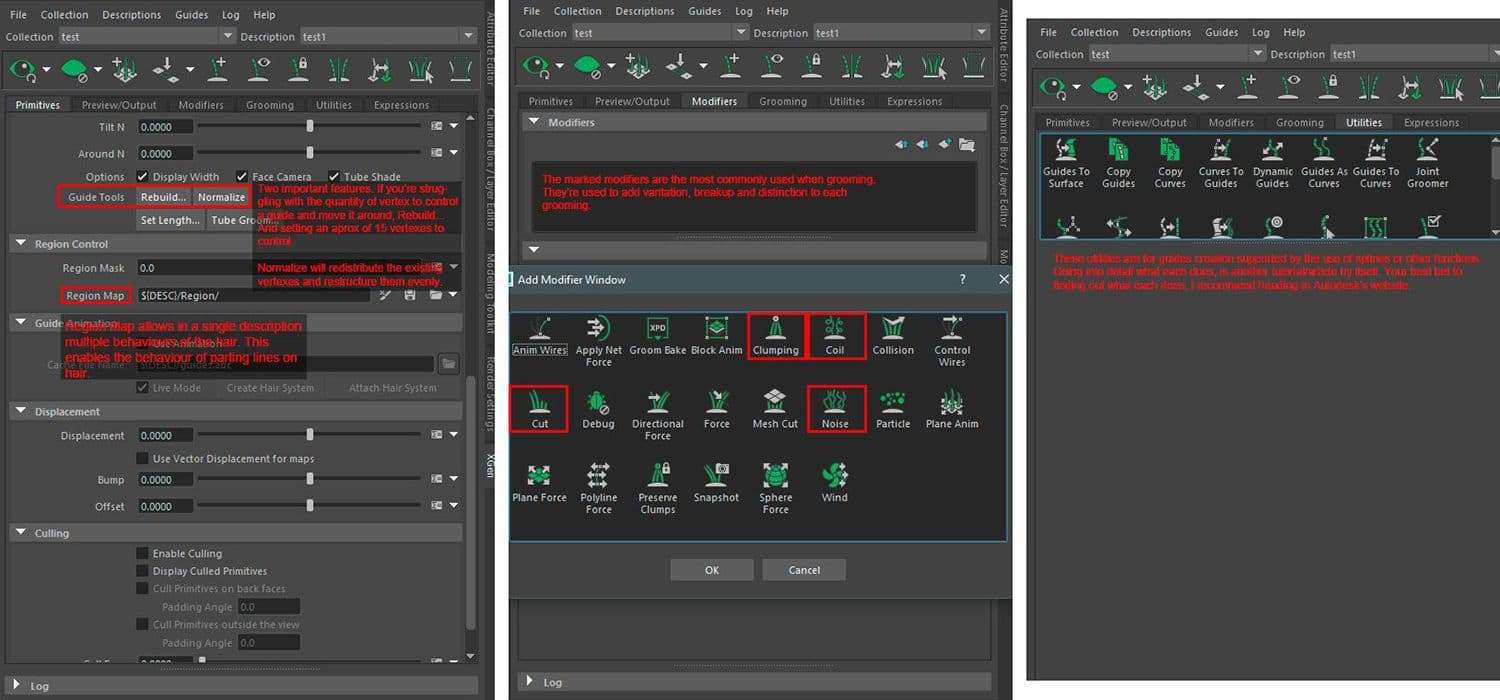
With this little rundown of the UI explained, let us elaborate on the method used to generate the guides. For new users, you'll develop the groom thinking that the best way to generate guides for hair is making them arbitrarily. Without even a pattern or system that could make sense to Xgen in order to generate the strands needed. This should not be the case.
Keep in mind on the shape of hairstyle you're going for and do your best to deconstruct it in a way which makes sense. Otherwise, you will be struggling with the way Xgen works on creating the strands. And, you'll keep adding guide after guide, scratching your head in doubt. Trying to make sense of the arrangement that you attempted to develop.
As everything — start simple. Don't overflow the groom with unnecessary quantity of guides. There will be a point in which you will add complementary guides. But, that point will come once you've reached the basic shape of the groom. Don't attempt on making clumps or breakup from guides. That's one of the main features Xgen is known for and can be easily replicated with a few well-placed modifiers.
My reference to work with the grooming is the next.
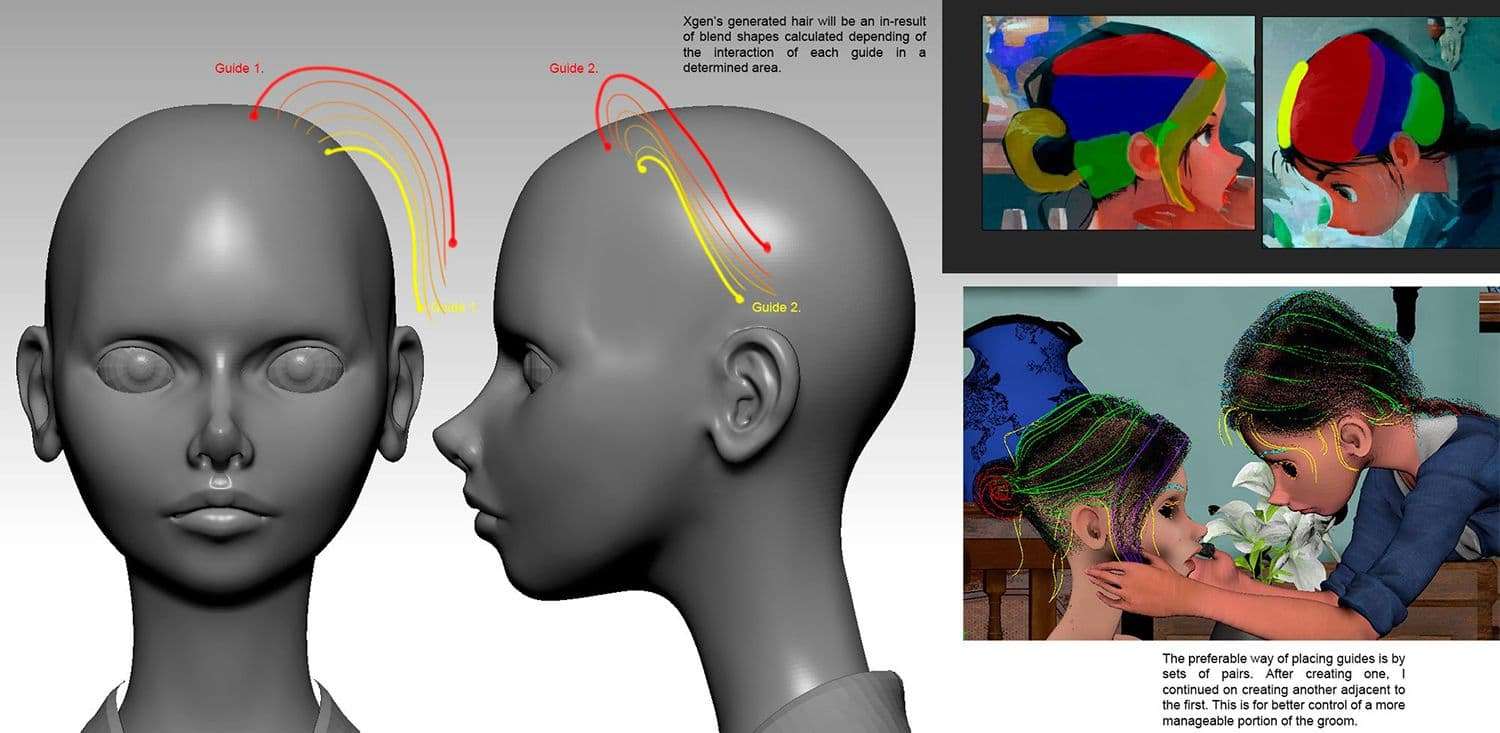
Note: this is a personal simplified attempt to explain the behavior of guides. Representing how they work when generating hair.
The scene is divided with two sets of collections with multiple descriptions:
While working enough with Xgen, you will soon become accustomed with the process. For that reason, I will not elaborate on the entire hair, except on two of the most complicated sets of descriptions. The Hair bun and the Braid. Both are a must-have features, and quite hard to control and recreate as guides. So, the manual process is not an option, if saving time is a factor. And even if it's attempted manually, there will always be that noticeable uneven form caused by this alternative.
For that, there's a handy trick to create guides out of curves and curves out of geometry.
The first assumption of a new user by looking at a long coiled guide could be "That seems complicated". It isn't, and I'll do my best to walk you through the process of making it.
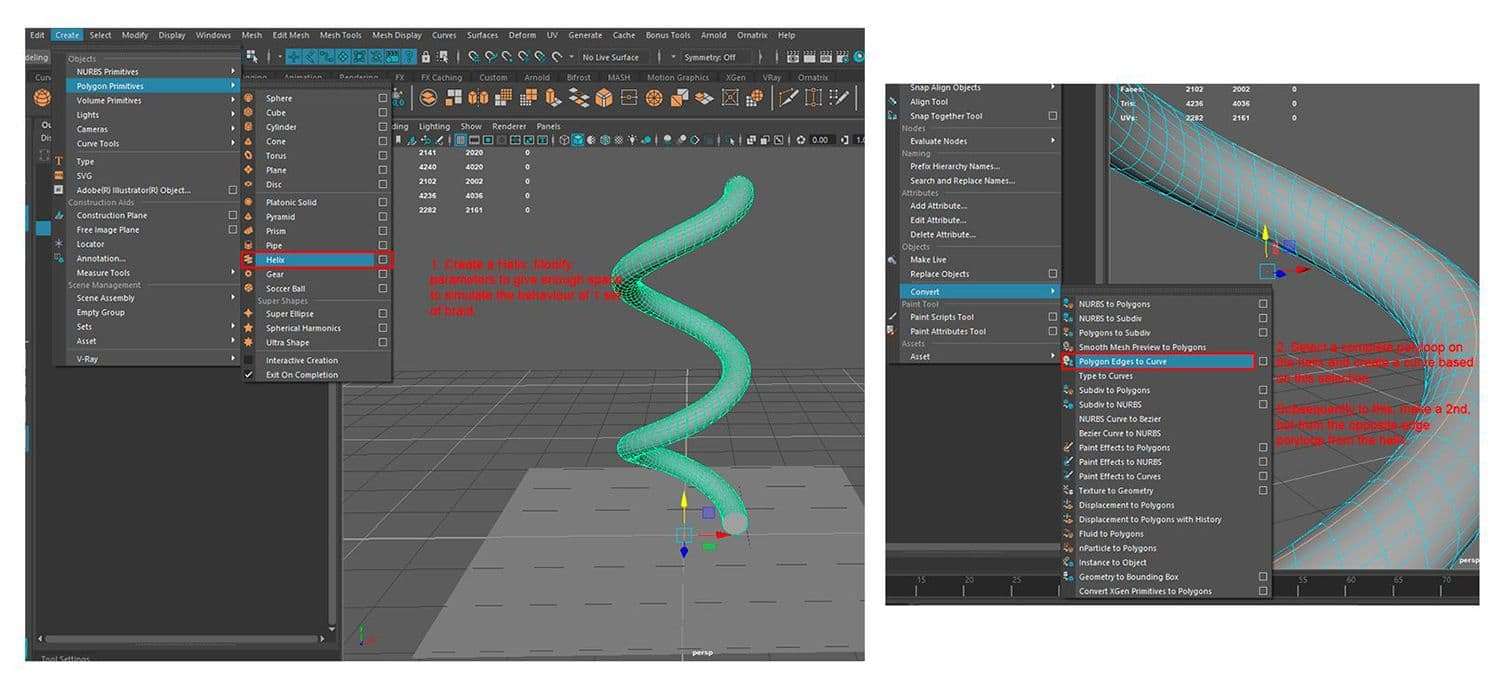
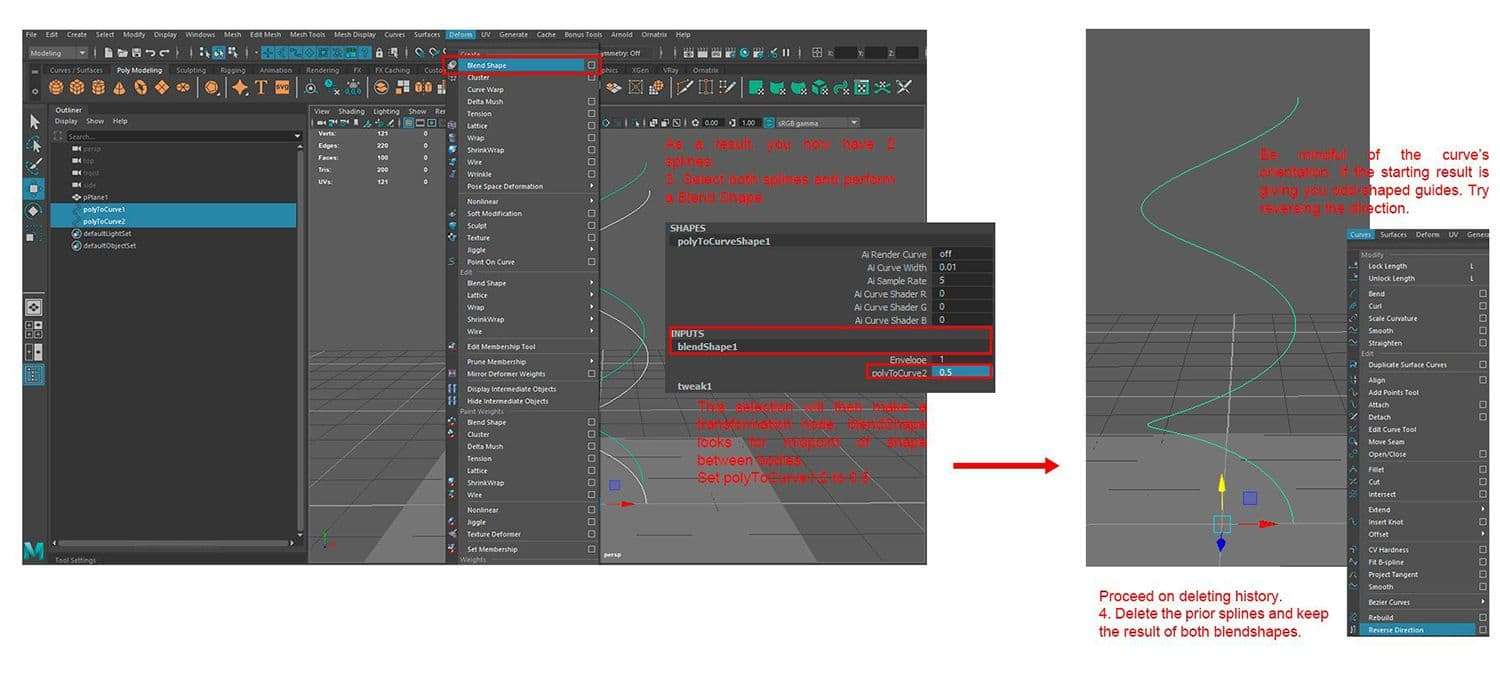
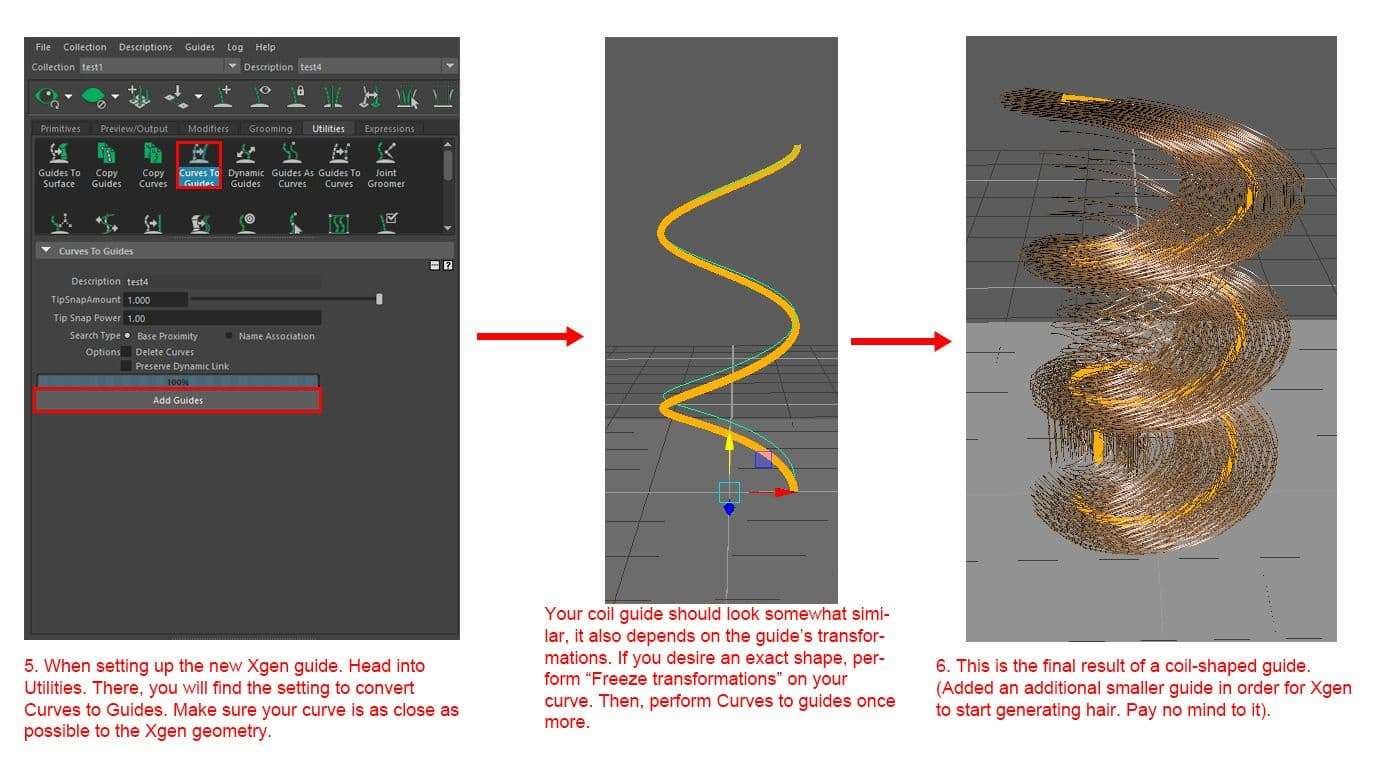
As presented in the image samples, the rundown to make a guide coil summarizes to this:
The process was the same to create both braid and hairbun. The only difference being — the size of the coil was more compressed when making the bun.
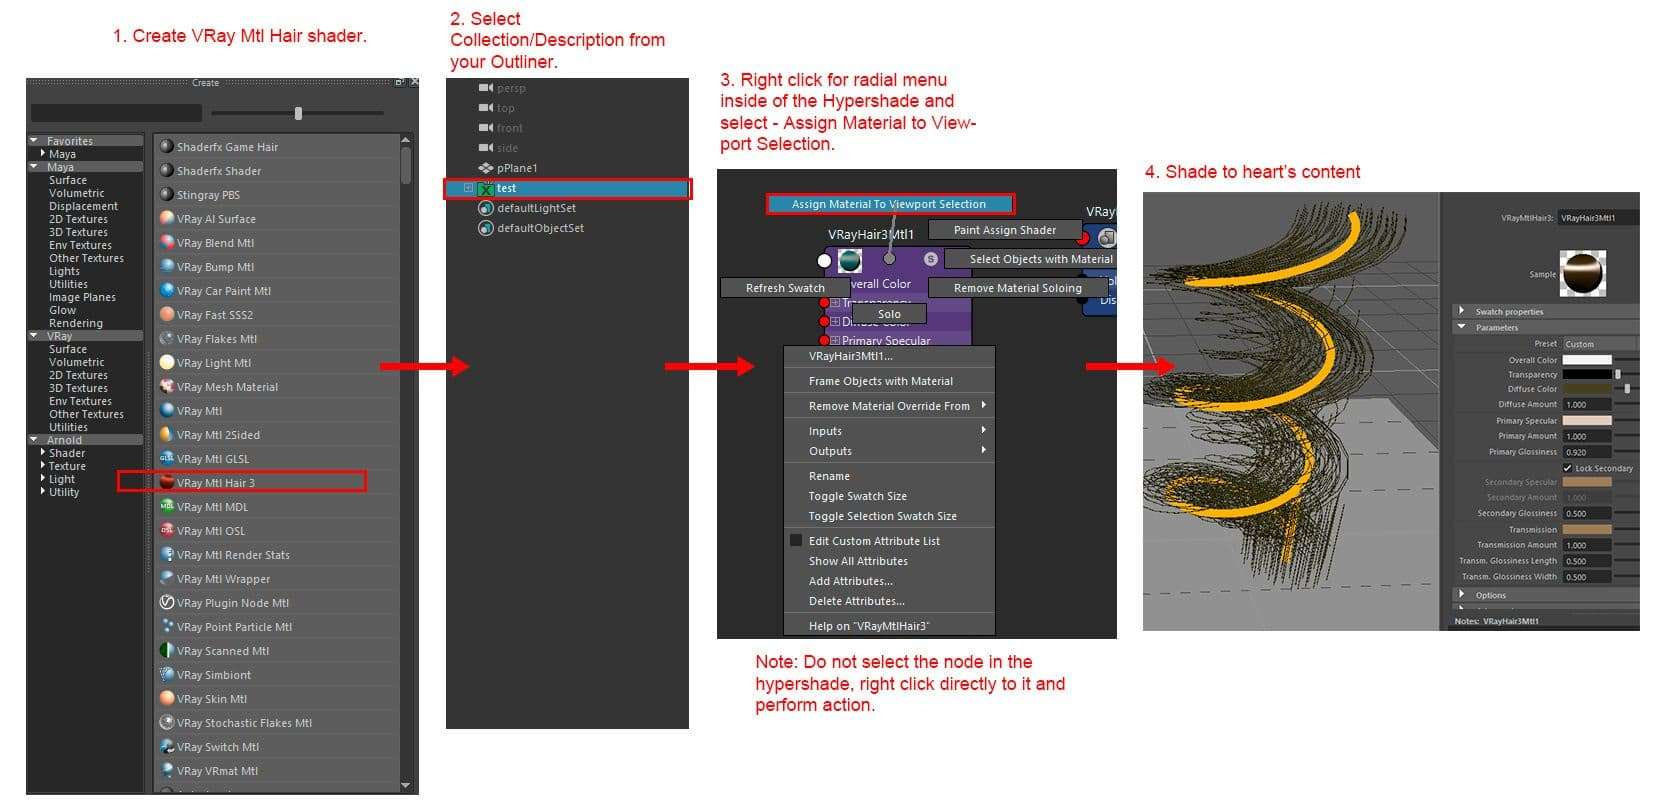
After having your entire groom finished. It's time to shade it in VRay and it's as simple as a couple of clicks away inside of Maya's Hypershade and Outliner.
For a lot more thorough information on Xgen, I recommend Jesus Fernandez' website. It's an invaluable resource for explaining every bit of Xgen and more, to their core.
With this, it ends the breakdown on some of the notable features in this project. As stated before — characters are quintessential to a story. Not to say an environment is uncapable of storytelling, that's not the case. Not by a long shot. But, having both in synergy, detailing both environment and characters with care and thoroughness. You will get a result that will entice not only yourself, but the audience as well. It matters not if the output is for videogames, or for films.
And, as final words to close this breakdown. I would like to encourage young artists to give it a shot at joining this industry. Take a gamble if this field is what you're striving for. Never let fear of failing hold you back. However, it never gets easier, and it shouldn't. Being too comfortable causes stagnation.
Avoid the feeling of conformity like the plague. Because as CG artists, technology is evolving fast and constantly, and so should we. Never forget that good foundations, lead to good results.
New tools will surface every year. But, foundational skills are ageless.
I would like to thank Think Tank Training Centre and Rusty Currier. For they have given me the knowledge to improve myself as a CG artist. And allowed me to meet awesome talent and the best kind of people I can call colleagues and friends.
Thank you for reading, and best of luck! Show everyone what you got! If there's anything you're particularly curious on knowing from this project. Don't hesitate to get in touch in any of these platforms.