Creating Immersive Game Worlds with Unreal Engine
Tarek Abdellatif, a 3D Game Environment / Prop Artist working remotely at Upsurge Studios in Australia, shares his process for creating an interior 3D environment using Unreal Engine.
Tarek Abdellatif, a 3D Game Environment / Prop Artist working remotely at Upsurge Studios in Australia, shares his process for creating an interior 3D environment using Unreal Engine.

Tarek Abdellatif is a 3D Game Environment / Prop Artist, working remotely at Upsurge Studios in Australia, and living in Cairo, Egypt. Tarek impressed us with his Immersive Alligator Farm Environment and we asked him to share his process for creating an interior 3D environment using Unreal Engine.
In my previous career I worked in commercials creating 3D assets and environments. However, I always wanted to work in Game Industry, and wanted to improve my skills in 3D for Games. As a result, I started studying online at Think Tank Training Centre.
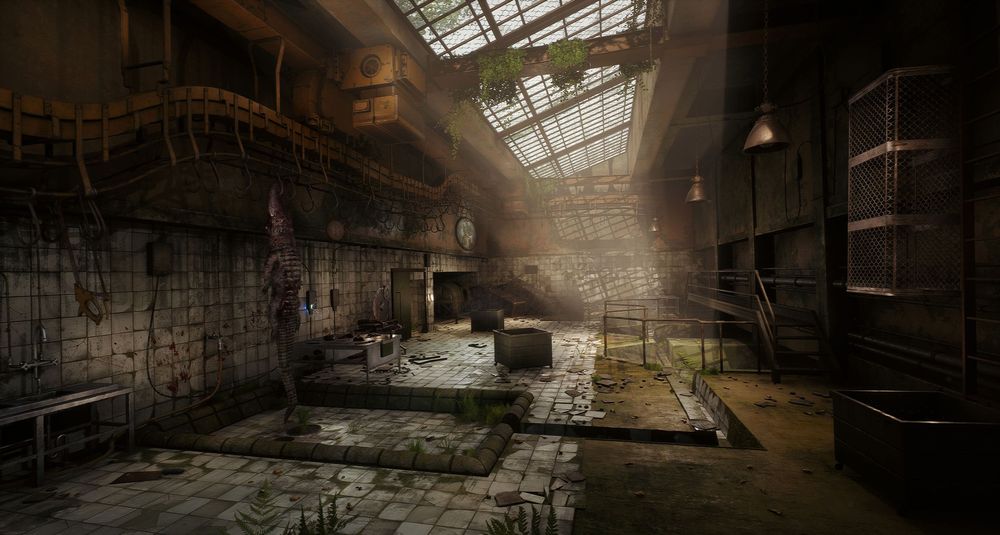
In this article I’m going to show you some of the process of creating an interior Environment based on a concept by Christoffer Lovéus from the Game Wolfenstein II: The New Colossus by Machine Games.

The project was done for my online Mentorship term graduation project at Think Tank training centre under the supervision of my very talented mentor Sergei Panin.
The idea to recreate this concept started when I used to play the game Wolfenstein II: The New Colossus. There were secret concept artworks that you could collect as a bonus in hidden places, and one piece in particular was located in New Orleans, Louisiana, in USA where it's known with Alligators. I liked the idea of creating a very old abandoned place that looked like a slaughter house for creating products from Alligator skin.
I used Maya and ZBrush for Sculpting, modeling and unwrap. Photoshop and Substance Painter and Designer and Marmoset for baking, texturing and rendering. I then used Unreal Engine 4 for the Realtime game and Adobe Premiere for editing the Final video, presentation, breakdown videos.
Some other notes:
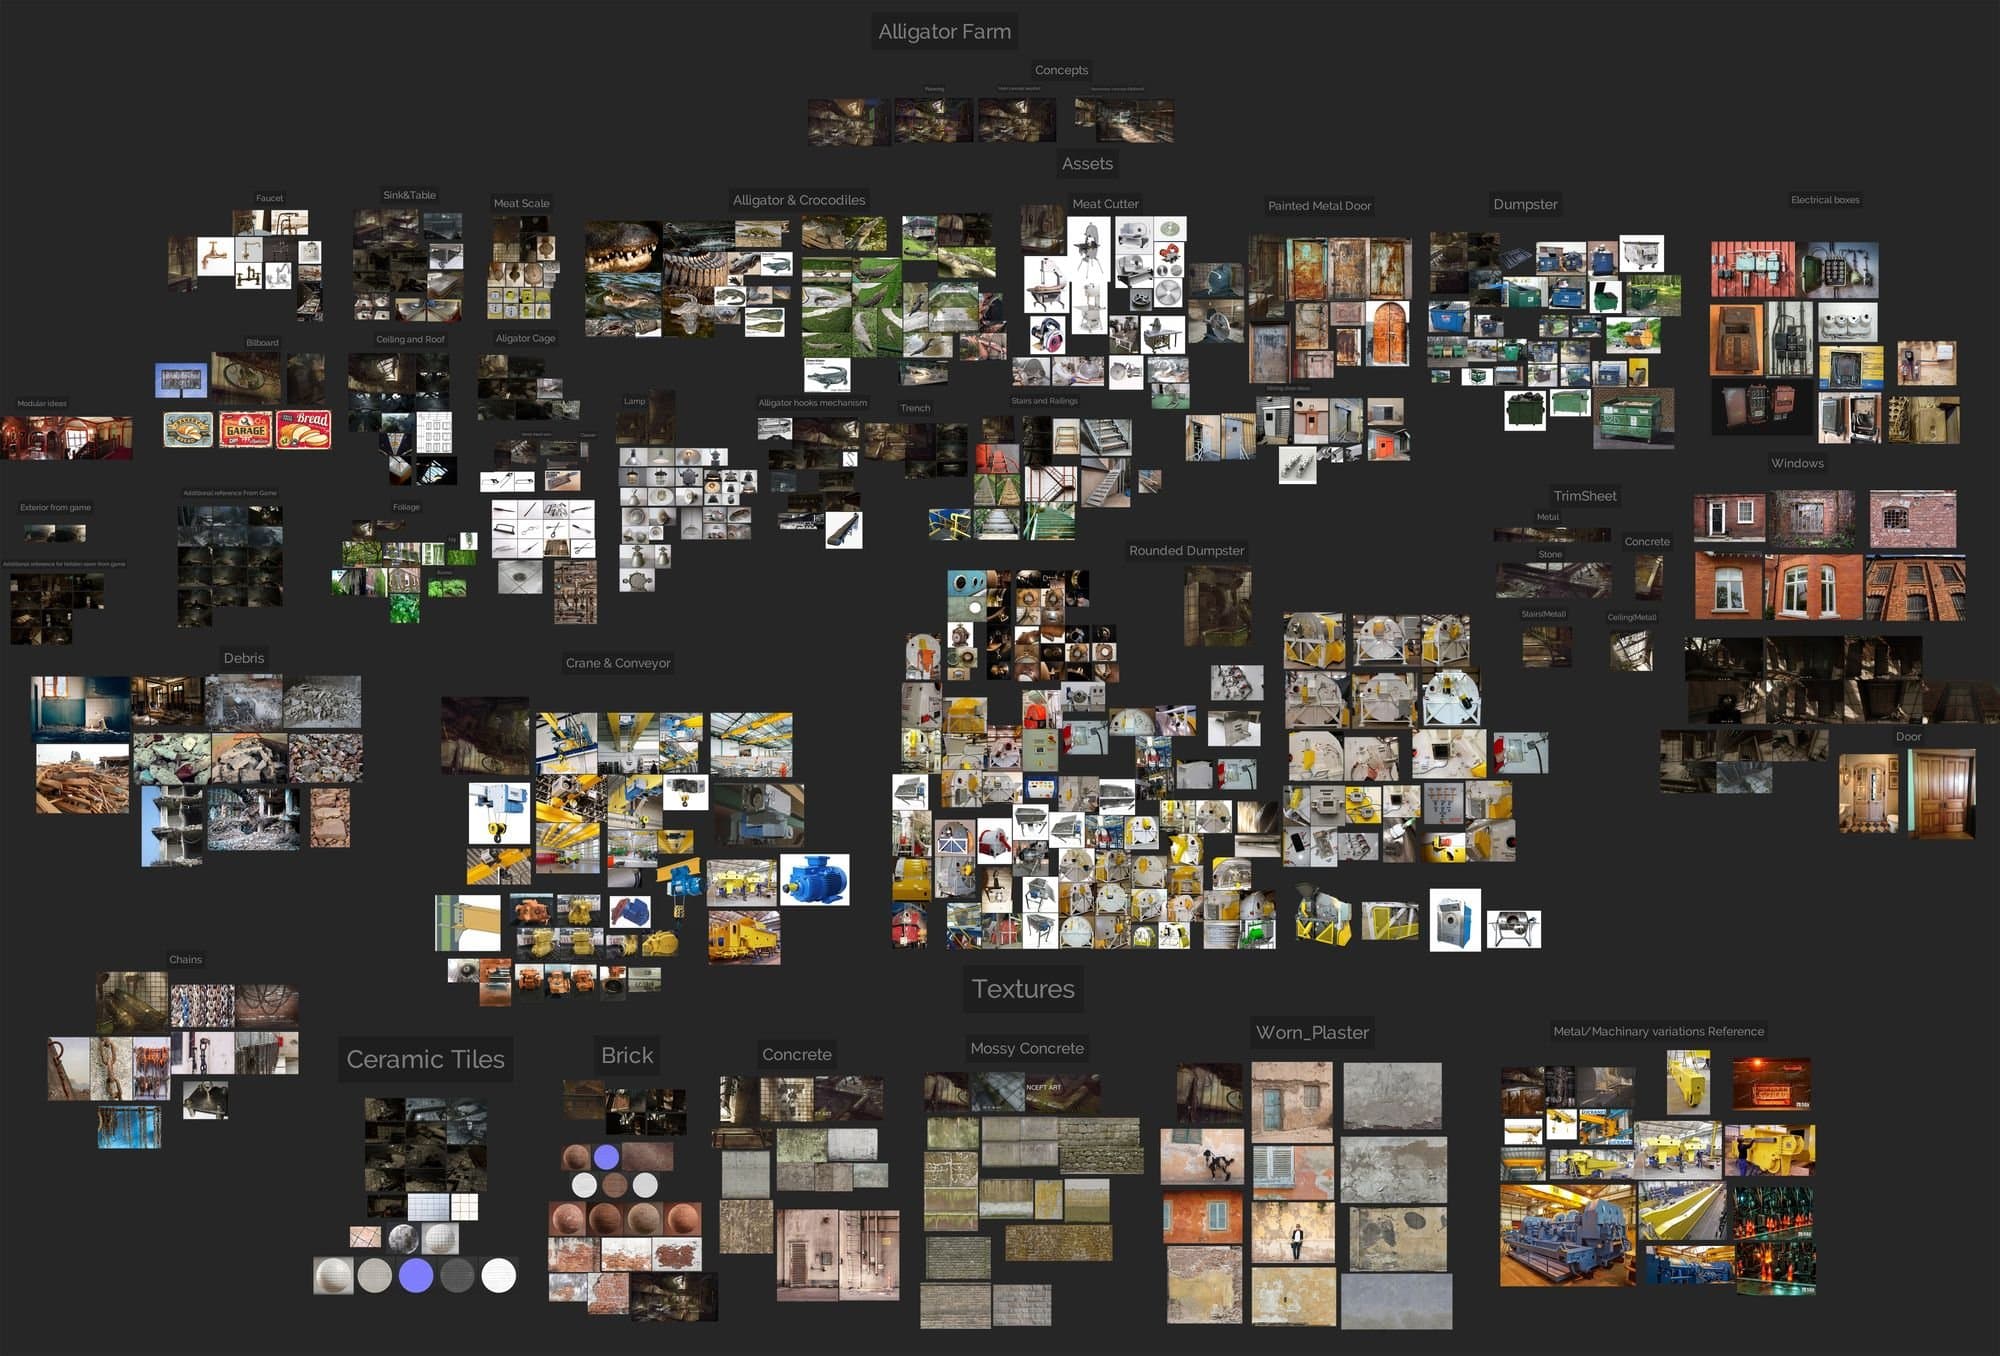
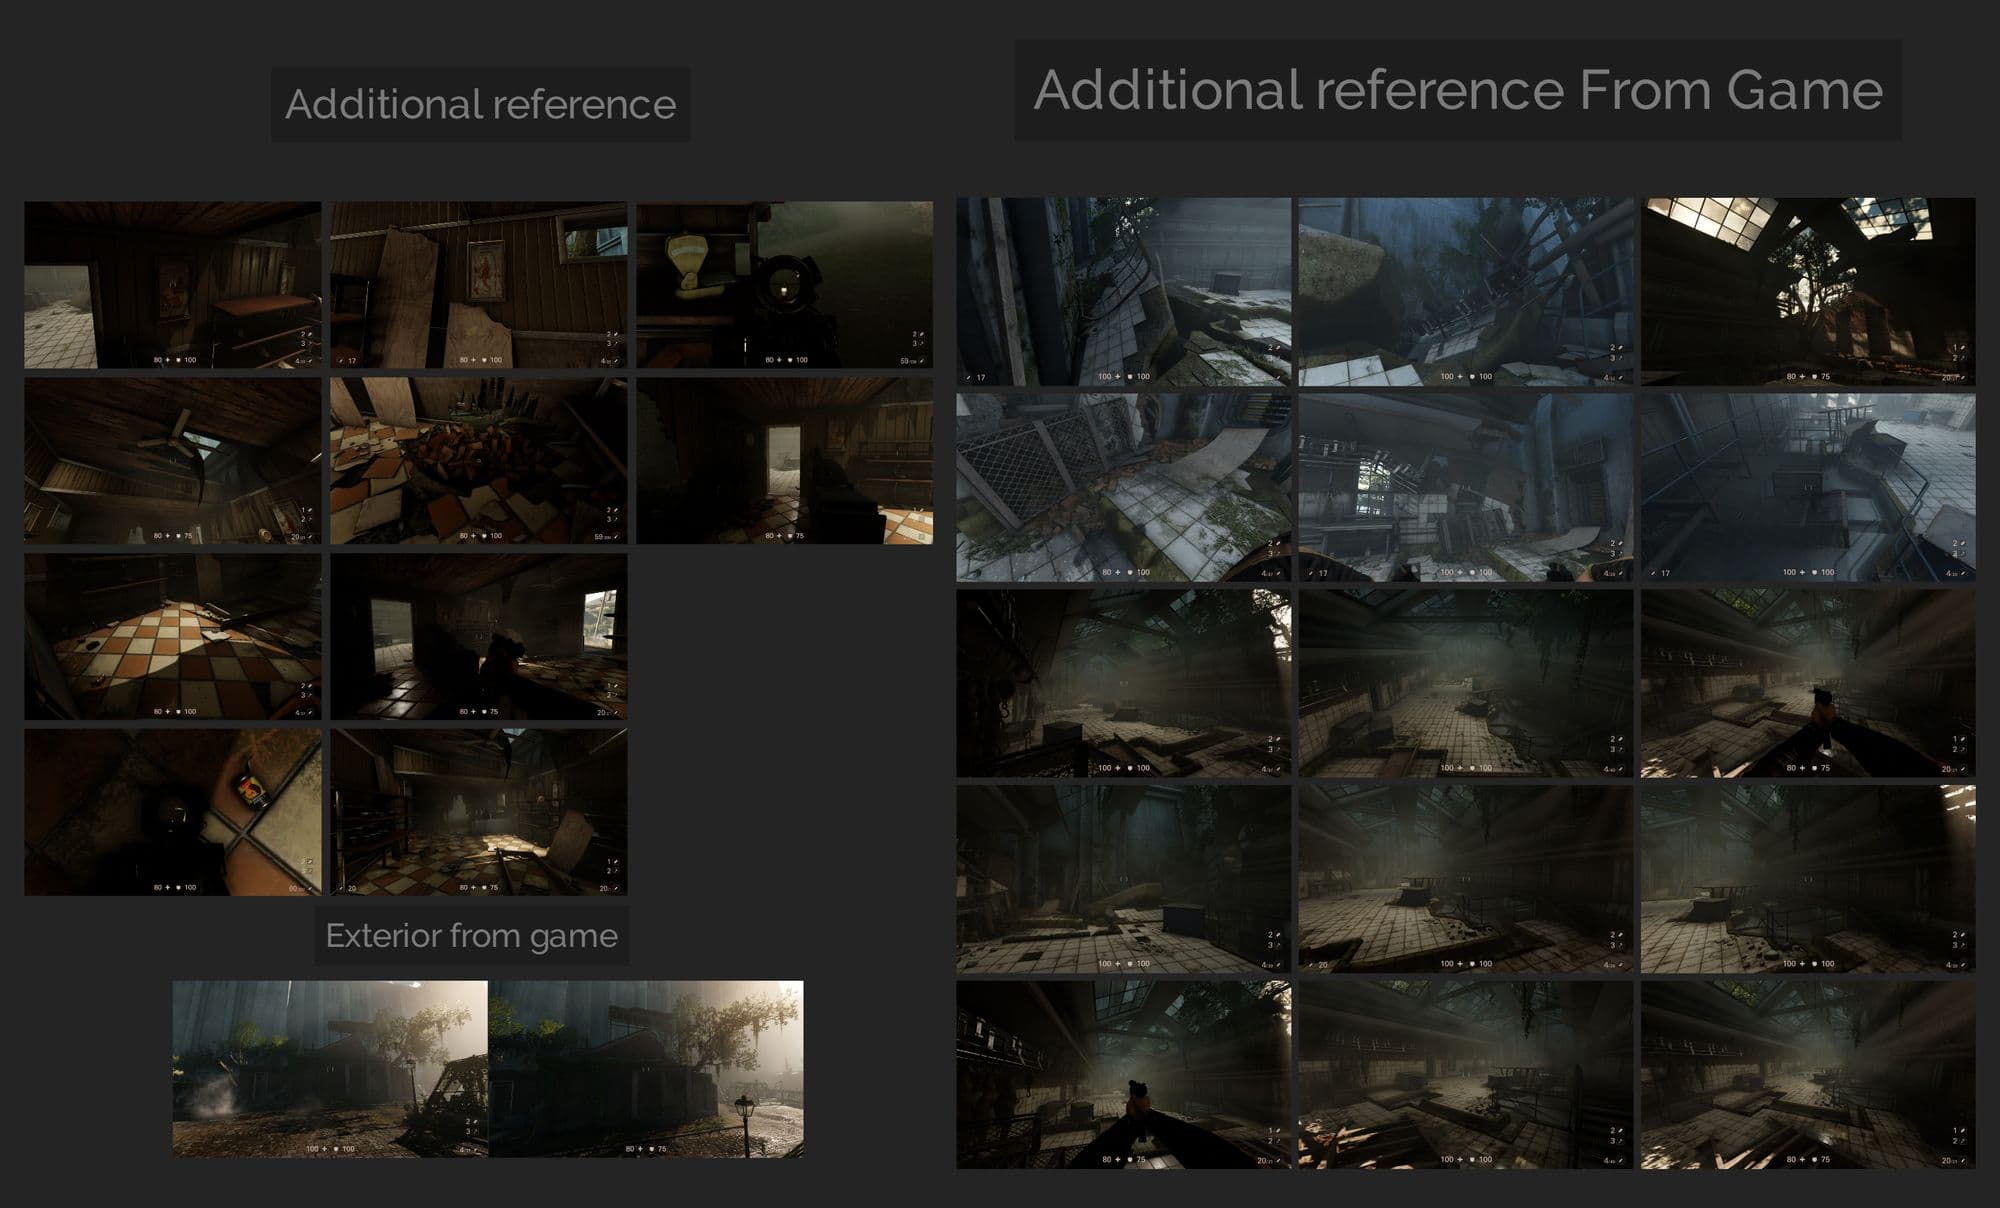
First of all I wanted to understand the elements in the concept so I started by gathering reference images and dragged them into PureRef software. The reference grew each time I progressed more, I even played the same level in the actual game again and took some snapshots - the level design of the game looked different than the concept art, but it helped me to understand the measurements and proportions.
I started first by planning what I should do by drawing quick lines and some proximity measurements, and decided what should be modular, or unique, which textures are tileable, unique or maybe both, and which assets should be hero or not.
I came up with this initial planning document:
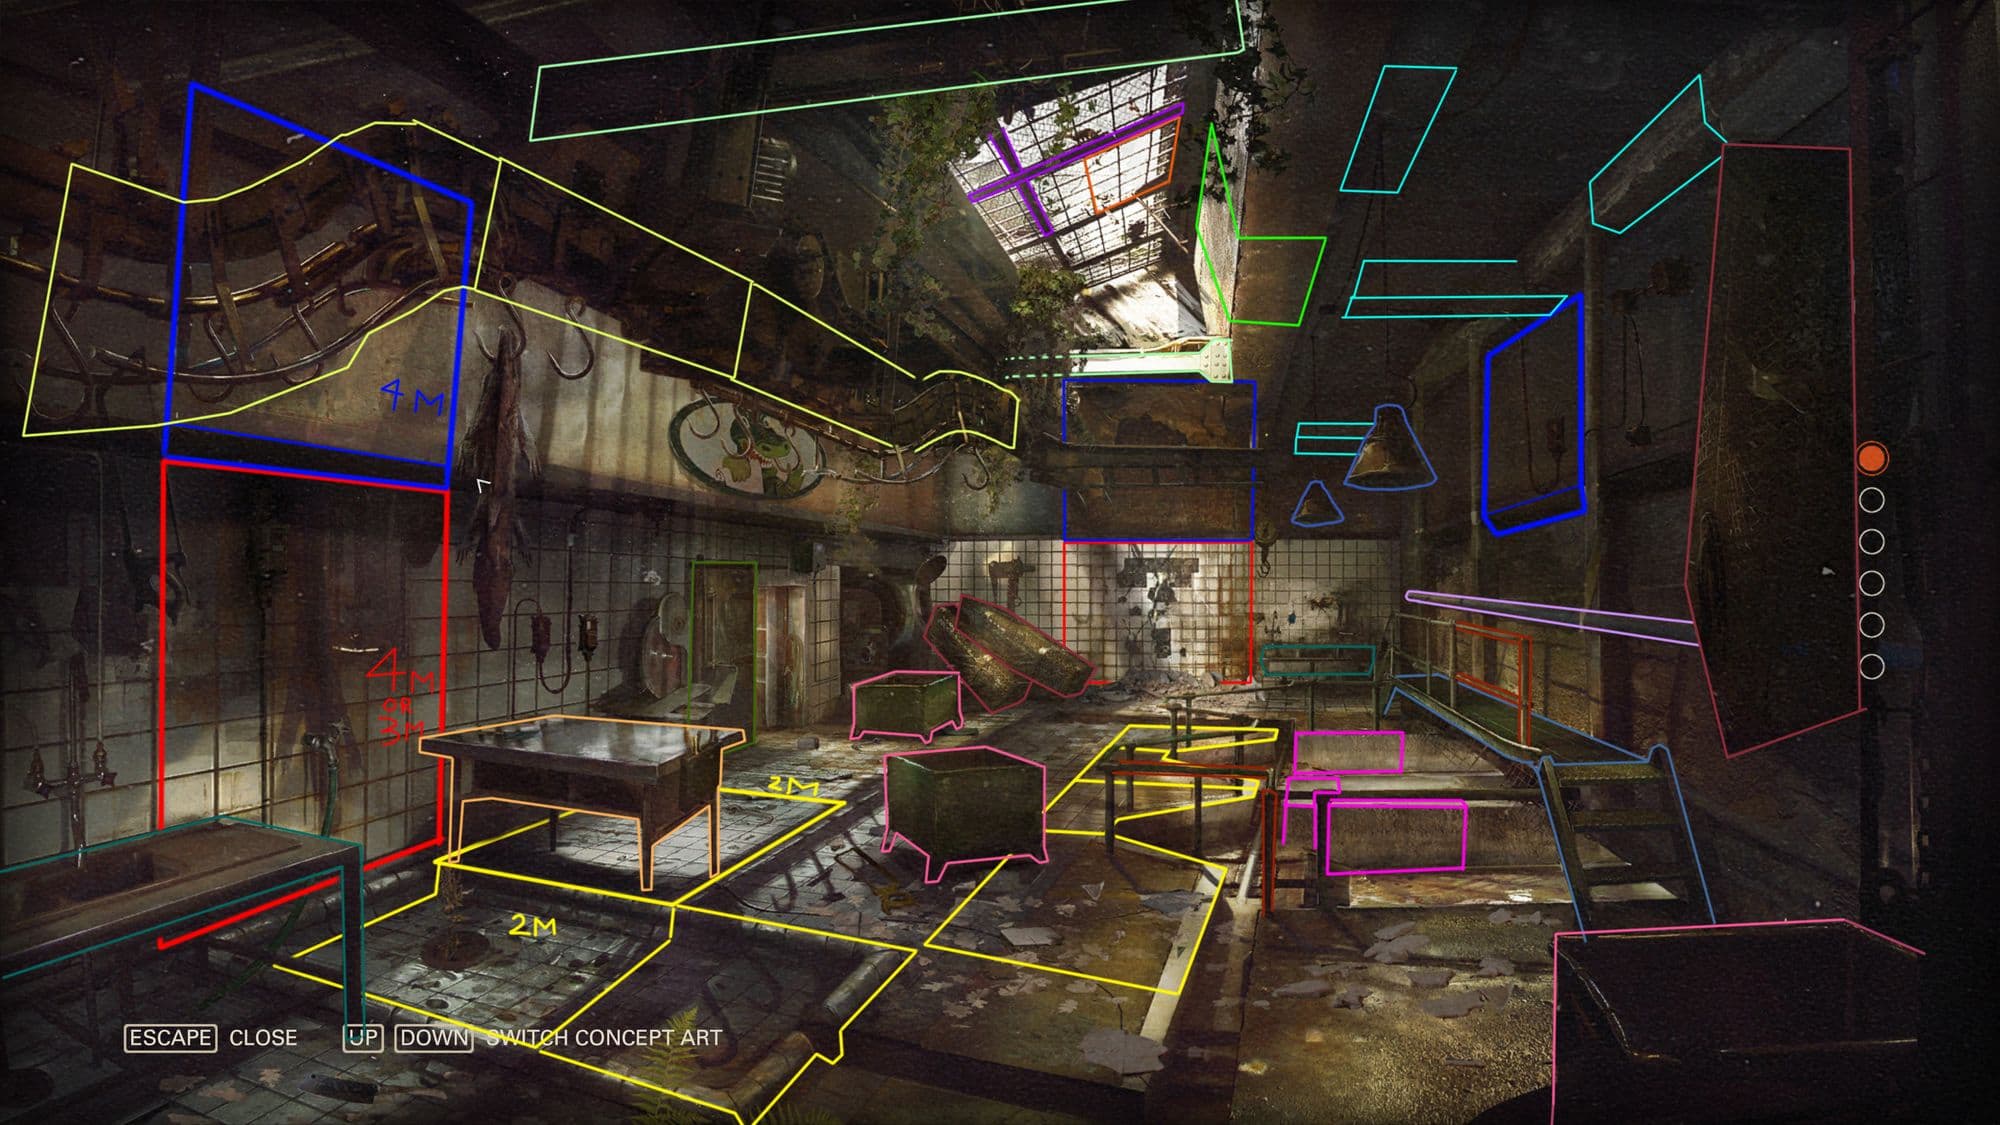
Some elements changed each time I progressed more, but most of the level creation was based on this plan.
Screenshots from the actual game Wolfenstein II: The New Colossus:
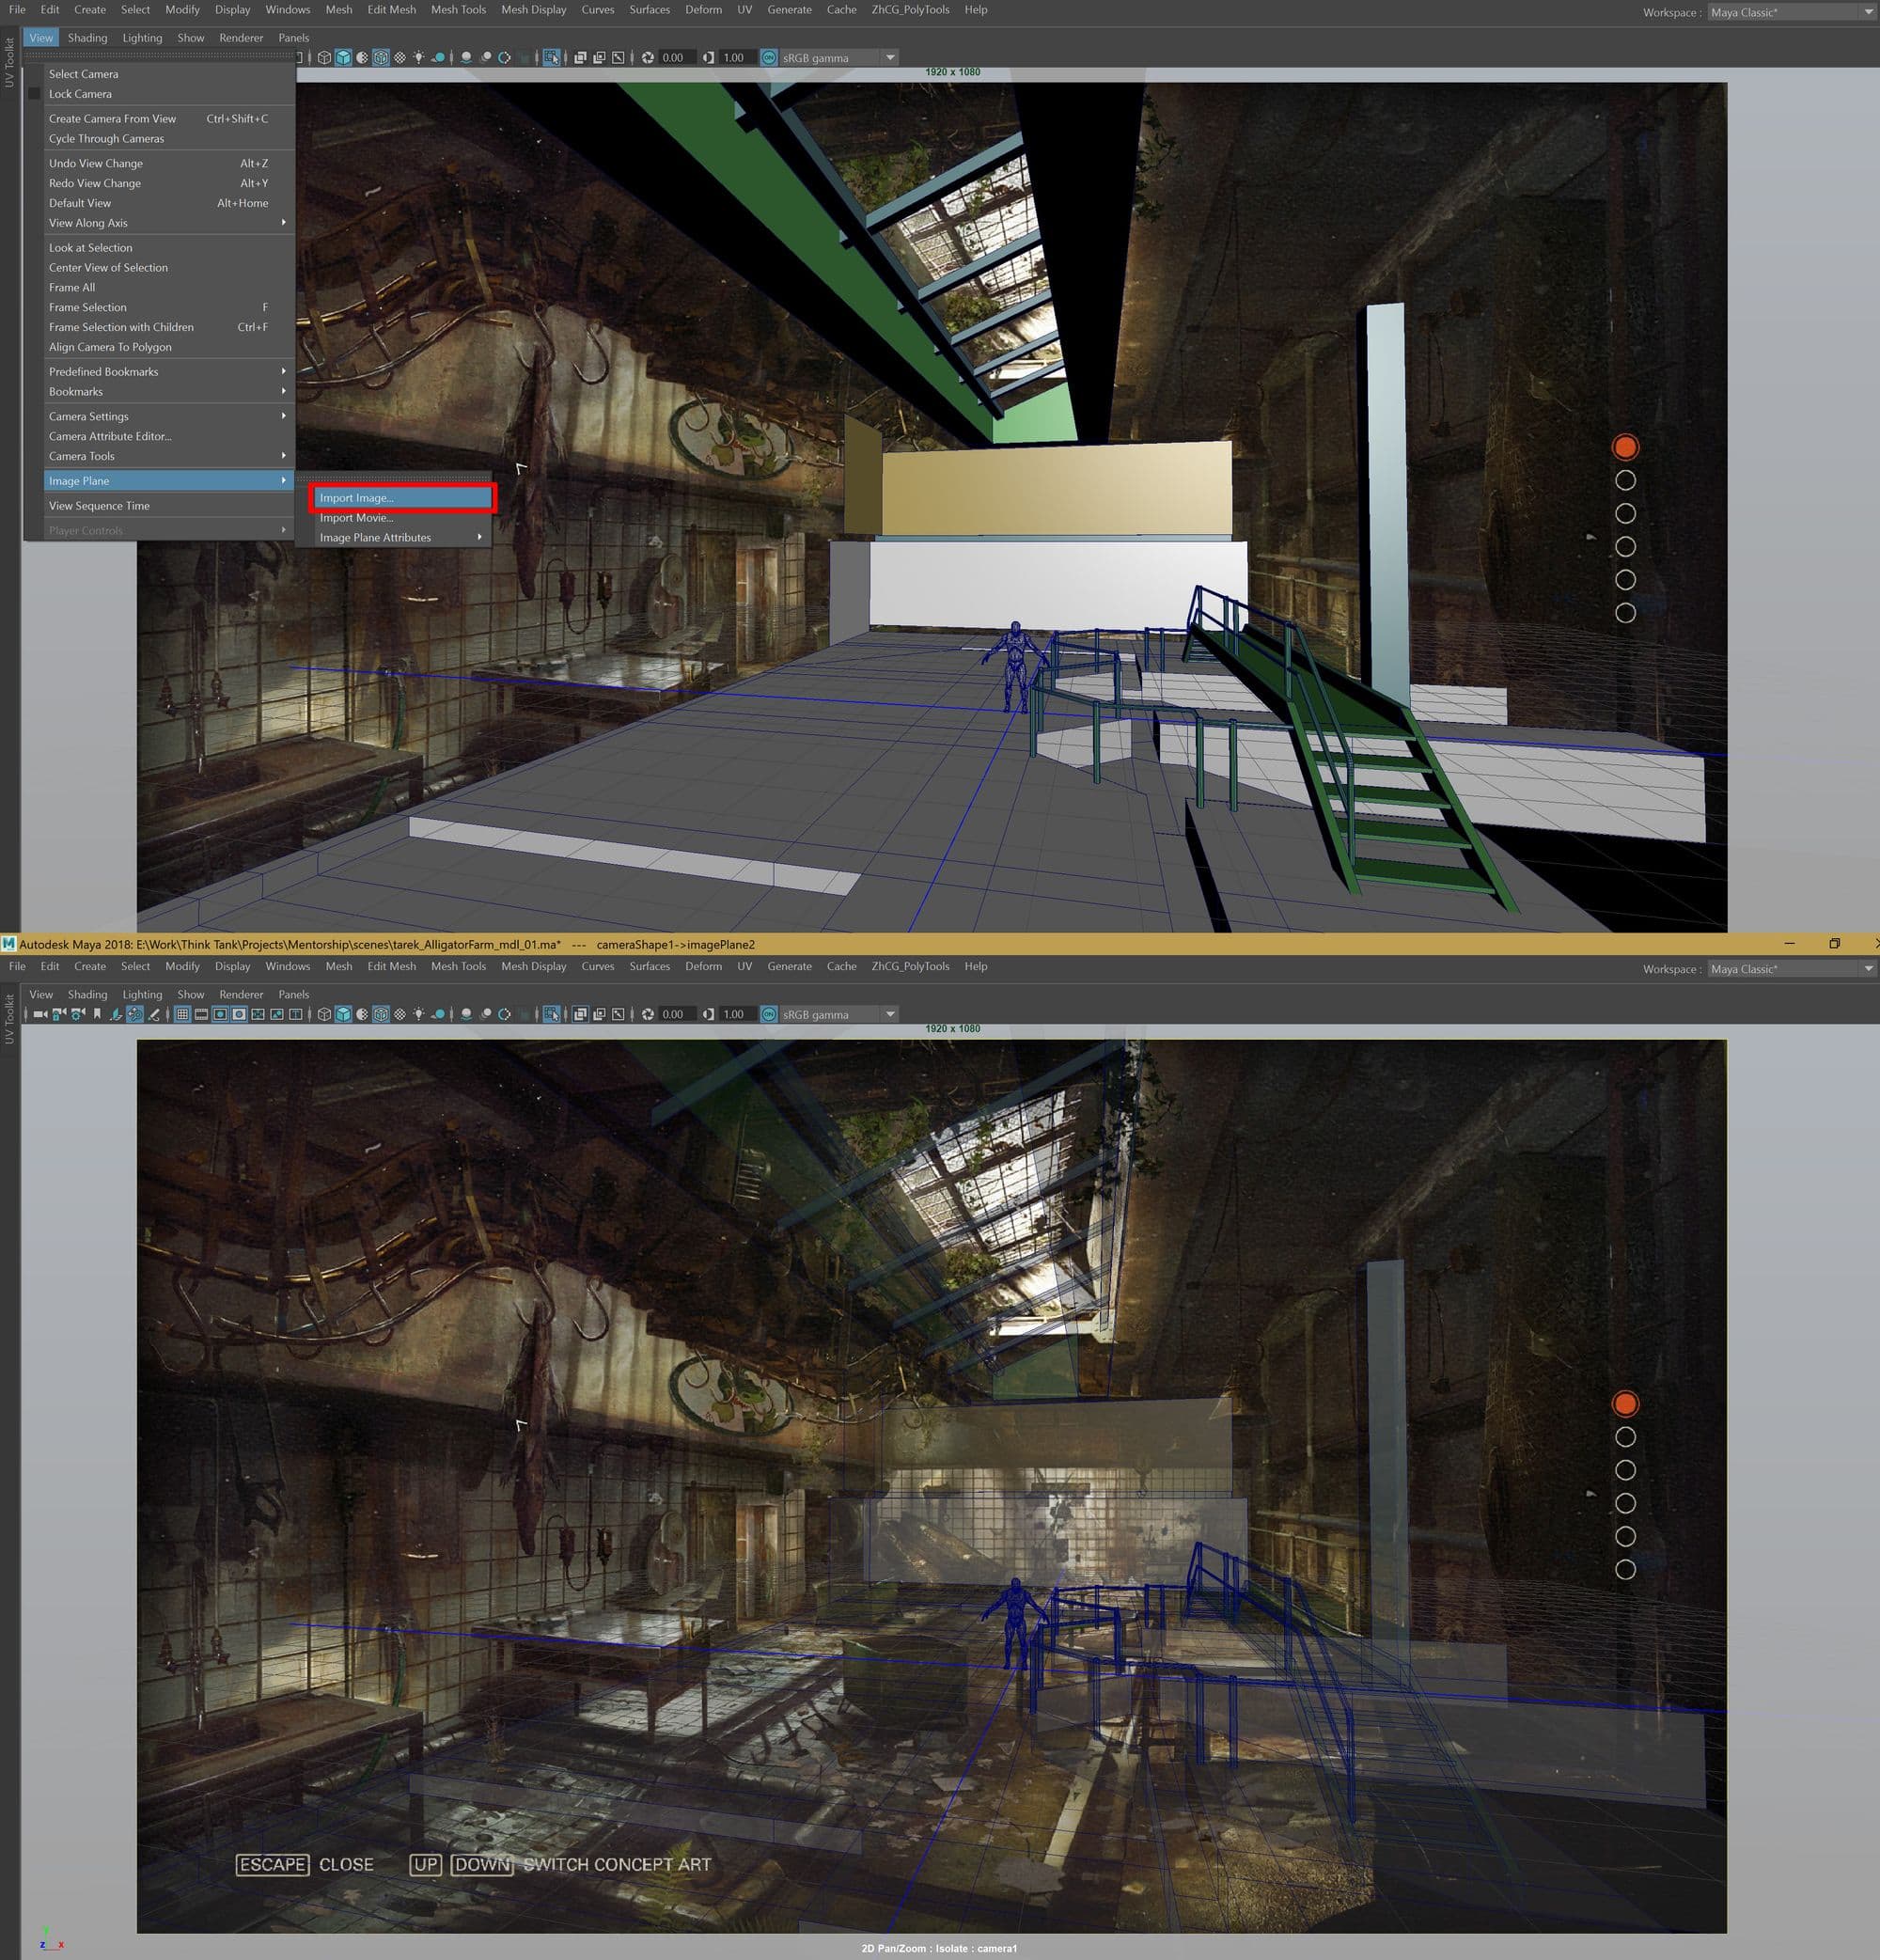
Before moving to Unreal I started with blocking out some meshes. I used a nice trick in Maya by creating a camera, and linked it to the concept art image, then played with focal length until I found some close values to match the perspective of the concept. Even though the concept is not perfect for realistic measurements, it helped me to get started.
After that, I started blocking out some initial meshes without details.
For some parts I planned to create 3 or 4 meters planes, so it could be used as modular assets, for example, like the walls and some of the ceiling parts.
Some other parts I planned to be part of a modular kit like the crane and conveyor, which I will talk more in depth about this part.
I used Substance 3D to create the materials. Some of the materials were created from scratch by SD like the Ceramic material, and others tweaked from a substance source material like the concrete variations and brick. Other materials were done in Substance like the plaster, or even baked from high poly mesh to plane, to create a trim sheet.
I started by creating a ceramic material using Substance 3D Designer. I tweaked a material I created beforehand based on an exercise from my last intermediate term that was provided by a Think Tank instructor and material artist, Dan Dunford. The material is not so complicated, but I’ll talk about some of the main parts.
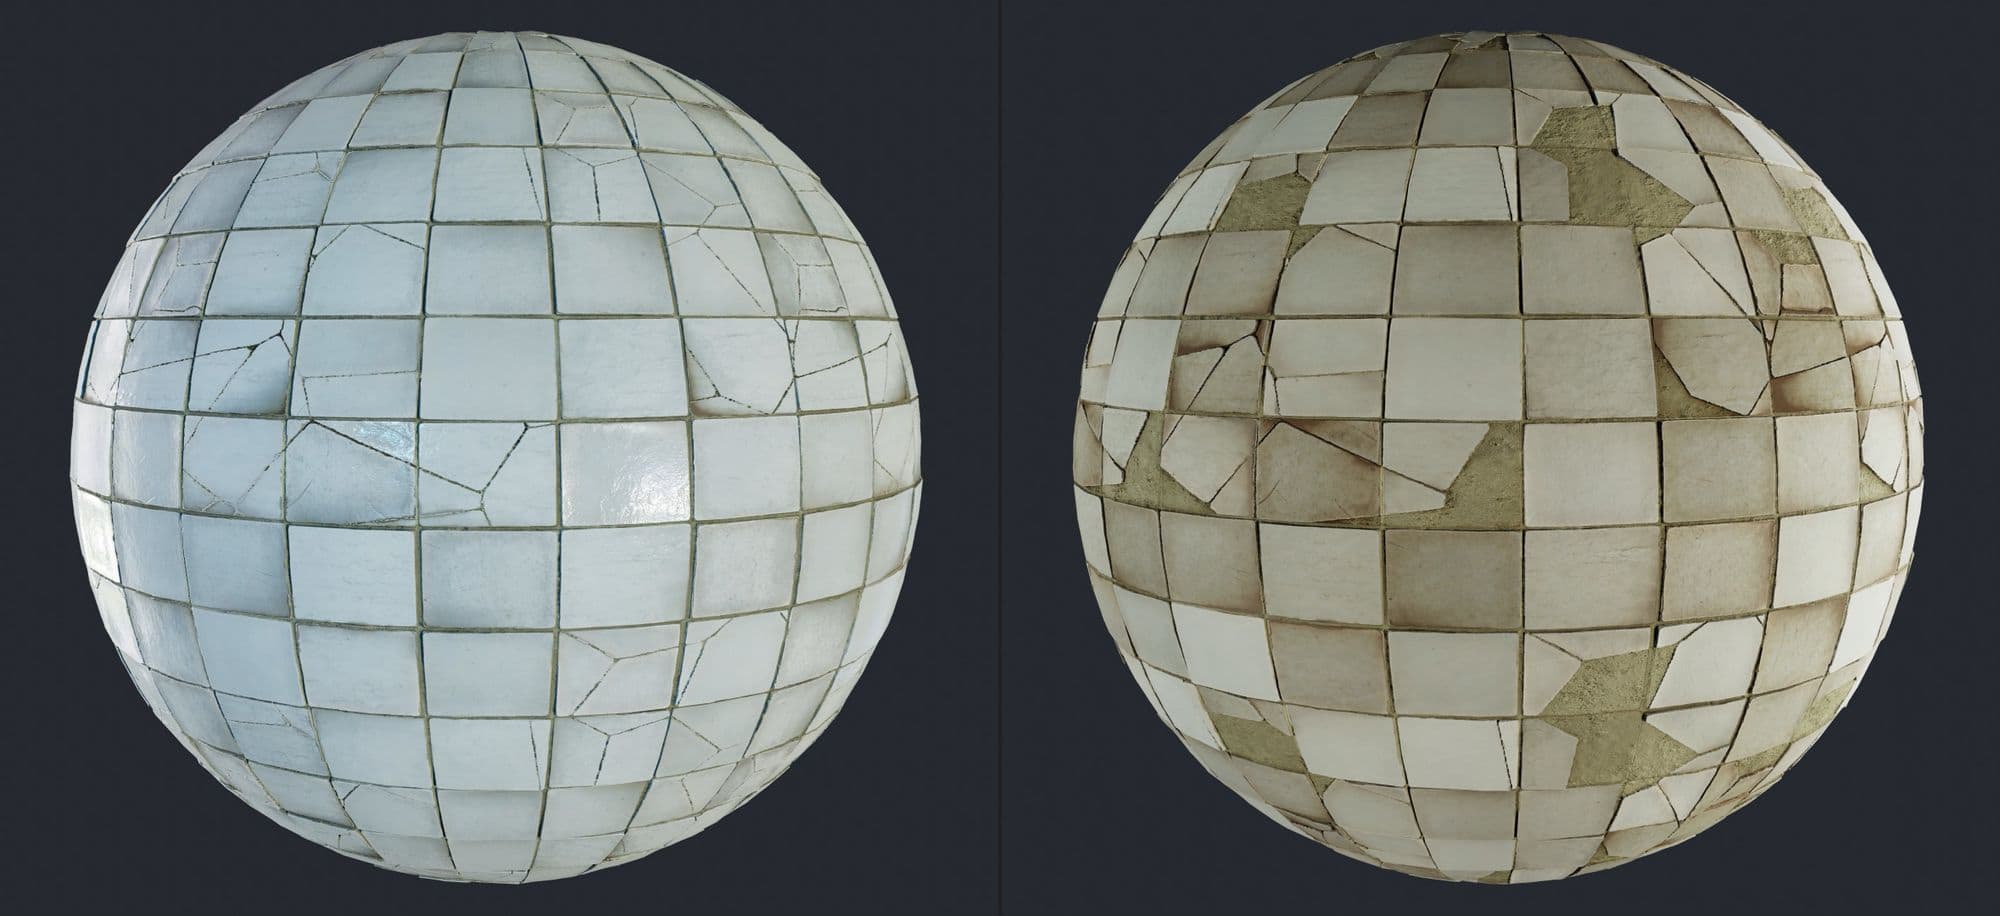
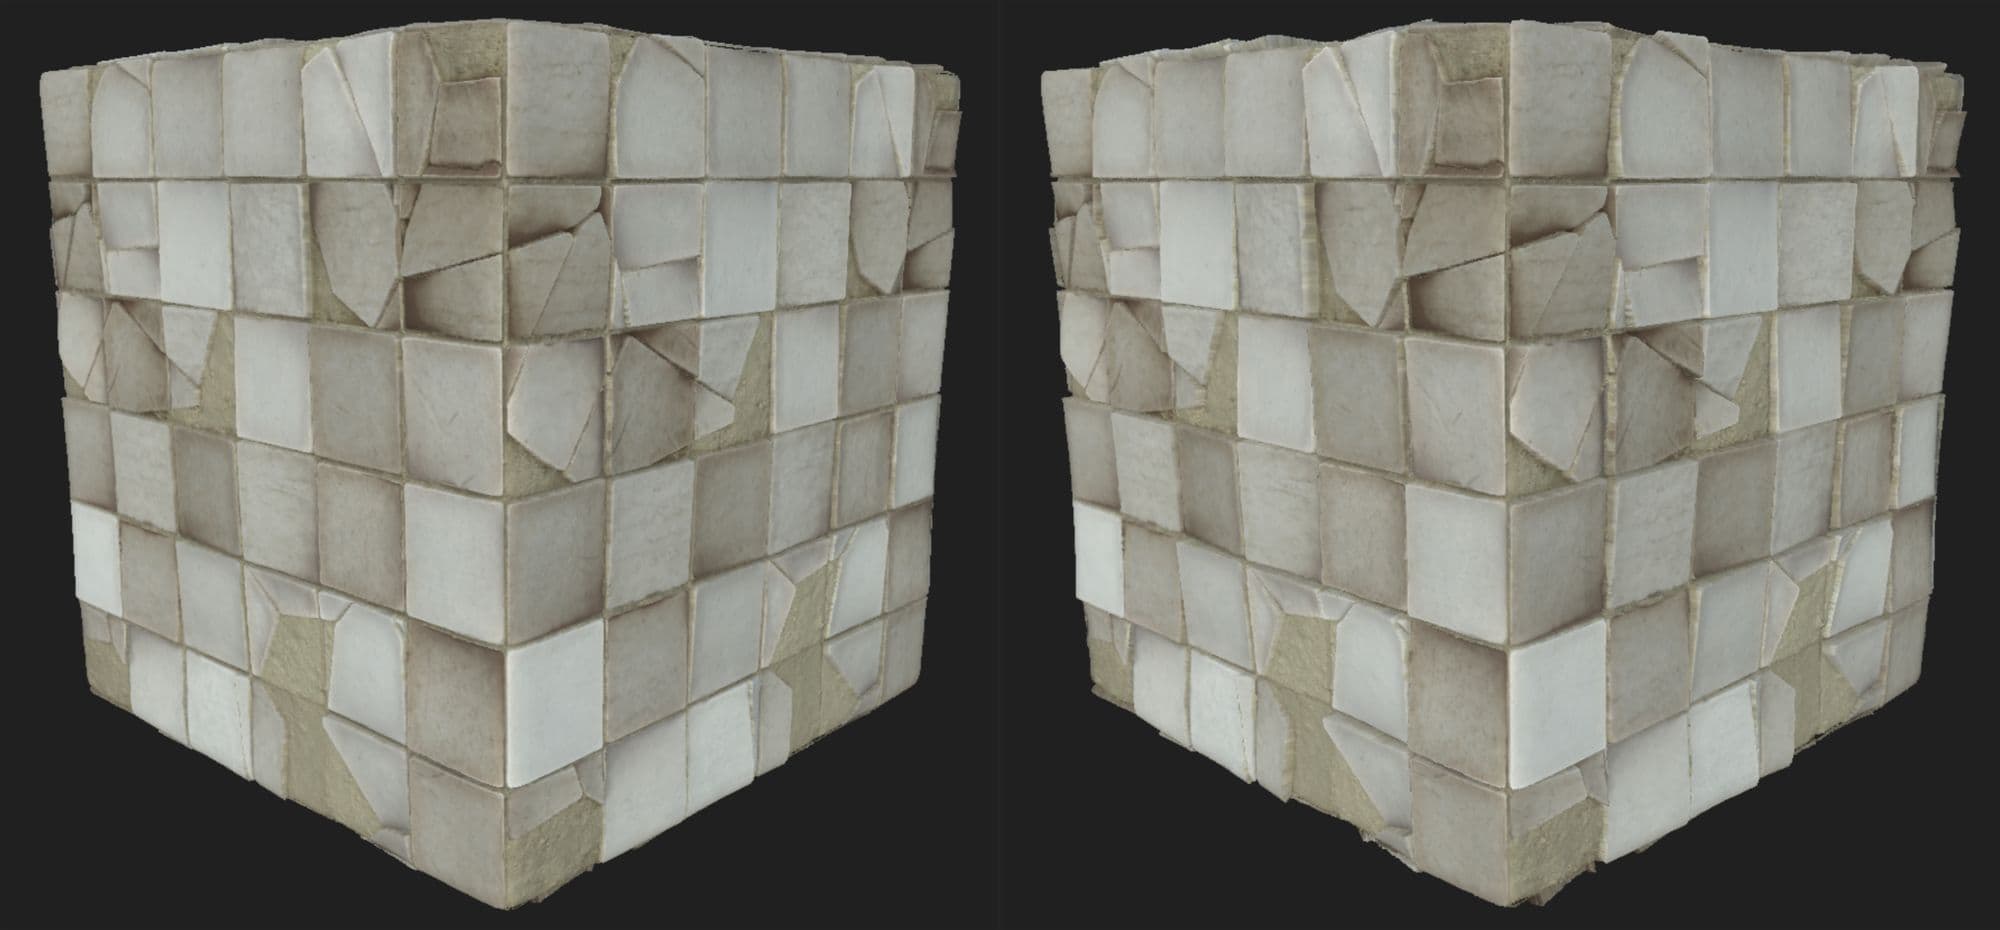
I created 2 Ceramic variations, so I could mix between them in Unreal vertex paint. One is cracked and clean, and the other is dirtier and rougher with more missing ceramic pieces and more concrete beneath the missing ceramic parts.
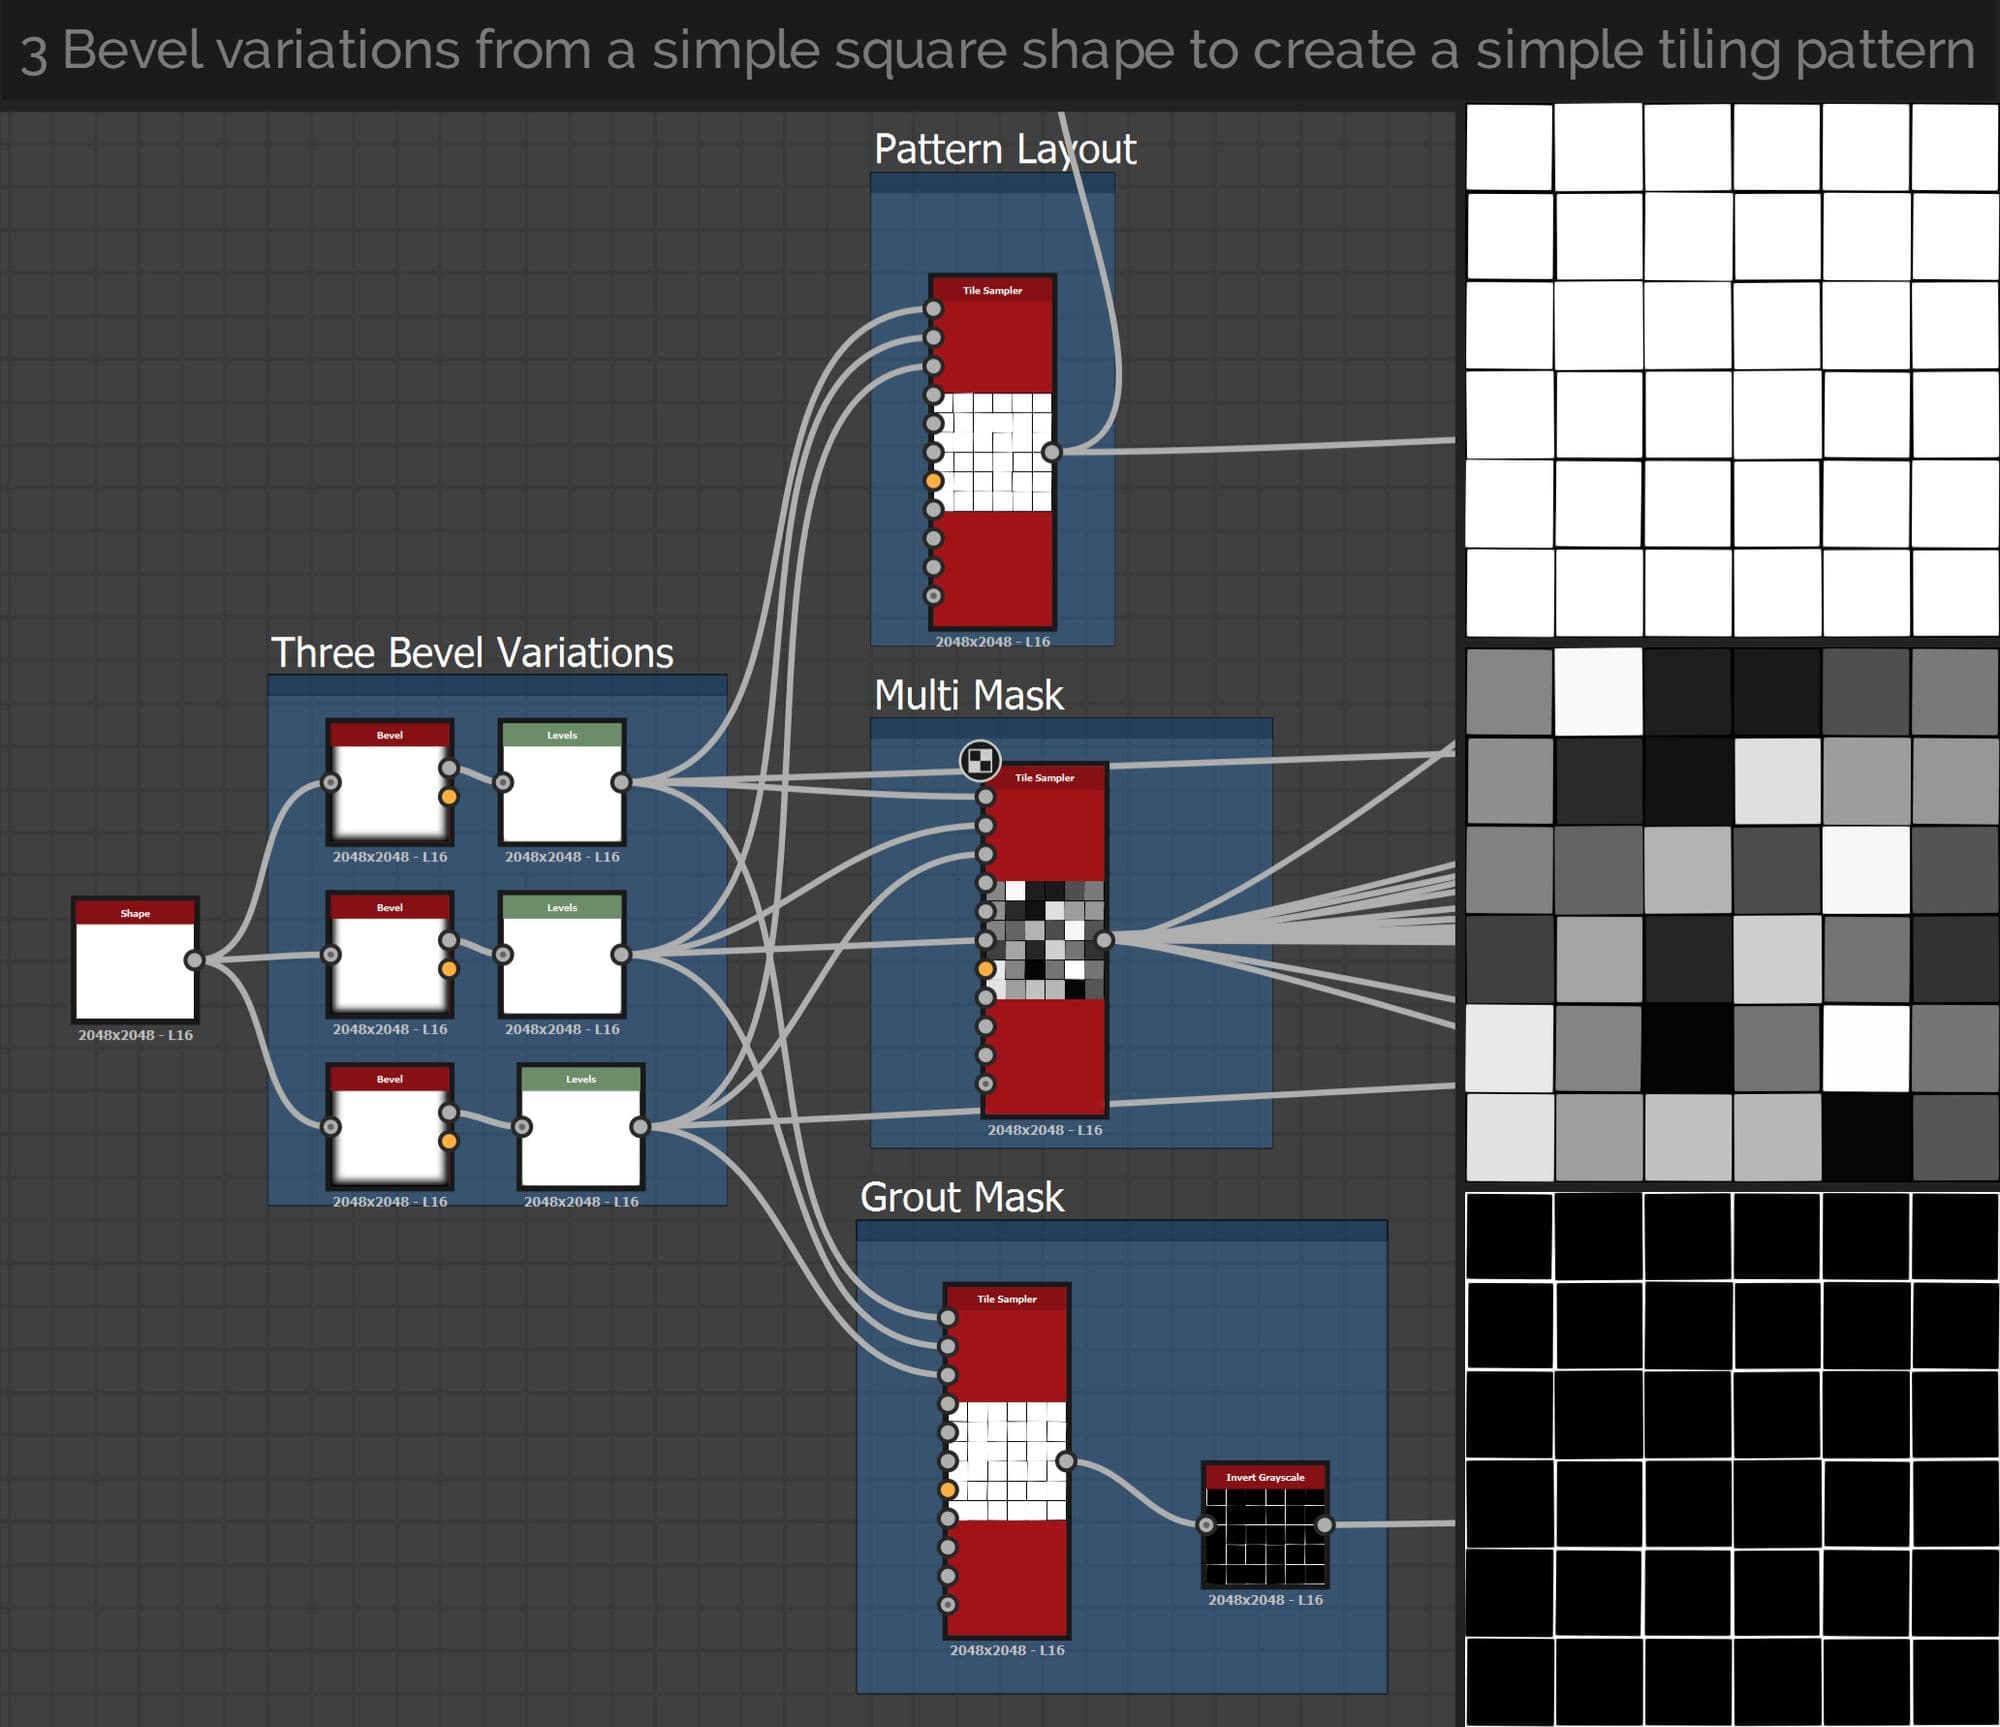
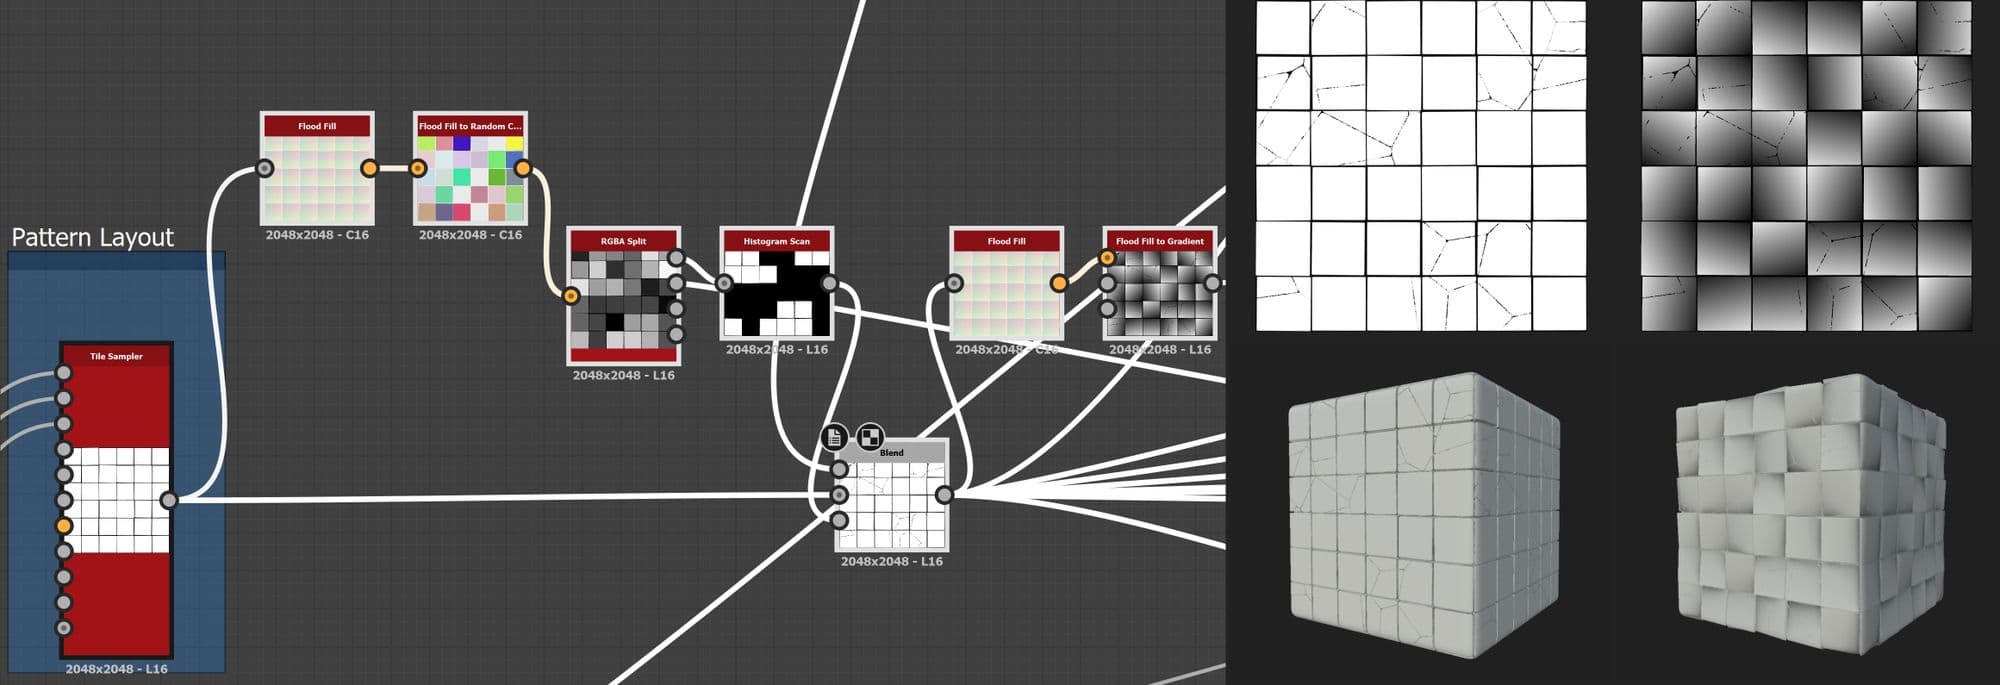
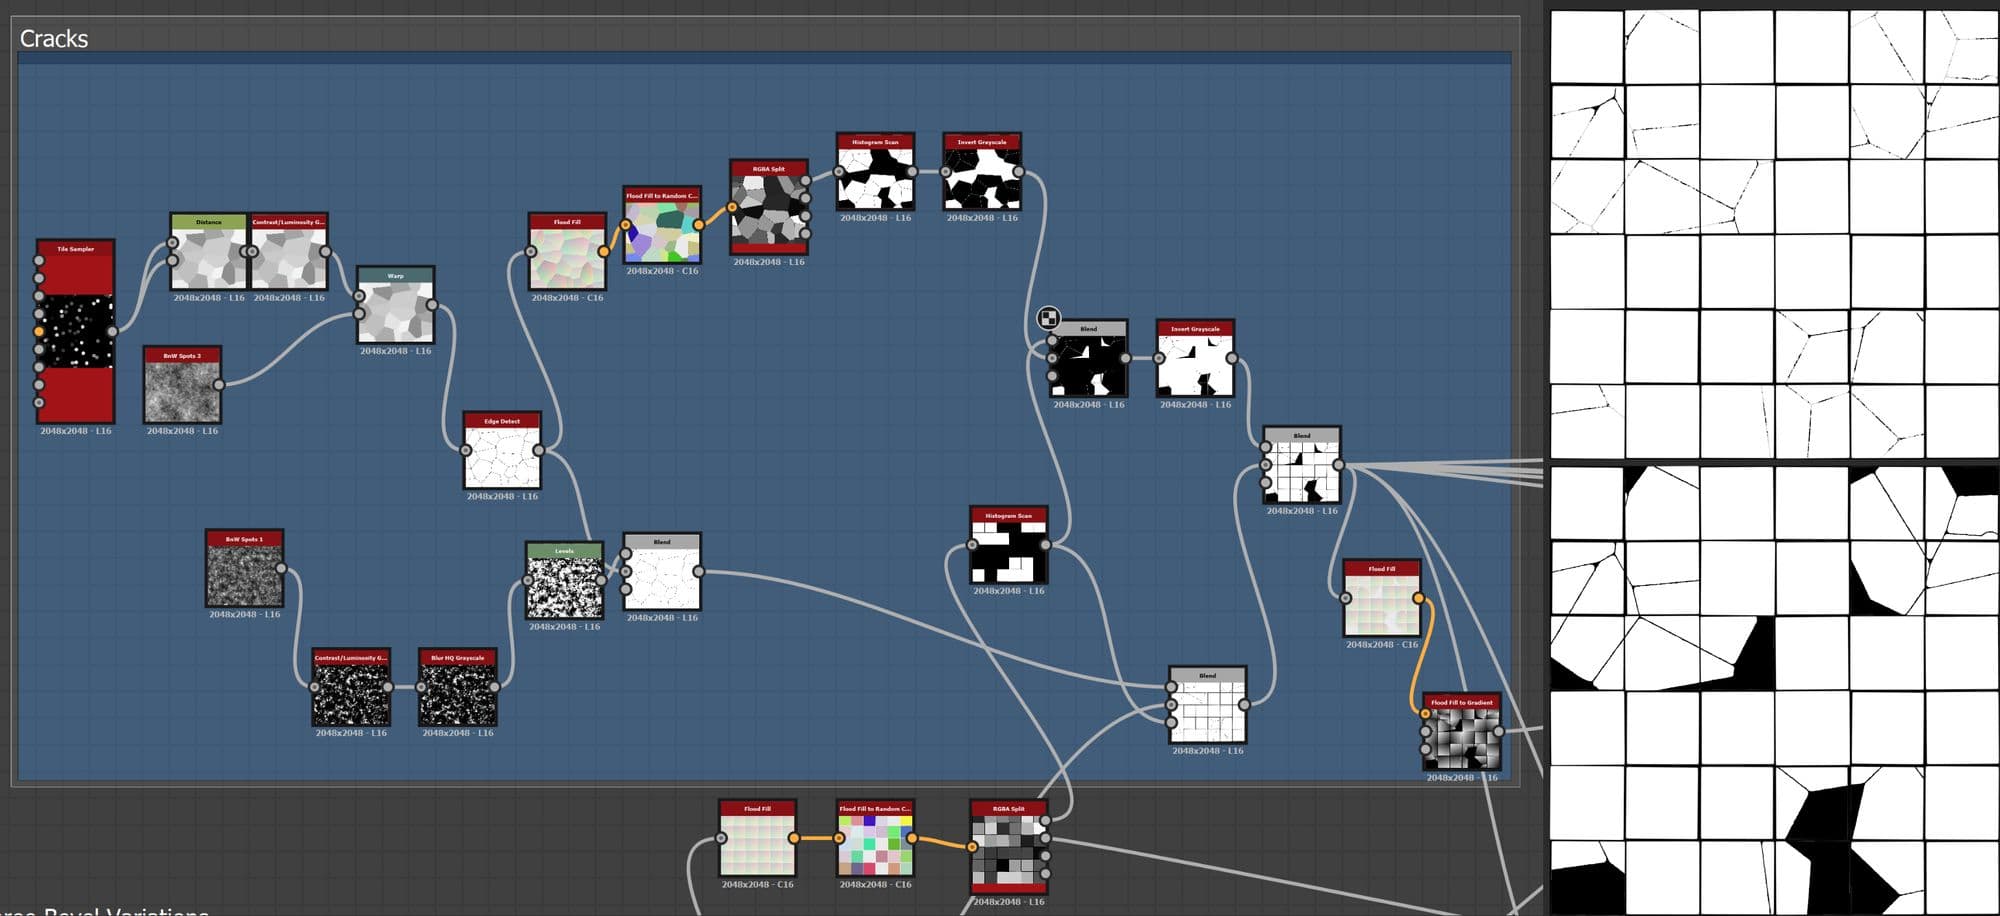
The idea is to try to create the height first and then the rest can be generated easily from there. I started by Creating 3 bevel variations from a simple square shape, and then using Tile Sampler, created a simple tiling Pattern and played with some values to create randomness. From the same tile sampler I created two versions - the first one to create a multi mask that can be used as a mask in blend nodes, and the other was inverted for the Grout mask.
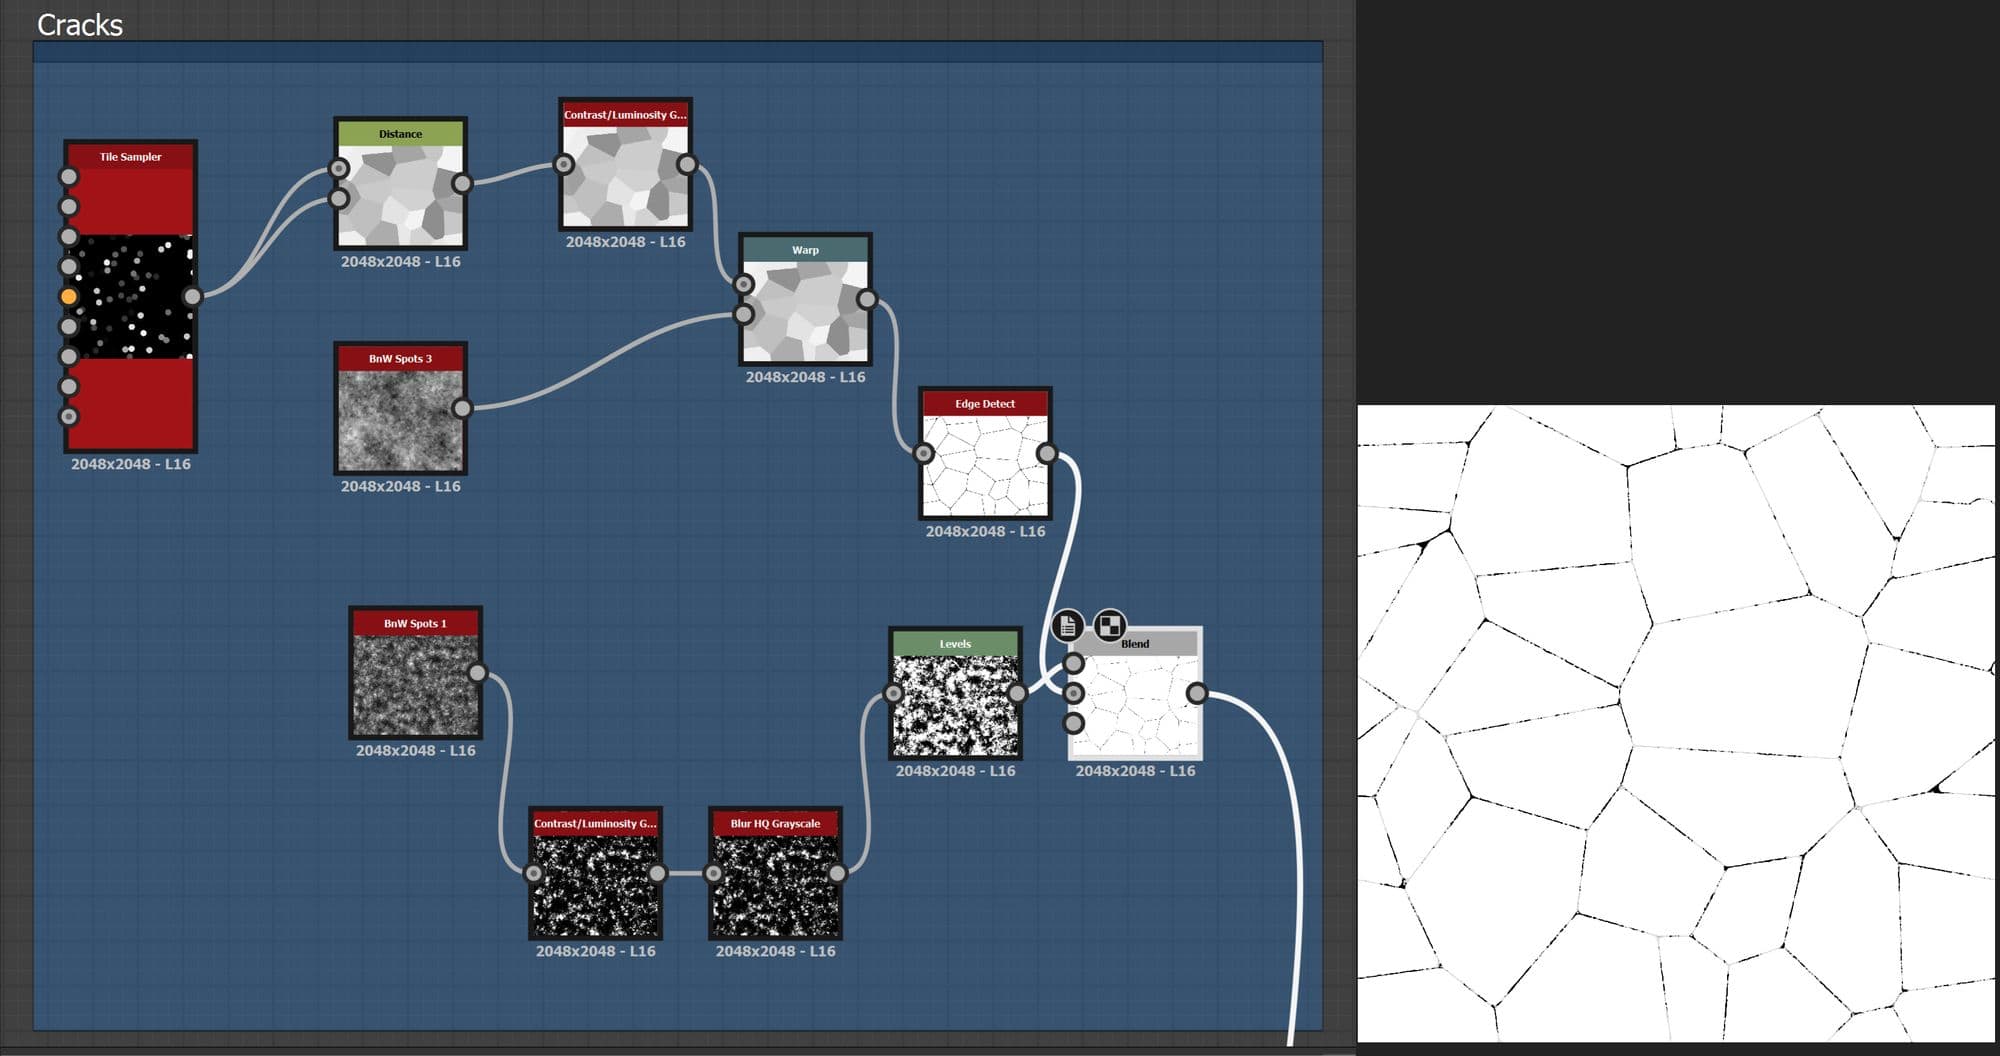
I created cracks using some nodes like a tile sampler using random Disc shapes and then distance, warp, and edge detect, blending (Add Linear Dodge) in the end with a BNW Spot by an opacity value that I felt was looking ok for my needs.
After that I used a flood fill to create a random colour that could be converted to a random mask using RGBA split. By using a node like Histogram Scan, you can play with the contrast and position to create a fully black and white random mask and then blend it with the tile sampler to get a base ceramic cracked shape, you can also use the random mask from the second tile sampler to get similar results.
After that, I started to create some variations to the tiles, like edge wobble, edge chipping, tilt, internal wobble and outer lip. For example, for the edge wobble I used a warp on a Perlin noise and blended it with the previous value using a random mask generated from the multi mask created earlier, but used a very subtle warp intensity.
For edge chipping I used a slope blur grayscale on clouds.. inverted and blended with the rest using the same multi mask with histogram shift/scan, and subtracted them to affect the edges more.
To create the internal wobble, I used directional warp with the same multi mask with gaussian noise, then blended with the edge wobble using multiply. I blended them again with the previous tilt value and used Add Sub.
In the end, I created some kind of an outer lip using the pattern node, beveled twice using different bevel values, then blended them together with the multi mask to affect a random tile, then blend again with the previous height values and the same multi mask and applied histogram scan/shift and so on.
I controlled how I wanted the shapes to be, by controlling the opacity values of the blend nodes, but most of the time I used subtle values.
After that, I used similar methods to create more shapes and randomness, then created the final height value to the grout as well.
Using the same height nodes, I was able to create Roughness, Albedo, Normal and AO.
I also created another variation, but more broken, using the same nodes, but with different values and more damaged ceramic tiles.
To create the damaged cracked parts, I added again Flood Fill, Flood Fill to Random Colour, RGBA Split and then Histogram Scan and multiplied it with the normal cracked one to create the new variation.
Playing with the same nodes created for the first variation of the ceramic tiles, I was able to create the second version. Both were used later to blend in Unreal using vertex painting after creating a master material that was used to blend many materials as an instance.
I exported the final outputs like that, left to right: Basecolor, Normal, Roughness, Ambient Occlusion, Height.
I also combined Roughness, Metallic, AO and Height in RGBA channels for most of my project texture outputs using 3D Designer RGBA Merge node, or creating a custom export preset from 3D Painter to compress the size instead of exporting each one to its own map.
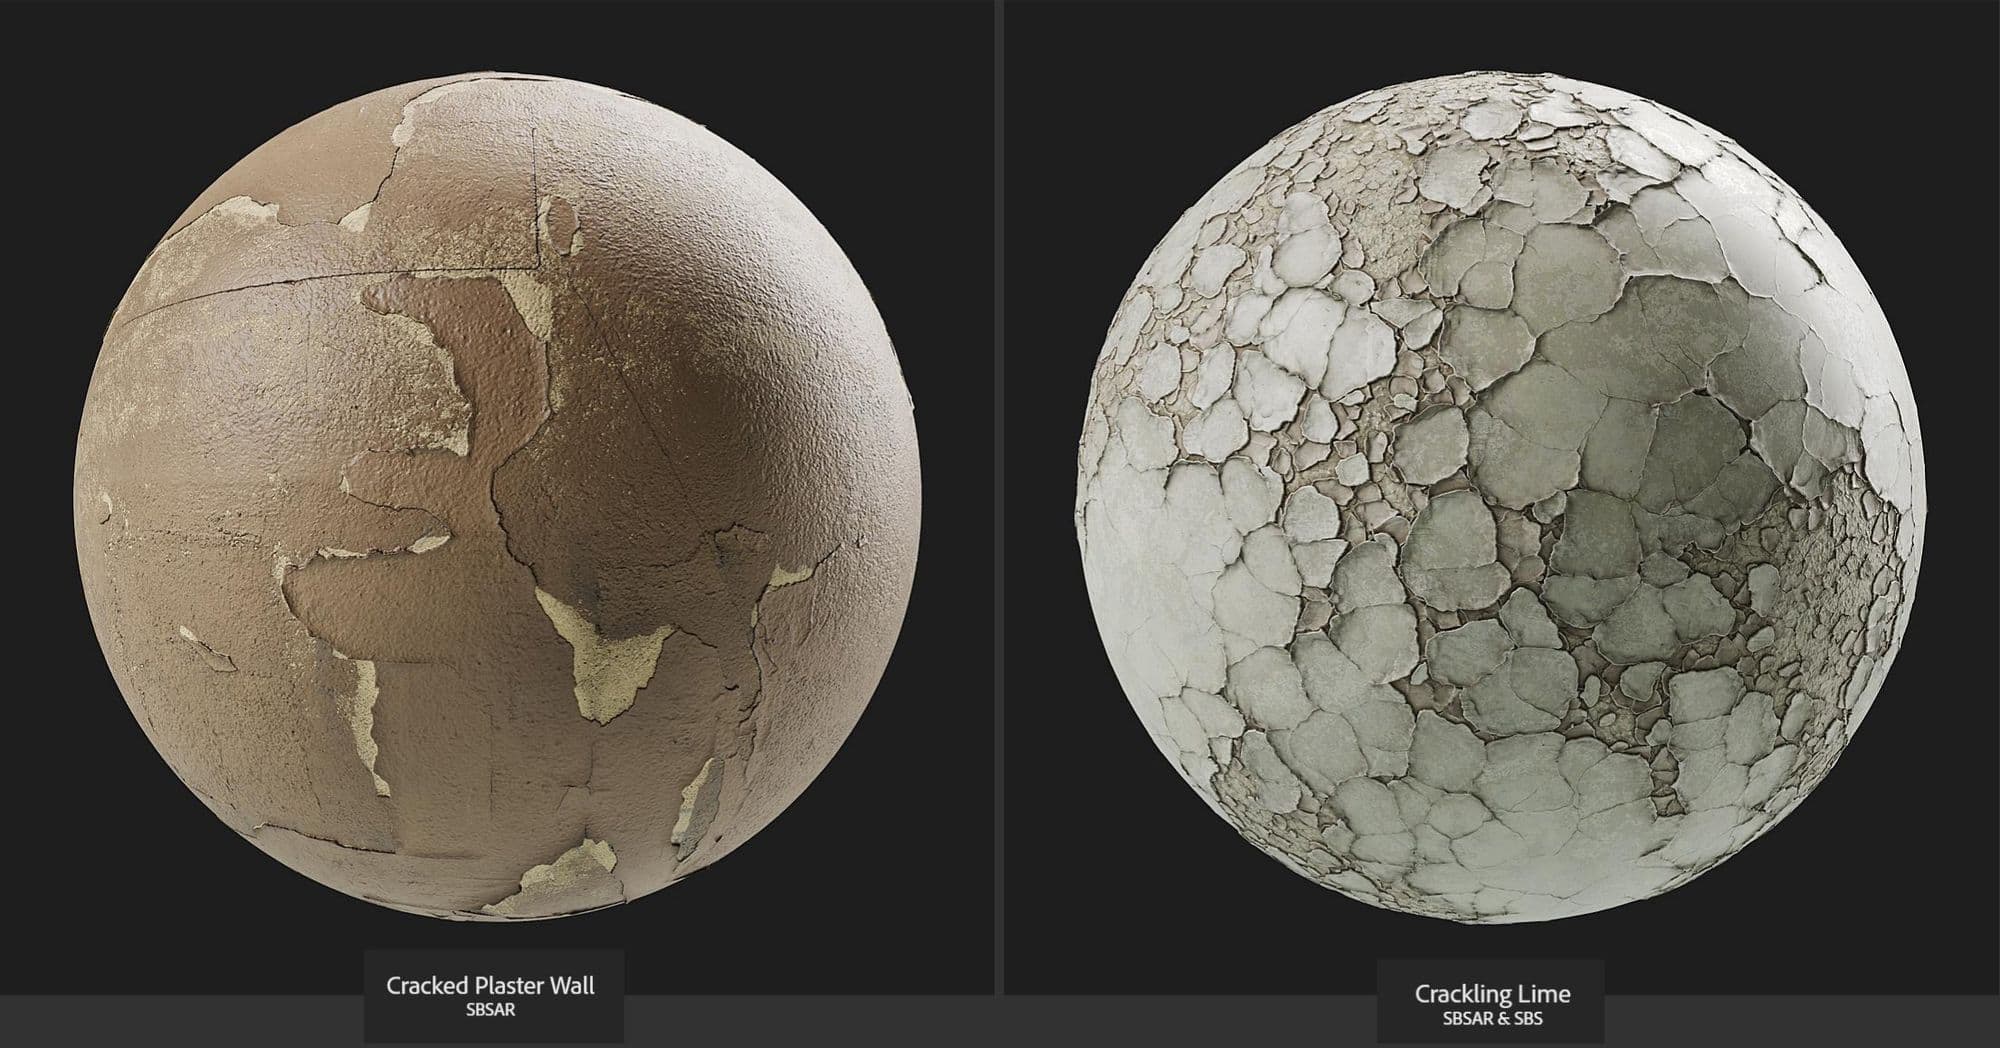
In Substance 3D Painter I mixed between two Substance source materials (Cracked Plaster Wall and Crackling Lime) with a tileable grunge mask and then added more random grunge layers as masks to create more colour and roughness variations.
I used the Anchor point and Micro Height features to create masks from the color, height of the plaster materials, just to add variations.
For example, I created an anchor point under the cracking Lime material and then created another fill layer to add moss and referenced a masked fill layer to that anchor point using the base colour once and height again, to add more moss at the cracks, then reduced it a bit by multiplying a grunge concrete-old from painter default tileable grunges.


I used the same methods over again with random grunge layers to get a result that I was satisfied with.
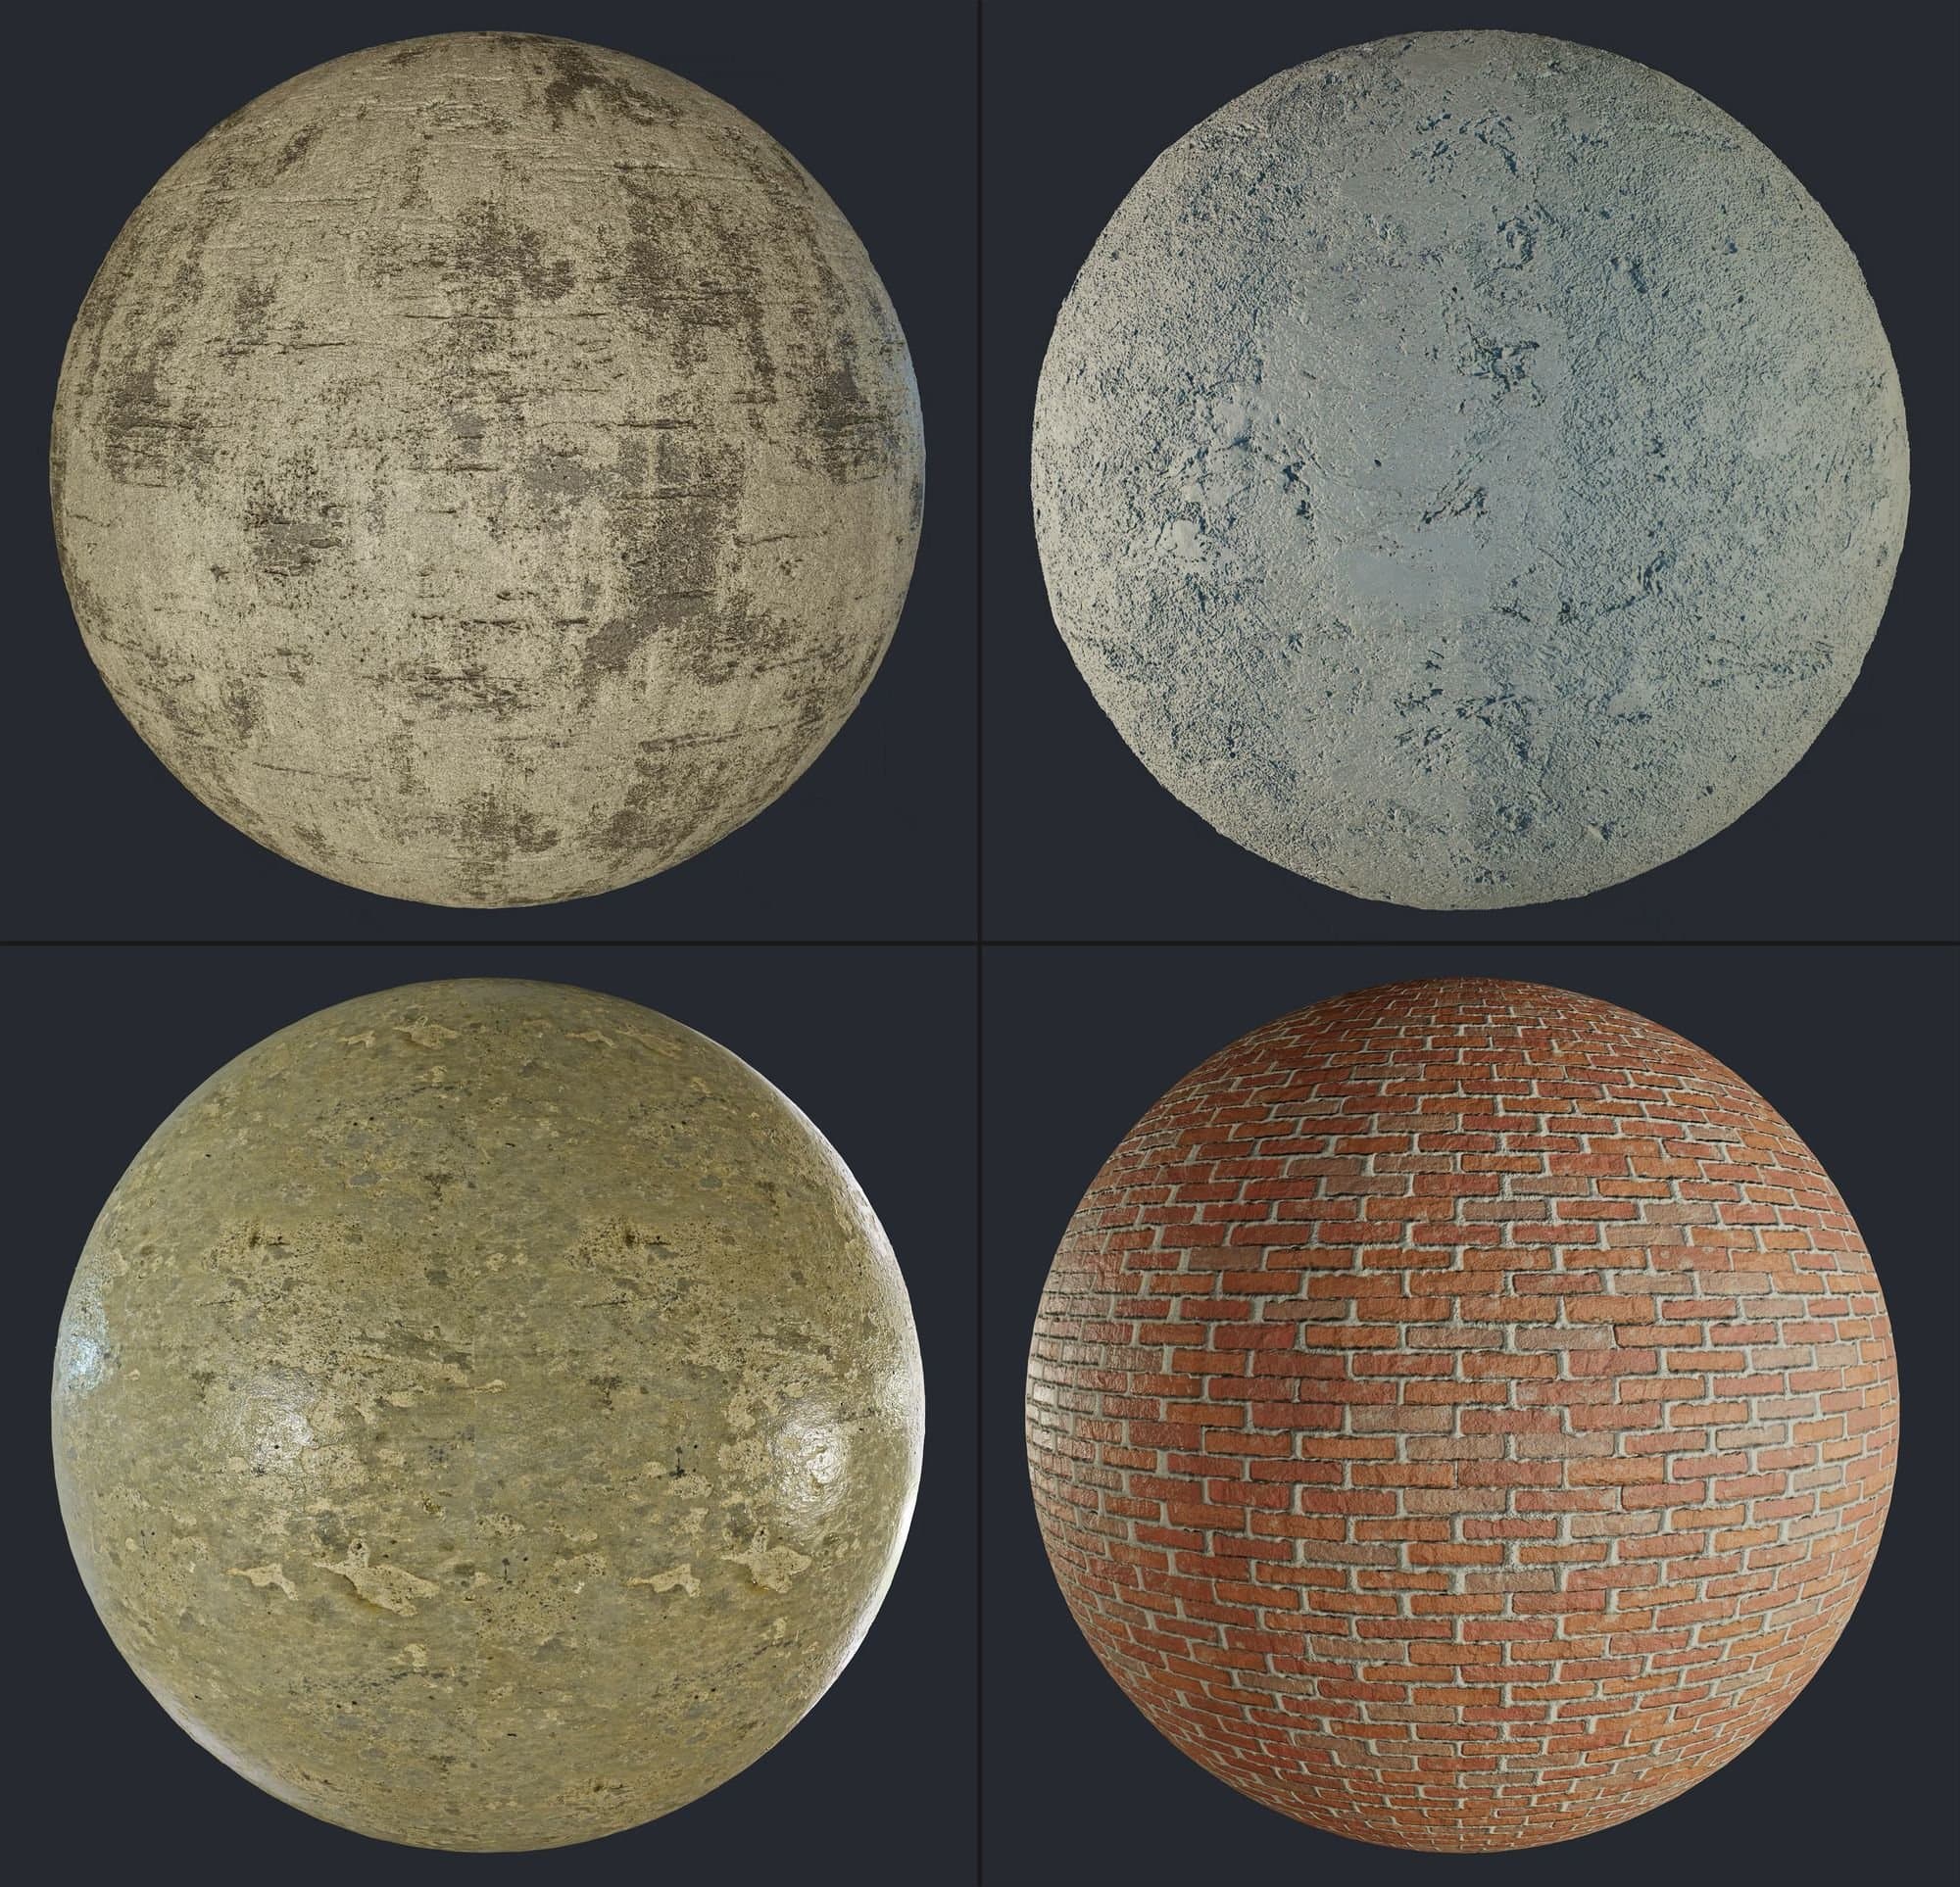
To create the concrete and brick materials, I combined plaster with three different concrete and brick materials in Unreal using vertex painting. I got them from Substance source and tweaked them a bit in 3D Designer, 3D Painter and Unreal.
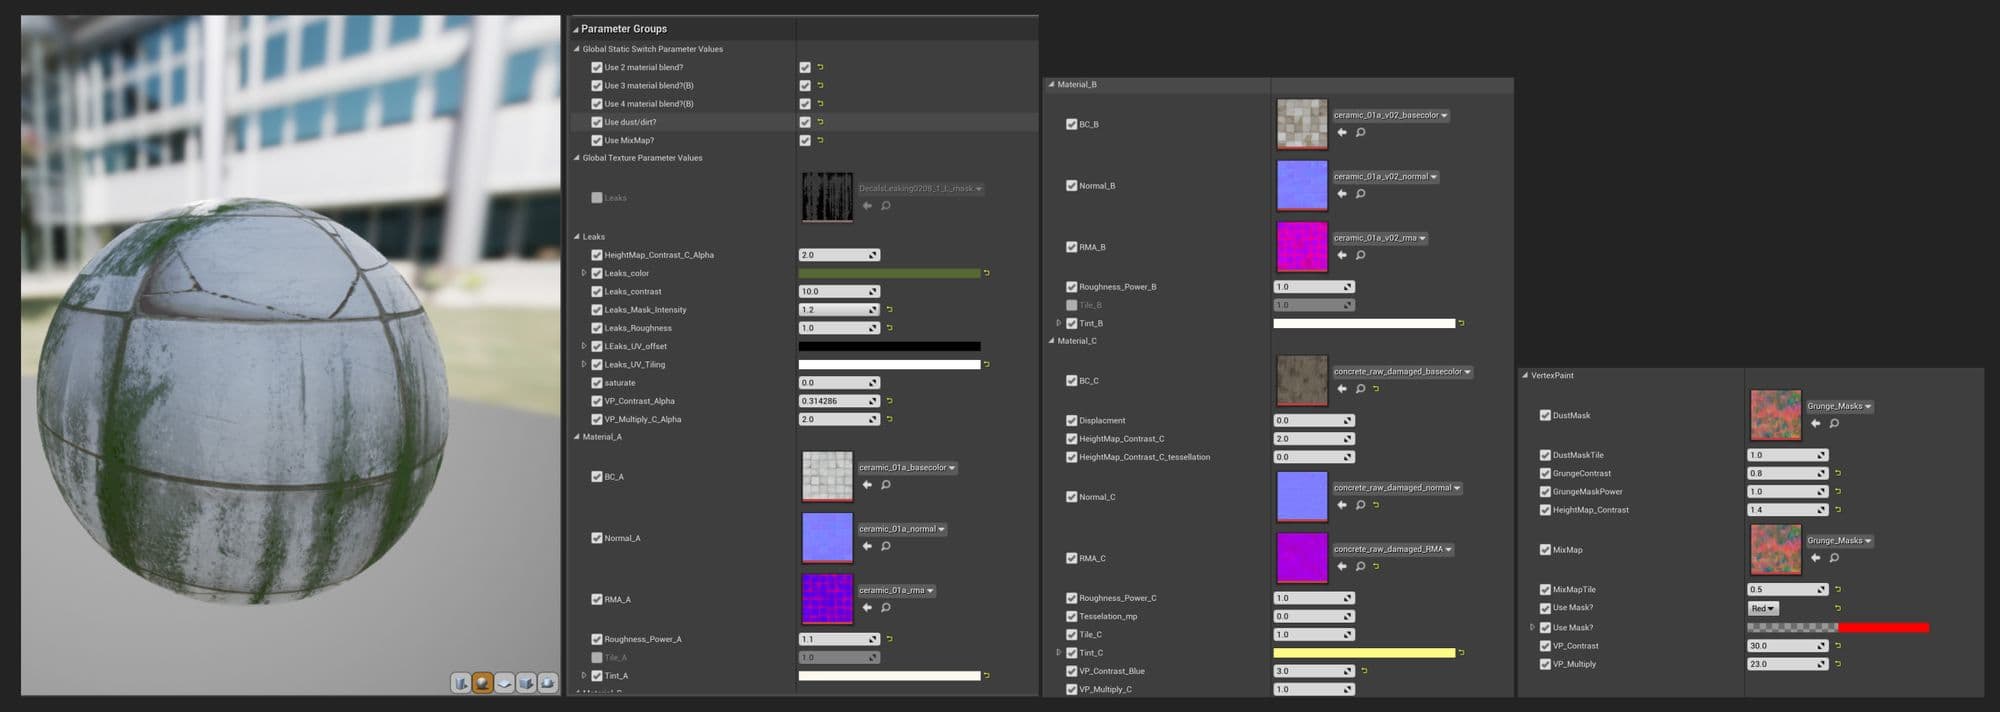
In Unreal I created a shader to blend between 3 or 4 materials using vertex painting’s RGBA channels.
I started by creating the first material, using the first Ceramic Variation that was created in Substance 3D Designer, just very basic stuff like creating parameters for the textures to control something like the Roughness, Tint and Tile, etc using nodes like Multiply, Power, etc. These parameters were created to be able to control them when creating material instance form this master material.
I did the same for the second Ceramic Variation and after that added a vertex colour using the Red channel to blend between them.
I used a HeightLerp nodes to blend using Height maps( Alpha channel of the RMAA in that case), used parameters to control the Height mop contrast and Vertex Paint contrast and the intensity of it.
I added more nodes to give the ability to blend between them with a mix map and also another one to add a dust/dirt pass.
Following the same steps, I blended between 3 other materials and the last one was used to add leaks with a custom leak mask/masks.

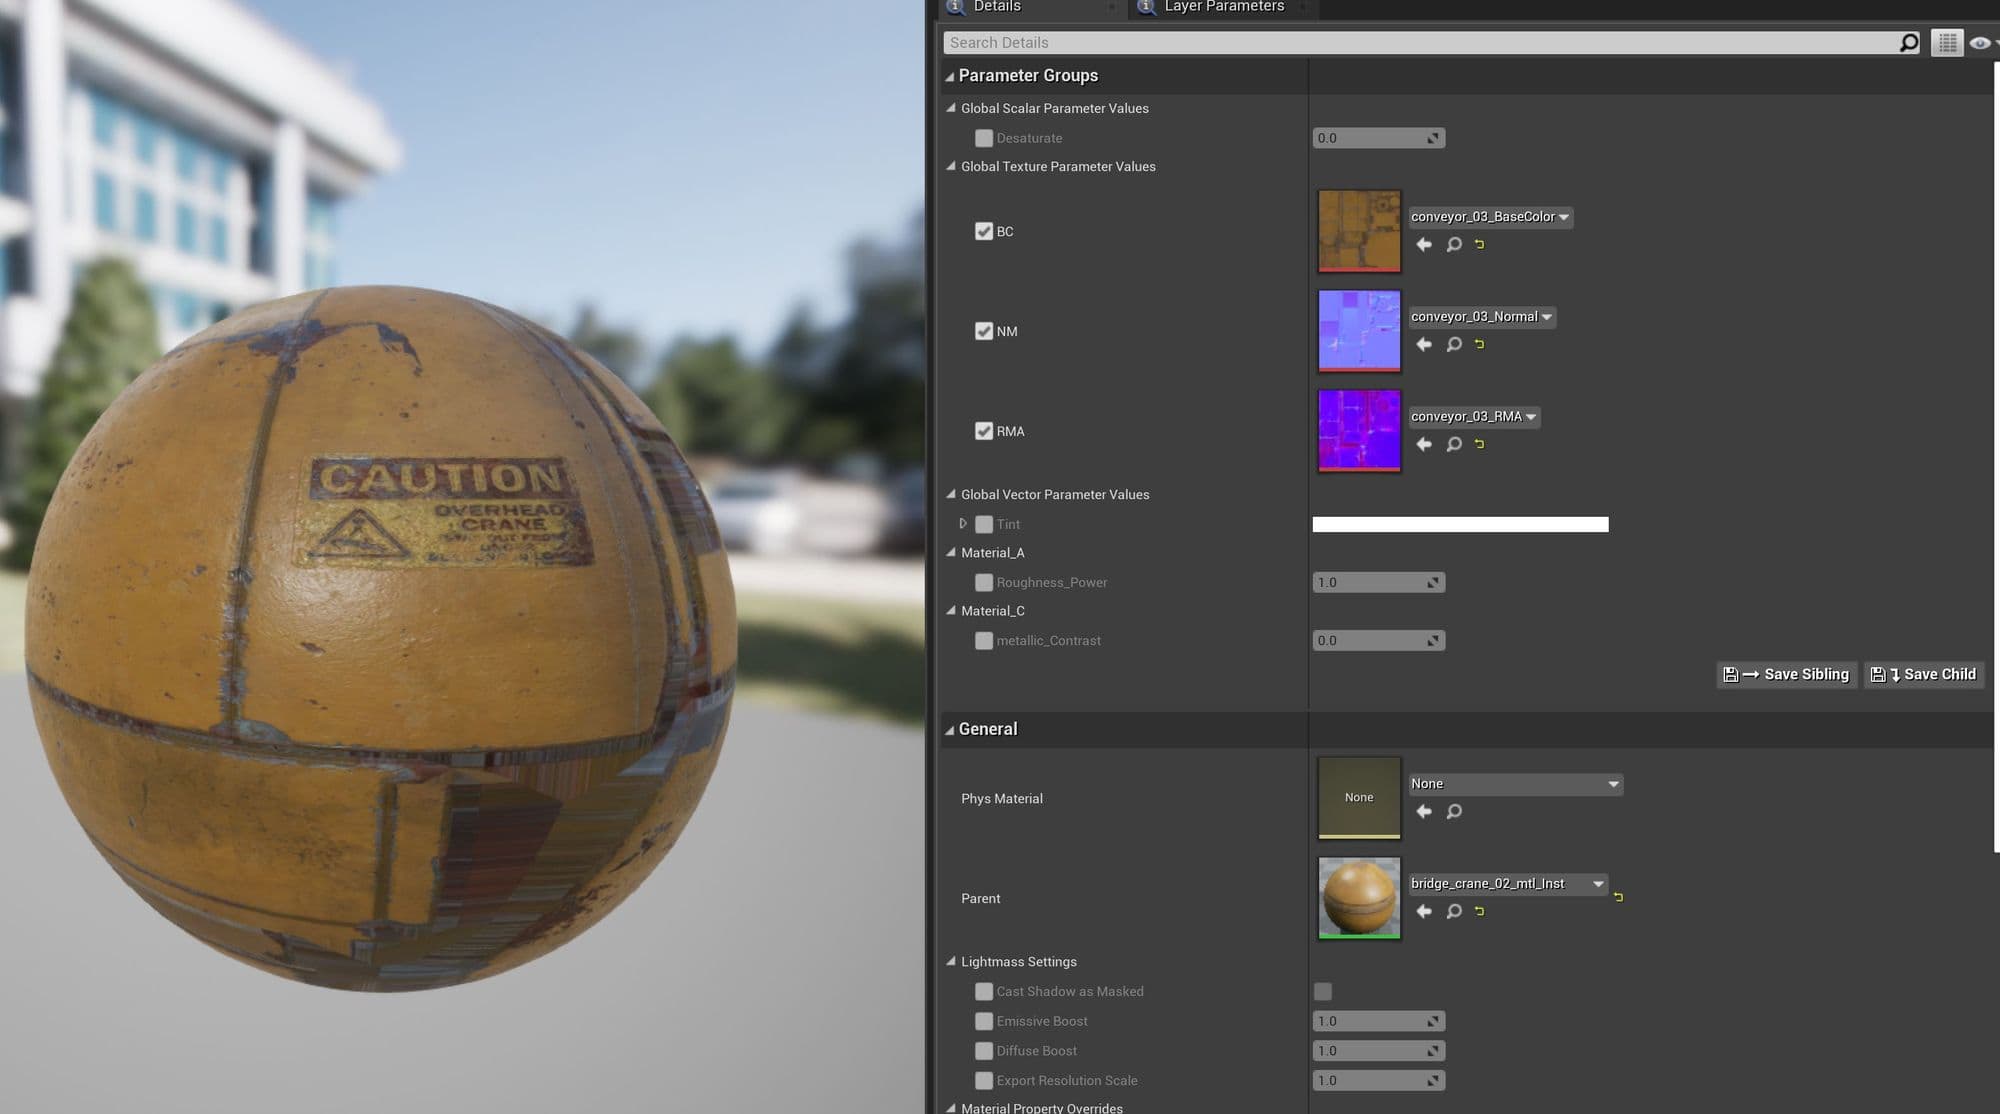
After that I created an instance materials and played with the results with some testing.
I created from the same master material and instances for Plaster/Cement/Brick wall, Ceramic Walls/Floor, etc.
For the props or hero assets I used a very simple master material and applied instances based on it to the assets.
I also created Master materials for Decals, Glass, etc based on some free shaders from Unreal Engine free projects.
I won’t be able to include everything, but I’ll talk about some methods I’ve used in modeling, uvs, and texturing for some assets.
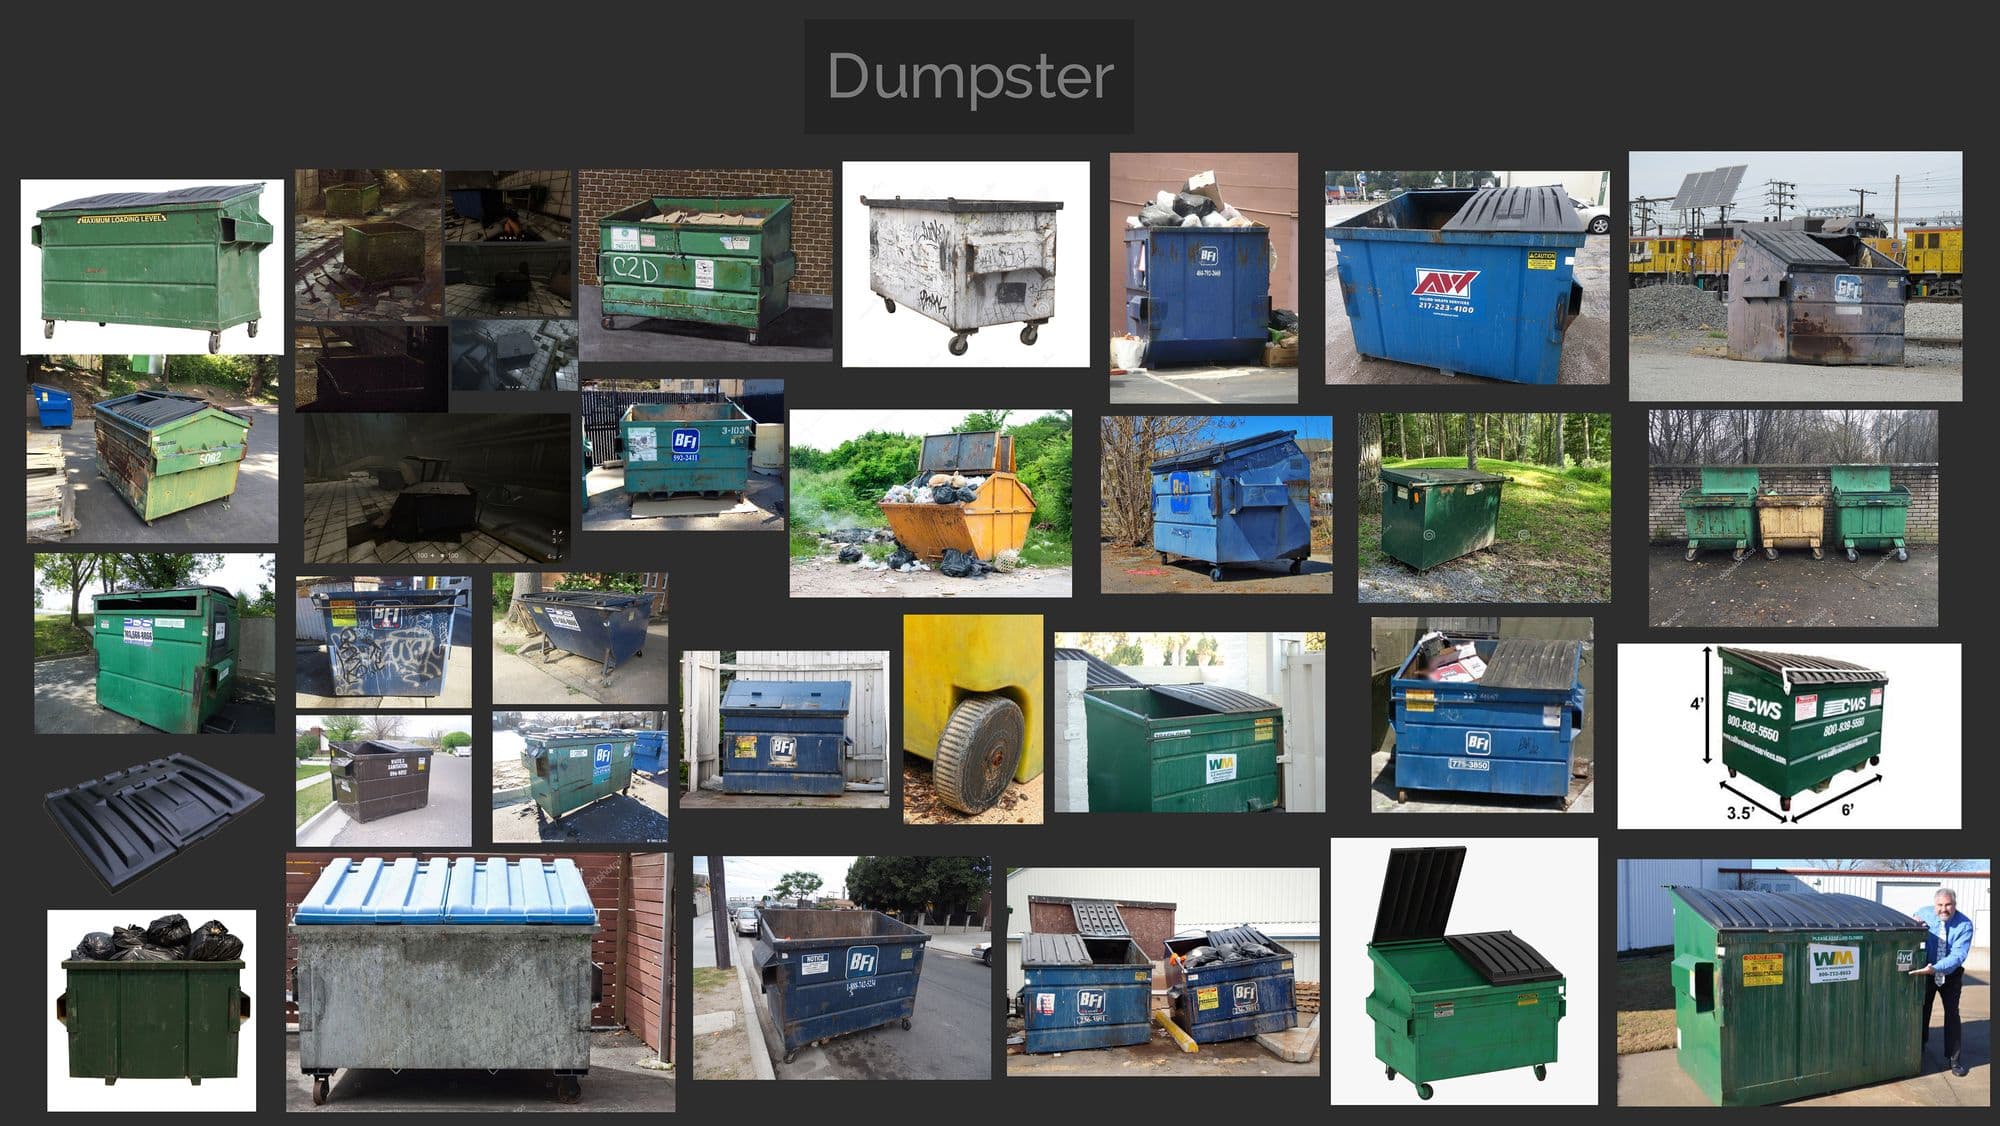
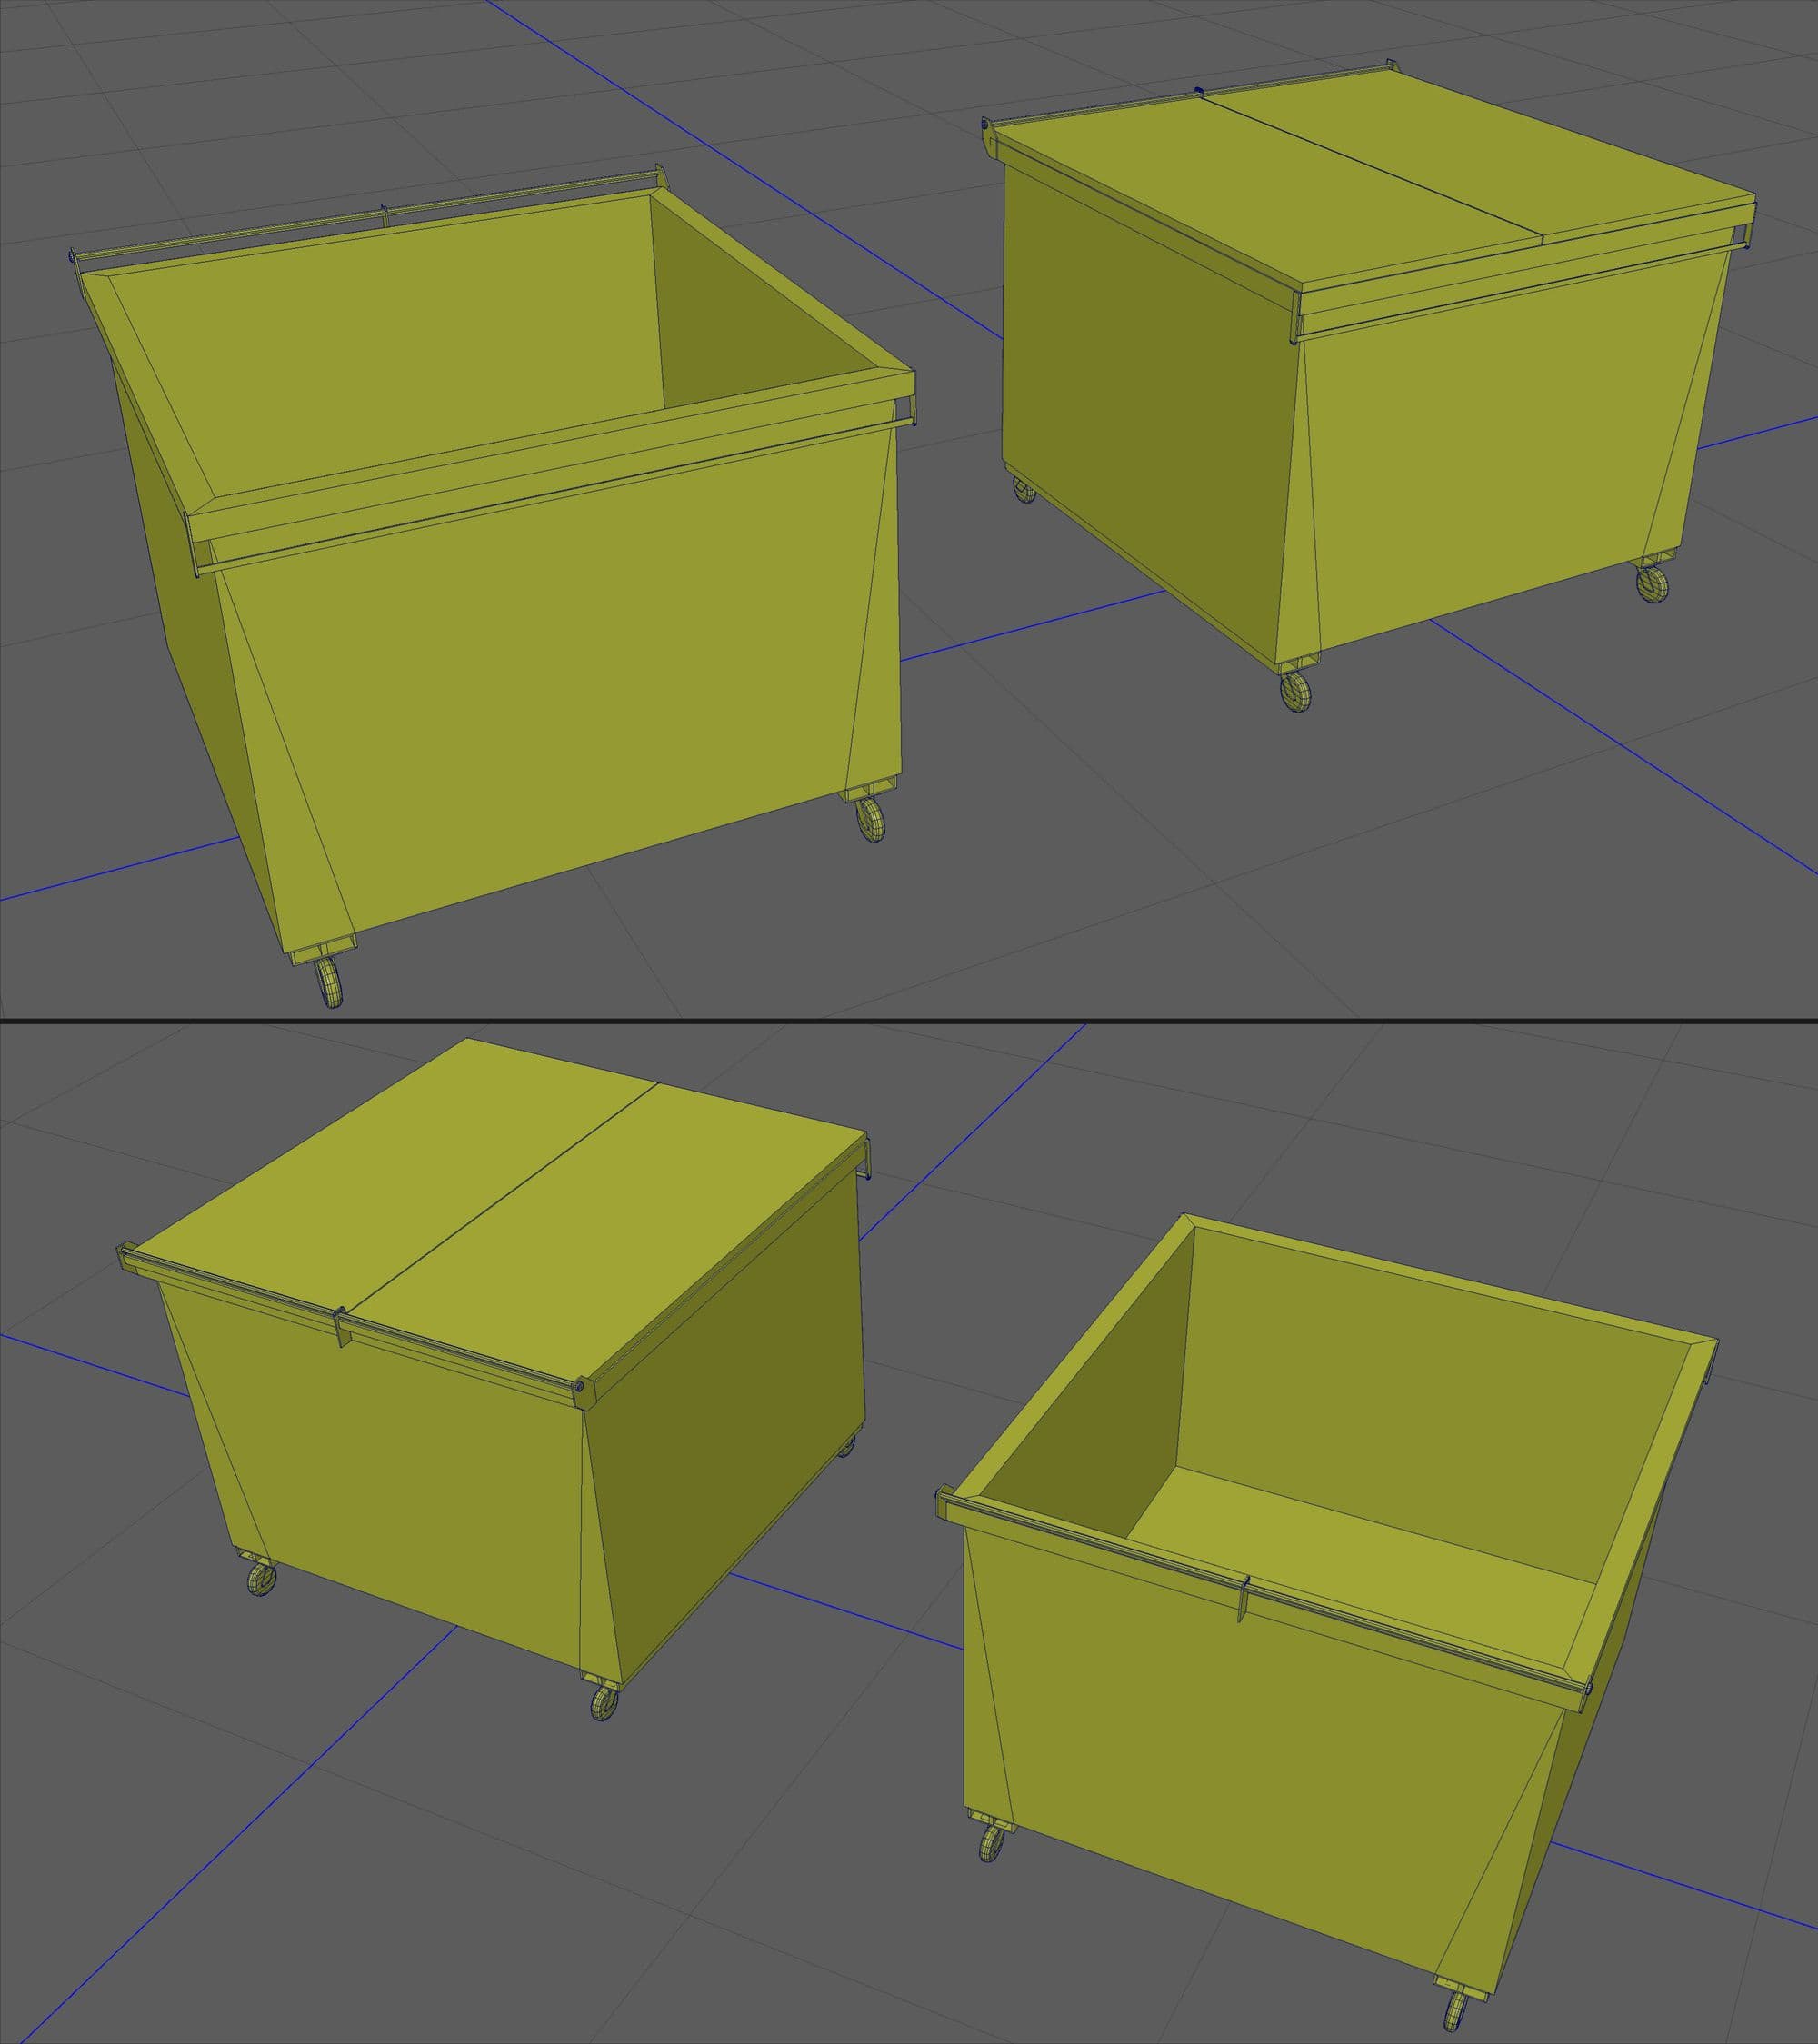
I started by collecting some reference images of different kinds of dumpsters and then decided to create a generic dumpster and made sure the proportions were close to the one in the concept.
High poly
I started the high poly modeling process with just very basic hard surface modeling, used Maya modeling tools like extrude, bevel, etc to create the mid part, tires and cover, and applied a material to each element so it could be used as a colour id later in Substance 3D Painter.
I created some floating geometry like bolts and the tires to get easy baking information later instead of modeling them from the same shape.
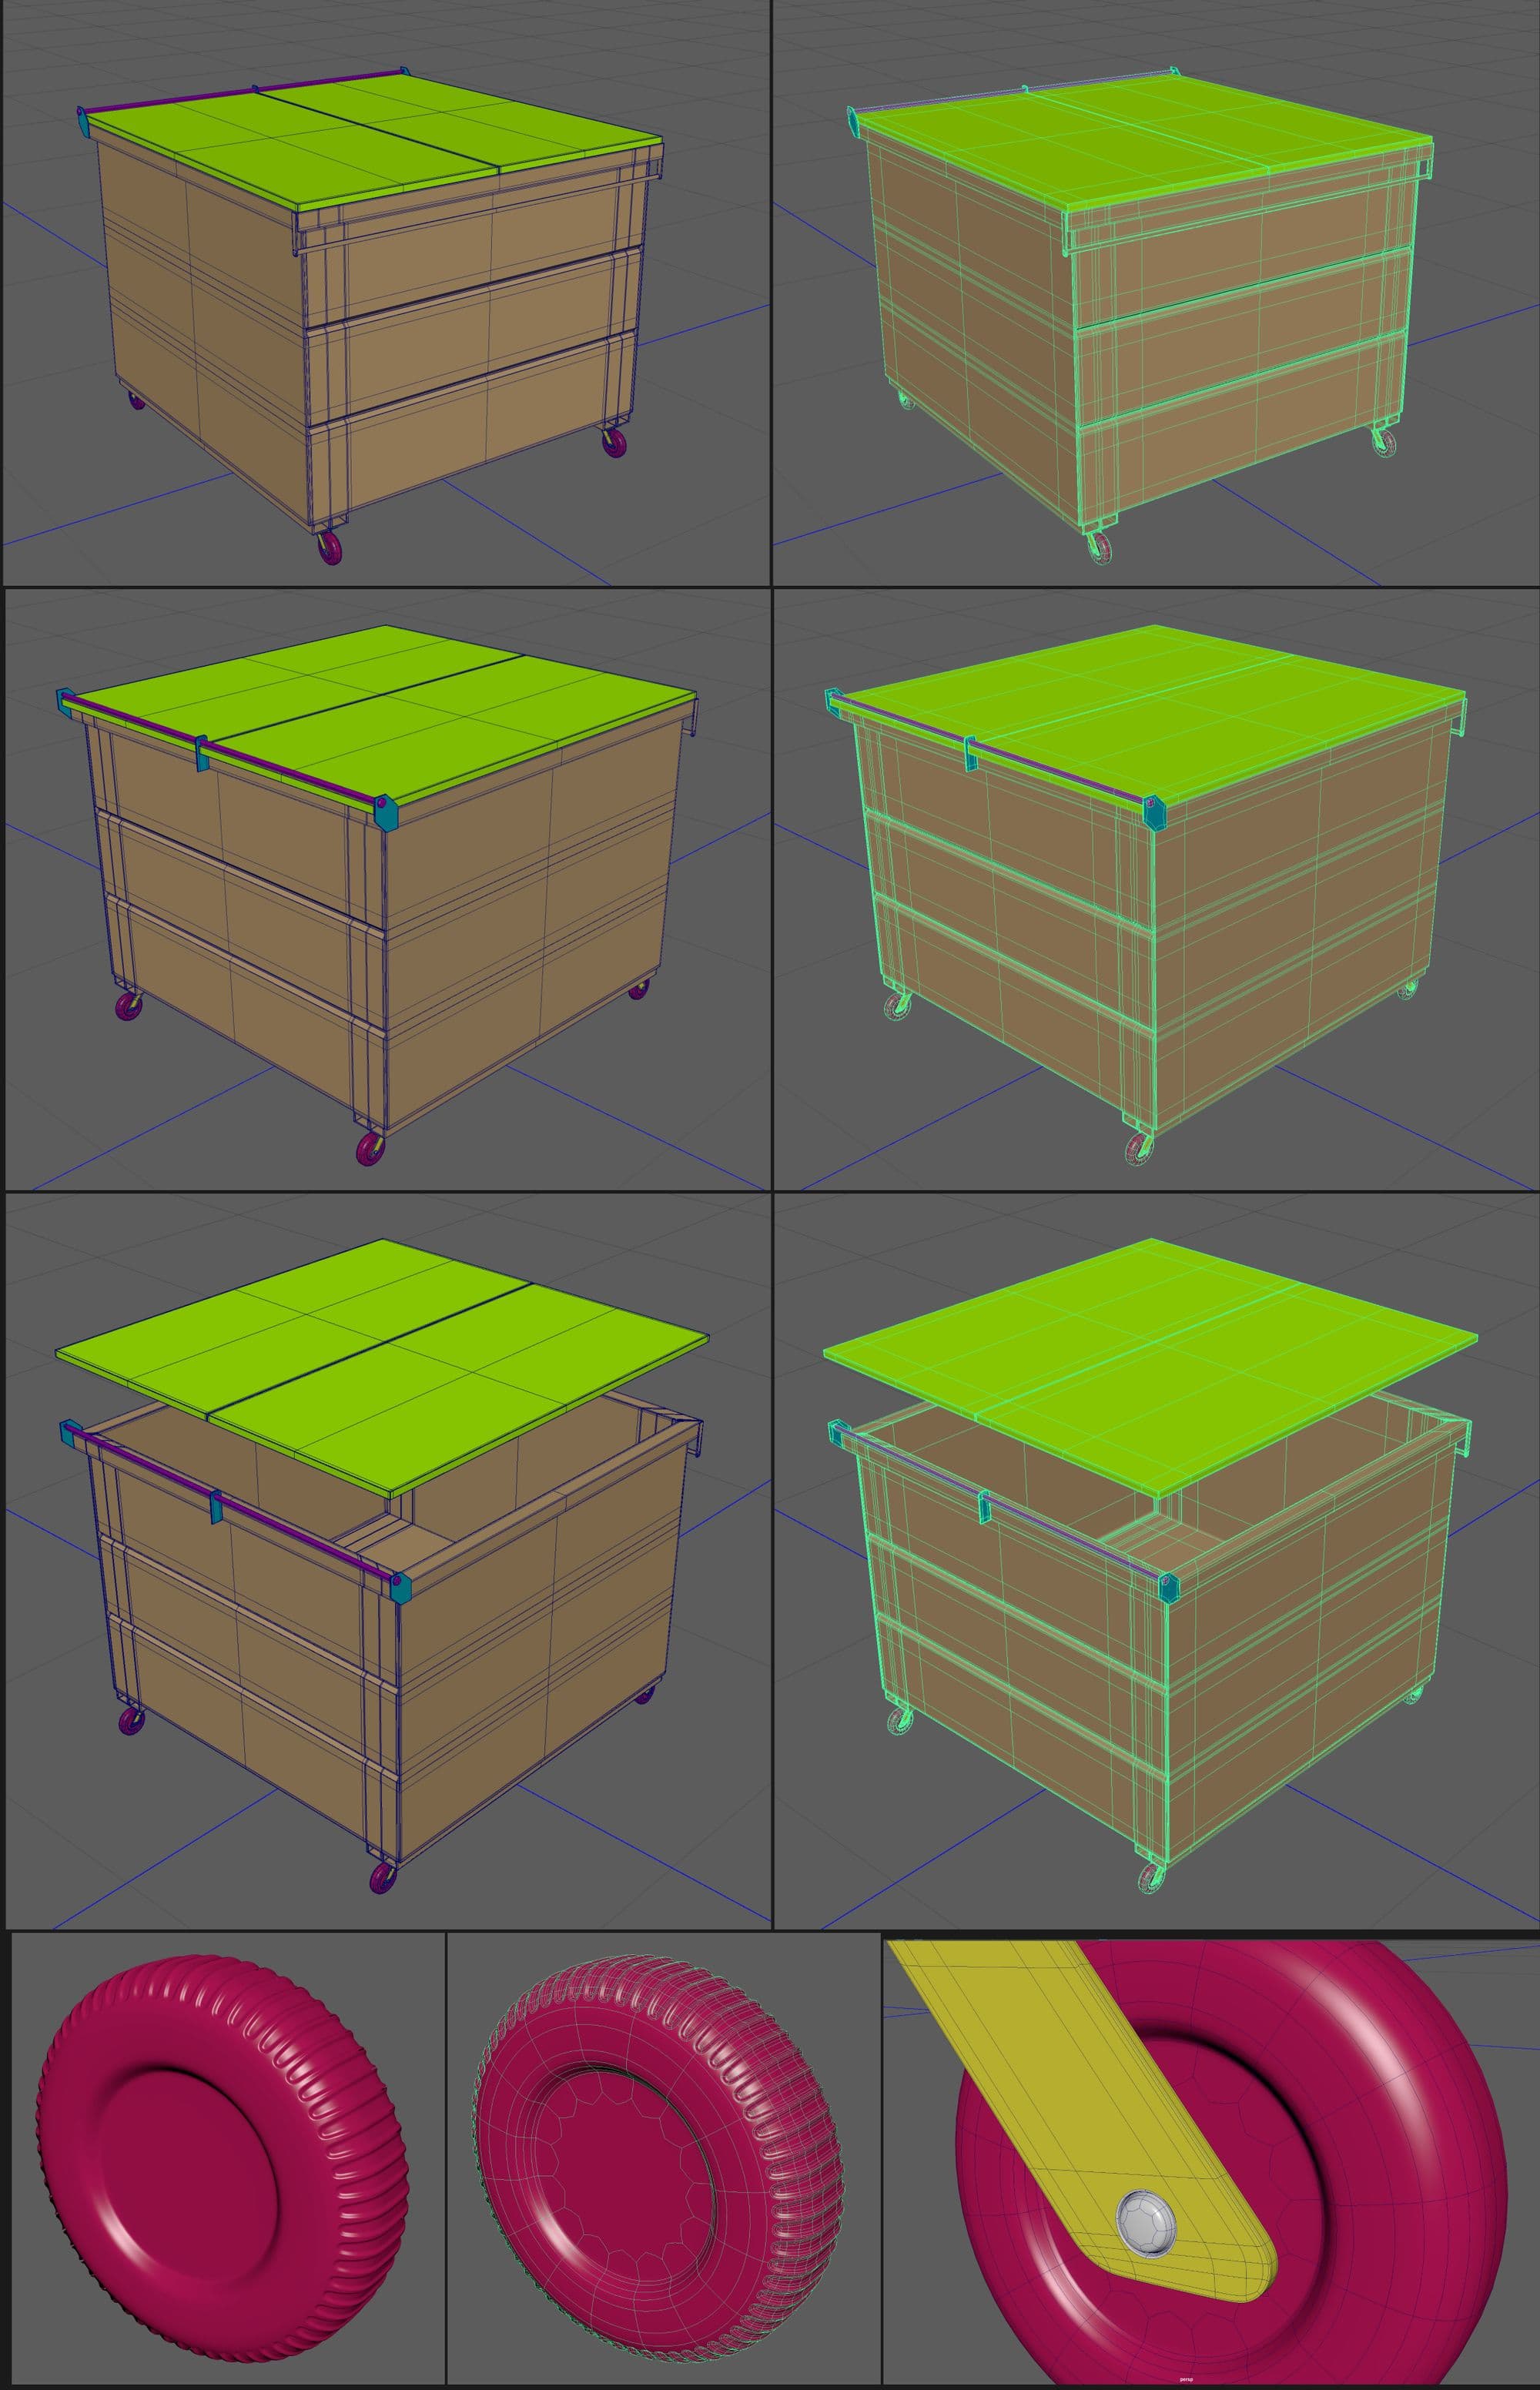
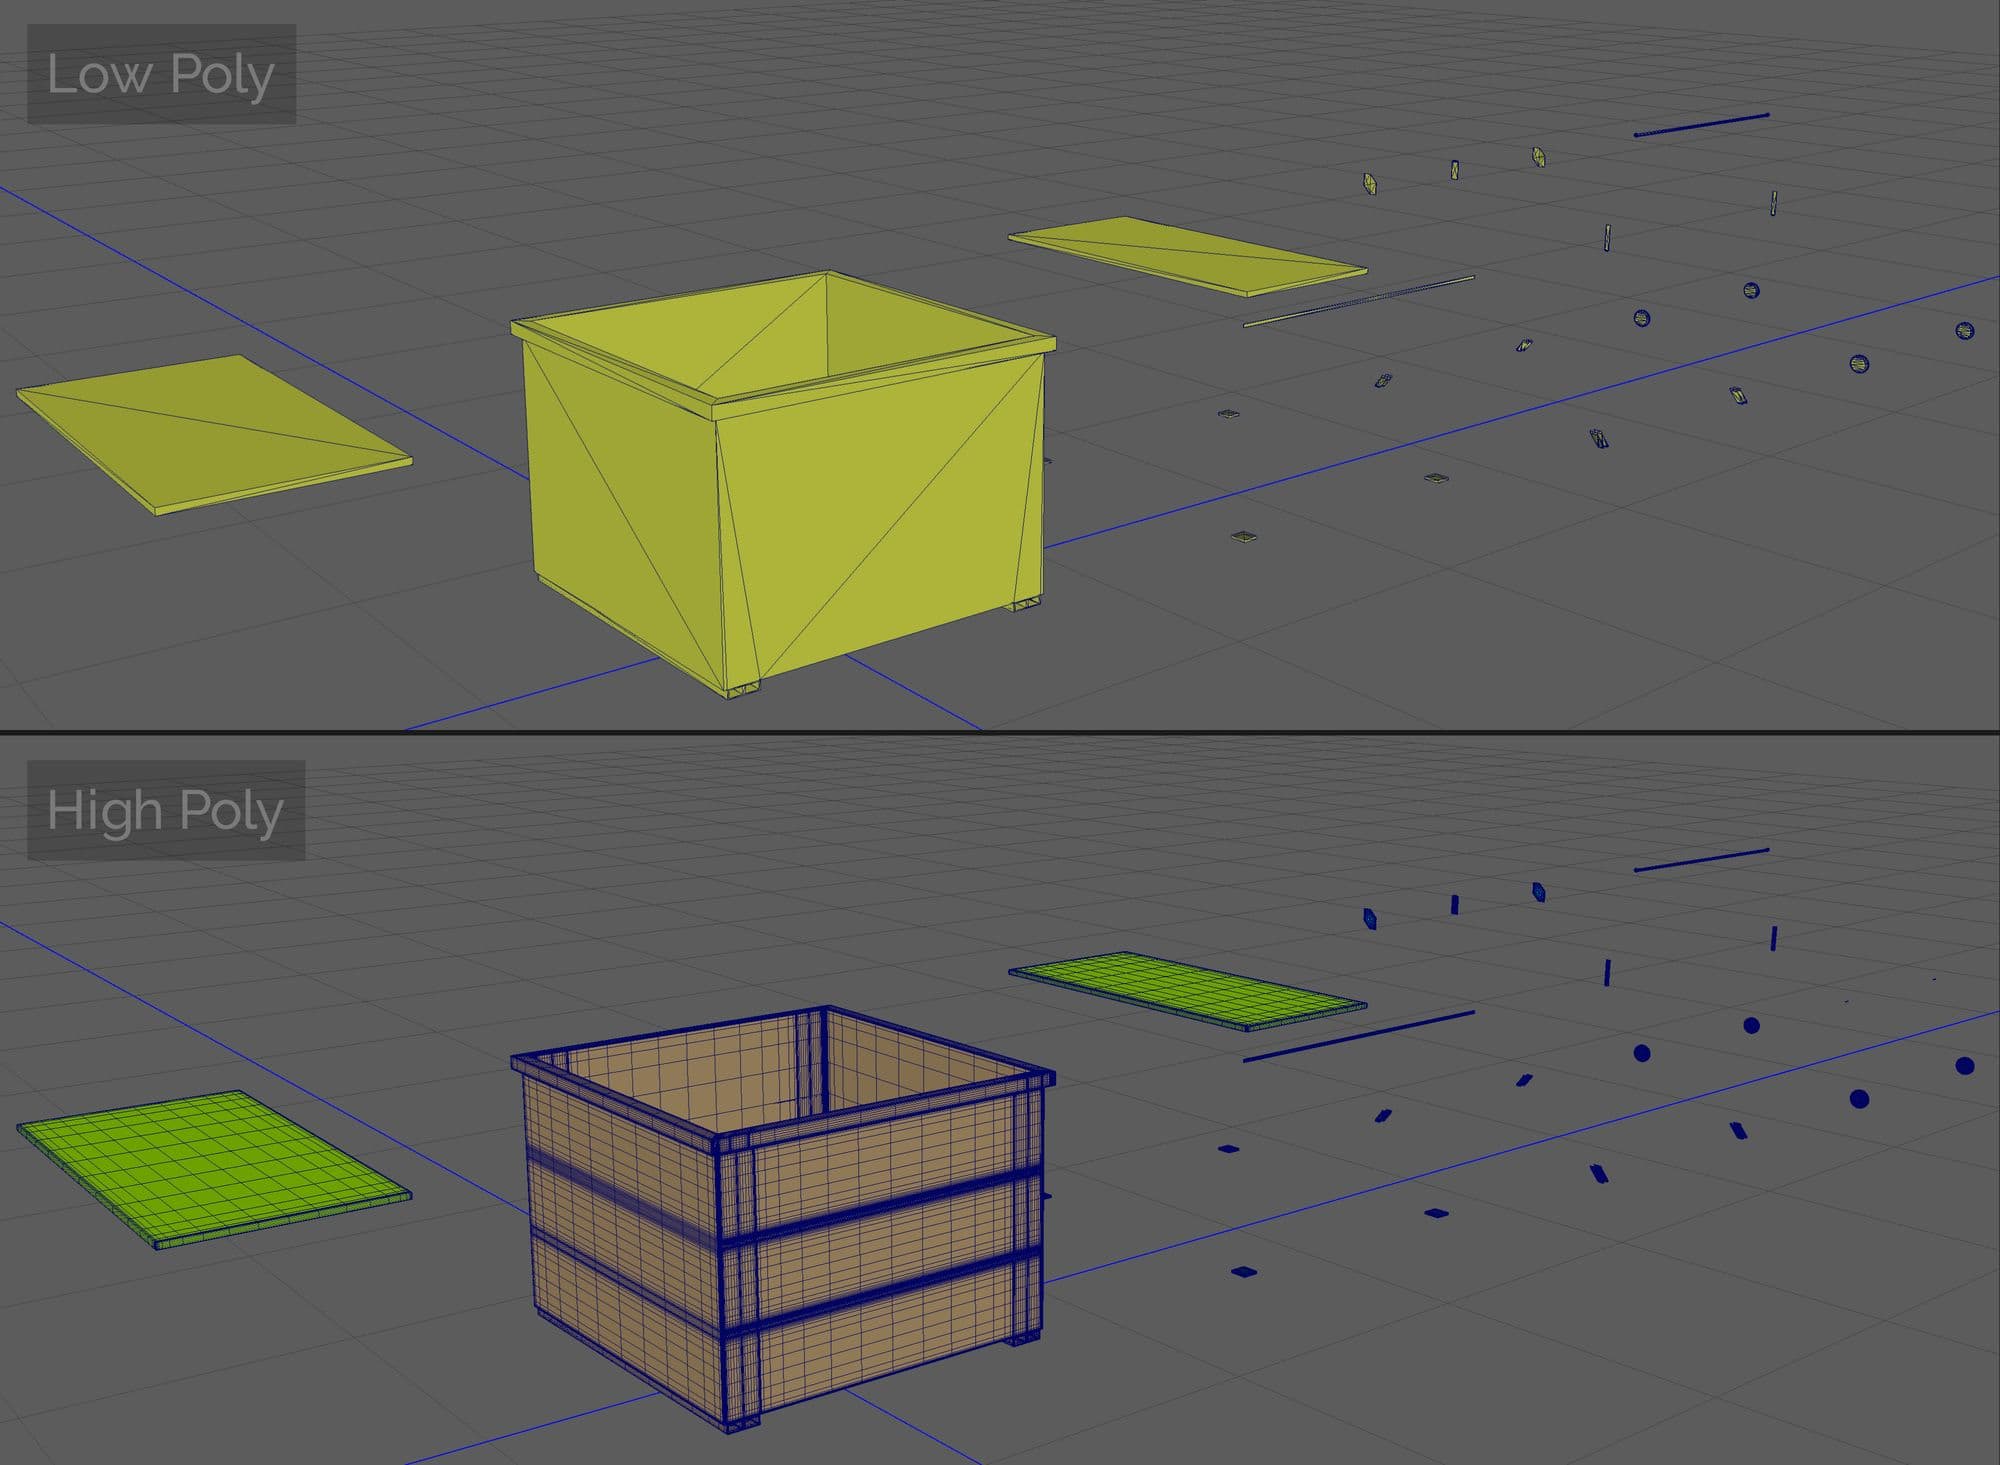
Uvs and Low Poly
I created a low poly mesh above the high poly one, tried to reuse the same base mesh to save time and just deleted extra edges and any geometry that was not contributing to the shape/silhouette. The mesh turned out to be 2200 with the cover tris and 2176 tris without it.
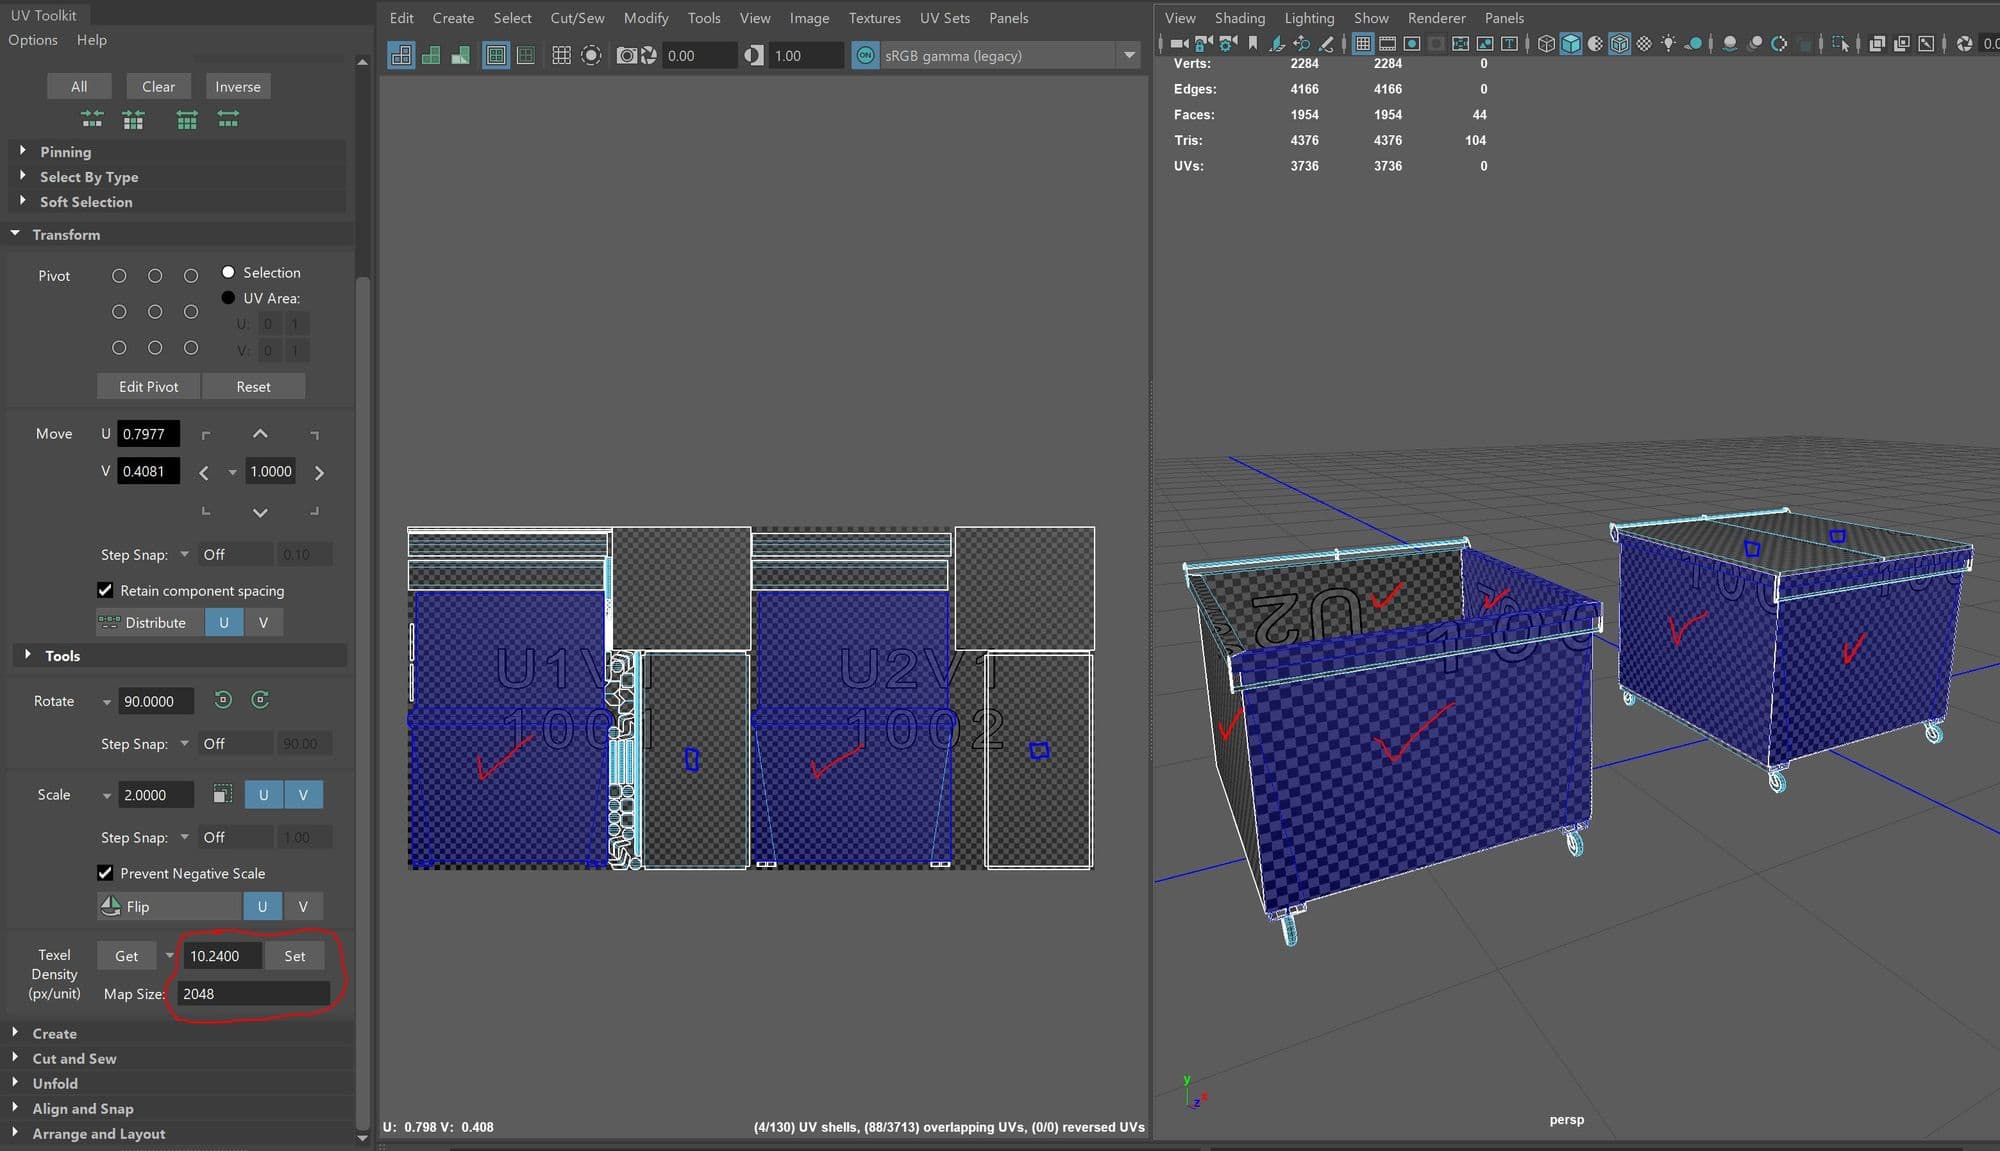
For the UVs I used Maya UV toolkit using it’s UV tools like normal projection, unfold stitch, cut and sew, etc.
I planned to reuse some UV shells of the dumpster to save UV space. For example, I reused parts like the sides and covers. I made sure to use a 1k per 1 meter for the texel density, and to be sure it’s correct you need to enter a value of 10.24 in the texel density and use a correct unit, in may case I used meter, for this dumpset I used 2048x2048 map size.
There are different ways to bake a mesh. You can either name each element from the high and low poly meshes with their same name and use in painter and match by mesh name. You can also explode the meshes, bake and then later re-import the final meshes to painter and start texturing. You can also use a software like Marmoset Toolbag to control the skew and cage better, but in this case I just exploded the meshes.
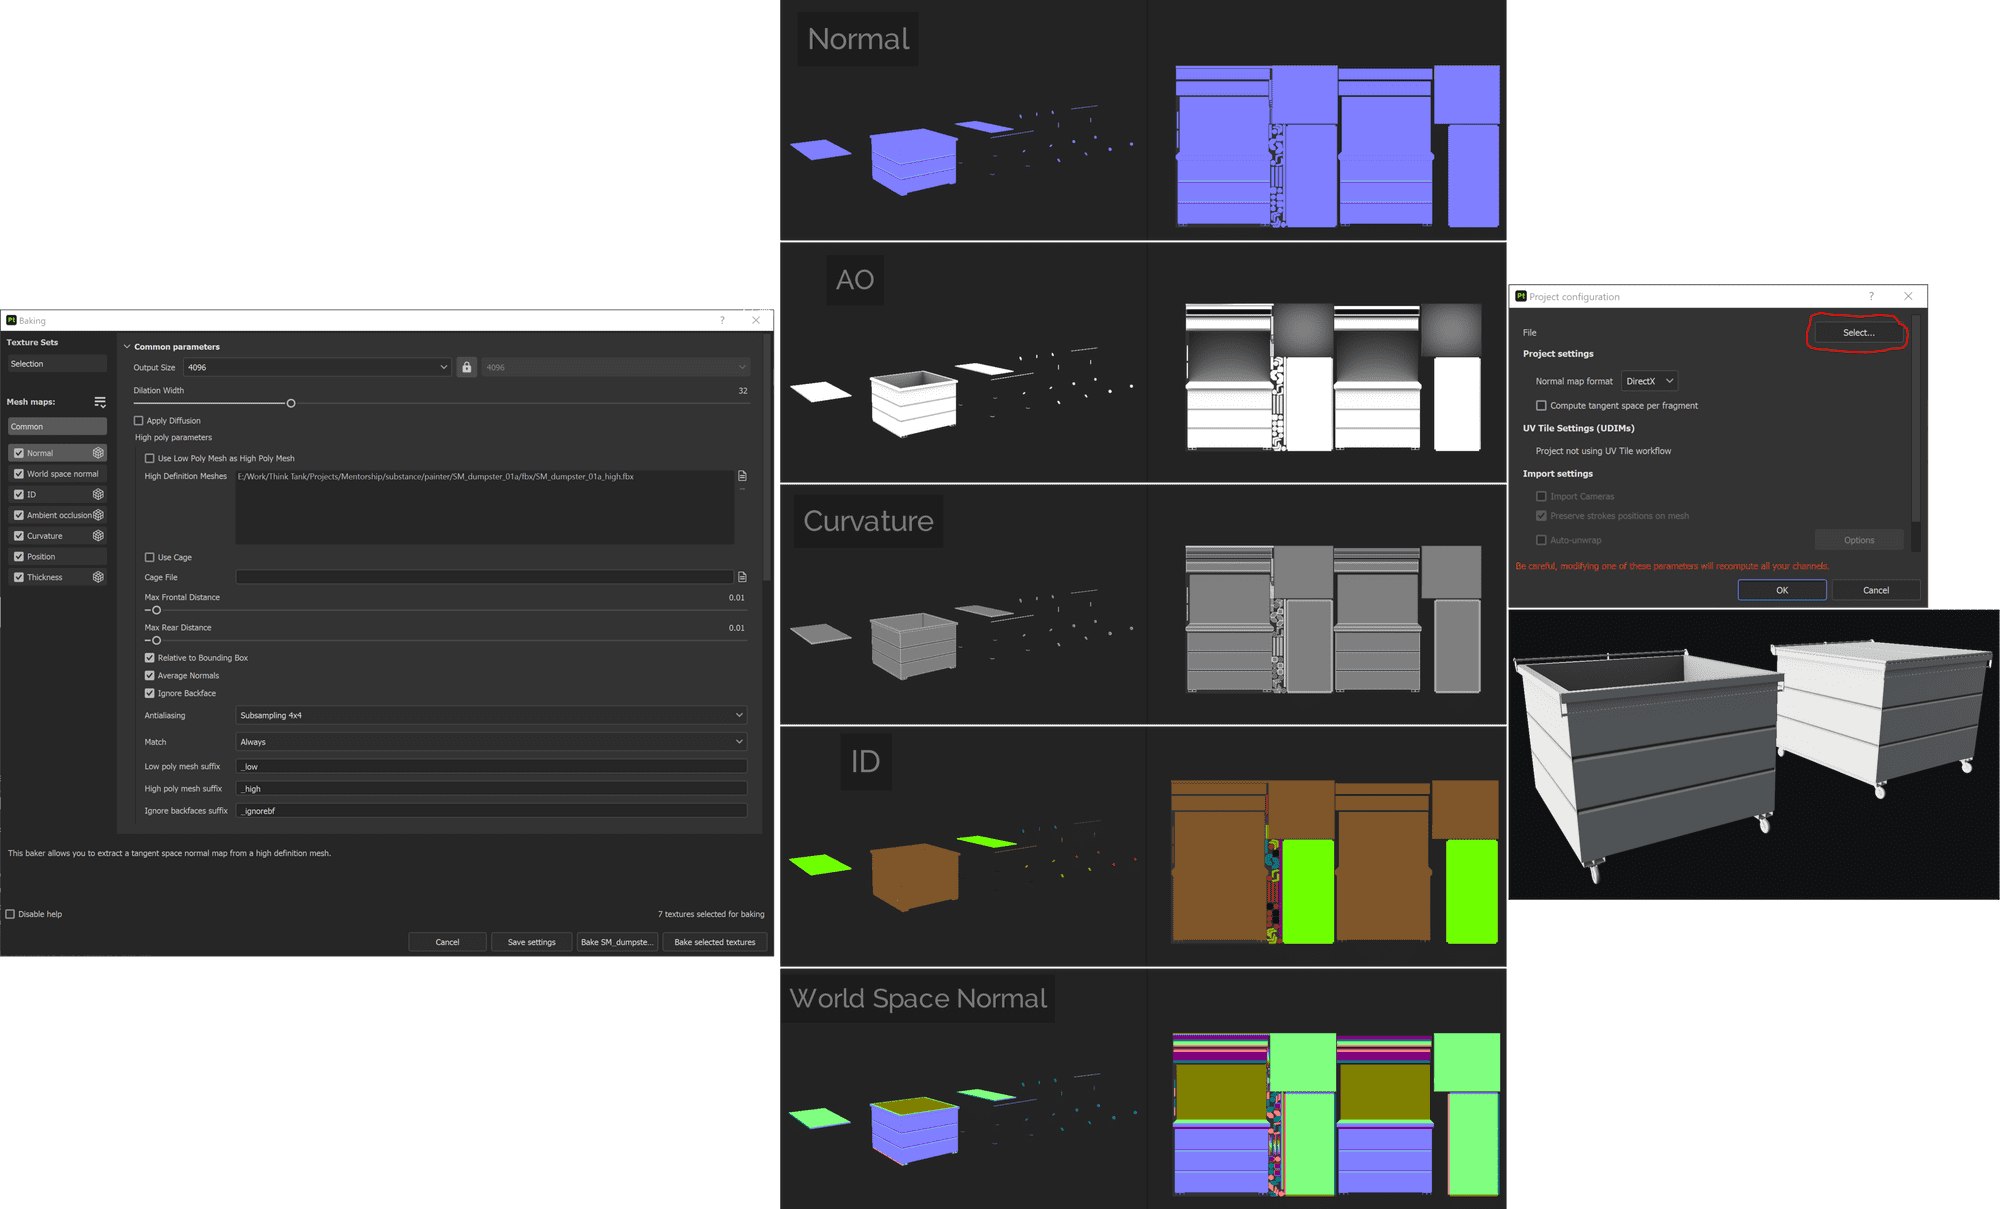
Before baking I prepared the meshes and exploded them like that and made sure to apply mesh smooth to the high poly.
In Substance 3D Painter I created a new file and included the low poly exploded mesh. Then, from texture set setting I selected bake mesh maps, and loaded the high poly mesh and tried different max frontal and rear distances. It turned out the default value worked fine for this project.
I recommend using an Anti Aliasing subsampling 4x4 or 8x8 less than that will get blurry results.
I baked in 4096 output size, but resized the maps to 2048x2048 after that to get the correct texel density inside Unreal Engine.
By baking the mesh it transferred the high poly details into the low poly mesh and created the mesh maps, Normal, World Space Normal, ID, Ambient Occlusion(AO), Curvature, Position and Thickness.
These mesh maps are very useful to start texturing the asset and saves huge time because it helps to generate masks like the AO and curvature and they can be placed automatically when using generators to add features like dirt or edge wear, etc.
After baking is done, I reimported the low poly mesh after I brought the elements in again so I could start texturing on a clean mesh. I chose Edit, Project Configuration then selected the assembled meshes (it will recognise the same bakes on it.)
I won’t be able to explain each layer because it will take a long time, but I’ll try to simplify what I did!
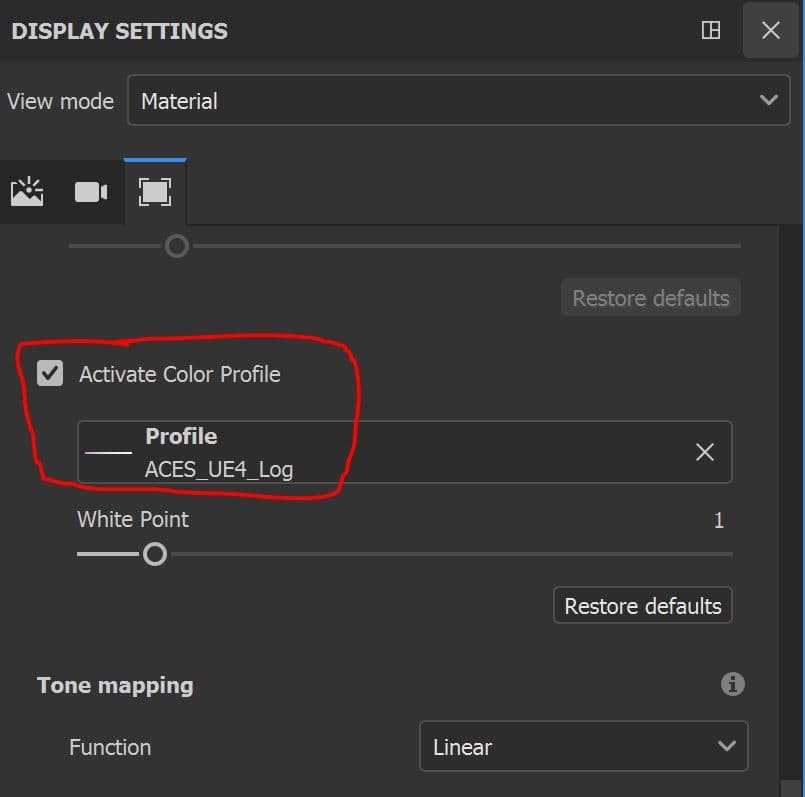
Before starting the texturing process in Substance 3D Painter I had to use Aces Color Profile because it would give me the correct results once I import the output textures in Unreal, so I downloaded a free ACES LUT For Substance Painter done by bleleux.
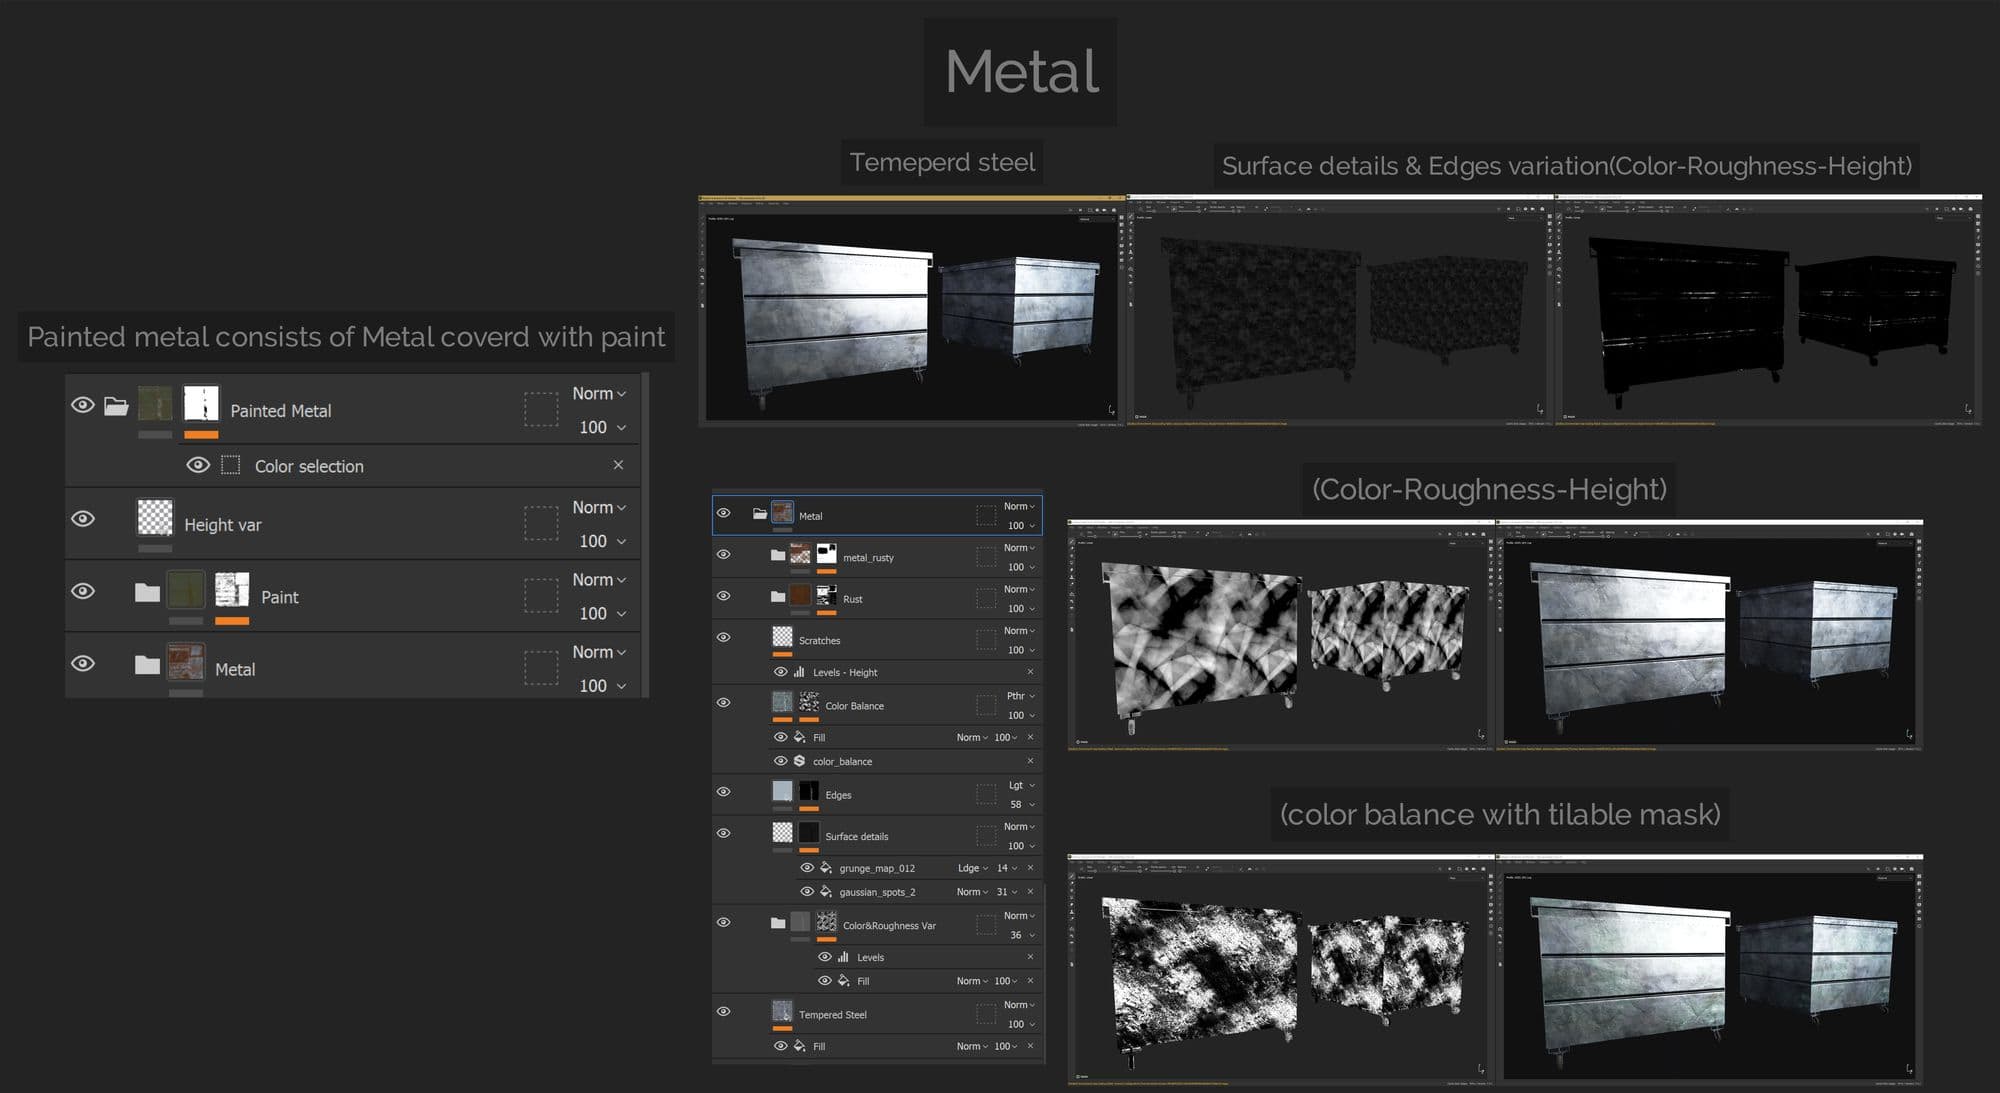
Based on reference of dumpsters I gathered as inspiration for the scenes materials, I found that they were composed paint and metal underneath with a mix of rust, dirt and different variations of grunge on top.
So the first thing to do is to either create a metal layer from scratch or pick a ready one and manipulate it, until you find a suitable result.
I created a Painted Metal folder and created a mask using colour id of the main body that consists of a metal and paint. I started with a metal material, picked Tempered Steel from ٍٍSubstance source, and changed some values of the colour and roughness, tiling, etc.
I added other custom layers for the metal to add variation and some surface imperfections. I used one of the scratches from megascan imperfections to add some surface roughness variation: Scratched Metal.
You can find lots of free useful textures on the Quixel megascan website or by downloading Quixel bridge.
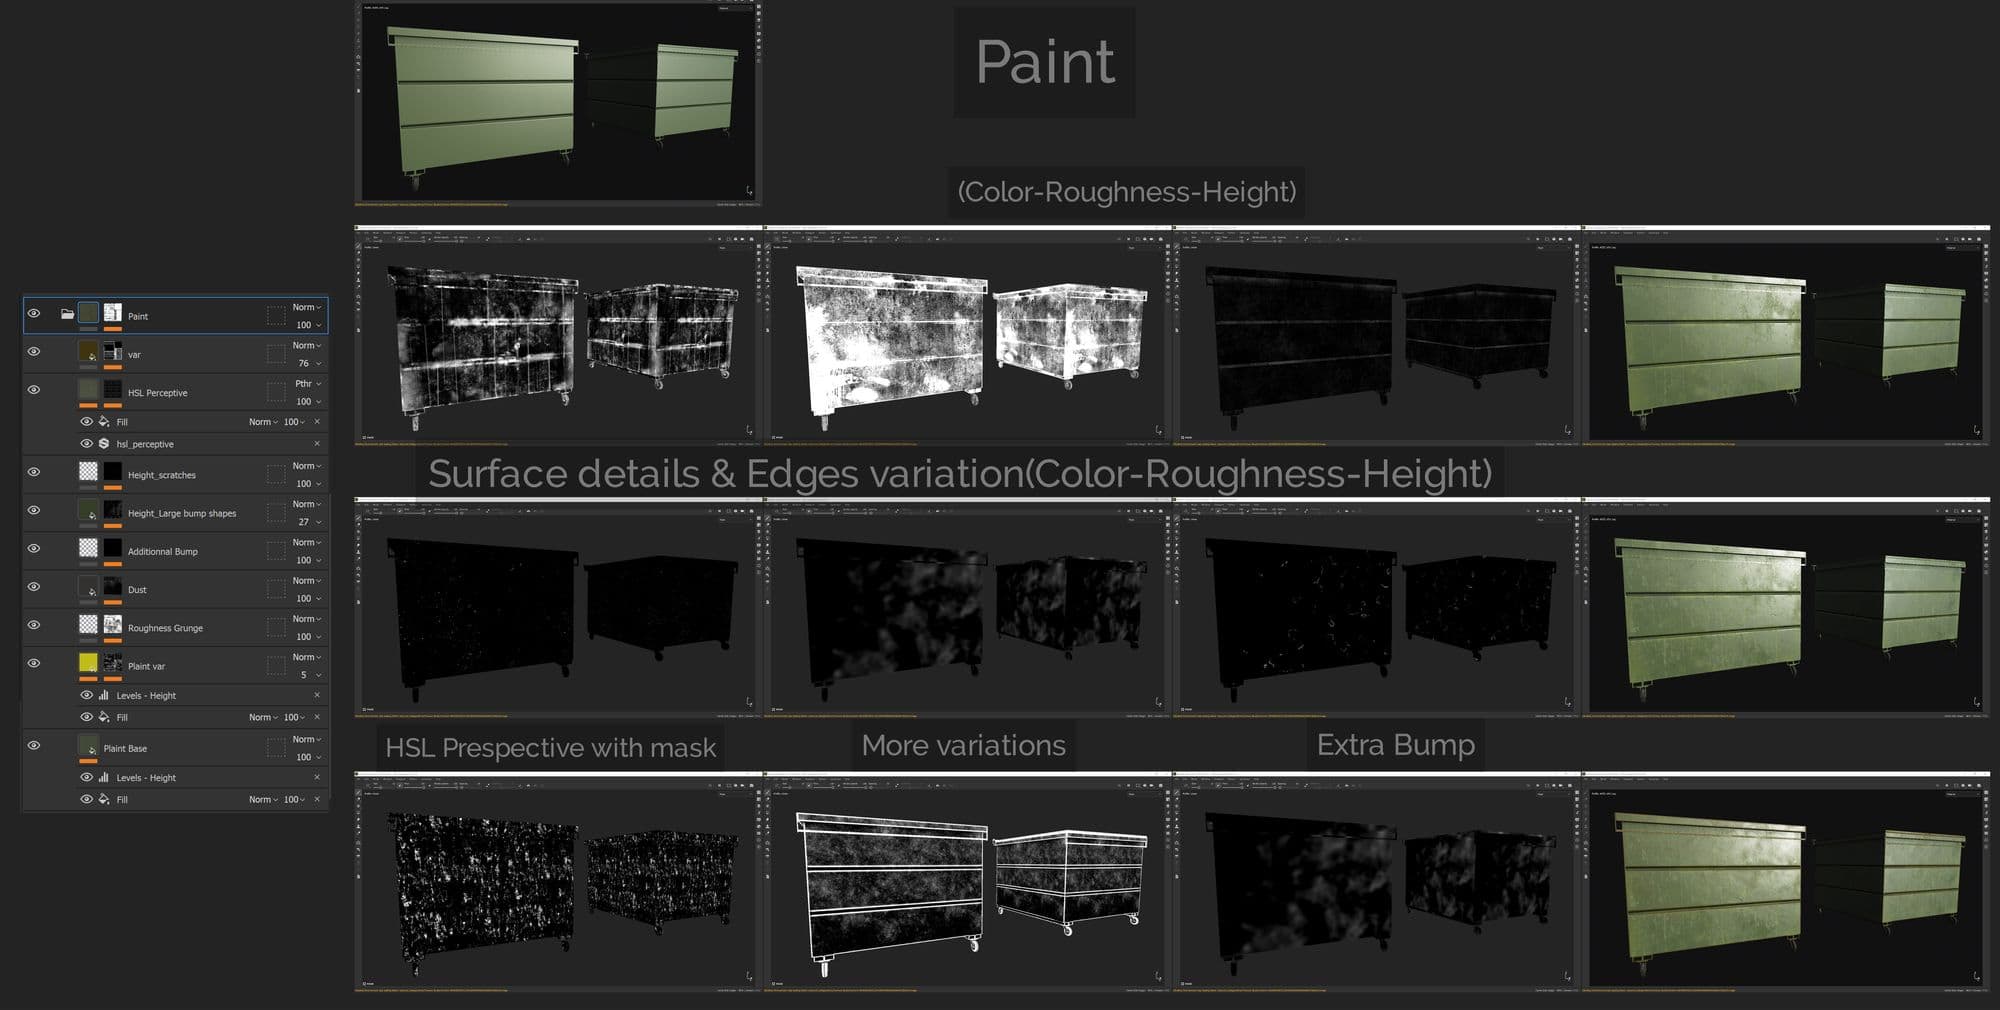
For the paint I used similar methods as metal and wanted to make it look like it was fading and dirty, so I used many colour variations.
I started with a simple base layer with green colour and simple noise for subtle bumps in the height channel, then added a yellowish fill layer and blended using some generators and the default painter's grunge tileables.
I changed some of their balance and contrast, and repeated some of the steps and added additional bump and HSL Perspective to create more colour fading where appropriate.
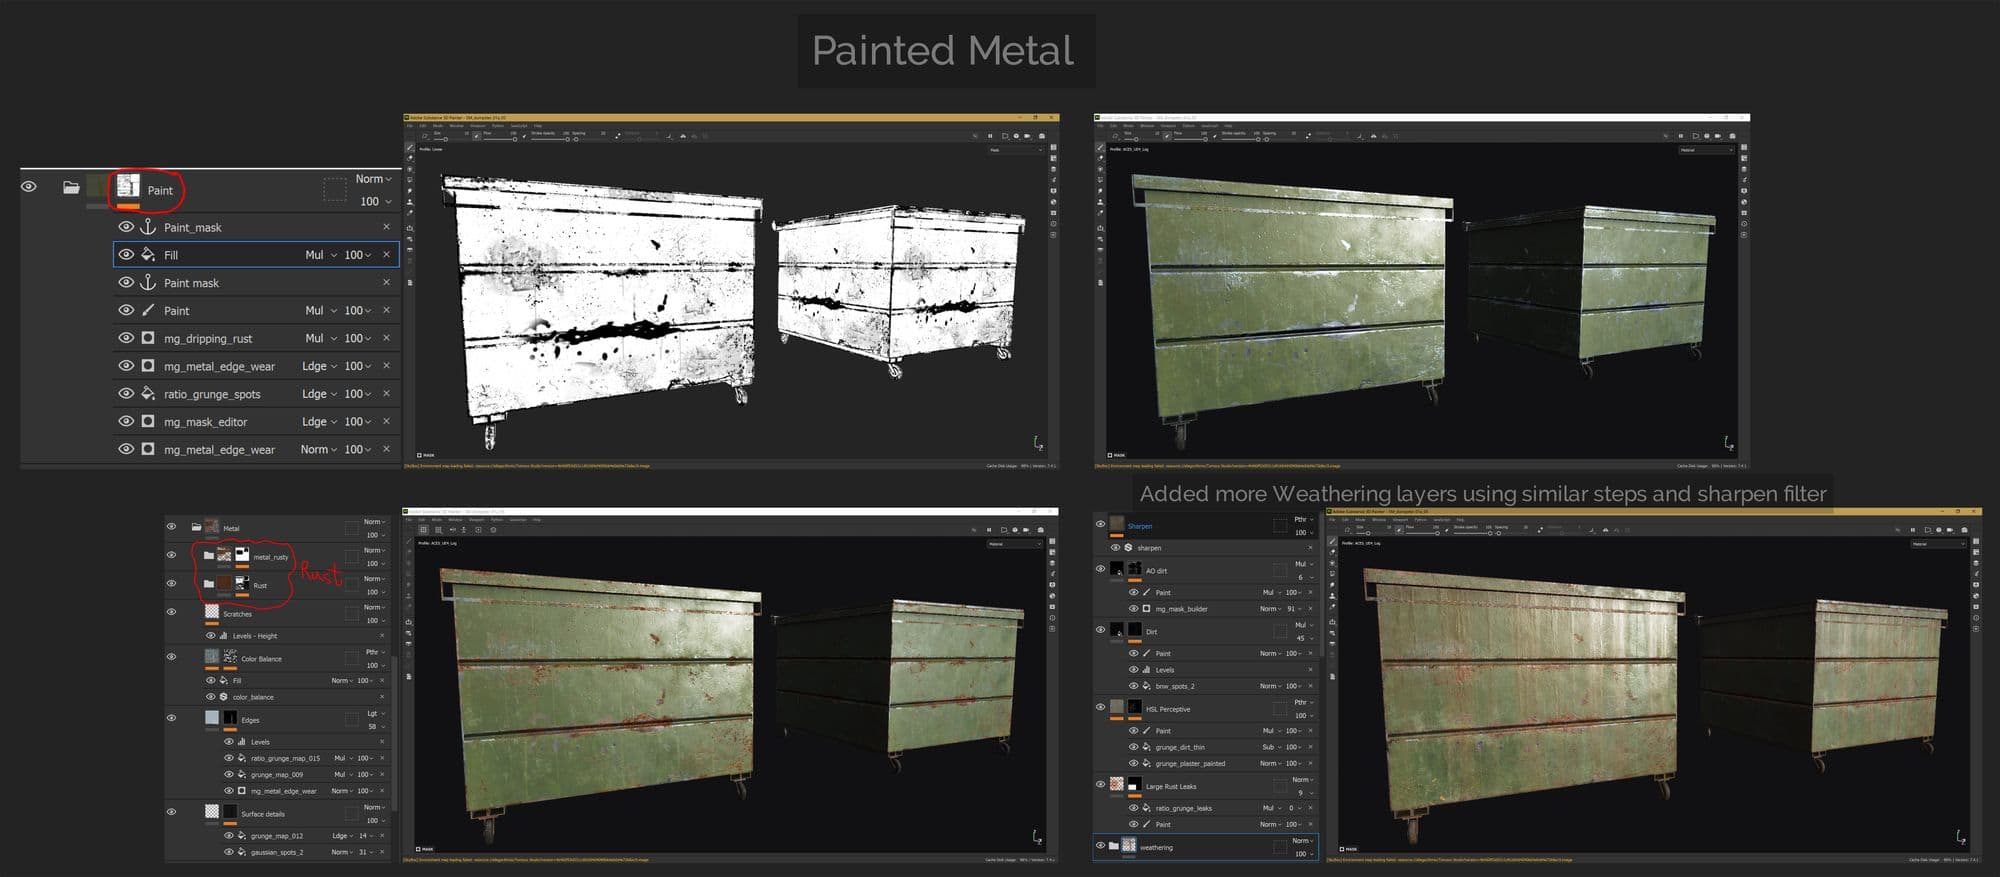
The next step was to blend between the paint and metal by creating some edge wear and some damage and grunge masks on the paint to reveal some of the metal beneath.
I then added rust layers on top of the metal and manually controlled the areas I didn’t want to be rusty or vice versa.
After that I added more weathering layers like dirt, colour fading, grunge and leaks, etc, using tileable textures or stencils by using the default painter’s grunge maps or a custom one created by Photoshop and above all of that, some additional subtle AO and sharpen filters so it helps the texture pop up more but not so much so it won’t create strange artifacts.
I followed similar steps to create materials for the wheels and other elements and exported the textures using the same preset I did for previous textures and applied it on an instance material in Unreal.
I used similar steps to create the other props, but will talk more about reference gathering and some methods used to be able to analyse the concept and try to create something from it, especially when the concept is not clear enough.
For the Alligator I used ZBrush to sculpt it, used a base mesh from Maya’s default content browser and then added details based on reference I collected from Google or taken by my Camera.
I mainly used Clay, ClayBuildUp, Damstandard, Standard and Standard Brushes and added surface noise to create the shape and details and best proportions I wanted after some mesh subdividing.
For the low poly I simply used Zremesher and then manually reduced it a bit in Maya.
I made a mistake that I didn’t T pose the alligator mesh from the start, and sculpted on a moving pose which I realised wasn't the correct way to do, but then I used ZBrush transpose master to easily get the final pose on the low poly mesh.
I did two versions for the alligator and they were unwrapped together, one for the main alligator and the second is for the body parts.
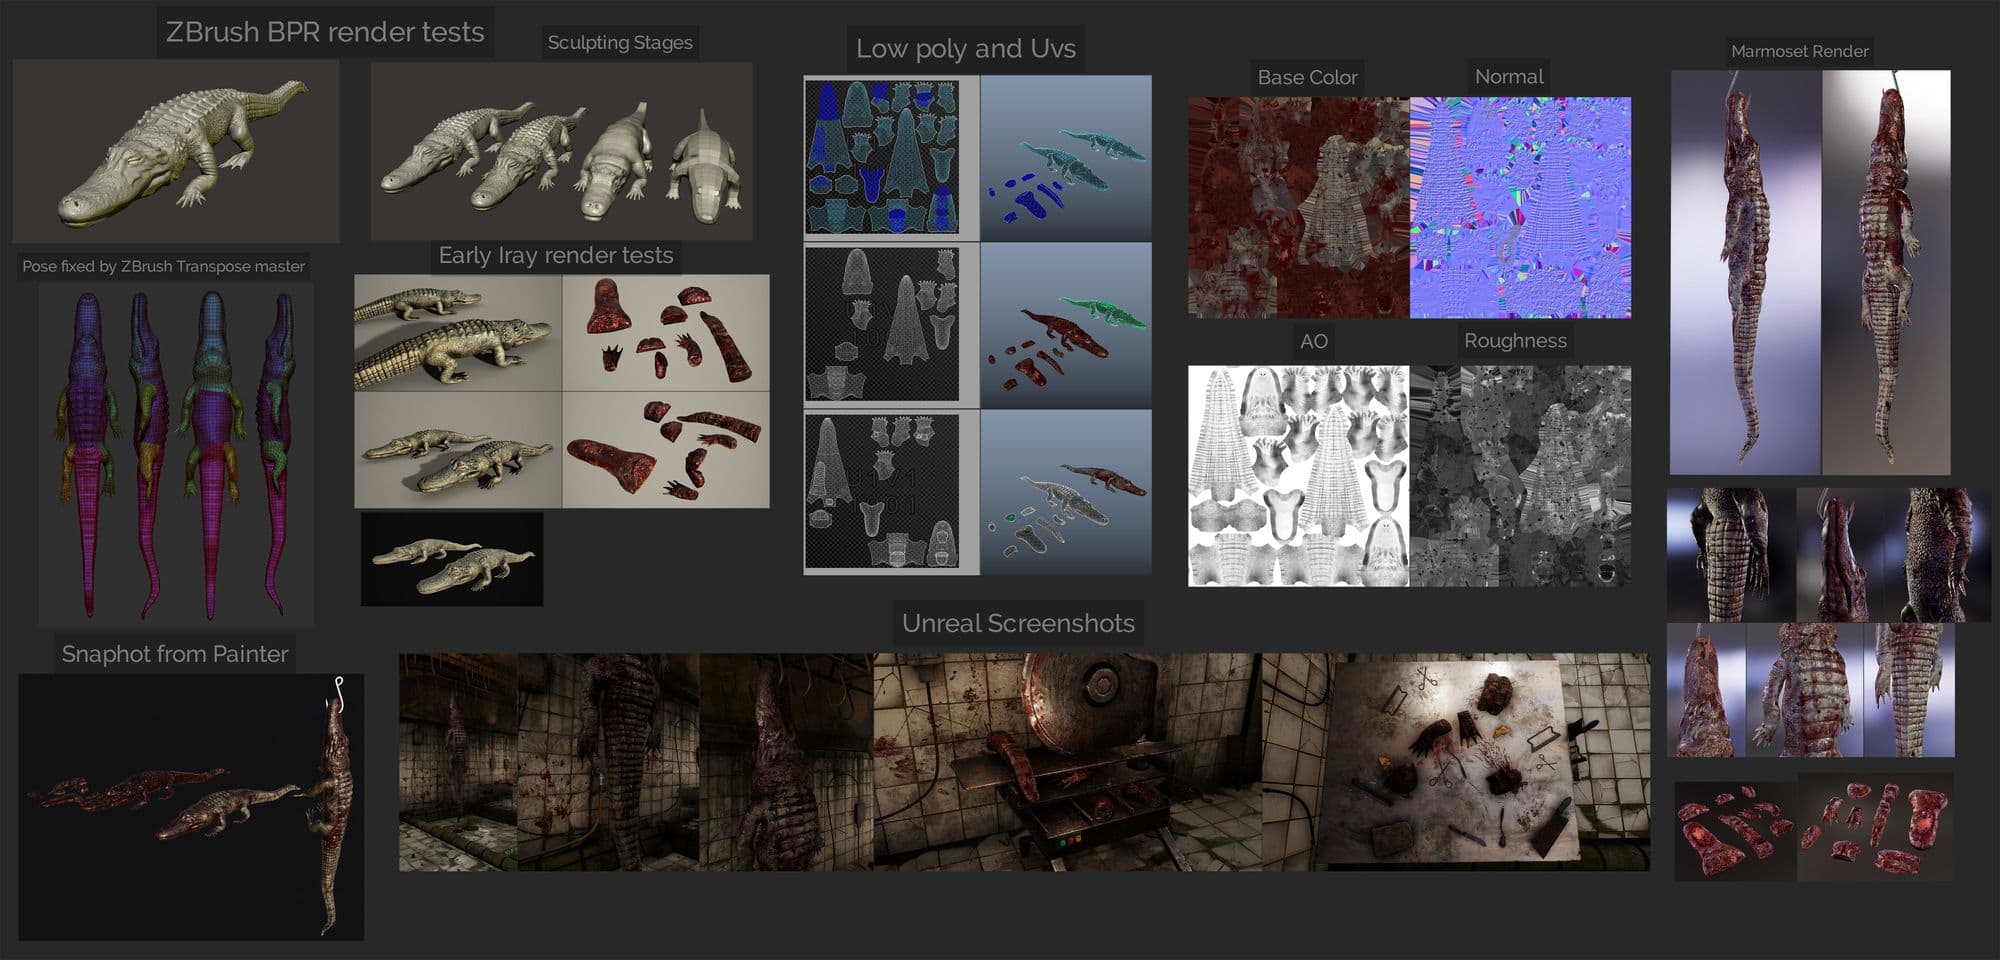
For the texturing part I used a combination of Substance source or default materials and tweaked them, using things like Patinated Frog Leather, Flesh Carbonized, Zombie Blood, and different generators and filters. I used some blood stencils or manually used particle brushes for random blood leaks.
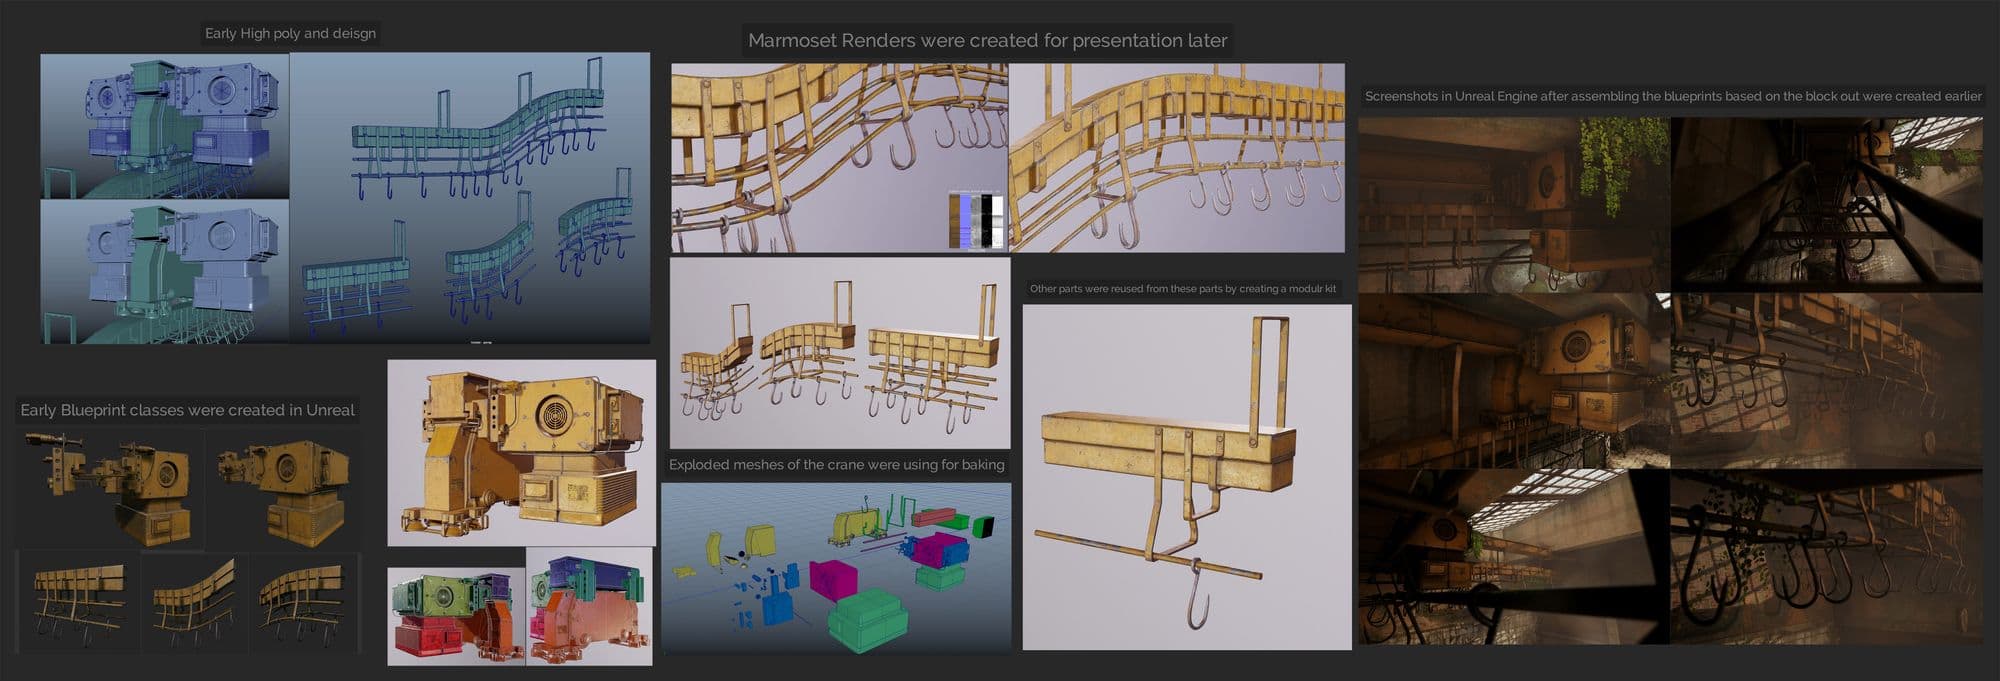
Crane and Conveyor assets were attached as blueprints classes in UE4 and used 6 different texture sets each is 2048x2048 and it's reused many times as prefabs in my project. The idea came from collecting reference similar to cranes and conveyors for cloth or bags.
For example the conveyor was created only from 6 elements, main body, hook and the arms, some of them share the same texture map or with the crane kit.
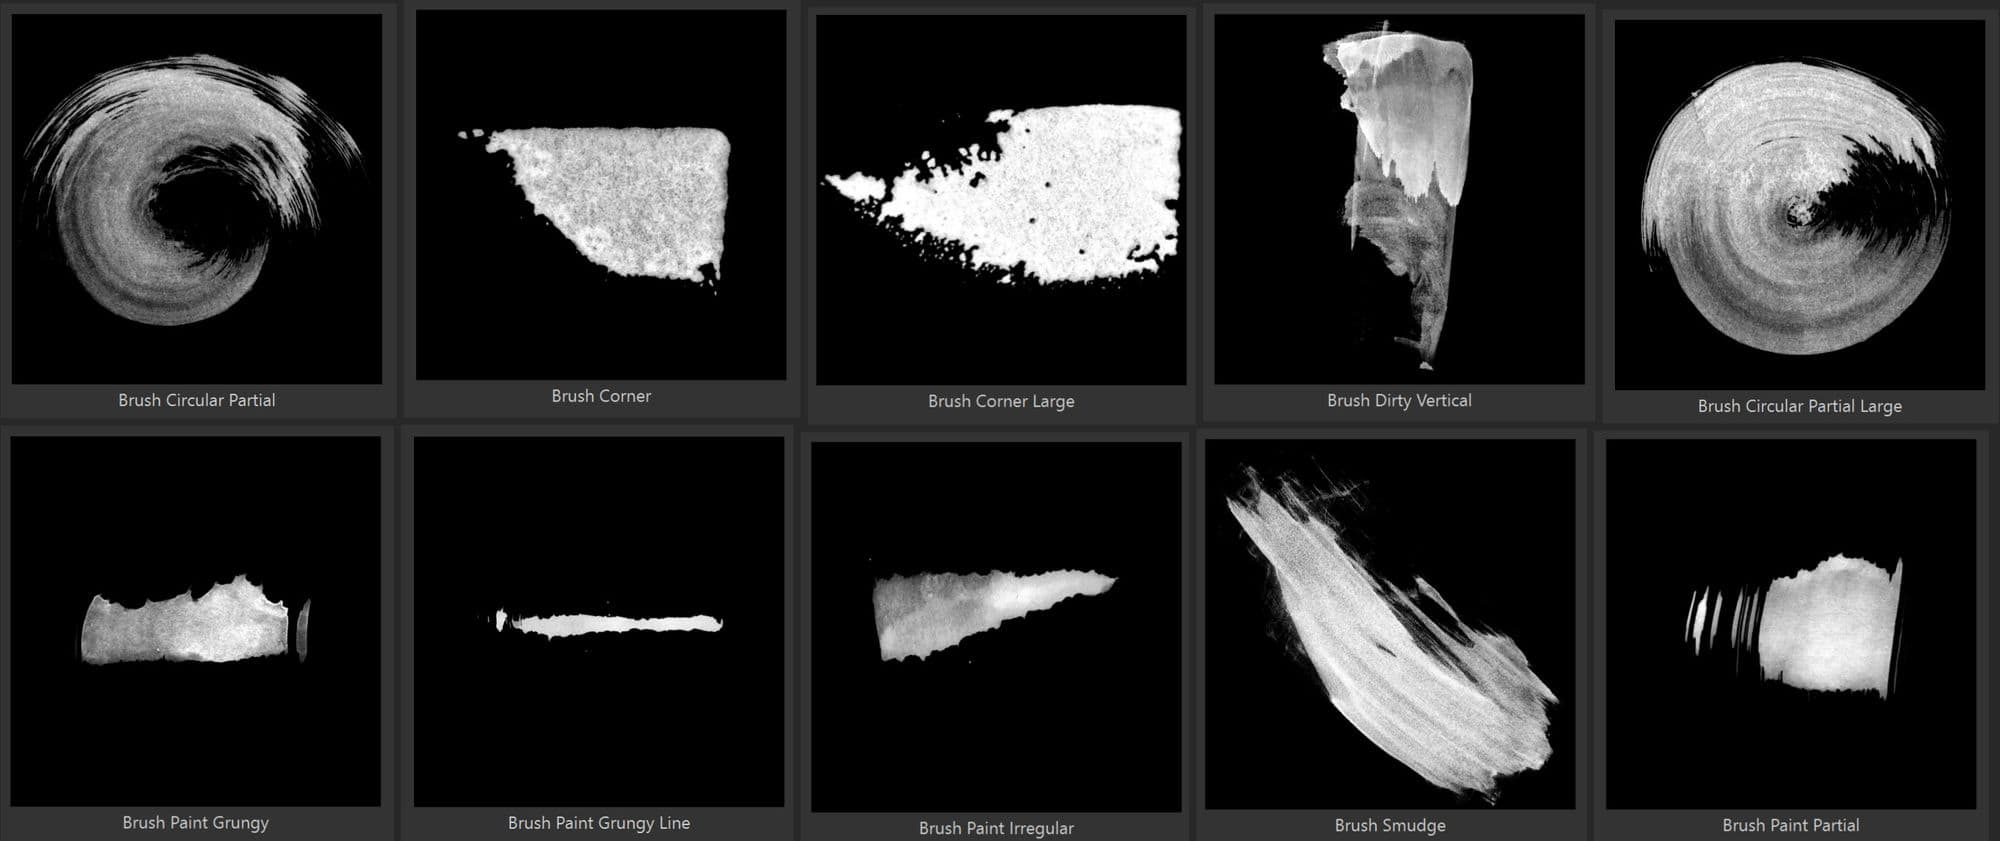
There are a very useful Alphas I used to create a better and unique transition between paint and metal, alphas like Pearl, Corner, Circular and Paint alphas in the default Substance Painter’s Alphas list. The good thing about these is that you can control their values like the hardness, flow, etc.
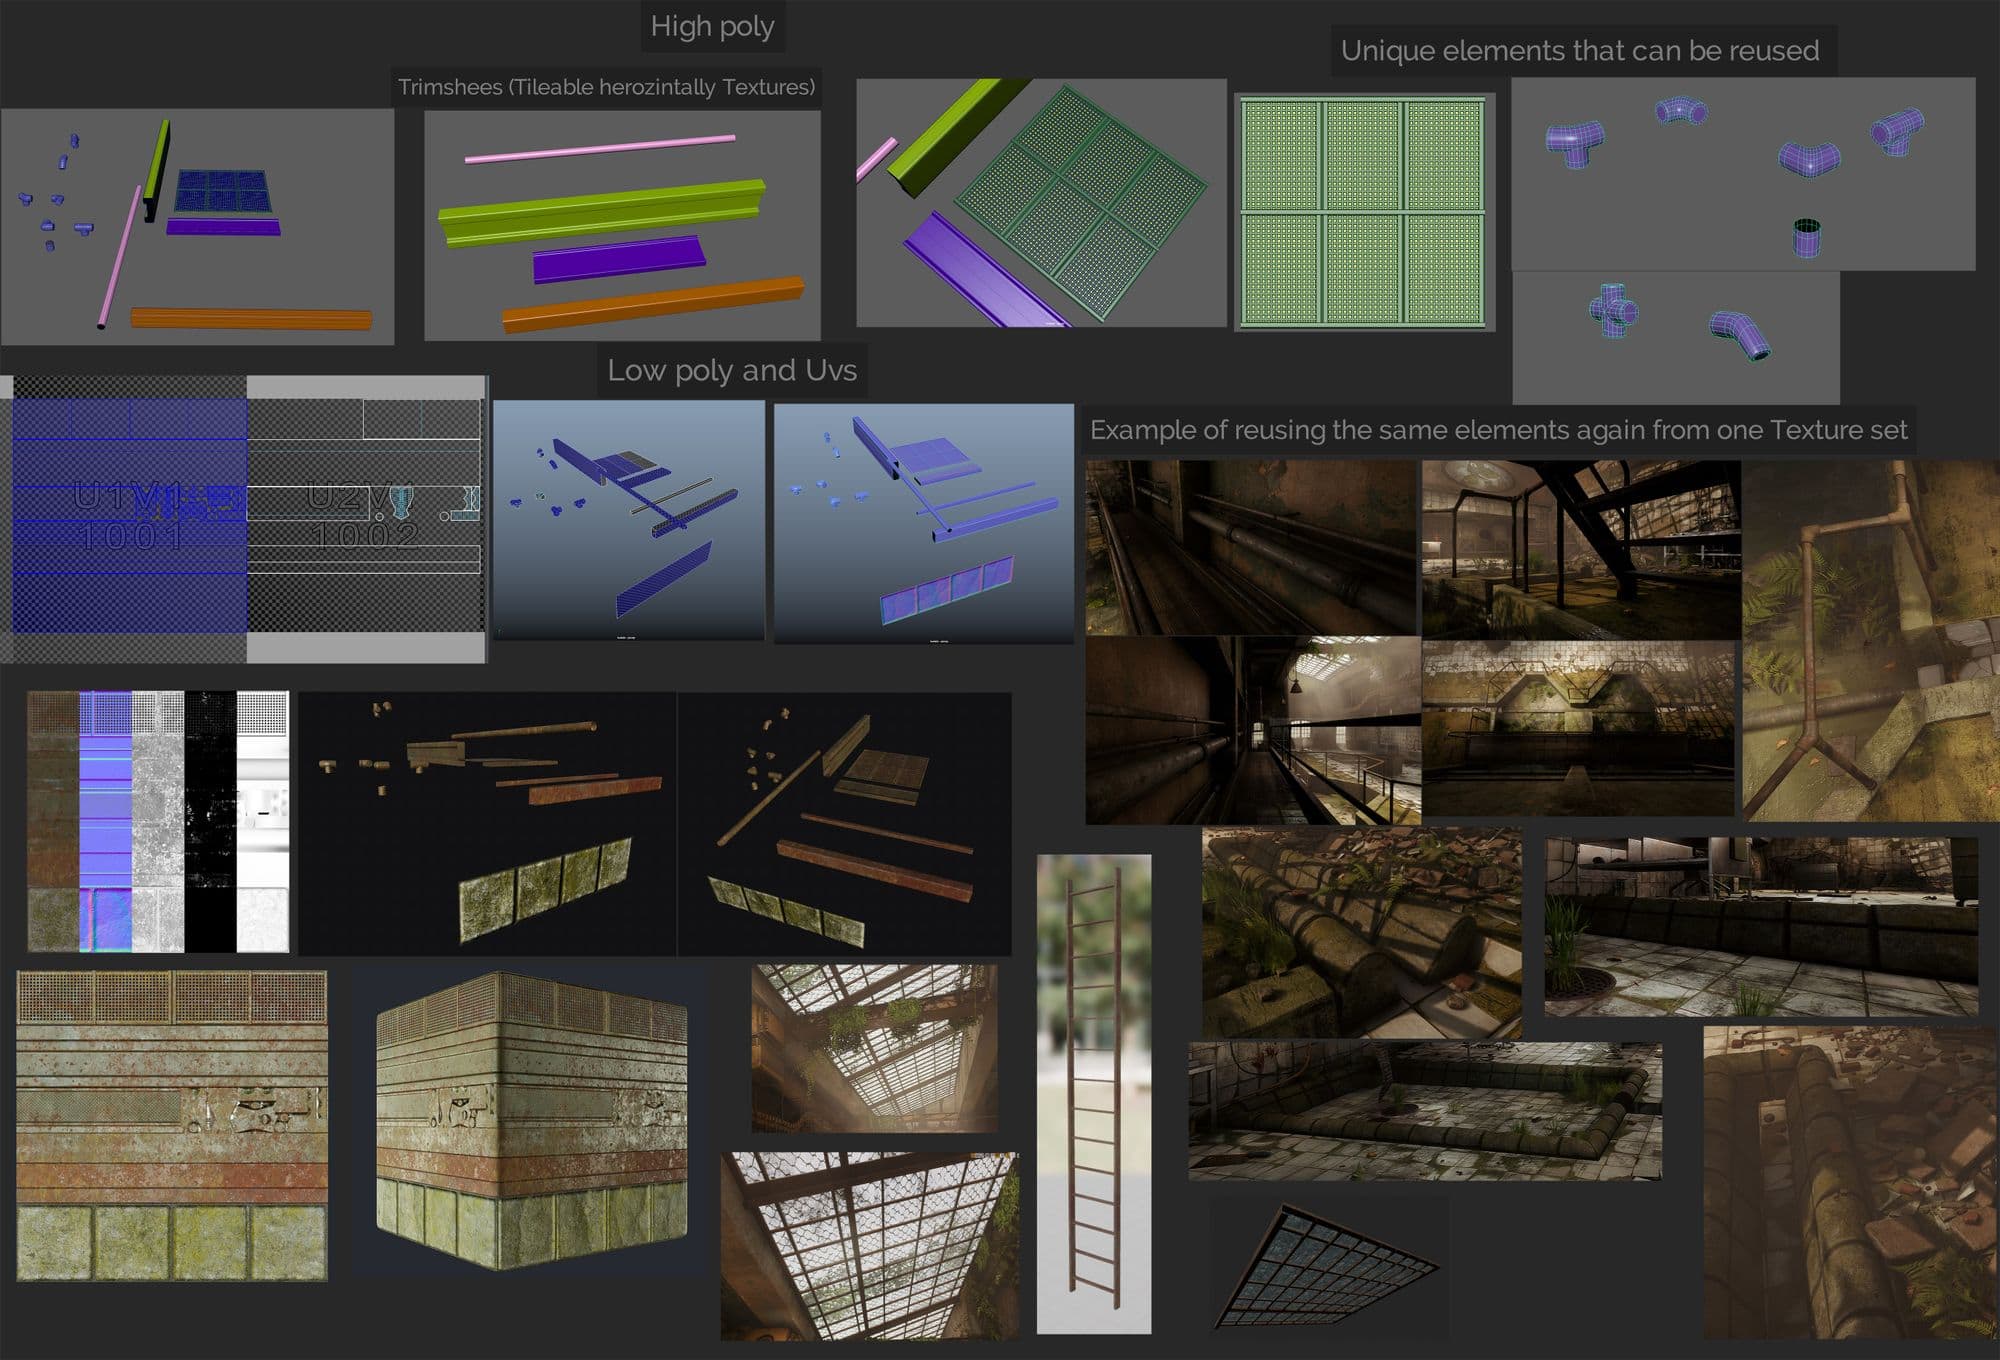
Some of the assets like the stairs, Pipes, stones, ceiling and ladder were reused from the same texture set; the texture set for these assets is a combination of trim sheets that can be tiled horizontally and unique elements.
This is a quick demonstration of creating a blueprint as a Prefab in Unreal Engine and building stairs from a modular kit based on one texture set.
Reusing assets is the fastest and optimal way for creating assets and scenes like this and very helpful in level design, the best way to do them is to plan early in the block out phase like I showed earlier and to make sure they snap together in the Grid, so you need to adjust them using the metric system.
There are 2 types of decals, deferred decals that can be created from an Unreal decal actor and it blends with the surface based on the distance (the closer it is, the more visible and vice versa) and it can warp over the asset unless you select not to receive decals for a specific asset.
Another type is mesh decals, and this type is imported as a static mesh like any normal asset imported to Unreal Engine, but either it will be on a flat plane with alpha or extracted and floating above an asset.
I used aSubstance 3D Designer to create most of the dirt patches and some of the decals were created from unique textures I got from google or textures.com and tweaked in Photoshop like some of the grunge and leaks, etc.
Unreal Master decal material was created based on City Subway Tunnel scene by Dekogon from the Unreal marketplace.
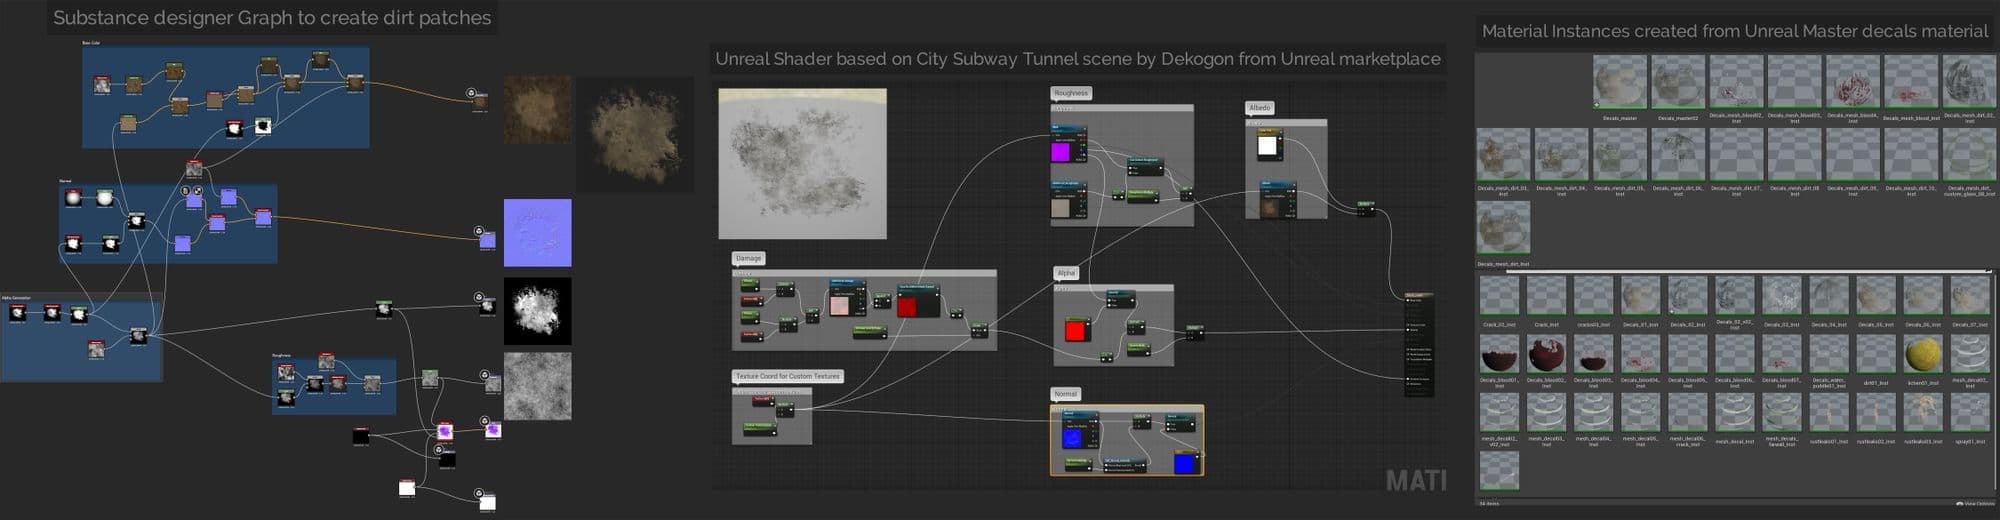
I created some of the mesh decals on a flat plane and exported to Unreal Engine as a static meshes, some were created on the table because the deferred decals won’t warp correctly around other assets and might create stretching or strange artifacts.
Others were created in one texture set on 6 planes and added some grunge, dirt textures around their edges by using Substance Painter.Later these planes were imported into Unreal as static meshes and then moved them closely to float above the windows glass between the bars to add some dirt or the table meshes to add blood or dirt and grunge, etc.
Other types of mesh decals can fake edge damage for something like concrete walls or columns.
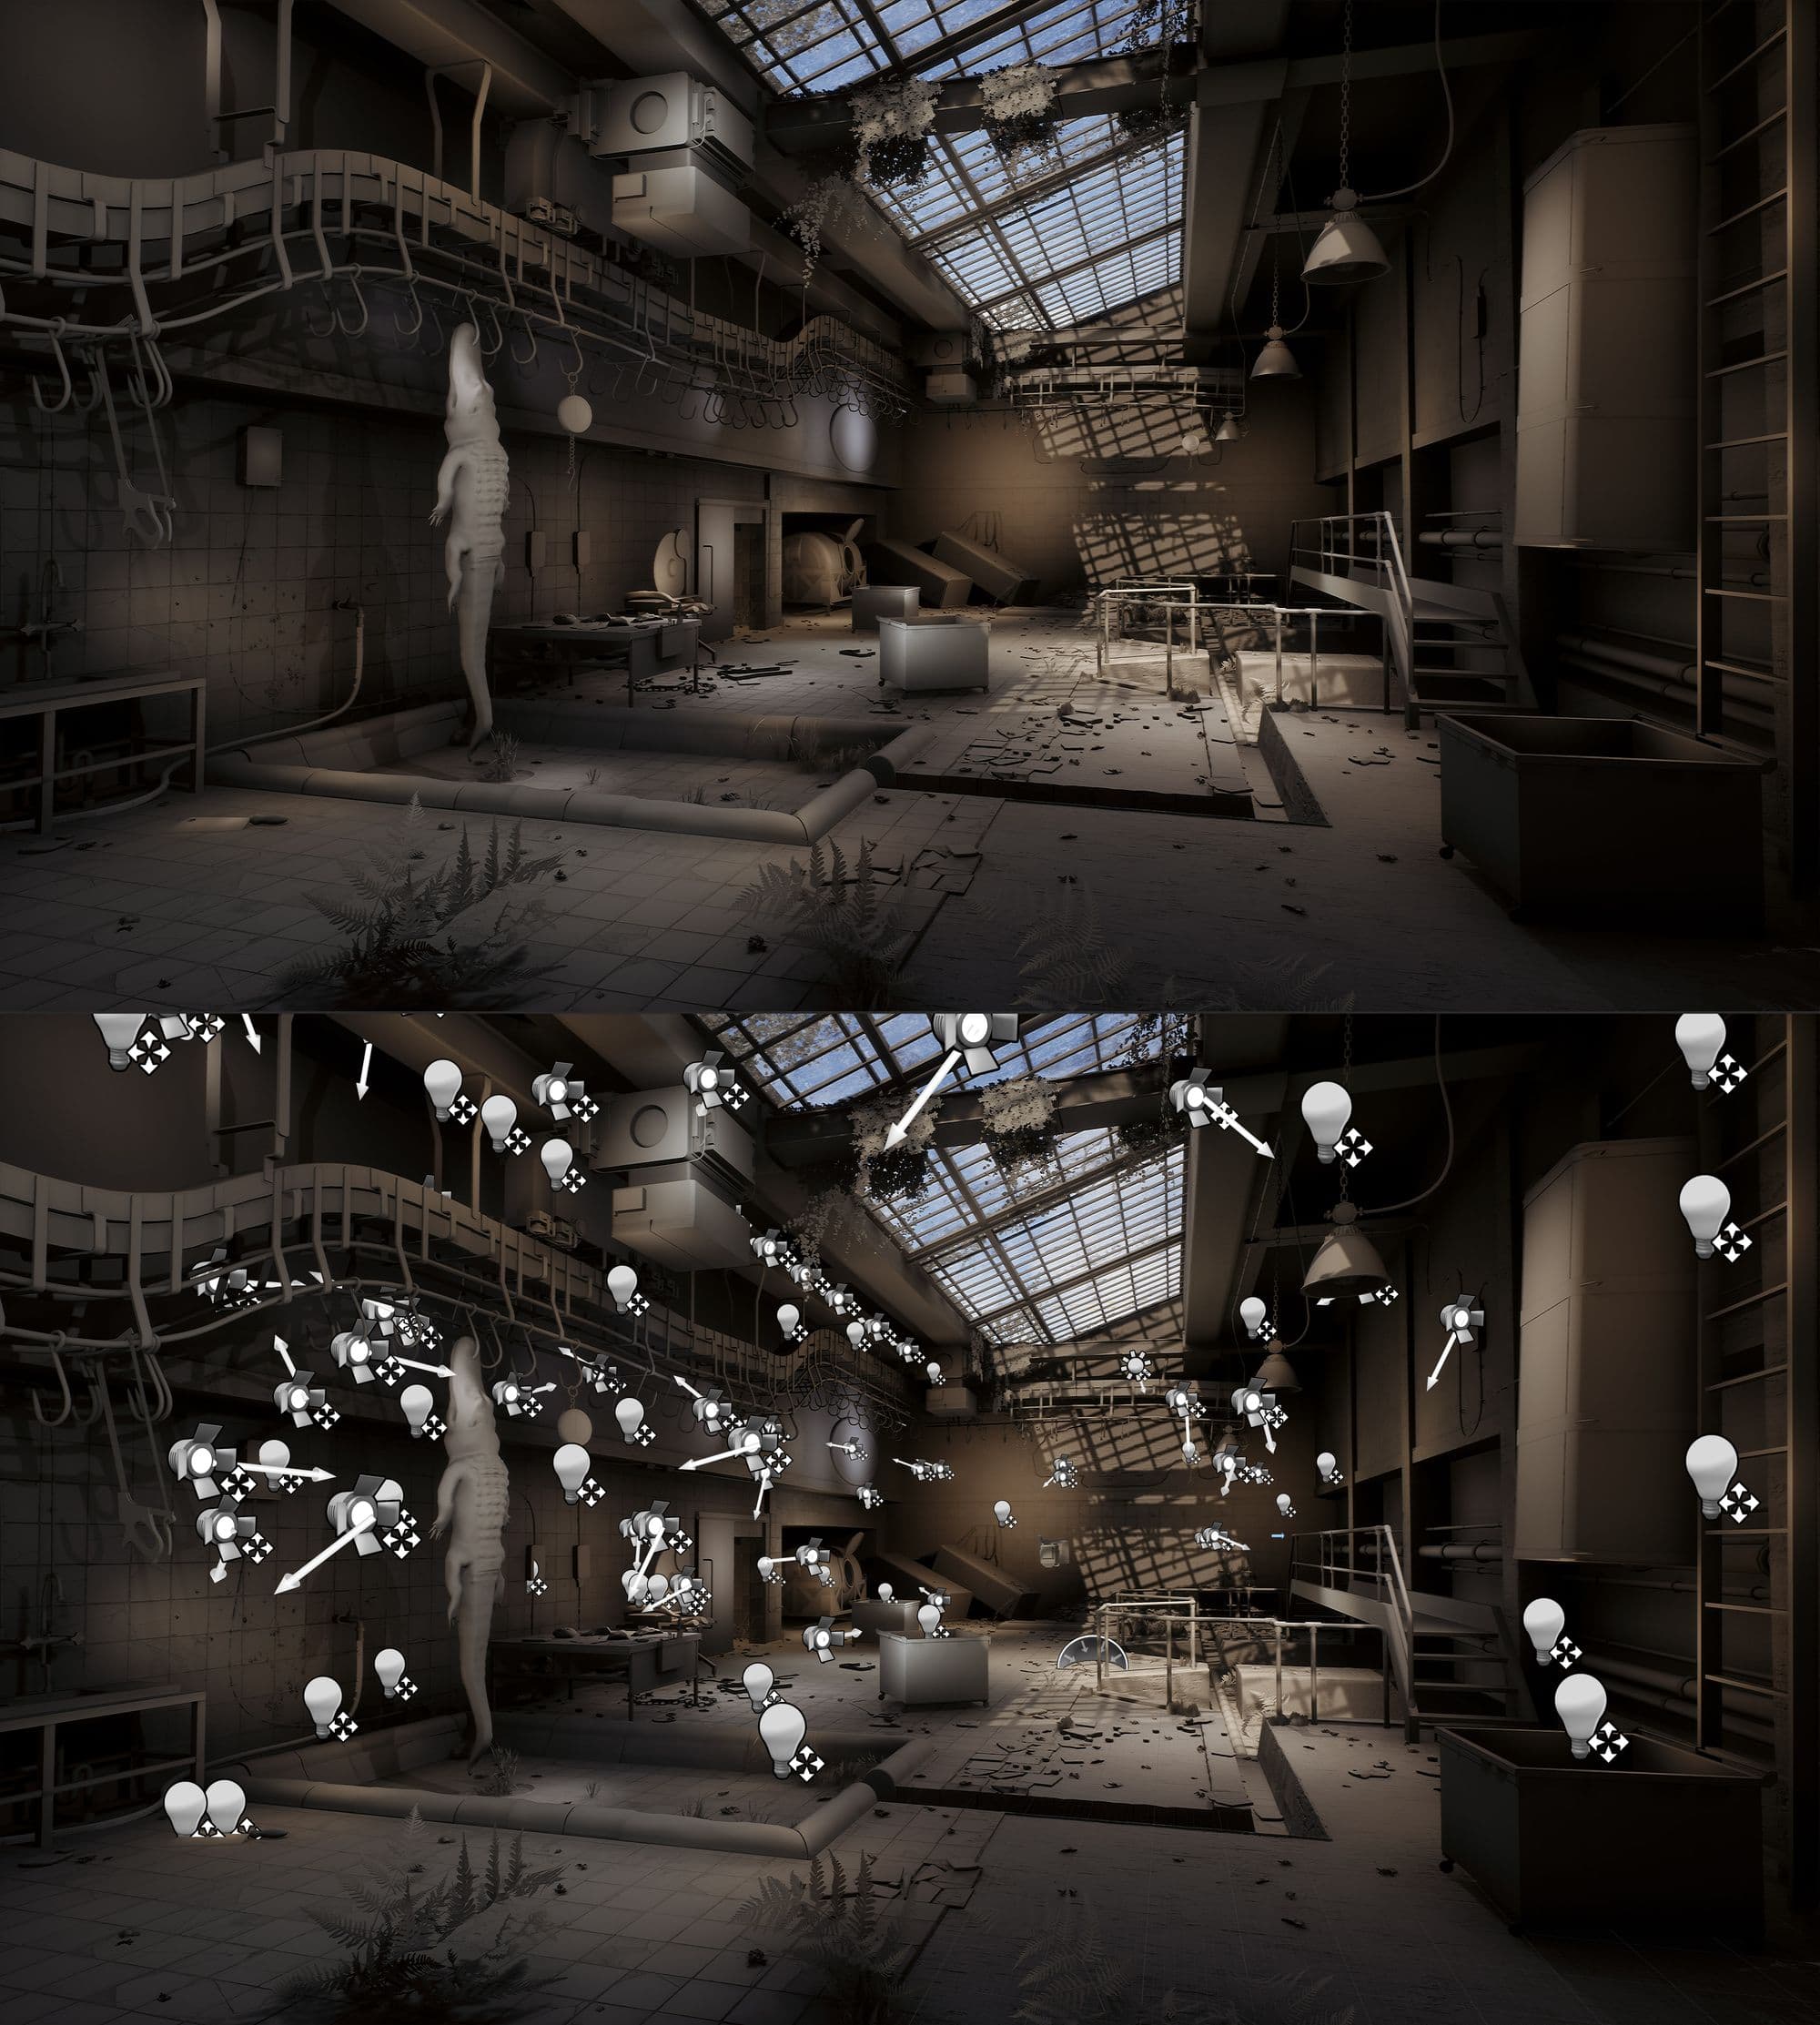
I used a combination of static, stationary and movable lights, but I realised after I completed my project that it’s better to use dynamic lights and only stationary for the skylight - this helped my scene to be faster without many frame drops in play mode.
I used a combination of point lights and spotlights, directional light and skylight. I wanted to fake some light on places like the wall, alligator, destruction walls/debris on the ground and the trench area.
I added an AtmosphericFog and ExponentialHeightFog to create a very convincing volumetric fog and God rays, and did some tweaks of the ExponentialHeightFog values until I found results that worked for me.
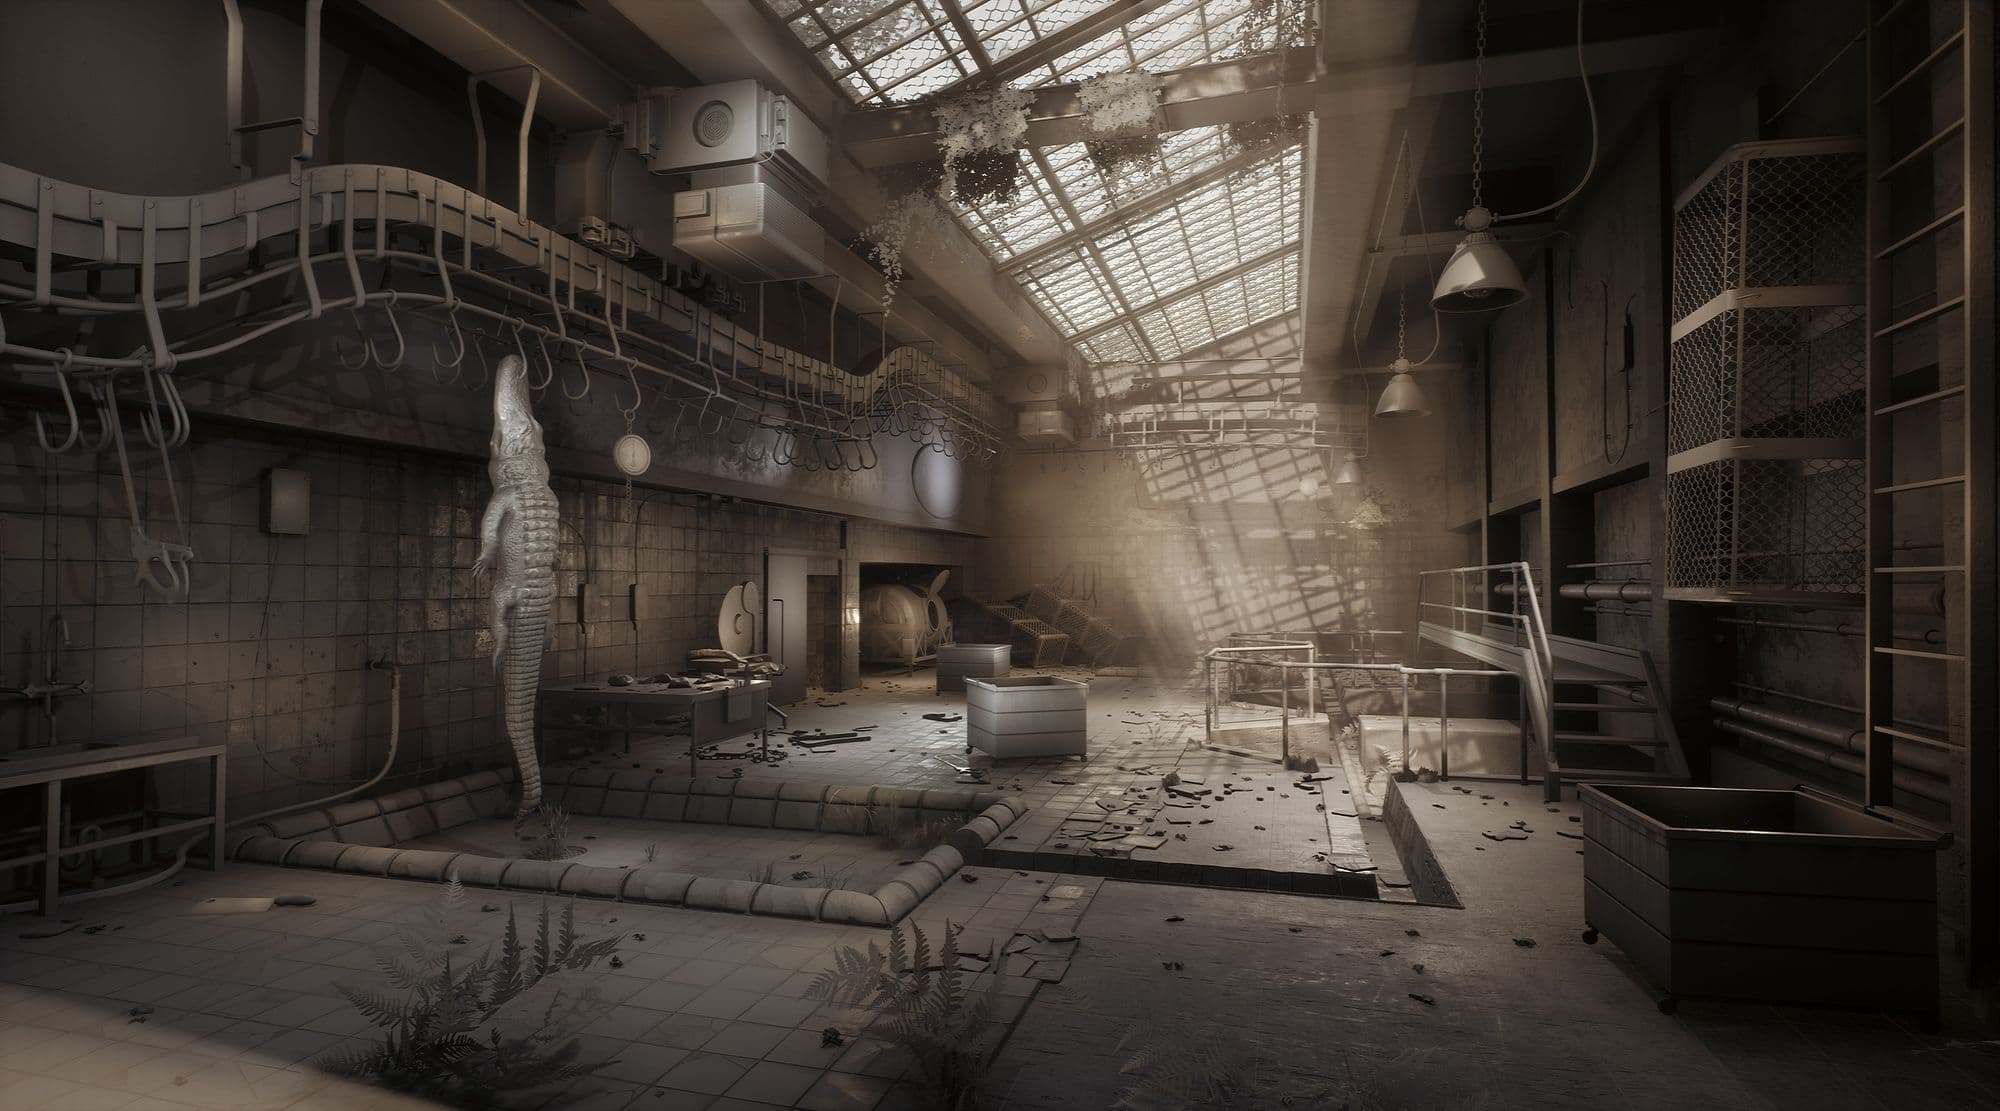
I used Post process volume and activated some of the Lens options like Bloom, Exposure, Chromatic Aberration, Dirt mask, Lens Flare, etc.
I added a custom Colour Grading LUT created from Photoshop and tweaked the Film values a bit. In the end, I added a custom sharpen filter based on this tutorial by Ervin Jesse.
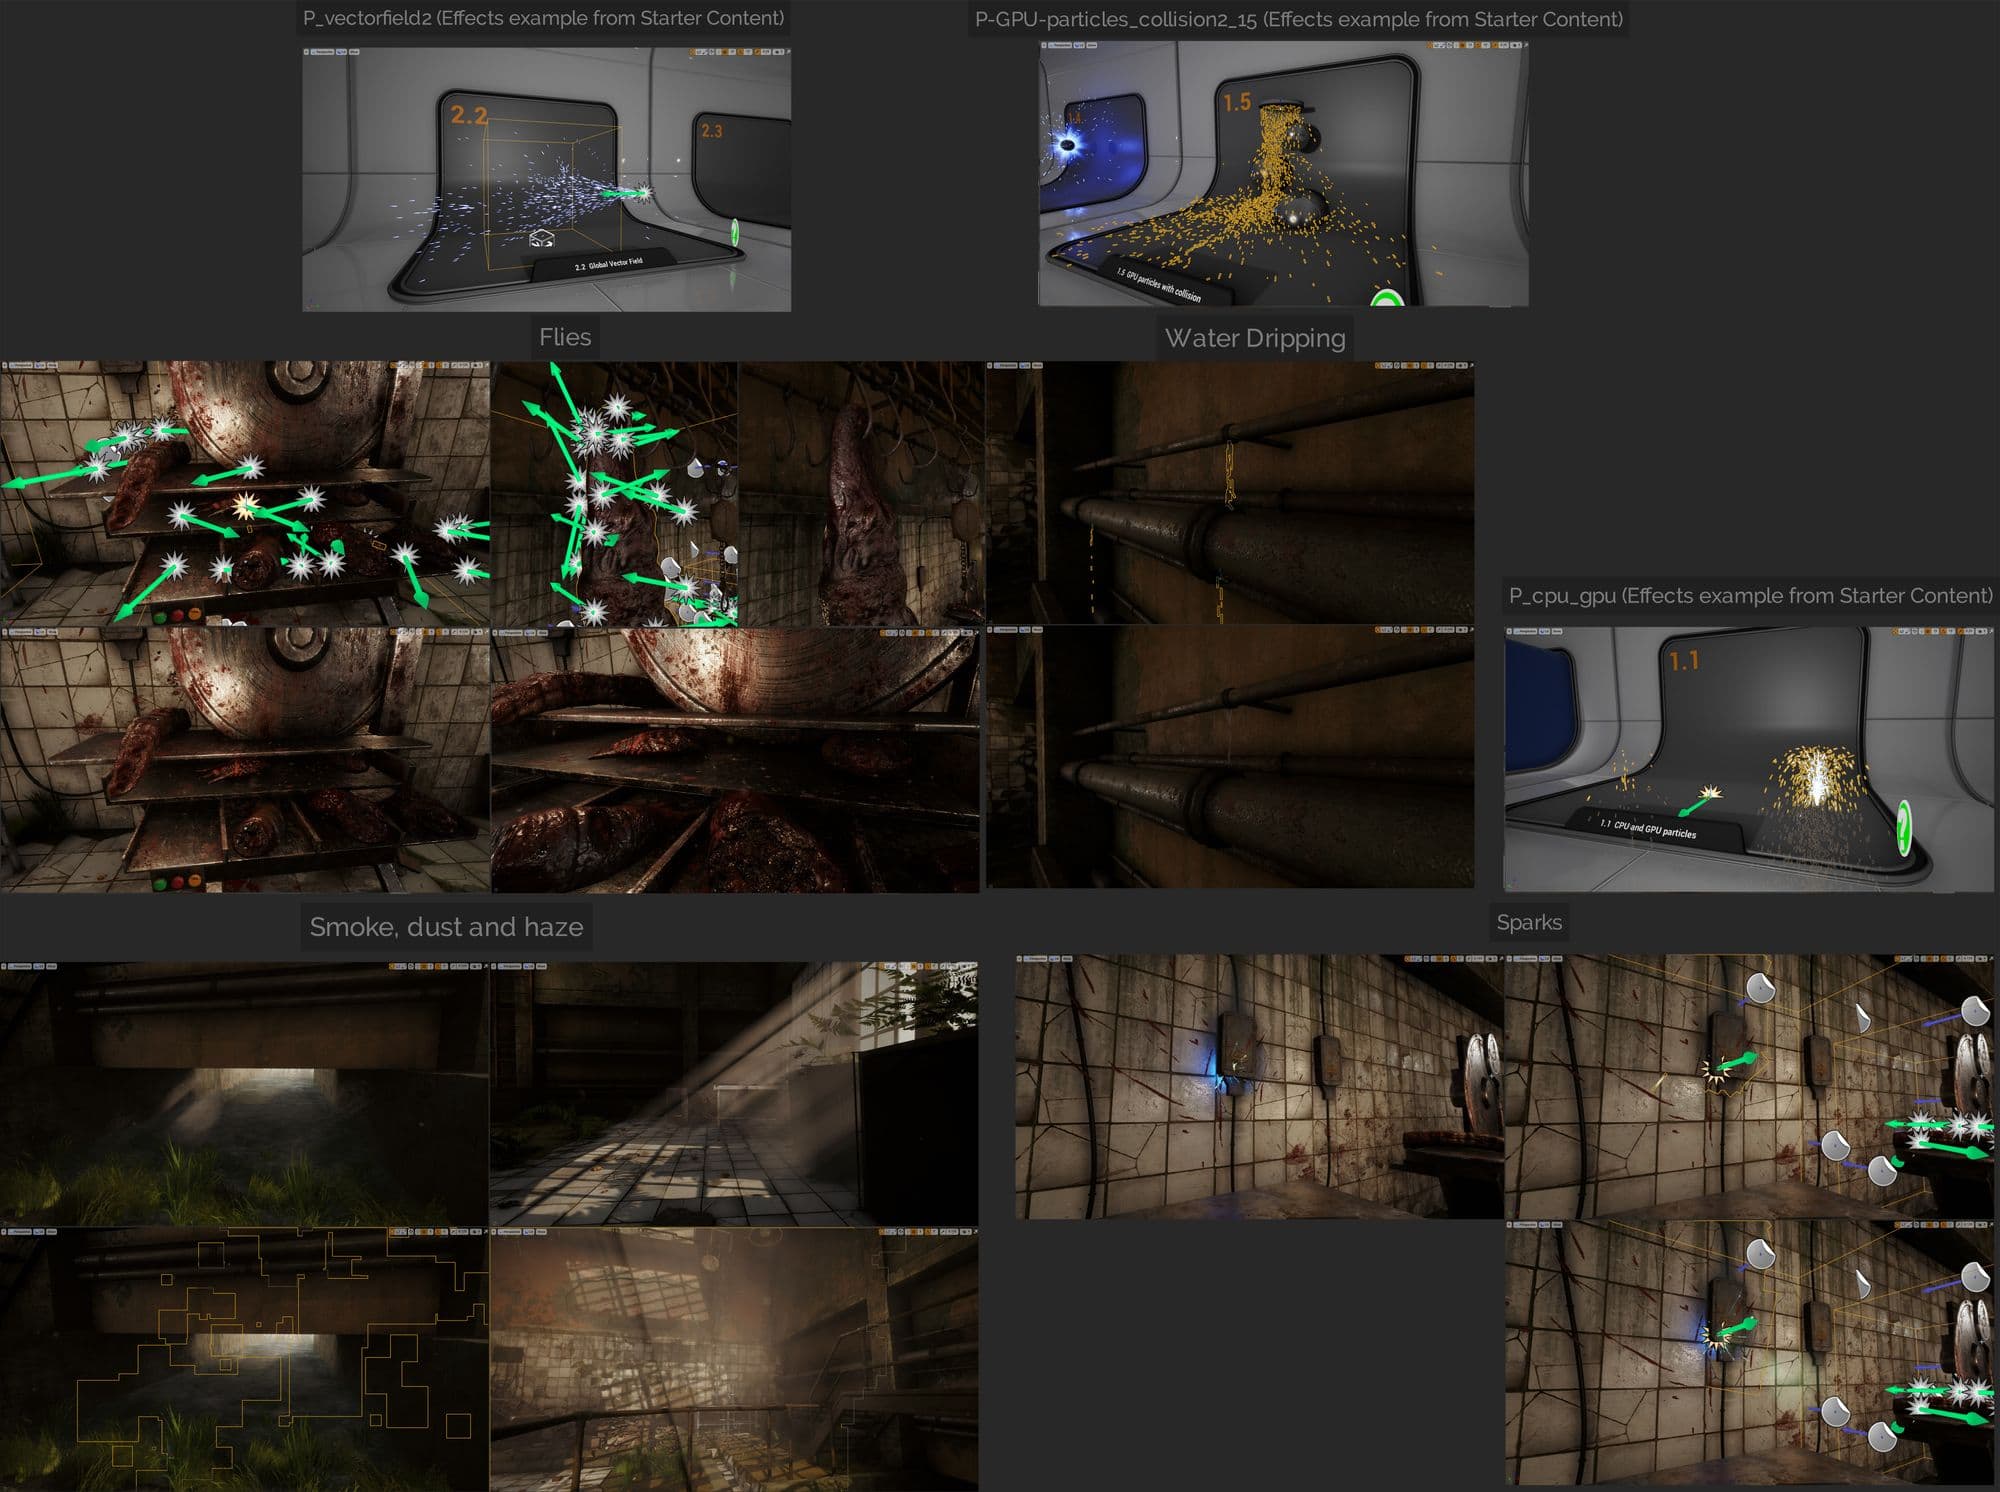
Most of the work I did with particles was to get Unreal starter content from Epic Games Launcher and pick similar effects of smoke, water dripping, sparks, dust, etc and then tweak their values until I found something that works better with my project.
For example, I opened the effects map from the example content and picked on of the vector fields emitters and vector field volume, and changed some of the values to make it look like some kind of fly or tiny insect.
The same process was applied for water dripping from the pipes: it was originally from the P-GPU-particles_collision2_15 example, and the spark was started from the P_cpu_gpu example.
The last thing I did wasto add a bit of modeling work to change some of the silhouette. I carefully broke some of the ceramic on the ground, and the wall, did some of geometry moving, but carefully without destroying the uvs, added debris, dead leaves using Unreal foliage tool, these small tweaks did a huge difference and helped the project to be more alive.
I tried to tell a story with the scene and to make modular and repeated assets, textures not be too obvious by using vertex paint, decals, blueprints, and scatter random broken parts from assets in the scene.
In the end I made some editing and created my final video for the project using Unreal sequencer, exported frames in exr and rendered them using Adobe Premiere after doing some breakdown and editing.
I believe Unreal Engine nowadays is one of the most powerful software that has made really magnificent changes in the Game and Film industries.
Thanks to Epic Games and Unreal Engine, these days anyone can create their own content, helping indie artists and developers who live in places that don’t have any resources an almost no companies in this industry, to learn for free with open source tutorials and content.
What I suggest if you want to make a winning portfolio piece is to study the concept, understand it, don’t rush the block out phase, if the project starts from a strong foundation it will come out really great and you can be creative using Unreal useful tools to create your own amazing levels.
Thanks so much to The Rookies for this opportunity and I hope you enjoy this article!
You can find more of Tarek's work on The Rookies and ArtStation.