Milijan Popovski is a recent graduate and intern at M3DS Academy. In this article Milijan dives deeper into the process and ideas that helped him make stunning concept art for the video game he collaborated on with fellow students.
Milijan Popovski is a Concept Artist with interests in both 2D and 3D Art, and a recent graduate of M3DS Academy. During his last year of school, he took the opportunity to develop his skills and participated in the Rookie awards 2022, along with other students from the Academy under the mentorship of M3DS instructors, working on the game Ohja.
The love for character and creature art served as an inspiration to Milijan in creating many of these characters and bringing them to life. In this article he dives deeper into the process and ideas that helped him make stunning concept art for the video game he collaborated on.
My name is Milijan Popovski. I am currently working as an intern at M3DS Academy. My entry for the Rookie Awards 2022 was a collection of all the concept artwork, sketches, and designs that I drew for the game Ohja.
From characters, and environments, to props, this is a somewhat deep dive into my work process, techniques, and methods I used during the making of the game. The final result is a culmination of all the experience I gained during the 5 months of drawing that I did.
Project Goal
One of the main goals for me was to bring an interesting and unique look to most of the characters in the game. Another focal point for us was for the player to be able to visually tell the characters apart by giving them identifiable colour palettes and cool designs.
As a rookie, this was the first obstacle I had to overcome and conquer: learning how to properly do research and sketch up ideas for something was just the beginning. Throughout the process, I learned a lot of useful information and techniques that I wish I knew during the first phase of drawing.
Because our eyes were set on a style that was a mix of realism and stylised, I had to adapt my style and get a consistent look on all of the characters.
Methods and tools
The program I was using for drawing all of the concepts was Photoshop.
Apart from using Photoshop, some of the earlier sketches were drawn on paper then transferred and worked on digitally. A very important thing I learned during my time drawing and painting in Photoshop is that naming and organisation of each layer is very important both for consistency and being easily able to find what layer you have been working on.
Each new page of concepts would consist of multiple layers being named according to each drawing. I also learned that writing and taking notes helps with creating concepts and following a set of rules set by yourself.
After organising ourselves I began with the concept design given to me. While working on all of the bosses I made sure to keep in mind that these designs were focused on being big and menacing filling the role of a boss in the game.
References and Sketching
I initially started sketching from my imagination, but I quickly learned that I had to do research and gather references before bringing my own ideas to the table.
I started browsing online on different platforms searching for ideas and artworks that could assist in the creation of these concepts. These are some of the websites I used for gathering references and ideas:
After gathering the majority of ideas for each character I started sketching, beginning with the first character, the witch.
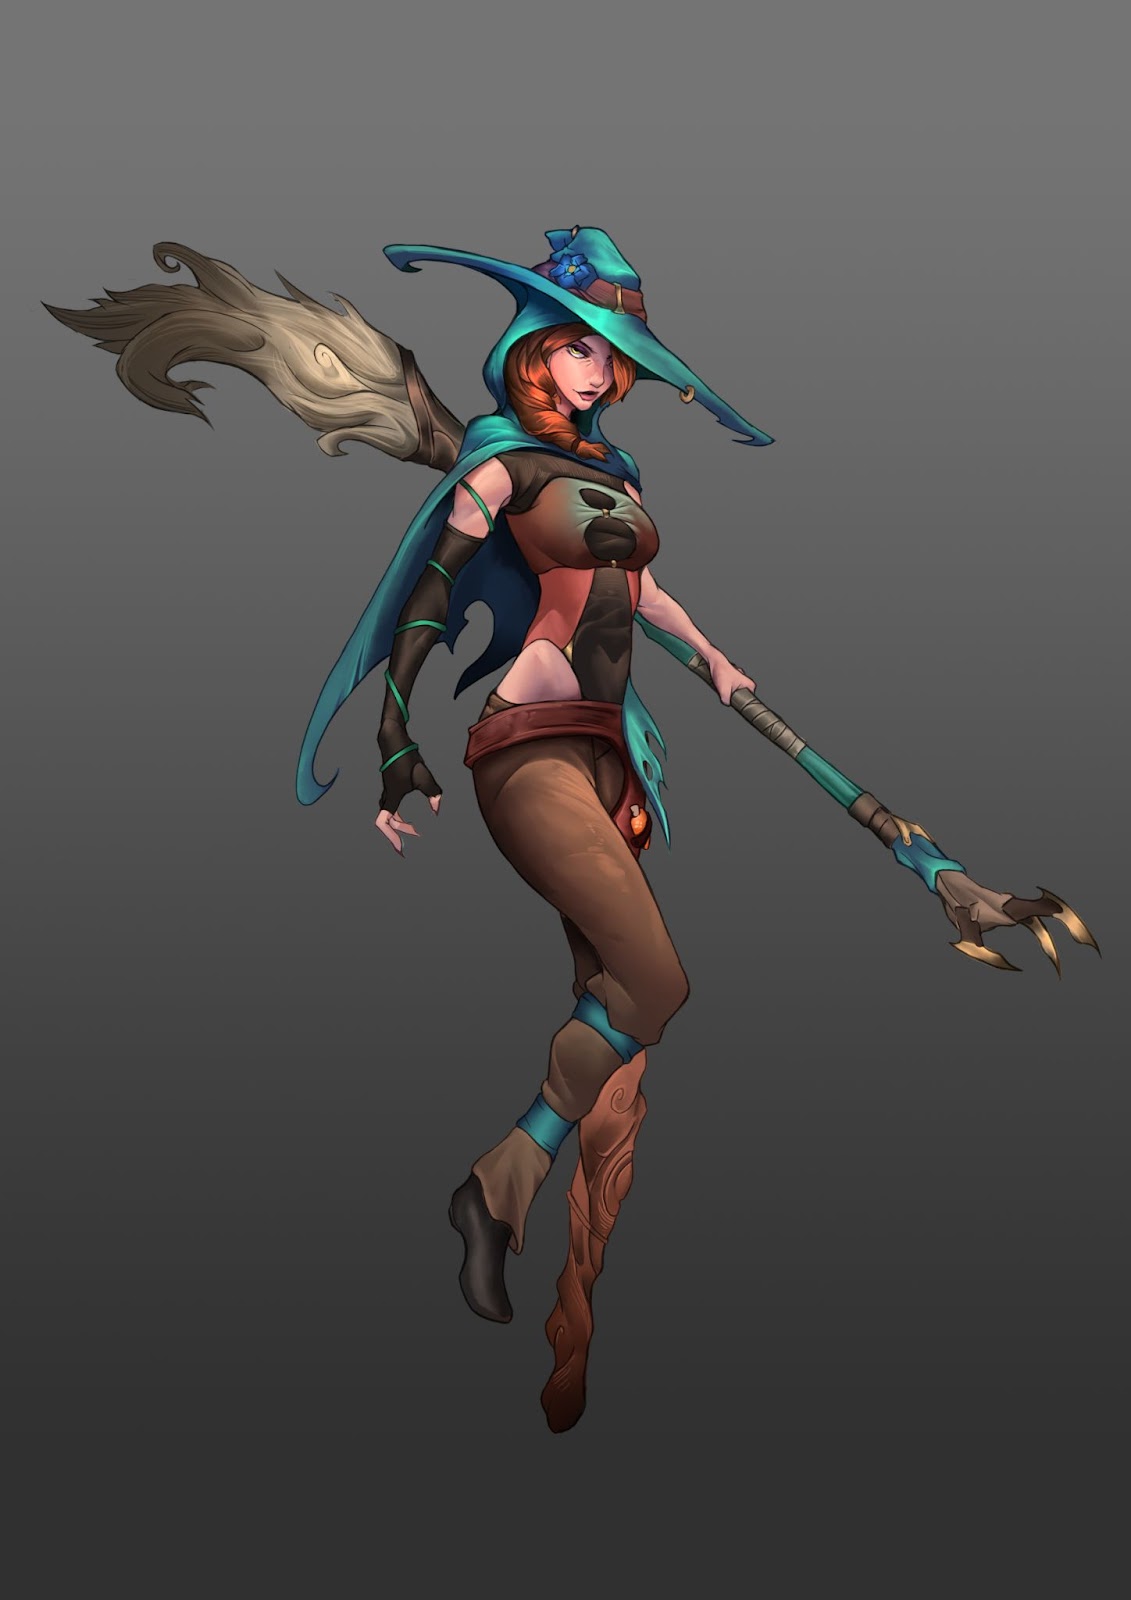
The Witch
The initial idea for the Witch was for her to be an evil character that would hunt down the other 3 characters and defeat them but that quickly changed when we decided to drastically change her character and have her be "good" instead. Her new role was to protect nature and stop the evil forces from destroying it.
I started sketching and creating multiple concepts for her, focusing on her attire and her key features. After narrowing down the witch’s design we wanted, I continued sketching up her final look. I mainly focused on line art and ignoring colour until we needed it for the colour palette.
Even though her drastic change in character happened later on in her design, it taught me a valuable lesson about creating concepts until you find a design that clicks and works for its intended idea, sticking with it until the end. After polishing the witch's look I drew and painted a final render of the witch for the showcase.
Final witch concept
The Witch's Environment
After finalising the witch, I moved over to her environment and props. I began by sketching the witch’s house. The idea was for the house to have a similar shape to a witch's hat. Because of the witch’s connection to nature, I decided her house should be organically connected with nature as if it was a part of it. I started browsing organic root formations that could go great with the style of home we were looking for, and after finding the right idea I finalised her house.
I then moved over to her props for the environment which consisted of standard witch items such as a cauldron and potions. I tried keeping that natural connection with all of her props, giving them roots and the natural way they fit into the witch's environment.
Witch house concept
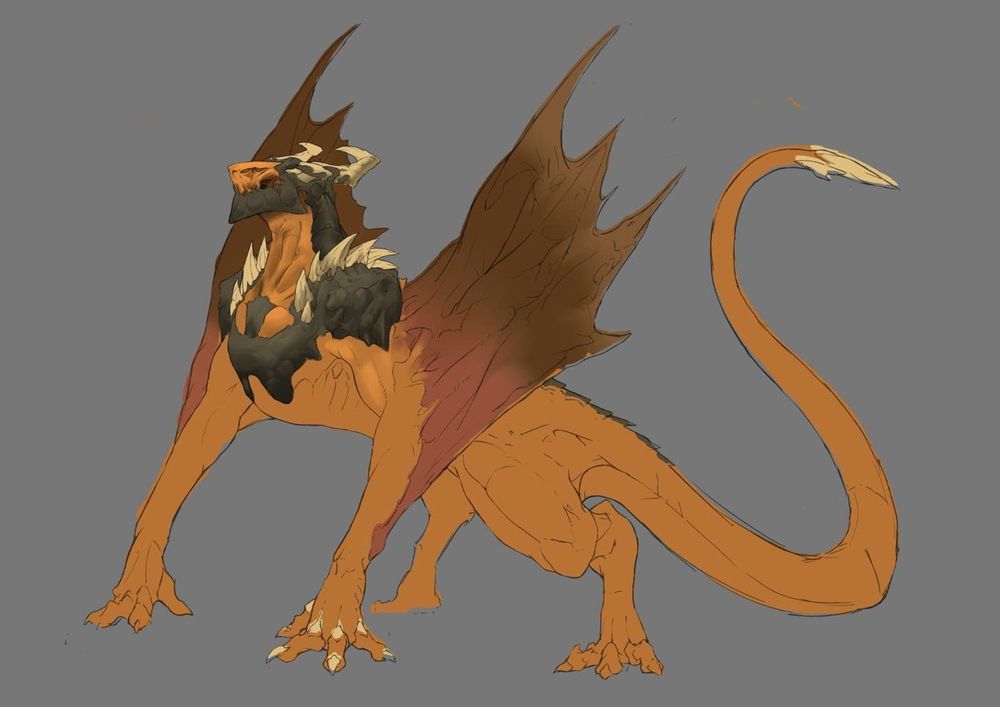
The Dragon
The first boss of the game was decided to be the dragon Thesaurus “Keeper of Treasure”. Since I was familiar with creature art and design I decided to draw more concepts of the dragon including different versions, races, shapes, and sizes.
After drawing multiple of these concepts we sat down and decided on combining some of them to form a unique-looking dragon design. We decided the dragon to be a wyvern. The dragon’s design consisted of him being in a more intimidating pose with his chest up front and his wings going alongside his arms all the way to his waist.
I decided to cover a part of his body with a much rougher texture almost like armour forming around his entire body, back and head. While the rest of the dragon would traditionally be covered in normal dragon scales.
For the dragon colour palette, we decided to go with a warmer tone so that it would fit in his environment. After finalising the dragon's design I painted a quick render both with and without colour for the showcase.
Final Dragon Concept
The Dragon's Environment
Initially, I didn't have an idea for the dragon's environment, but we had a couple of things I wanted to fill out. Firstly I wanted the environment to be large enough for the dragon to at least fly or glide around.
Initially I wanted to make it a chamber filled with the gold the dragon was protecting. But after talking about it, I decided to stay with the chamber but give it pillars allowing the dragon to grab onto them and hang from them. Since I couldn't leave it in just one chamber, I decided to remove the walls of the outer part and expose the landscape that was behind it, high above the clouds in the mountains.
This was only the outline and top-down view of the environment map for the dragon, and after it got approved I created a quick little render to showcase the placement of the pillars and the location of the scattered gold in the area as help for my colleagues to better understand the environment.
After finishing up the environment I took some time creating different props for the environment such as piles of gold, pillars, cauldrons of fire, giant flags hanging from the pillars, and different types of treasures and treasure chests, with the portal out of the level being located at the end of the chamber.
Dragon Concept Environment
The Banshee
The next character on the list was the second boss of the game, the banshee Gag’Thar, “Keeper of the restless”. The main focal point of this character was his reaper-like inspired look we began with. The first obstacle that we ran into for this character was how do we make him different from a standard robed reaper?
We figured adding something that makes him unique to his looks would work, for example, instead of having two hands we even thought of giving him 3, but finally settled with 4. The key traits that accompanied this character were his hood, his robes, and his 4 arms, all that was left was to focus on his clothing and what style he would have.
I started sketching and forming multiple clothing combinations, giving him armour with sharp edges, wraps, and cloth, and even armour made up of bones.
After some discussions, we decided that we would take visual inspiration from the 1950s clothing styles but transform them into robes with previously mentioned bone armour forming a very interesting design.
Later on, we determined the banshee's colour palette, giving him a main colour of purple with light blue accent colours. After finishing up his colours and design, I did a final character render for the showcase.
Final Banshee concept
The Banshee's Environment
One of the first ideas for the banshee’s environment was a basic graveyard where the witch would fight against him. After some thinking, an interesting concept came to mind. We thought about making the Banshee’s environment resemble a decayed corpse of some sort of giant with a large sword impaled in the middle of the ribcage with the exit of the level being the skull of the giant.
I designed and drew the level layout following a traditional graveyard except with an increased scale of things forming a carcass of the said giant from a top-down view. After being done with the layout I drew and placed some of the props on the level and I decided to render a perspective shot of the environment as a reference for my other colleagues. After finishing up some of the grave designs, trees, sculptures, and monuments I finished up the banshees environment.
Banshee Environment Concept
The Spider
While I didn't fully work on the spider I only provided concepts as ideas and guides for the looks I thought would make him look like the final boss for the game.
Apart from the spider’s design, I worked more on the spider’s environment and level layout, concerning the prop placements, egg sack placements, and overall look and form of the environment. I created two rendered perspective shots of the environment for an easier view of the area.
Conclusion
I hope that the process of creating many of these concepts was insightful or at least entertaining to read through. Thank you again for taking the time and reading all the way to the end.
You can find more of Milijan's work on The Rookies.